RHEL7.X配置VNC服务方法与步骤
1、安装X套件,注意大小写;
[root@dazhi /]# yum groupinstall -y 'Server with GUI'
2、安装tigervnc-server软件包;
[root@dazhi /]# yum -y install tigervnc-server
3、配置VNC;
[root@dazhi /]# cat /etc/sysconfig/vncservers
# THIS FILE HAS BEEN REPLACED BY /lib/systemd/system/vncserver@.service
[root@dazhi /]#
查看/lib/systemd/system/vncserver@.service配置示例;
[root@dazhi /]# cat /lib/systemd/system/vncserver@.service
# The vncserver service unit file
#
# Quick HowTo:
# 1. Copy this file to /etc/systemd/system/vncserver@.service
# 2. Replace <USER> with the actual user name and edit vncserver
# parameters appropriately
# (ExecStart=/usr/sbin/runuser -l <USER> -c "/usr/bin/vncserver %i"
# PIDFile=/home/<USER>/.vnc/%H%i.pid)
# 3. Run `systemctl daemon-reload`
# 4. Run `systemctl enable vncserver@:<display>.service`
#
# DO NOT RUN THIS SERVICE if your local area network is
# untrusted! For a secure way of using VNC, you should
# limit connections to the local host and then tunnel from
# the machine you want to view VNC on (host A) to the machine
# whose VNC output you want to view (host B)
#
# [user@hostA ~]$ ssh -v -C -L 590N:localhost:590M hostB
#
# this will open a connection on port 590N of your hostA to hostB's port 590M
# (in fact, it ssh-connects to hostB and then connects to localhost (on hostB).
# See the ssh man page for details on port forwarding)
#
# You can then point a VNC client on hostA at vncdisplay N of localhost and with
# the help of ssh, you end up seeing what hostB makes available on port 590M
#
# Use "-nolisten tcp" to prevent X connections to your VNC server via TCP.
#
# Use "-localhost" to prevent remote VNC clients connecting except when
# doing so through a secure tunnel. See the "-via" option in the
# `man vncviewer' manual page.
[Unit]
Description=Remote desktop service (VNC)
After=syslog.target network.target
[Service]
Type=forking
# Clean any existing files in /tmp/.X11-unix environment
ExecStartPre=/bin/sh -c '/usr/bin/vncserver -kill %i > /dev/null 2>&1 || :'
ExecStart=/usr/sbin/runuser -l <USER> -c "/usr/bin/vncserver %i"
PIDFile=/home/<USER>/.vnc/%H%i.pid
ExecStop=/bin/sh -c '/usr/bin/vncserver -kill %i > /dev/null 2>&1 || :'
[Install]
WantedBy=multi-user.target
访问root用户的VNC界面配置方法
[root@dazhi /]# vim /etc/systemd/system/vncserver@:1.service
[Unit]
Description=Remote desktop service (VNC)
After=syslog.target network.target
[Service]
Type=forking
# Clean any existing files in /tmp/.X11-unix environment
ExecStartPre=/bin/sh -c '/usr/bin/vncserver -kill %i > /dev/null 2>&1 || :'
ExecStart=/usr/sbin/runuser -l root -c "/usr/bin/vncserver %i"
PIDFile=/root/.vnc/%H%i.pid
ExecStop=/bin/sh -c '/usr/bin/vncserver -kill %i > /dev/null 2>&1 || :'
[Install]
WantedBy=multi-user.target
[root@dazhi /]# vncpasswd
Password:
Verify:
Would you like to enter a view-only password (y/n)? n
A view-only password is not used
[root@dazhi /]#
访问dazhi用户的VNC界面配置方法
[root@dazhi /]# vim /etc/systemd/system/vncserver@:2.service
[Unit]
Description=Remote desktop service (VNC)
After=syslog.target network.target
[Service]
Type=forking
# Clean any existing files in /tmp/.X11-unix environment
ExecStartPre=/bin/sh -c '/usr/bin/vncserver -kill %i > /dev/null 2>&1 || :'
ExecStart=/usr/sbin/runuser -l dazhi -c "/usr/bin/vncserver %i"
PIDFile=/home/dazhi/.vnc/%H%i.pid
ExecStop=/bin/sh -c '/usr/bin/vncserver -kill %i > /dev/null 2>&1 || :'
[Install]
WantedBy=multi-user.target
[root@dazhi /]# su - dazhi
Last login: Fri Aug 6 11:28:20 CST 2021 on pts/1
[dazhi@dazhi ~]$
[dazhi@dazhi ~]$ vncpasswd
Password:
Verify:
Would you like to enter a view-only password (y/n)? n
A view-only password is not used
[dazhi@dazhi ~]$
4、启动VNC服务;
[root@dazhi /]# systemctl daemon-reload
[root@dazhi /]# systemctl enable vncserver@:1.service
[root@dazhi /]# systemctl start vncserver@:1.service
5、查看VNC服务(注:要查看某个用户的VNC服务,需要切换到该用户下执行vncserver -list);
[root@dazhi /]# vncserver -list
TigerVNC server sessions:
X DISPLAY # PROCESS ID
:1 25925
[root@dazhi /]# su - dazhi
Last login: Fri Aug 6 14:21:45 CST 2021 on pts/1
[dazhi@dazhi ~]$ vncserver -list
TigerVNC server sessions:
X DISPLAY # PROCESS ID
:2 26613
[dazhi@dazhi ~]$ exit
logout
[root@dazhi /]# su - weblogic
Last login: Fri Aug 6 14:20:22 CST 2021 on pts/1
[weblogic@dazhi ~]$ vncserver -list
TigerVNC server sessions:
X DISPLAY # PROCESS ID
:3 27576
[weblogic@dazhi ~]$
6、关闭VNC服务(注:关闭VNC服务需要切换到对应用户下执行);
[root@dazhi /]# vncserver -list
TigerVNC server sessions:
X DISPLAY # PROCESS ID
:1 25925
[root@dazhi /]# vncserver -kill :1
Killing Xvnc process ID 25925
[root@dazhi /]# vncserver -list
TigerVNC server sessions:
X DISPLAY # PROCESS ID
[root@dazhi /]#
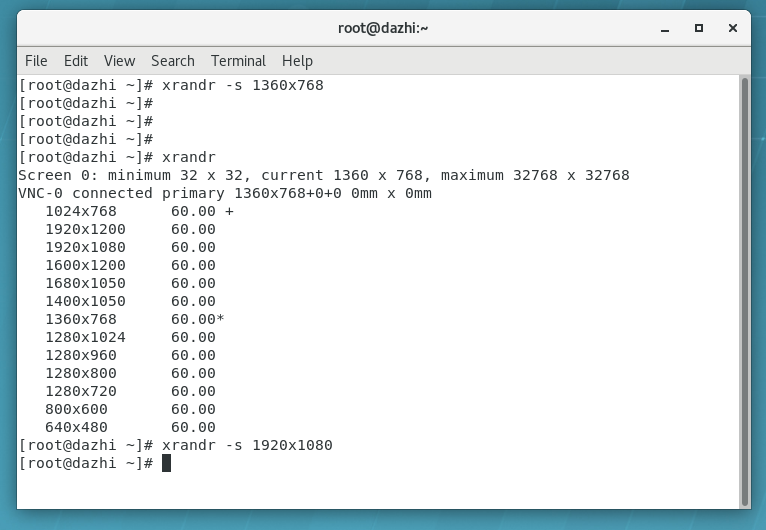
7、调整VNC界面分辨率,先执行xrandr查看当前服务器支持分辨率情况,然后执行xrandr -s 1920x1080修改自己想要的分辨率。