

SpringBoot坚持学习第十天:集成SpringSecurity
一、搭建基本页面
导入页面的依赖并且关闭页面的缓存。
<dependency>
    <groupId>org.springframework.boot</groupId>
    <artifactId>spring-boot-starter-thymeleaf</artifactId>
</dependency>spring.thymeleaf.cache=false编写一个index的页面。
<!DOCTYPE html>
<html xmlns="http://www.w3.org/1999/xhtml">
<head>
    <title>index</title>
</head>
<body>
<h1>Hello SpringBoot</h1>
</body>
</html>
@RequestMapping("/")
public String index() {
return "index";
}核心:引入SpringSecurity,导入SpringSecurity的stater。
<dependency>
<groupId>org.springframework.boot</groupId>
<artifactId>spring-boot-starter-security</artifactId>
</dependency>再次启动项目发现启动日志上出现了

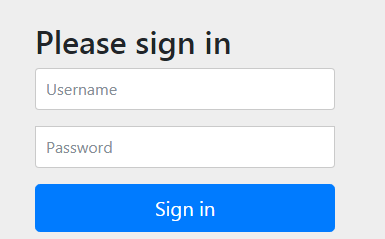
启动项目后再次访问http://localhost:8080/,跳转到了SpringSecurity默认的登录页面。
用户名默认为user,密码在控制台上打开。
可以连续按两次shift,找到UserDetailsServiceAutoConfiguration这个类的源码。可找到打印的这行代码,进行相关的源码分析。
如果想修改用户名和密码,可以在 application.properties 重新进行配置
# security
spring.security.user.name=admin
spring.security.user.password=admin二、认证与退出
首先把我踩过的坑先提炼出来
(1)两个请求的请求名称相同,但是请求方式不一样,一个是GET,另外一个是POST,那么进入的后台方法就不同。
(2)SpringSecurity的 登录请求/login 与 登出请求/logout 只支持POST方法。
好了,先编写一个项目的根目录,项目的根目录可以跳转一个主页。但是主页是要求登录后才能查看。所以在跳转主页的过程中,请求会被重定向到登录认证页面。如果认证成功,则跳转主页,反之则提示用户登录失败。
最先编写跳转index.html的代码。
    @RequestMapping("/")
    public String index() {
        return "index";
}编写index.html页面。主页中使用 thymeleaf 模版引擎,发送进入 受限制页面 /home 请求。
<!DOCTYPE html>
<html lang="en" xmlns:th="http://www.thymeleaf.org">
<head>
<title>index</title>
</head>
<body>
<h1>Hello SpringBoot</h1>
<a th:href="@{/home}">进入主页</a>
</body>
</html>请求将会被SpringSecurity拦截。就像Shiro的拦截器那样。
在下面的配置中
"/" 与 "/index" 这两个请求是不需要认证的。
anyRequest().authenticated()表明其它请求都需要认证拦截。好比Shiro中的 auth拦截器。
然后接着配置:认证路径,配置好认证路径是/login,这个请求注意了,是GET处理方式,需要与SpringSecurity提供的POST方式区别开来。所以,我们要在Controller中编写一个处理/login请求并且是GET方式的代码。此外,登录认证请求是不需要被拦截的。
最后配置退出请求,配制成 /logout,表示为退出资源。在页面中使用POST方式的,将被发送到SpringSecurity中处理它。
@Configuration
@EnableWebSecurity
public class SecurityConfig extends WebSecurityConfigurerAdapter {
@Override
protected void configure(HttpSecurity http) throws Exception {
http.authorizeRequests()
//这两个请求不需要认证,相当于Shiro中的 anon拦截器
.antMatchers("/", "/index").permitAll()
//其余任何请求需要先登录验证,否则跳转到登录页面
.anyRequest().authenticated()
//配置登录页面
.and()
.formLogin()
//注释掉下面的自定义登录请求,就会跳转到springsecurity的默认登录页
.loginPage("/login")
.permitAll()
//退出请求不拦截,退出请求默认是/logout
.and()
.logout()
.permitAll()
//忽略退出请求的同源限制
.and()
.csrf()
.ignoringAntMatchers("/logout");
}
}好了,在index页面中发送/home请求,将会被重定向到/login GET 请求。这个在上述配置中的loginPage("/login") 配置好了。我们来编写处理 /login GET 请求的处理程序。此请求最终重定向到login.html中。
/**
* 此处必须指明为GET方法
* 与SpringSecurity中的/login区别开来
*
* @return
*/
@RequestMapping(value = "/login", method = RequestMethod.GET)
public String login() {
return "login";
}编写login.html。在页面上配置好一个form表单,发送路径依旧为 /login ,但是处理方式是POST,这个请求将会被发送到SpringSecurity中处理。
<!DOCTYPE html>
<html lang="en" xmlns:th="http://www.thymeleaf.org">
<head>
<meta charset="UTF-8">
<title>登录</title>
</head>
<body>
<div th:if="${param.error}">
用户名或密码错
</div>
<div th:if="${param.logout}">
您已注销成功
</div>
<!-- 使用thymeleaf模版引擎 ,需要指明为post请求-->
<form th:action="@{/login}" method="post">
用户名<input type="text" name="username"><br>
密码<input type="password" name="password"><br>
<input type="submit" value="提交">
</form>
</body>
</html>如果登录成功,将会跳转到/home。默认的帐号密码可以在配置文件中配置。
# security
spring.security.user.name=admin
spring.security.user.password=admin最后编写处理/home请求的代码。这个请求将会跳转到home.html中。
    @RequestMapping("/home")
    public String home() {
        return "home";
    }
在home页面中,再配置一个退出请求。退出请求使用POST方式,发送给SpringSecurity处理。
<!DOCTYPE html>
<html lang="en" xmlns:th="http://www.thymeleaf.org">
<head>
    <meta charset="UTF-8">
    <title>核心业务页面</title>
</head>
<body>
<h3>核心业务页面,需要登录</h3>
<form method="post" th:action="@{/logout}">
   <button type="submit">退出</button>
</form>
</body>
</html>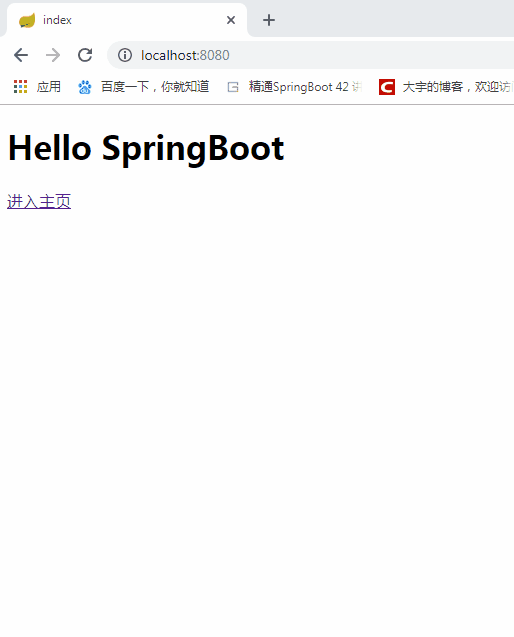
三、角色与权限
指明帐号密码对应的权限
访问 "/admin/**"需要ADMIN角色
访问"/home/**"需要ADMIN与USER角色
@Configuration
@EnableWebSecurity
public class SecurityConfig extends WebSecurityConfigurerAdapter {
    @Override
    protected void configure(HttpSecurity http) throws Exception {
        http.authorizeRequests()
                //指明"/resource/**"请求与"/"请求可以直接访问
                .antMatchers("/resources/**", "/").permitAll()
                //指明"/admin/**"请求需要ADMIN角色
                .antMatchers("/admin/**").hasRole("ADMIN")
                //指明"/home/**"需要ADMIN或者USER角色
                .antMatchers("/home/**").access("hasRole('ADMIN') or hasRole('USER')")
                //其它任何请求需要先登录
                .anyRequest().authenticated()
                .and()
                .formLogin()
                .permitAll()
                .and()
                .logout()
                .permitAll()
                .and()
                .csrf()
                .ignoringAntMatchers("/logout");
    }

    @Autowired
    public void configureGlobal(AuthenticationManagerBuilder auth) throws Exception {
        ...
    }
}
再为用户配置角色与权限信息
    @Autowired
    public void configureGlobal(AuthenticationManagerBuilder auth) throws Exception {
        auth.inMemoryAuthentication()
                //指明加密方式
                .passwordEncoder(new BCryptPasswordEncoder())
                //优先使用Java中的配置
                .withUser("user")
                .password(new BCryptPasswordEncoder()
                        //指明角色为USER
                        .encode("123456")).roles("USER")
                .and()
                .withUser("admin")
                .password(new BCryptPasswordEncoder()
                        //指明角色为ADMIN与USER
                        .encode("admin")).roles("ADMIN", "USER");
    }
@RequestMapping("/admin")
public String admin() {
return "admin";
}最后编写 admin.html。退出使用POST方式
<!DOCTYPE html>
<html lang="en" xmlns:th="http://www.thymeleaf.org">
<head>
    <meta charset="UTF-8">
    <title>admin页面</title>
</head>
<body>
<h3>管理员页面admin</h3>
<form method="post" th:action="@{/logout}">
    <button type="submit">退出</button>
</form>

</form>
</body>
</html>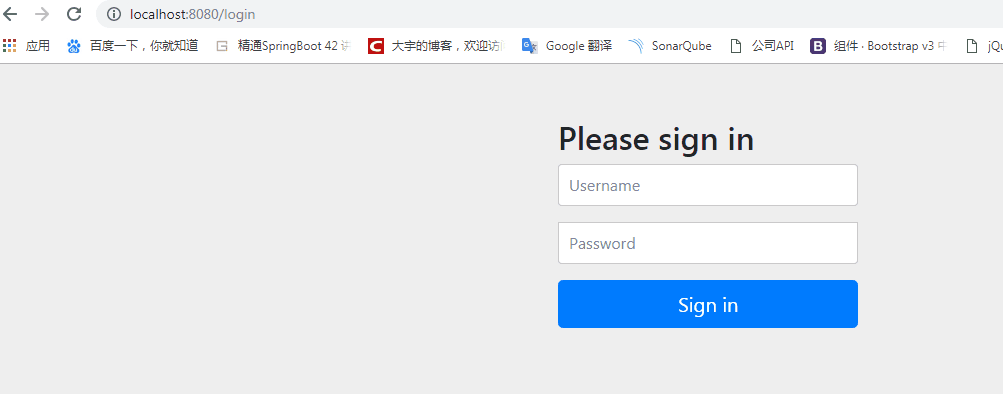
四、附录
更多的权限控制方式参看下表:
| 方法名 | 解释 |
|---|---|
| access(String) | Spring EL 表达式结果为 true 时可访问 |
| anonymous() | 匿名可访问 |
| denyAll() | 用户不可以访问 |
| fullyAuthenticated() | 用户完全认证可访问(非 remember me 下自动登录) |
| hasAnyAuthority(String...) | 参数中任意权限的用户可访问 |
| hasAnyRole(String...) | 参数中任意角色的用户可访问 |
| hasAuthority(String) | 某一权限的用户可访问 |
| hasRole(String) | 某一角色的用户可访问 |
| permitAll() | 所有用户可访问 |
| rememberMe() | 允许通过 remember me 登录的用户访问 |
| authenticated() | 用户登录后可访问 |
| hasIpAddress(String) | 用户来自参数中的 IP 时可访问 |
