第二节:使用Ribbon作为服务消费者
一、环境准备
对于Ribbon而言,大宇只能记住:Ribbon是一个基于Http和TCP的负载均衡工具。
在上一小节的代码基础上,开启 Eureka--Server 与 Eureka--Client项目。
Eureka--Client 项目开启后,将配置文件中的端口从8762改为8763,再启动一次。这好比启动了两个服务器,来了一个小小的分布式项目,同一个项目分别部署在8762端口与8763端口。
如何一个工程启动多个实例,请看这篇文章:如何在IDEA启动多个Spring Boot工程实例_方志朋的专栏-CSDN博客_idea启动多个springboot项目
启动后,访问http://localhost:8761/,在注册中心中应该就能看到同一个服务器名,有两个对应的端口。
我本机的效果是这样的。

二、建一个服务消费者
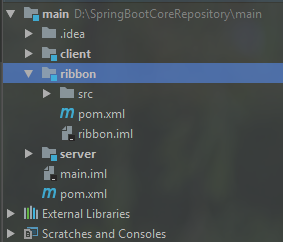
右击项目根目录,New--Module--选择左侧的Maven,点击next--输入新模块的名字ribbon,创建后的效果应该像下面那样。
2.1 导入ribbon依赖
<?xml version="1.0" encoding="UTF-8"?>
<project xmlns="http://maven.apache.org/POM/4.0.0"
         xmlns:xsi="http://www.w3.org/2001/XMLSchema-instance"
         xsi:schemaLocation="http://maven.apache.org/POM/4.0.0 http://maven.apache.org/xsd/maven-4.0.0.xsd">
    <parent>
        <artifactId>main</artifactId>
        <groupId>com.safesoft</groupId>
        <version>1.0-SNAPSHOT</version>
    </parent>
    <modelVersion>4.0.0</modelVersion>

    <artifactId>ribbon</artifactId>

    <dependencies>
        <dependency>
            <groupId>org.springframework.cloud</groupId>
            <artifactId>spring-cloud-starter-netflix-eureka-client</artifactId>
        </dependency>
        <dependency>
            <groupId>org.springframework.boot</groupId>
            <artifactId>spring-boot-starter-web</artifactId>
        </dependency>
        <dependency>
            <groupId>org.springframework.cloud</groupId>
            <artifactId>spring-cloud-starter-netflix-ribbon</artifactId>
        </dependency>
    </dependencies>
</project>
2.2 编写application.yml配置文件
#当前项目要被部署的端口
#8761是注册中心  8762是服务提供者一号  8763是服务提供者二号
server:
  port: 8764

#当前ribbon项目注册到下面配置的注册中心中
eureka:
  client:
    serviceUrl:
      defaultZone: http://localhost:8761/eureka/

#当前项目名
spring:
  application:
    name: service-ribbon
2.3 编写启动类
@EnableEurekaClient表明这是一个服务提供者
@EnableDiscoveryClient表示向服务中心注册
@LoadBalanced表明RestTemplate工具类将会负载均衡
package com.safesoft.ribbon;

import org.springframework.boot.SpringApplication;
import org.springframework.boot.autoconfigure.SpringBootApplication;
import org.springframework.cloud.client.discovery.EnableDiscoveryClient;
import org.springframework.cloud.client.loadbalancer.LoadBalanced;
import org.springframework.cloud.netflix.eureka.EnableEurekaClient;
import org.springframework.context.annotation.Bean;
import org.springframework.web.client.RestTemplate;

/**
 * @author jay.zhou
 * @date 2019/1/24
 * @time 16:00
 */
@SpringBootApplication
@EnableEurekaClient
@EnableDiscoveryClient
public class ApplicationRibbon {

    public static void main(String[] args) {
        SpringApplication.run( ApplicationRibbon.class, args );
    }

    @Bean
    @LoadBalanced
    RestTemplate restTemplate() {
        return new RestTemplate();
    }
}
2.4 编写服务接口
写一个Controller与Service,在Service中,尝试访问另外服务器的接口。
package com.safesoft.ribbon.web;

import com.safesoft.ribbon.service.HelloService;
import org.springframework.beans.factory.annotation.Autowired;
import org.springframework.web.bind.annotation.RequestMapping;
import org.springframework.web.bind.annotation.RestController;

/**
 * @author jay.zhou
 * @date 2019/1/24
 * @time 16:07
 */
@RestController
public class HelloController {


    @Autowired
    HelloService helloService;

    @RequestMapping("hello")
    public String hello(String name){
        //调用Service接口,并返回JSON数据
        return helloService.obtainOtherServiceData(name);
    }
}
package com.safesoft.ribbon.service;

import org.springframework.beans.factory.annotation.Autowired;
import org.springframework.stereotype.Service;
import org.springframework.web.client.RestTemplate;

/**
 * @author jay.zhou
 * @date 2019/1/24
 * @time 16:08
 */
@Service
public class HelloService {

    /**
     * 将IOC容器中的负载均衡RestTemplate工具注入进来
     */
    @Autowired
    RestTemplate restTemplate;

    public String obtainOtherServiceData(String name) {
        //尝试调用其它微服务接口,访问的是SERVICE-CLIENT这个服务器的/hi 接口
        return restTemplate.getForObject("http://SERVICE-CLIENT/hi?name=" + name, String.class);
    }
}
2.5 启动ribbon项目
在浏览器上输入:http://localhost:8764/hello?name=dayu,我本机效果
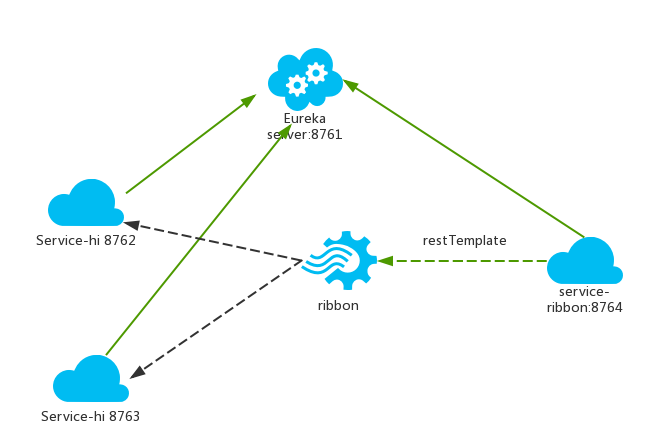
说明发送给8764端口的请求,被分发到SERVICE-CLIENT项目。且分别交替发给部署在8762与8763的服务器。
此时的架构
三、源码下载
GitHub - hairdryre/Study_SpringCloud
参考文章:史上最简单的SpringCloud教程 | 第二篇: 服务消费者(rest+ribbon)(Finchley版本)
----------------------------------------------------分割线-------------------------------------------------------
阅读更多
如果本文对你有帮助,不妨请我喝瓶可乐吧!
你的打赏是对我最好的支持!


 浙公网安备 33010602011771号