线程本地存储记录
线程本地存储(TLS)的一些总结
一、静态线程局部存储
1.MinGW编译器下
代码:
#include<iostream>
#include<thread>
#include<windows.h>
#include<mutex>
using namespace std;
mutex mu;
__thread int num = 0;//使用关键字__thread修改的变量
void test(int i)
{
num+=i;
mu.lock();
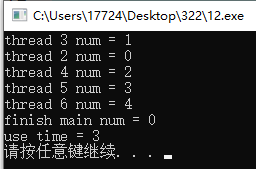
cout<<"thread "<<this_thread::get_id()<<" num = "<<num<<endl;
mu.unlock();
}
int main()
{
clock_t t1 = clock();
thread th[5];
for(int i=0;i<5;i++)
{
th[i] = thread(test,i);
}
for(int i=0;i<5;i++)
{
th[i].join();
}
cout<<"finish main num = "<<num<<endl;
clock_t t2 = clock();
cout<<"use time = "<<(t2-t1)<<endl;
system("pause");
}
静态存储主要依靠关键字 __thread修饰变量。
运行结果:
2.msvc编译器下
代码类似,只是前面的修饰符变化而已。
代码:
#include<iostream>
#include<thread>
#include<windows.h>
#include<mutex>
using namespace std;

mutex mu;
//_thread int num = 0;
_declspec (thread) int num = 0;


void test(int i)
{
	num += i;

	mu.lock();
	cout << "thread " << this_thread::get_id() << " num = " << num << endl;
	mu.unlock();
	//Sleep(1000);
}

int main()
{
	clock_t t1 = clock();
	thread th[5];
	for (int i = 0; i<5; i++)
	{
		th[i] = thread(test, i);
	}
	for (int i = 0; i<5; i++)
	{
		th[i].join();
	}
	cout << "finish main num = " << num << endl;
	clock_t t2 = clock();
	cout << "use time = " << (t2 - t1) << endl;
	system("pause");
	return 0;
}
运行结果就不贴了,运行结果基本一直,除了线程id为全局id之外。
二、动态线程局部存储
代码:
#include<iostream>
#include<thread>
#include<windows.h>
#include<mutex>
using namespace std;

mutex mu;
__declspec (thread) int num = 0;
DWORD index = 0;
void test(int i)
{
	num+=i;
	int count = 7*i;
	TlsSetValue(index,(LPVOID)count);//此函数必须在自己的线程之内操作,才能改变自己的槽
    //这里举个简单的例子,就一个int和LPVOID是一样大的。更小的数据,比如char之类的,直接存储就好了。大一些的就只能存储指针。
	mu.lock();

	cout<<"thread "<<this_thread::get_id()<<" num = "<<num<<endl;
	cout<<(int)TlsGetValue(index)<<endl;//在自己的线程之内使用,才有意义。
    __asm {
		mov	eax, DWORD PTR FS:[0x18]//TEB环境块
		mov eax, DWORD PTR DS :[eax + 0xE14] //因为index为1,所以是0XE10+0x4
		mov count,eax
	}
	cout << "count = " << count << endl;//操作线程存储槽和函数是一样的
	mu.unlock();
}

int main()
{
	index = TlsAlloc();
	clock_t t1 = clock();
	thread th[5];
	for(int i=0;i<5;i++)
	{
		th[i] = thread(test,i);
	}
	for(int i=0;i<5;i++)
	{
		th[i].join();
	}
	cout<<"finish main num = "<<num<<endl;
	clock_t t2 = clock();
	cout<<"use time = "<<(t2-t1)<<endl;
	TlsFree(index);
	system("pause");
}
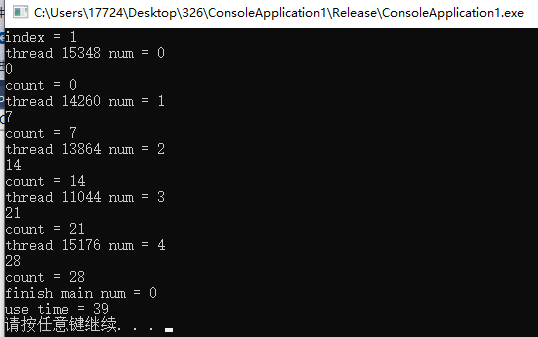
直接操作线程的TLS存储槽和使用这几个函数是一样的效果。
三、TLS回调函数。
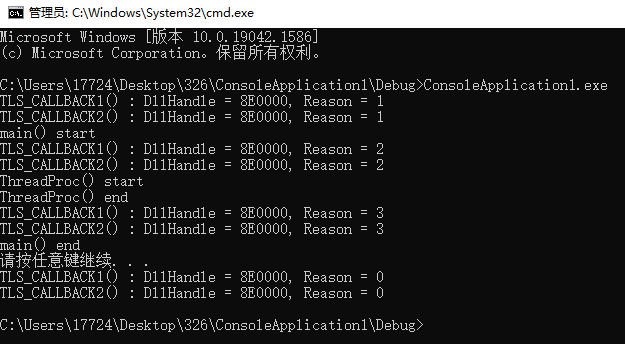
代码来源于网上。需要注意的是debug版本的exe可以看见回调函数输出到控制台,release版本的看不见。
参考至本篇博客:https://www.cnblogs.com/dliv3/p/6489629.html
代码:
#include <windows.h>

//告知连接器使用TLS
#pragma comment(linker, "/INCLUDE:__tls_used")

void print_console(char* szMsg)
{
	HANDLE hStdout = GetStdHandle(STD_OUTPUT_HANDLE);
	//先于主线程调用执行的TLS回调函数中使用printf可能会发生Runtime Error,可直接调用WriteConsole API
	WriteConsoleA(hStdout, szMsg, strlen(szMsg), NULL, NULL);
}

void NTAPI TLS_CALLBACK1(PVOID DllHandle, DWORD Reason, PVOID Reserved)
{
	char szMsg[80] = { 0, };
	wsprintfA(szMsg, "TLS_CALLBACK1() : DllHandle = %X, Reason = %d\n", DllHandle, Reason);
	print_console(szMsg);
}

void NTAPI TLS_CALLBACK2(PVOID DllHandle, DWORD Reason, PVOID Reserved)
{
	char szMsg[80] = { 0, };
	wsprintfA(szMsg, "TLS_CALLBACK2() : DllHandle = %X, Reason = %d\n", DllHandle, Reason);
	print_console(szMsg);
}
/*
注册TLS函数
.CRT$XLX的作用
CRT表示使用C Runtime 机制
X表示表示名随机
L表示TLS Callback section
X也可以换成B~Y任意一个字符
*/
#pragma data_seg(".CRT$XLX")
//存储回调函数地址
PIMAGE_TLS_CALLBACK pTLS_CALLBACKs[] = { TLS_CALLBACK1, TLS_CALLBACK2, 0 };
#pragma data_seg()

DWORD WINAPI ThreadProc(LPVOID lParam)
{
	print_console("ThreadProc() start\n");

	print_console("ThreadProc() end\n");

	return 0;
}

int main(void)
{
	HANDLE hThread = NULL;

	print_console("main() start\n");
	//创建子线程
	hThread = CreateThread(NULL, 0, ThreadProc, NULL, 0, NULL);
	//等待子线程结束
	WaitForSingleObject(hThread, 60 * 1000);
	CloseHandle(hThread);

	print_console("main() end\n");
	system("pause");
	return 0;
}
回调函数标准写法:
BOOL WINAPI DllMain(HINSTANCE hinstDLL, DWORD fdwReason, LPVOID lpvReserved)

回调函数执行原因:

#define DLL_PROCESS_ATTACH 1 	//进程启动
#define DLL_THREAD_ATTACH 2		//线程启动
#define DLL_THREAD_DETACH 3		//线程结束
#define DLL_PROCESS_ATTACH 0	//进程结束
四:WindowsPE权威指南关于线程本地存储的实验。
代码:
	.386
	.model flat,stdcall
	option casemap:none

include windows.inc
include user32.inc
includelib user32.lib
include kernel32.inc
includelib kernel32.lib

	.data
szText db 'HelloWorldPE',0,0,0,0

;所谓构造,就是自己指定0x18字节的数据,作为TLS目录表 IMAGE_TLS_DIRECTORY32
TLS_DIRR dd offset Tls1
		 dd offset Tls2
		 dd offset Tls3
		 dd offset TlsCallBack
		 dd 0
		 dd 0
Tls1     dd 0
Tls2 	 dd 0
Tls3 	 dd 0
TlsCallBack dd	offset TLS
			dd 0
			dd 0
	.data?
TLSCalled db ?
	.code
start:
	invoke ExitProcess,NULL
	RET
TLS:
cmp byte ptr [TLSCalled],1 ;因为回调函数会多次调用,和上面Cpp的调用结果一样,这里只是为了在创建的时候有信息框弹出。
je @exit
mov byte ptr [TLSCalled],1
invoke MessageBox,NULL,addr szText,NULL,MB_OK

@exit:
RET
	end start
这么编译,PE的数据目录表本来是没有TLS表的,所以需要我们手动修改exe

从.text节往上数,然后修改即可。
修改完毕,再运行就有信息框了。

 浙公网安备 33010602011771号