PXE无人值守安装
-
简介
1.1 什么是PXE
|
PXE(Pre-boot Execution Environment,预启动执行环境)是由Intel公司开发的最新技术,工作于Client/Server的网络模式,支持工作站通过网络从远端服务器下载映像,并由此支持通过网络启动操作系统,在启动过程中,终端要求服务器分配IP地址,再用TFTP(trivial file transfer protocol)或MTFTP(multicast trivial file transfer protocol)协议下载一个启动软件包到本机内存中执行,由这个启动软件包完成终端基本软件设置,从而引导预先安装在服务器中的终端操作系统。 严格来说,PXE 并不是一种安装方式,而是一种引导方式。进行 PXE 安装的必要条件是在要安装的计算机中必须包含一个 PXE 支持的网卡(NIC),即网卡中必须要有 PXE Client。PXE 协议可以使计算机通过网络启动。此协议分为 Client端和 Server 端,而PXE Client则在网卡的 ROM 中。当计算机引导时,BIOS 把 PXE Client 调入内存中执行,然后由 PXE Client 将放置在远端的文件通过网络下载到本地运行。运行 PXE 协议需要设置 DHCP 服务器和 TFTP 服务器。DHCP 服务器会给 PXE Client(将要安装系统的主机)分配一个 IP 地址,由于是给 PXE Client 分配 IP 地址,所以在配置 DHCP 服务器时需要增加相应的 PXE 设置。此外,在 PXE Client 的 ROM 中,已经存在了 TFTP Client,那么它就可以通过 TFTP 协议到 TFTP Server 上下载所需的文件了。 |
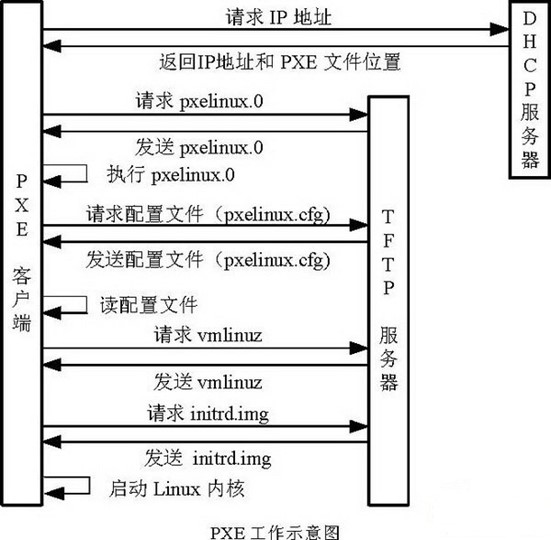
PXE的工作过程:
|
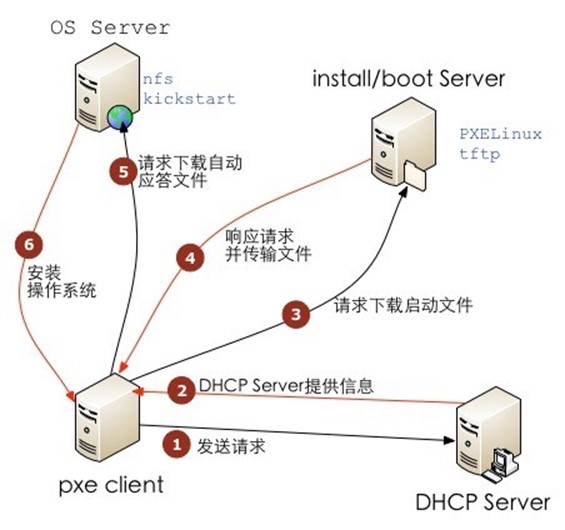
1. PXE Client 从自己的PXE网卡启动,向本网络中的DHCP服务器索取IP; 2. DHCP 服务器返回分配给客户机的IP 以及PXE文件的放置位置(该文件一般是放在一台TFTP服务器上) ; 3. PXE Client 向本网络中的TFTP服务器索取pxelinux.0 文件; 4. PXE Client 取得pxelinux.0 文件后之执行该文件; 5. 根据pxelinux.0 的执行结果,通过TFTP服务器加载内核和文件系统; 6. 进入安装画面, 此时可以通过选择HTTP、FTP、NFS 方式之一进行安装; 详细工作流程,请参考下面这幅图: |
1.2 什么是Kickstart
|
Kickstart是一种无人值守的安装方式。它的工作原理是在安装过程中记录典型的需要人工干预填写的各种参数,并生成一个名为ks.cfg的文件。如果在安装过程中(不只局限于生成Kickstart安装文件的机器)出现要填写参数的情况,安装程序首先会去查找Kickstart生成的文件,如果找到合适的参数,就采用所找到的参数;如果没有找到合适的参数,便需要安装者手工干预了。所以,如果Kickstart文件涵盖了安装过程中可能出现的所有需要填写的参数,那么安装者完全可以只告诉安装程序从何处取ks.cfg文件,然后就去忙自己的事情。等安装完毕,安装程序会根据ks.cfg中的设置重启系统,并结束安装。 PXE+Kickstart 无人值守安装操作系统完整过程如下: |
-
系统环境
|
实验环境:VMware Workstation 10 系统平台:CentOS release 6.6 (最小化安装) 网络模式:NAT模式(共享主机的IP地址) DHCP / TFTP IP:192.168.233.161 HTTP / FTP / NFS IP:192.168.233.161 防火墙已关闭/iptables: Firewall is not running. SELINUX=disabled |
-
NFS环境引导部署
|
挂载系统盘 |
mkdir /data/sys -p mount /dev/cdrom /mnt setenforce 0 cp -a /mnt/* /data/sys/ |
|
挂载NFS |
yum install nfs-utils –y echo "/data/sys/ 192.168.233.0/24(ro,sync)" >> /etc/exports rpcbind start /etc/init.d/nfs start chkconfig nfs on chkconfig rpcbind on showmount -e 127.0.0.1 |
|
安装TFTP |
yum install tftp-server* -y |
|
修改tftp管理器xinetd文件 |
1 vi /etc/xinetd.d/tftp 改 disable =yes====>disable = no 2 server_args = -s /var/lib/tftpboot #tftp的默认路径,一会要把启动文件放进这里 |
|
启动xinetd |
/etc/init.d/xinetd start chkconfig xinetd on chkcoffig --list xinetd |
|
PXE引导配置 |
cp /usr/share/syslinux/pxelinux.0 /var/lib/tftpboot/ #PXE启动映像文件由syslinux软件包提供,默认已安装,没安装的话yum install syslinux –y 安装即可 将生成的pxelinux.0这个文件复制到"/tftpboot"目录即可: #[root@wuren ~]# find /usr/ -type f -name "pxelinux.0" |
|
用于网络启动的内核文件 |
将Centos安装目录中的"images/pxeboot/"文件拷到tftp中 cp /mnt/images/pxeboot/* /var/lib/tftpboot/ |
|
将光盘中的ioslinux.cfg复制为default |
cp /data/sys/isolinux/isolinux.cfg /var/lib/tftpboot/pxelinux.cfg/default |
|
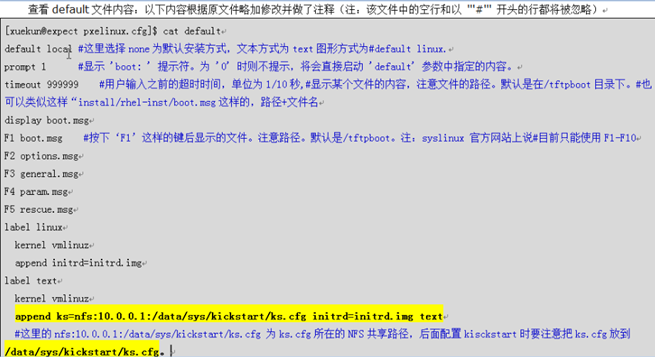
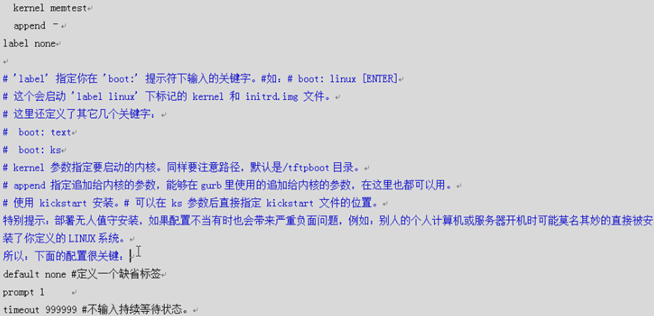
default文件内容 |
|
|
配置DHCP |
yum install dhcp* -y vim /etc/dhcp/dhcpd.conf # DHCP Server Configuration file. # see /usr/share/doc/dhcp*/dhcpd.conf.sample # see 'man 5 dhcpd.conf' # ddns-update-style interim; ignore client-updates; allow booting; #定义能够PXE启动 allow bootp; #定义支持bootp subnet 192.168.233.0 netmask 255.255.255.0 { range 192.168.233.100 192.168.233.120; #dhcp客户端获取ip的范围 option routers 192.168.233.1;#网关 option subnet-mask 255.255.255.0;#掩码 default-lease-time 21600; max-lease-time 43200; filename "/data/sys/kickstart/ks.cfg"; next-server 192.168.233.161; #TFTP Server的IP地址,本机ip filename "/var/lib/tftpboot/pxelinux.0"; #pxelinux启动文件位置,后面会介绍 } service dhcpd start |
|
配置kickstart |
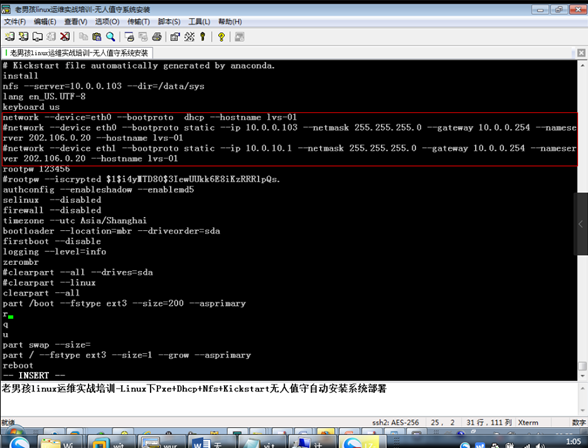
mkdir -p /data/sys/kickstart cp /root/anaconda-ks.cfg /data/sys/kickstart/ks.cfg chmod 644 /data/sys/kickstart/ks.cfg vi /data/sys/kickstart/ks.cfg
# Kickstart file automatically generated by anaconda.
#version=DEVEL install nfs --server=192.168.233.161 --dir=/data/sys lang en_US.UTF-8 keyboard us #network --onboot no --device eth0 --bootproto dhcp --noipv6 network –device=eth0 –bootproto dhcp –hosaname zhang #rootpw --iscrypted $6$.F9w09ACWQUy0h9o$9bpMMEJO9.JlcLst6OxSuPX/VhnlJJKVCDu84n2M/Z34t9DM3K2 Grub2pjXaxhBVqmK/z54NjDd6V6xIAQktq. rootpw 123456 firewall --service=ssh authconfig --enableshadow --passalgo=sha512 selinux --disabled timezone --utc Asia/Shanghai bootloader --location=mbr --driveorder=sda --append="crashkernel=auto rhgb quiet" --password =$6$u52wM9Dij5PXfpRD$iAAiu3KLXvRbXWHRJAUx9QD3NGF1nMMAnDaQISeFTYQ1fLr8HVBrk/EcTnNZv6z4PCaB29g ByNoFiZEYBm/OA/ # The following is the partition information you requested # Note that any partitions you deleted are not expressed # here so unless you clear all partitions first, this is # not guaranteed to work #clearpart --none
part /boot --fstype=ext4 --asprimary --size=200 part swap --asprimary --size=1000 part / --fstype=ext4 --grow --asprimary --size=200
#reboot repo --name="CentOS" --baseurl=cdrom:sr0 --cost=100 ##########安装包选择##########
%packages @base @compat-libraries @core @debugging @development @server-policy @workstation-policy sgpio device-mapper-persistent-data systemtap-client
#此处还可以加很多东西#### 这里只是提供一个方法和思路而已,实际上在安装前能做的哈有很多,比如做raid等 安装后也有很多,比如nagios客户端,pupert,snmp等所有客户端的安装,退一步说,实现这些也不一定把配置写进ks.cfg中,还可以用脚本调用的方式,脚本可以放在nfs上,也可以放在http服务上。 #########安装前初始化########### %pre阶段即可以通过命令部署RAID,在post后通过配置文件也可。
#########安装后初始化##########
#######################
|
|
ks的文章还很深,多去研究 |
|
|
|
-
出现的错误:
-
PXE错误
-

把filename "/var/lib/tftpboot/pxelinux.0"改成pxelinux.0就行了。
-
this device may need to be reinitialized
|
>Error processing drive: pci-0000:00:10-scsi-0:0:0:0 20480MB VMware,VMware Virtual S This device may need to be reinitialized. REINITIALIZING WILL CAUSE ALL DATA TO BE LOST! This action may also be applied to all other disks needing reinitialization. Device details: pci-0000:00:10.0-scsi-0:0:0:0 底下有四个按钮,Ignore、Ignore all、Re-initialize、Re-initialize all |
|
究其原因是因为CentOS的界面安装非常的不流畅。需要1G以上内存的支持,所以才会出现这个提示。因此,建议安装的童鞋使用1G以上的内存作为虚拟机的内存,酱紫就不会出现这个提示了。 |
-
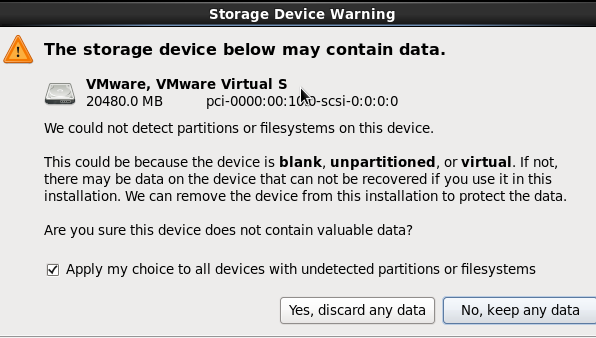
出现The storage may contain data的警告
|
|
在ks.cfg中加入
# Clear the Master Boot Record
zerombr
-
出现ks.cfg无法访问的问题
确保ks.cfg的访问权限没问题






 浙公网安备 33010602011771号