使用Ocelot API网关保护IdentityServer
是否需要将IdentityServer置于Ocelot API网关之后,由Ocelot API网关对其进行保护,需要看具体的架构需求。在微软官方的eShopOnContainers架构案例中,由于根据不同的业务需求,设置了多个Ocelot API网关,因此,这个案例并没有将IdentityServer置于Ocelot API网关之后。也就是说,它所采用的架构大致如下:
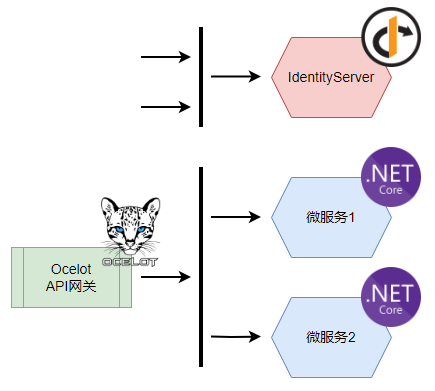
这种架构需要在实际部署的时候,将IdentityServer的前端页面资源的地址直接暴露出来,以便前端应用程序能够直接跳转到IdentityServer的登录界面完成登录。实现这种架构其实非常容易,无需对IdentityServer和Ocelot API网关进行任何特殊配置,Ocelot只需要负责基于业务的微服务即可。 在更多的情况下,我还是倾向于将IdentityServer也置于Ocelot API网关之后,让Ocelot保护起来,以便外界访问服务端能够有一个统一的接口,在部署上也显得更加方便,此时,架构将变成下面的形式:
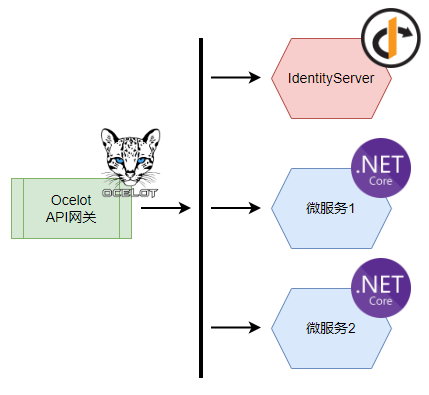
通过默认的IdentityServer和Ocelot的配置,无法达到这样的架构拓扑,本文就按照操作步骤,介绍一下如何实现将IdentityServer置于Ocelot API网关之后。
Step 1:在Ocelot的配置中代理IdentityServer路由
第一步很容易理解,就是将IdentityServer也看成是一个微服务,然后在Ocelot中修改配置,使得IdentityServer能够由Ocelot所代理。首先修改ocelot.configuration.json文件,加入针对IdentityServer的配置:
{
  "DownstreamPathTemplate": "/auth/{everything}" ,
  "DownstreamScheme": "https" ,
  "DownstreamHostAndPorts": [
    {
      "Host": "localhost" ,
      "Port": 9001
    }
  ],
  "UpstreamPathTemplate": "/auth/{everything}" ,
  "UpstreamHttpMethod": [
    "Get" ,
    "Post" ,
    "Options"
  ],
  "UpstreamHeaderTransform": {
    "X-Forwarded-Host": "{UpstreamHost}"
  },
  "SwaggerKey": "AuthService"
}
并在Ocelot项目中,将Authority改为/auth路径:
var idsAuthority = "https://localhost:9000/auth" ;关注两点:
- 下游的IdentityServer相对路径已经为/auth,而不是根路径/,因此,接下来需要修改IdentityServer的路由,将所有的资源路由都改到/auth下
- 此处使用了UpstreamHeaderTransform,将当前访问的主机地址传递到下游IdentityServer,让IdentityServer的Base URL变为当前访问的地址
经过上面的两个设置,原本IdentityServer的API,例如:https://localhost:9001/connect/token,就变成了Ocelot的地址,如:https://localhost:9000/auth/connect/token。
Step 2:修改IdentityServer路由
在IdentityServer的项目中,打开HostingExtensions.cs文件,修改ConfigurePipeline方法:
public static WebApplication ConfigurePipeline(this WebApplication app)
{
    app.UseSerilogRequestLogging();

    if (app.Environment.IsDevelopment())
    {
        app.UseDeveloperExceptionPage();
    }

    app.Map("/auth" , app =>
    {
        app.UseStaticFiles();
        app.UseRouting();
        app.UseAuthorization();
        app.UseEndpoints(endpoints =>
        {
            endpoints.MapControllerRoute(
                name: "default" ,
                pattern: "{controller=Home}/{action=Index}/{id?}");
            endpoints.MapRazorPages().RequireAuthorization();
        });
        app.UseIdentityServer();
    });

    return app;
}
此时,所有的IdentityServer的资源都将在/auth路由下开放,如果现在运行IdentityServer项目,打开的浏览器中就会显示404 Not Found,原因是IdentityServer的主页已经不再是在根路径下了,而是在/auth下。为了便于调试,可以考虑在launchSettings.json中,修改launchUrl设置:
{
  "profiles": {
    "SelfHost": {
      "commandName": "Project" ,
      "launchUrl": "auth" ,
      "launchBrowser": true ,
      "environmentVariables": {
        "ASPNETCORE_ENVIRONMENT": "Development"
      },
      "applicationUrl": "https://localhost:9001"
    }
  }
}
Step 3:处理X-Forwarded-Host Http请求Header
在IdentityServer项目中,打开HostingExtensions.cs文件,在ConfigureServices方法中加入:
builder.Services.Configure(options =>
{
    options.ForwardedHeaders = ForwardedHeaders.XForwardedHost;
    options.ForwardLimit = 2; //Limit number of proxy hops trusted
    options.KnownNetworks.Clear();
    options.KnownProxies.Clear();
});
并且在ConfigurePipeline方法中的最上方,加入:
app.UseForwardedHeaders();到此为止,相关修改已经完成,可以测试一下。
在Blazor WebAssembly应用程序中测试
如何在Blazor WebAssembly中集成IdentityServer实现身份验证,我会在后续的文章中介绍。
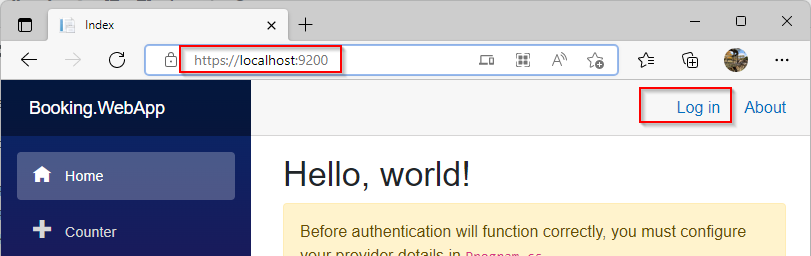
在一个集成了IdentityServer认证系统的Blazor WebAssembly应用程序中,对上面的更改进行测试。我们的Blazor WebAssembly App是部署在9200端口,IdentityServer是部署在9001端口,而Ocelot则是部署在9000端口。直接启动Blazor WebAssembly应用程序,点击Login按钮:
然后,页面会跳转到IdentityServer的登录界面,注意URL地址已经是Ocelot API网关的地址:

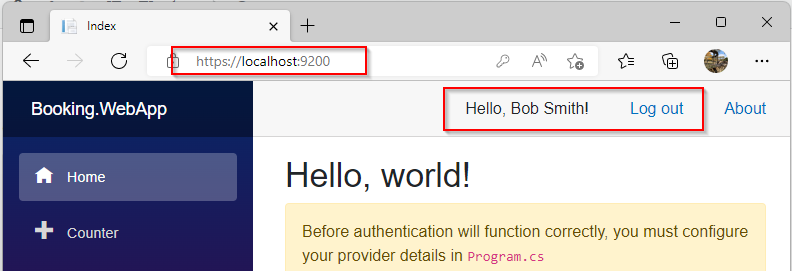
输入用户名、密码,然后点击Login按钮进行登录,登录成功后,会返回我们的Blazor WebAssembly应用主界面:

 浙公网安备 33010602011771号