浅谈SpringBoot运行原理①
在主启动类中会标注 @SpringBootApplication注解,该注解表明此类为SpringBoot的主配置类,在该注解下会发现还有很多注解(具体如下):
@SpringBootConfiguration
@EnableAutoConfiguration
@ComponentScan(
    excludeFilters = {@Filter(
    type = FilterType.CUSTOM,
    classes = {TypeExcludeFilter.class}
), @Filter(
    type = FilterType.CUSTOM,
    classes = {AutoConfigurationExcludeFilter.class}
)}
)
public @interface SpringBootApplication {
    // ......
}
@ComponentScan:自动扫描并加载符合条件的组件或者bean,将这个bean定义到IOC容器中(对应xml配置中的元素)。
@SpringBoorConfiguration:SpringBoot的配置类,标注在某个类上,表明这个是SpringBoot的配置类。该注解下详情:
// 点进去得到下面的 @Component
@Configuration
public @interface SpringBootConfiguration {}

@Component
public @interface Configuration {}
这里的@Configuration说明这是一个配置类(对应的spring的xml配置文件)
再进一步可看到里面有个@Component注解,次注解说明启动类本身就是Spring中的一个组件而已,负责启动应用!
在@SpringBootApplication注解中可以继续看到@EnableAutoConfiguration注解:开启自动配置功能。
以前我们需要手动配置的功能,现在SpringBoot帮我们自动配置了;此注解会告诉SpringBoot开启自动配置功能,这样自动配置才能生效。
点进@EnableAutoConfiguration注解又可看到上面有一个@AutoConfigurationPackage注解:自动配置包。
@Import({Registrar.class})
public @interface AutoConfigurationPackage {
}
@Import:Spring 底层注解,给容器中导入一个组件。
Registrar.class作用:将主启动类的所在包及包下面所有的子包里面的所有组件扫描到Spring容器之中;
分析完此步骤,跳往上一步骤:
@Target(ElementType.TYPE)
@Retention(RetentionPolicy.RUNTIME)
@Documented
@Inherited
@AutoConfigurationPackage
@Import(AutoConfigurationImportSelector.class)
public @interface EnableAutoConfiguration {
    .......
}
@Import(AutoConfigurationImportSelector.class):给容器导入组件;

AutoConfigurationImportSelector:自动配置导入选择器,点击详情可看到会导入哪些选择器:
// 获得候选的配置
protected List<String> getCandidateConfigurations(AnnotationMetadata metadata, AnnotationAttributes attributes) {
    //这里的getSpringFactoriesLoaderFactoryClass()方法
    //返回的就是我们最开始看的启动自动导入配置文件的注解类;EnableAutoConfiguration
    List<String> configurations = SpringFactoriesLoader.loadFactoryNames(this.getSpringFactoriesLoaderFactoryClass(), this.getBeanClassLoader());
    Assert.notEmpty(configurations, "No auto configuration classes found in META-INF/spring.factories. If you are using a custom packaging, make sure that file is correct.");
    return configurations;
}
这个方法又调用了 SpringFactoriesLoader 类的静态方法!我们进入SpringFactoriesLoader类loadFactoryNames() 方法
public static List<String> loadFactoryNames(Class<?> factoryType, @Nullable ClassLoader classLoader) {
        ClassLoader classLoaderToUse = classLoader;
        if (classLoaderToUse == null) {
            classLoaderToUse = SpringFactoriesLoader.class.getClassLoader();
        }
        String factoryTypeName = factoryType.getName();
    //这里它又调用了 loadSpringFactories 方法
    return loadSpringFactories(classLoaderToUse).getOrDefault(factoryTypeName, Collections.emptyList()); }
继续查看loadSpringFactories 方法详情:
private static Map<String, List<String>> loadSpringFactories(ClassLoader classLoader) {
        Map<String, List<String>> result = cache.get(classLoader);
        if (result != null) {
            return result;
        }

        result = new HashMap<>();
        try {
            Enumeration<URL> urls = classLoader.getResources(FACTORIES_RESOURCE_LOCATION);
            while (urls.hasMoreElements()) {
                URL url = urls.nextElement();
                UrlResource resource = new UrlResource(url);
                Properties properties = PropertiesLoaderUtils.loadProperties(resource);
                for (Map.Entry<?, ?> entry : properties.entrySet()) {
                    String factoryTypeName = ((String) entry.getKey()).trim();
                    String[] factoryImplementationNames =
                            StringUtils.commaDelimitedListToStringArray((String) entry.getValue());
                    for (String factoryImplementationName : factoryImplementationNames) {
                        result.computeIfAbsent(factoryTypeName, key -> new ArrayList<>())
                                .add(factoryImplementationName.trim());
                    }
                }
            }

            // Replace all lists with unmodifiable lists containing unique elements
            result.replaceAll((factoryType, implementations) -> implementations.stream().distinct()
                    .collect(Collectors.collectingAndThen(Collectors.toList(), Collections::unmodifiableList)));
            cache.put(classLoader, result);
        }
        catch (IOException ex) {
            throw new IllegalArgumentException("Unable to load factories from location [" +
                    FACTORIES_RESOURCE_LOCATION + "]", ex);
        }
        return result;
    }
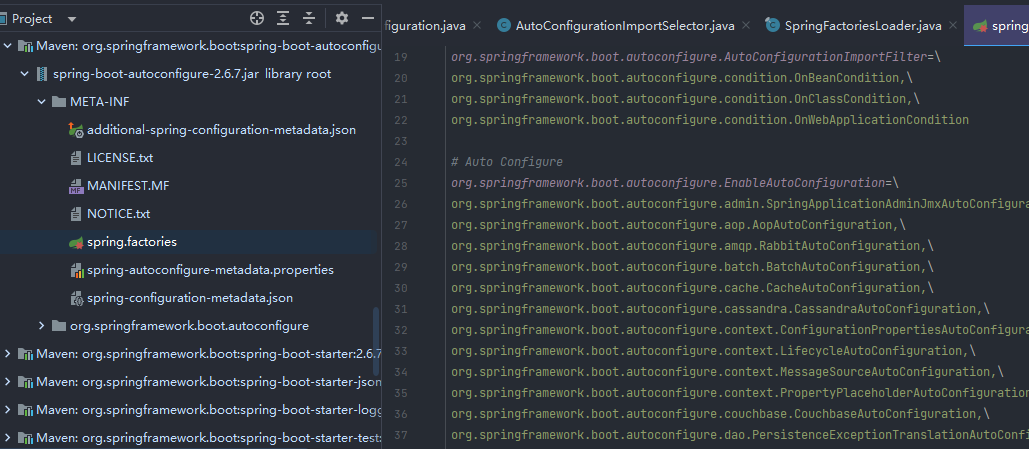
此时会发现使用到了一个文件:spring.factories,搜索后可找到该文件。
此时打开此文件会发现很多自动配置的文件:这就是自动配置的根源所在
![]()
当我们随便点开一个配置类时(我这里是打开了DispatcherServletAutoConfiguration),可以看到
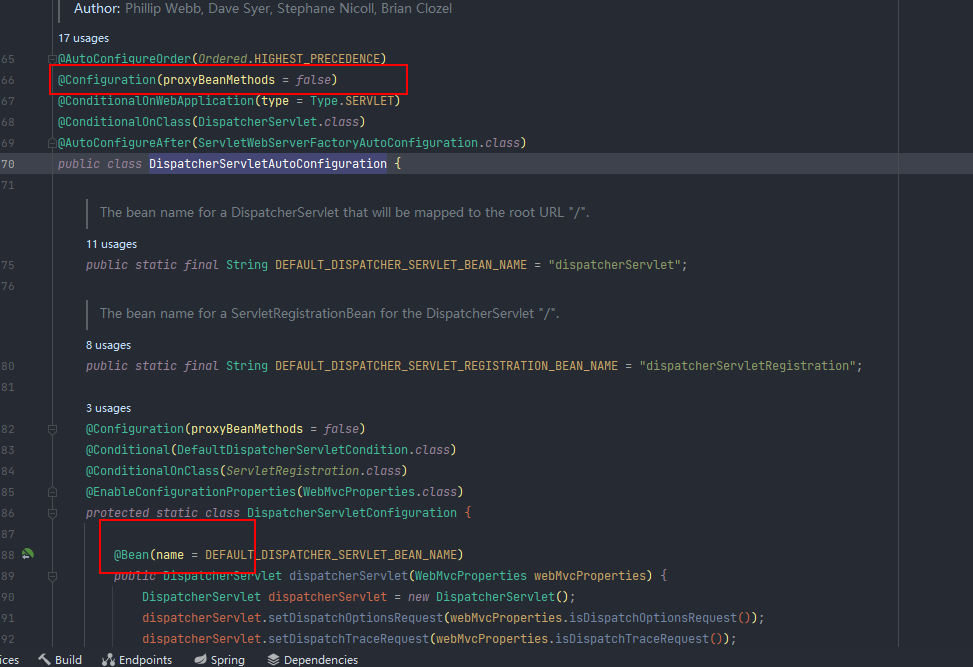
上面都有@Configuration注解,说明都是JavaConfig的配置类。并且都自动注入了Bean。
所以自动配置的真正实现是会先加载spring.factories的配置文件,并将其中对应的org.springframework.boot.autoconfigure. 包下的配置项,通过反射实例化为对应标注了
@configuration的JavaConfig形式的IOC容器配置类,然后这些都会成为一个示例加载到IOC容器之中。
结论:
- SpringBoot在启动的时候会先加载spring.factories这样一个配置文件,并从中获取EnableAutoConfiguration指定的值。
- 将这些值作为自动配置类导入到spring容器之中,自动配置类就会生效,从而自动帮我们配置所需工作。
- 整个J2EE的整体解决方案和自动配置都在springboot-autoconfigure的jar包中;
- 它会给容器中导入非常之多的自动配置类,就是给容器导入这个场景中所需要的的组件,并配置好这些组件;
- 有了自动配置类,免去了我们手动编写配置注入工能组件等的工作。
SpringApplication
SpringBootApplication.run()方法开启的是一个服务
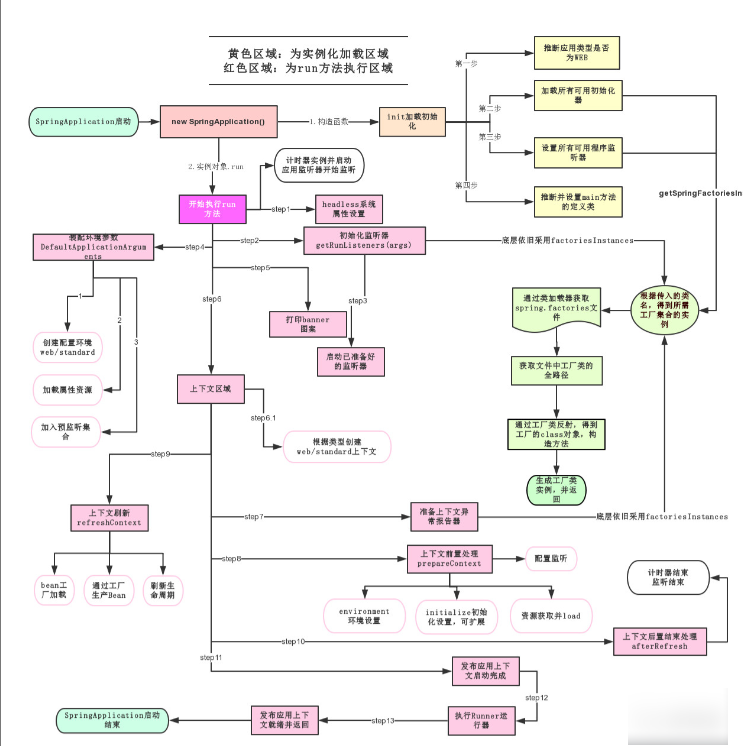
SpringApplication.run分析
分析该方法主要分两部分,一部分是SpringApplication的实例化,二是run方法的执行;
这个类主要做了以下四件事情:
1、推断应用的类型是普通的项目还是Web项目
2、查找并加载所有可用初始化器 , 设置到initializers属性中
3、找出所有的应用程序监听器,设置到listeners属性中
4、推断并设置main方法的定义类,找到运行的主类
本文引用 狂神说Java 对SpringBoot浅分析 :https://www.cnblogs.com/hellokuangshen/p/12450327.html

 浙公网安备 33010602011771号