机械制造作业考研题目答案分享——工艺尺寸链
Homework 8
版权声明
本内容由狂小虎原创整合,请不要售卖,为了防止爬虫以及保持免费性,设置为仅粉丝可见。另外,题目以及解释可能不完全正确,仅供参考,同时也欢迎各位在讨论区指点出内容的错误之处。
文章目录
- 版权声明
- 1 Try pointing out the shortcomings existing in the following workpieces from the point of machining shown as Fig. 1, and propose a way to improve them.
- 2 Try selecting the rough and finish datum surface when machining the surfaces that have the arc marked ▽ in Fig 2, and explain the reason.
- 3 When machining the part shown in the following figure 3, the dimension 6±0.1mm must be ensured. As it is inconvenient for inspection, dimension of L is measured to indirectly ensure it. Please decide the dimension L and its tolerance.
- 4 When machining the spindle shown in Fig.4, the depth of keyway t=4_0^(+0.15)mm must be ensured. Its machining process includes:
- 5 The material for one part is 2Cr13, and its machining sequence is,
- 6. In Fig 5(a), It is the design requirement of a workpiece, and Fig.(b) is the operational drawing (工序图). The workpiece is machined through the following operations,
1 Try pointing out the shortcomings existing in the following workpieces from the point of machining shown as Fig. 1, and propose a way to improve them.
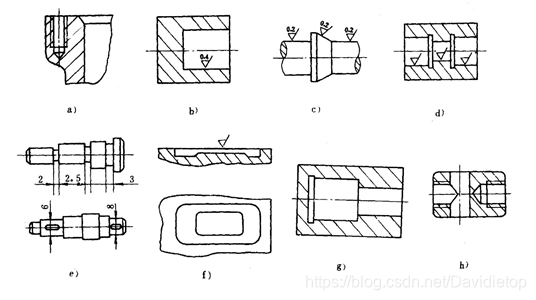

2 Try selecting the rough and finish datum surface when machining the surfaces that have the arc marked ▽ in Fig 2, and explain the reason.

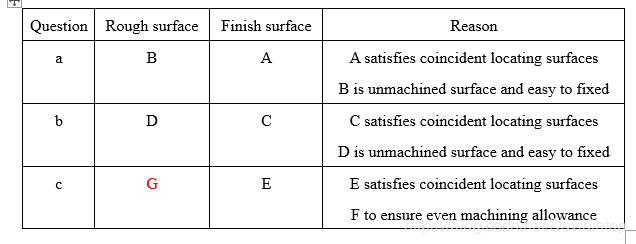
3 When machining the part shown in the following figure 3, the dimension 6±0.1mm must be ensured. As it is inconvenient for inspection, dimension of L is measured to indirectly ensure it. Please decide the dimension L and its tolerance.
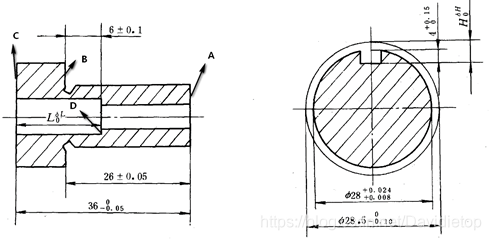
Fig.3 For exercise 3 Fig.4 For exercise 4
Solution
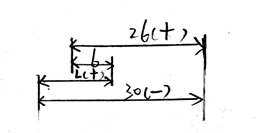
First, 6±0.1 is resultant dimension.
6 = L + 26 − 36 6=L+26-36 6=L+26−36
L = − 26 + 36 + 6 = 16 L=-26+36+6=16 L=−26+36+6=16
KaTeX parse error: Double subscript at position 8: 0.1=δ_δ_̲{Lmax}+0.05-(-0…
δ L m a x = 0.1 − 0.05 − 0.05 = 0 δ_{Lmax}=0.1-0.05-0.05=0 δLmax=0.1−0.05−0.05=0
− 0.1 = δ L m i n − 0.05 − 0 -0.1=δ_{Lmin}-0.05-0 −0.1=δLmin−0.05−0
δ L m i n = − 0.1 + 0.05 = − 0.05 δ_{Lmin}=-0.1+0.05=-0.05 δLmin=−0.1+0.05=−0.05
In a word, L 0 δ L = 1 6 − 0.05 0 m m L_0^{δ_L }=16_{-0.05}^0 mm L0δL=16−0.050mm
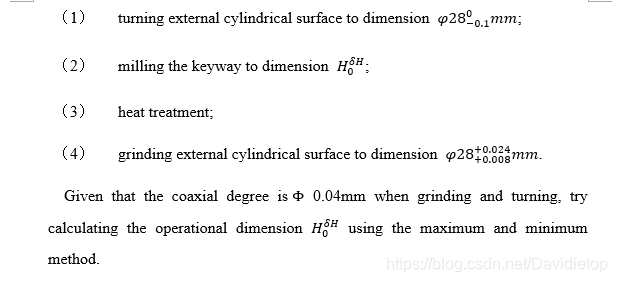
4 When machining the spindle shown in Fig.4, the depth of keyway t=4_0^(+0.15)mm must be ensured. Its machining process includes:
(1) turning external cylindrical surface to dimension
φ
2
8
−
0.1
0
φ28_{-0.1}^0
φ28−0.10 mm;
(2) milling the keyway to dimension
H
0
δ
H
H_0^δH
H0δH;
(3) heat treatment;
(4) grinding external cylindrical surface to dimension
φ
2
8
+
0.008
+
0.024
φ28_{+0.008}^{+0.024}
φ28+0.008+0.024 mm.
Given that the coaxial degree is Φ 0.04mm when grinding and turning, try calculating the operational dimension
H
0
δ
H
H_0^δH
H0δH using the maximum and minimum method.
Φ means coaxial degree, but φ means diameter.
Solution
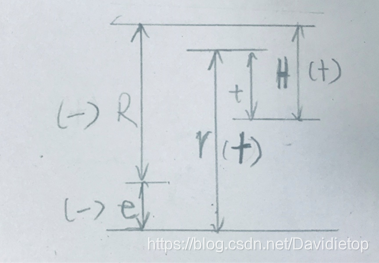
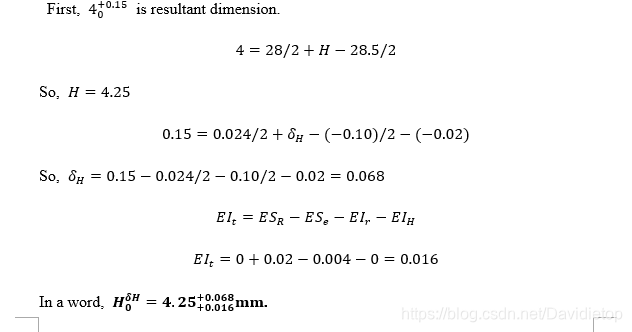
First, = 4 0 + 0.15 =4_0^{+0.15} =40+0.15 is resultant dimension.
4 = 28 / 2 + H − 28.5 / 2 4=28/2+H-28.5/2 4=28/2+H−28.5/2
So, H=4.25
0.15 = 0.024 / 2 + δ H − ( − 0.10 ) / 2 − ( − 0.02 ) 0.15=0.024/2+δ_H-(-0.10)/2-(-0.02) 0.15=0.024/2+δH−(−0.10)/2−(−0.02)
So, δ_H=0.15-0.024/2-0.10/2-0.02=0.068
E I t = E S R − E S e − E I r − E I H EI_t=ES_R-ES_e-EI_r-EI_H EIt=ESR−ESe−EIr−EIH
E I t = 0 + 0.02 − 0.004 − 0 = 0.016 EI_t=0+0.02-0.004-0=0.016 EIt=0+0.02−0.004−0=0.016
In a word, H 0 δ = 4.2 5 + 0.016 + 0.068 m m H_0^δ=4.25_{+0.016}^{+0.068} mm H0δ=4.25+0.016+0.068mm.
5 The material for one part is 2Cr13, and its machining sequence is,
Solution
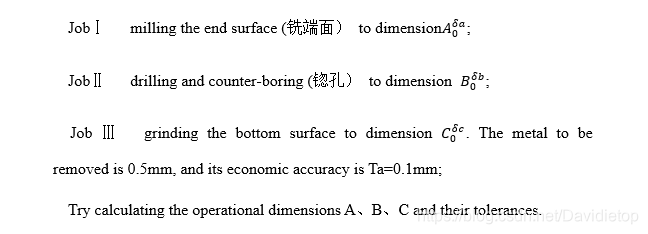
6. In Fig 5(a), It is the design requirement of a workpiece, and Fig.(b) is the operational drawing (工序图). The workpiece is machined through the following operations,
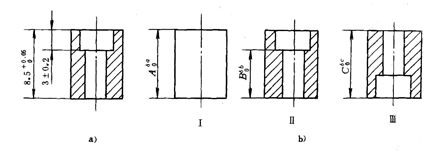
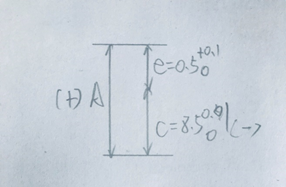
Solution,

I
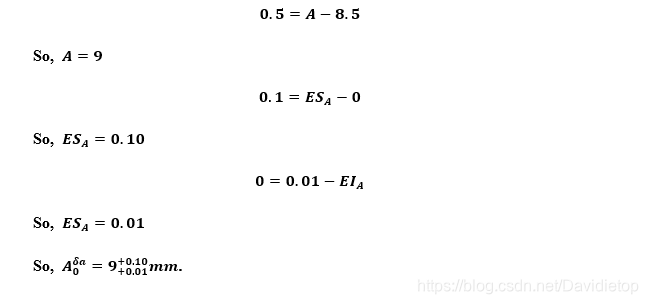
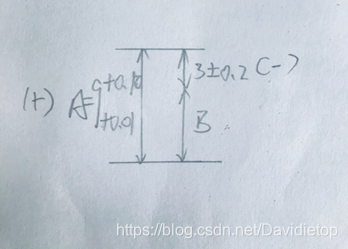
II


 浙公网安备 33010602011771号