
win11结合wsl2搭建开发环境之二:基于wsl子系统Ubuntu24.04,编译安装nginx
基于wsl子系统Ubuntu24.04,编译安装nginx
使用PowerShell启动子系统
wsl -d Ubuntu-24.04
1. 更换软件镜像源
# 备份
cp /etc/apt/sources.list.d/ubuntu.sources /tmp/ubuntu.sources.bak
# 编辑
vim /etc/apt/sources.list.d/ubuntu.sources
最终内容如下
Types: deb
URIs: http://mirrors.tuna.tsinghua.edu.cn/ubuntu/
Suites: noble noble-updates noble-security
Components: main restricted universe multiverse
Signed-By: /usr/share/keyrings/ubuntu-archive-keyring.gpg

Types: deb
URIs: http://mirrors.usts.edu.cn/ubuntu/
Suites: noble noble-updates noble-security
Components: main restricted universe multiverse
Signed-By: /usr/share/keyrings/ubuntu-archive-keyring.gpg

Types: deb
URIs: http://mirrors.163.com/ubuntu/
Suites: noble noble-updates noble-security
Components: main restricted universe multiverse
Signed-By: /usr/share/keyrings/ubuntu-archive-keyring.gpg

# 下面是原本国外镜像源,可以屏蔽掉
# 由于国内源并不是实时更新那些库的,如果屏蔽后找不到某些库了,可以开回来
#Types: deb
#URIs: http://archive.ubuntu.com/ubuntu/
#Suites: noble noble-updates noble-backports
#Components: main restricted universe multiverse
#Signed-By: /usr/share/keyrings/ubuntu-archive-keyring.gpg

#Types: deb
#URIs: http://security.ubuntu.com/ubuntu/
#Suites: noble-security
#Components: main restricted universe multiverse
#Signed-By: /usr/share/keyrings/ubuntu-archive-keyring.gpg
修改完后,刷新一下
apt update
2. 前期准备
apt update
apt install build-essential libpcre3-dev libssl-dev net-tools
mkdir -p /mnt/d/wsl/install
3. prce 安装
cd /mnt/d/wsl/install
wget https://github.com/PCRE2Project/pcre2/releases/download/pcre2-10.44/pcre2-10.44.tar.gz
tar -zxvf pcre2-10.44.tar.gz
cd pcre2-10.44/
./configure --prefix=/usr/local/pcre2-10.44
# 一般使用的命令是 make && make install
# 这里使用`-j$(nproc)`参数,是自动最大线程编译安装,这样会快很多
make -j$(nproc) && make install -j$(nproc)
4. zlib 安装
cd /mnt/d/wsl/install
wget https://github.com/madler/zlib/releases/download/v1.3.1/zlib-1.3.1.tar.gz
tar -zxvf zlib-1.3.1.tar.gz
cd zlib-1.3.1/
./configure --prefix=/usr/local/zlib-1.3.1
make -j$(nproc) && make install -j$(nproc)
5. openssl安装
cd /mnt/d/wsl/install
wget https://github.com/openssl/openssl/releases/download/openssl-3.3.1/openssl-3.3.1.tar.gz
tar -zxvf openssl-3.3.1.tar.gz
cd openssl-3.3.1/
./config --prefix=/usr/local/openssl-3.3.1
make -j$(nproc) && make install -j$(nproc)
6. nginx安装
6.1 创建用户
创建一个 nginx 用户,为了降低服务器风险,让 nginx 以最小的权限运行
useradd -s /sbin/nologin nginx
6.2 编译
最新版可查看: https://nginx.org/en/download.html
当前使用的是nginx-1.27.3
cd /mnt/d/wsl/install
wget https://nginx.org/download/nginx-1.27.3.tar.gz
tar zxvf nginx-1.27.3.tar.gz
cd nginx-1.27.3

# 说明
# --user, --group: 使用nginx用户
# --http-log-path, --error-log-path: 为了防止子系统越来越大,我是把日志放在宿主机的目录/mnt/d/log/nginx
# --with-pcre, --with-zlib, --with-openssl: 特别强调,这里的路径是*源码*路径,而不是*安装后*的路径
./configure \
--prefix=/usr/local/nginx \
--user=nginx \
--group=nginx \
--sbin-path=/usr/local/nginx/sbin/nginx \
--conf-path=/usr/local/nginx/conf/nginx.conf \
--pid-path=/usr/local/nginx/nginx.pid \
--http-log-path=/mnt/d/log/nginx/access.log \
--error-log-path=/mnt/d/log/nginx/error.log \
--with-pcre=/mnt/d/wsl/install/pcre2-10.44 \
--with-zlib=/mnt/d/wsl/install/zlib-1.3.1 \
--with-openssl=/mnt/d/wsl/install/openssl-3.3.1 \
--with-stream \
--with-stream_ssl_preread_module \
--with-http_ssl_module \
--with-http_v2_module \
--with-http_realip_module

# 编译
make -j$(nproc) && make install -j$(nproc)
6.3 加入系统管理
touch /usr/lib/systemd/system/nginx.service
vim /usr/lib/systemd/system/nginx.service
内容如下
[Unit]
Description=nginx - high performance web server
Documentation=http://nginx.org/en/docs/
After=network.target remote-fs.target nss-lookup.target

[Service]
Type=forking
PIDFile=/usr/local/nginx/nginx.pid
ExecStartPre=/usr/local/nginx/sbin/nginx -t -c /usr/local/nginx/conf/nginx.conf
ExecStart=/usr/local/nginx/sbin/nginx -c /usr/local/nginx/conf/nginx.conf
ExecReload=/usr/local/nginx/sbin/nginx -s reload
ExecStop=/usr/local/nginx/sbin/nginx -s stop
PrivateTmp=true

[Install]
WantedBy=multi-user.target
验证 nginx 是否正常运行
systemctl daemon-reload
systemctl stop nginx.service
systemctl start nginx.service
systemctl reload nginx.service
systemctl restart nginx.service

systemctl status nginx
# 应显示 Active: active (running)
开机自启
systemctl enable nginx
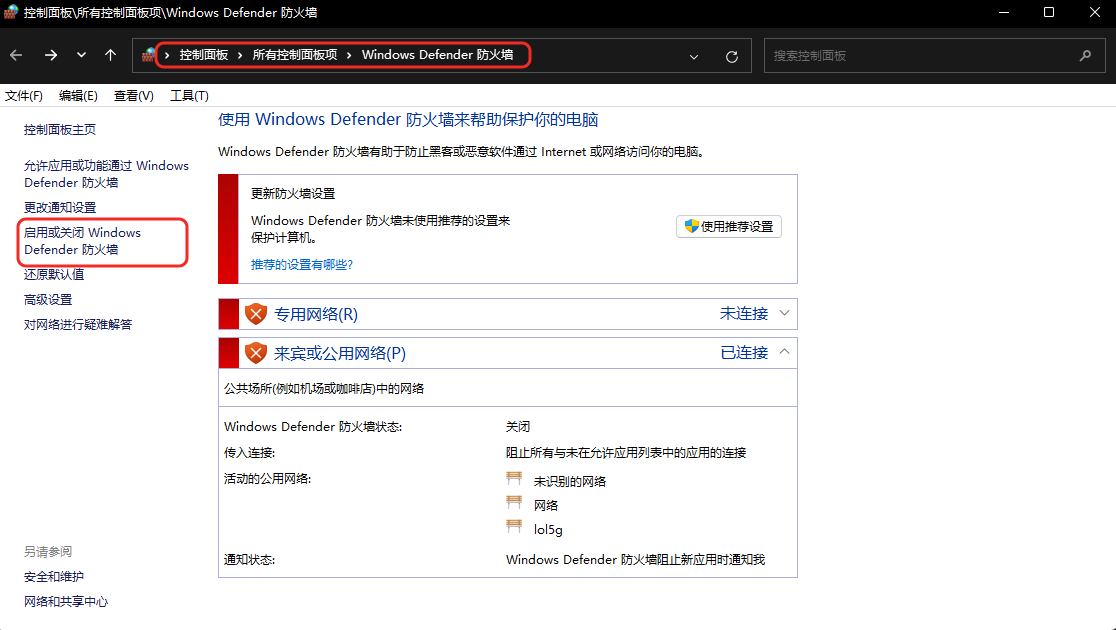
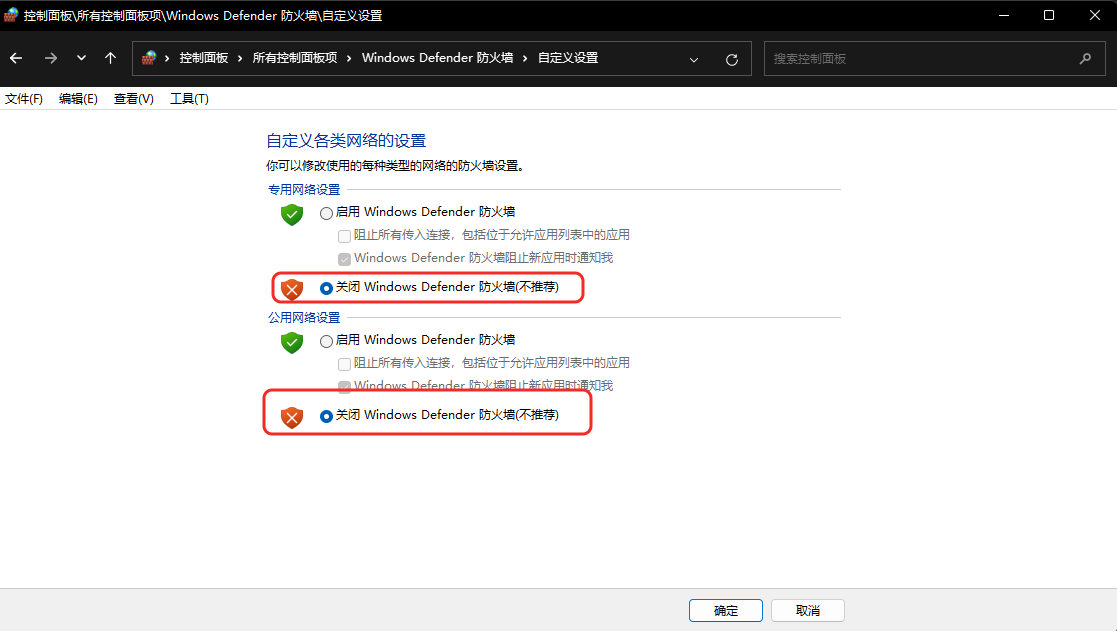
7. 关闭win11防火墙
win11跟wsl需要互相访问,直接把win11防火墙关掉!

 浙公网安备 33010602011771号