VirtualBox7.1搭建ubuntu24 server
Ubuntu24 server版的安装过程就不多说的,网上大把。可参考: https://www.cnblogs.com/yinzhengjie/p/18253463
现在说下配置过程
上网配置
诉求
- 虚拟机能上外网
- 宿主机跟虚拟机能互联
VirtualBox网卡设置
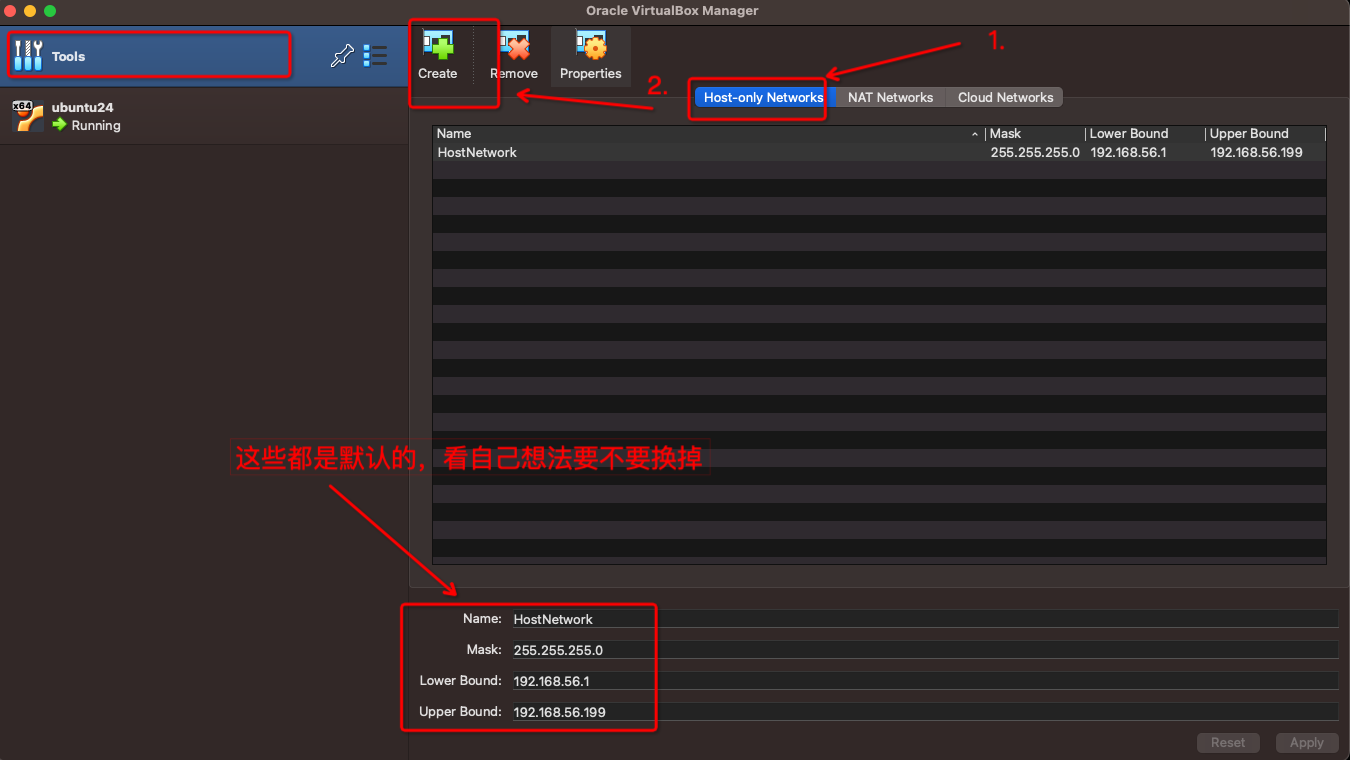
Host-only网络
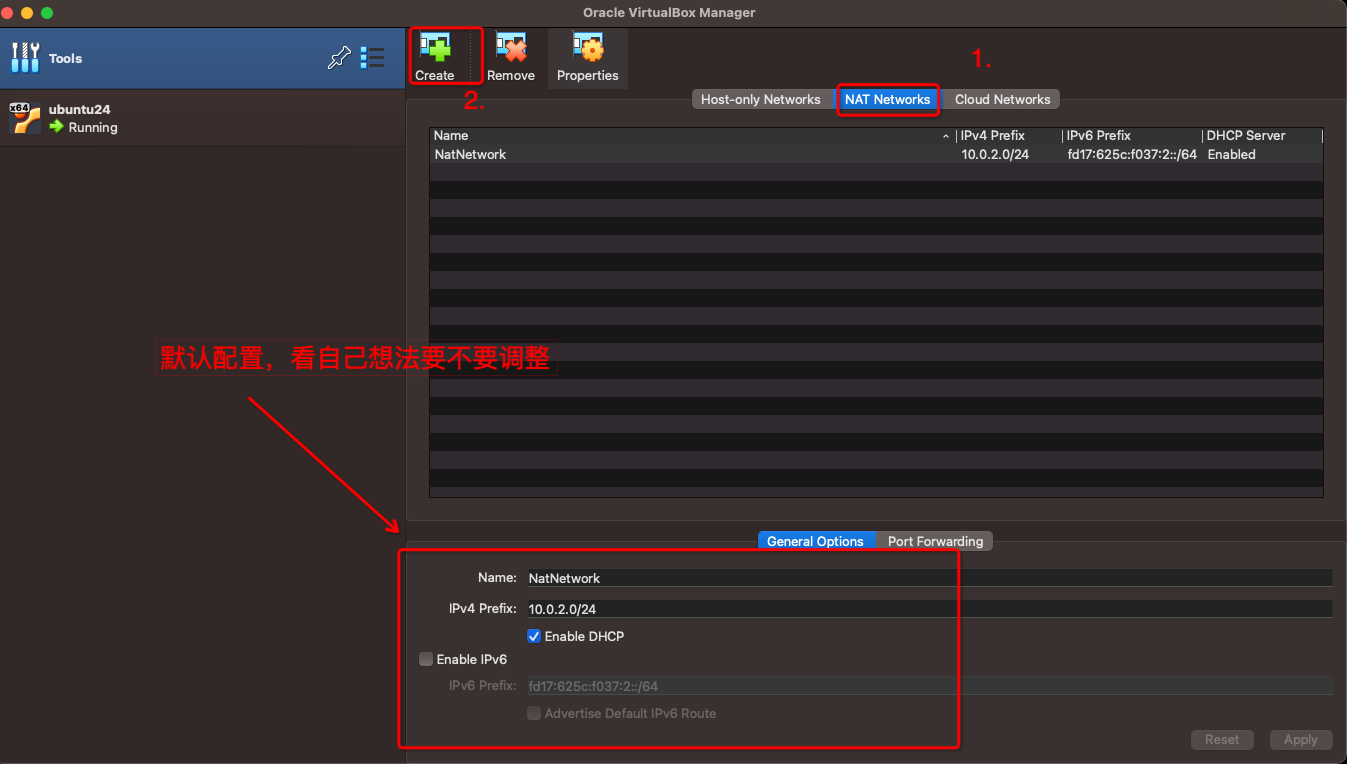
NAT网络
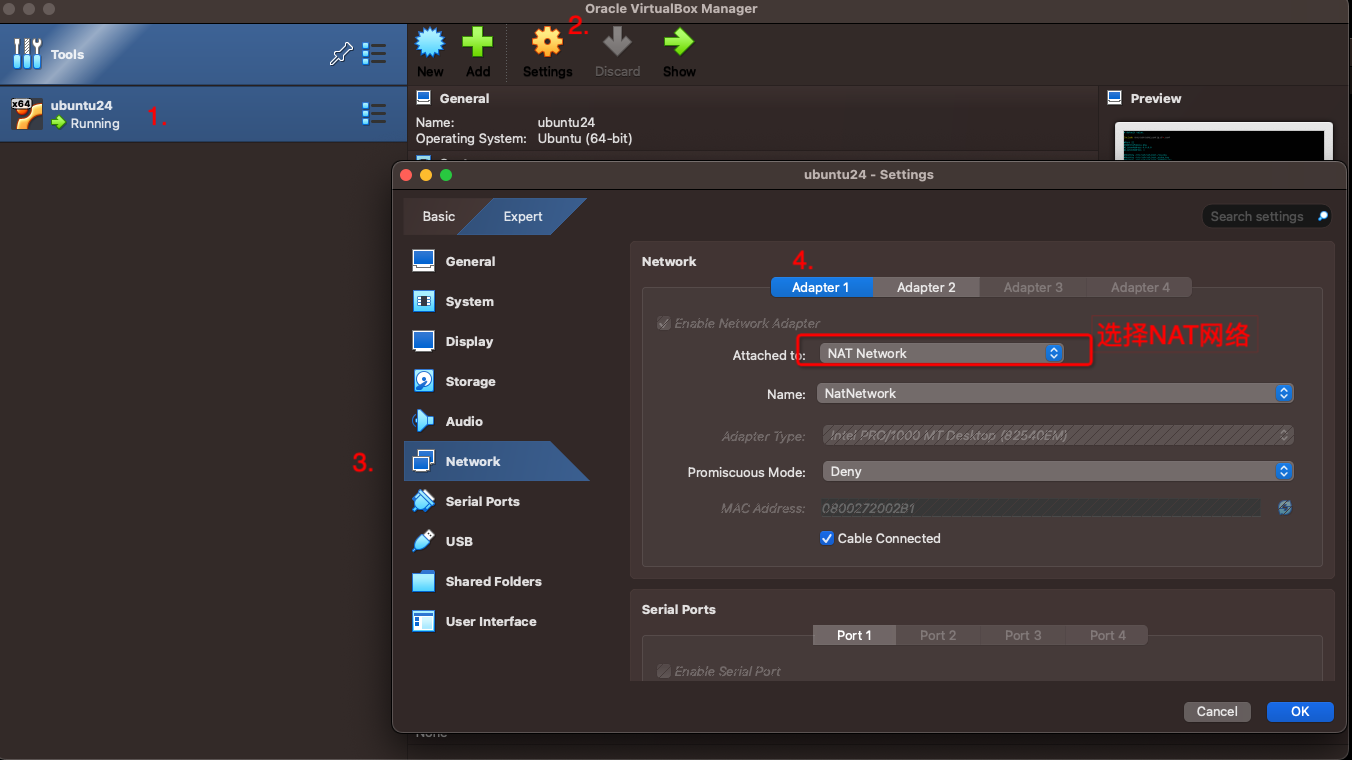
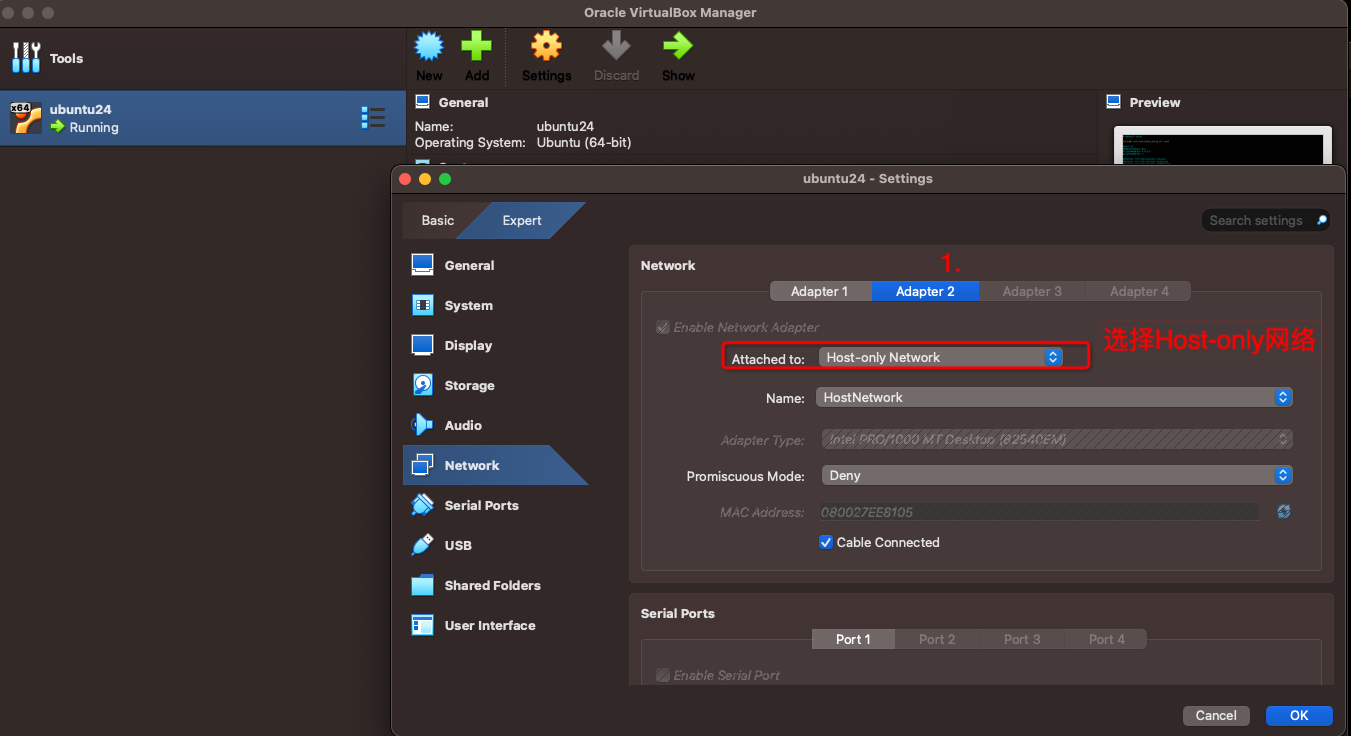
虚拟机网络设置
Ubuntu系统配置
启动登录
所有操作,我都是使用root账号的,所以并没有加sudo
注意
- 系统默认只启动了一个网卡的,还要自己去配置网卡
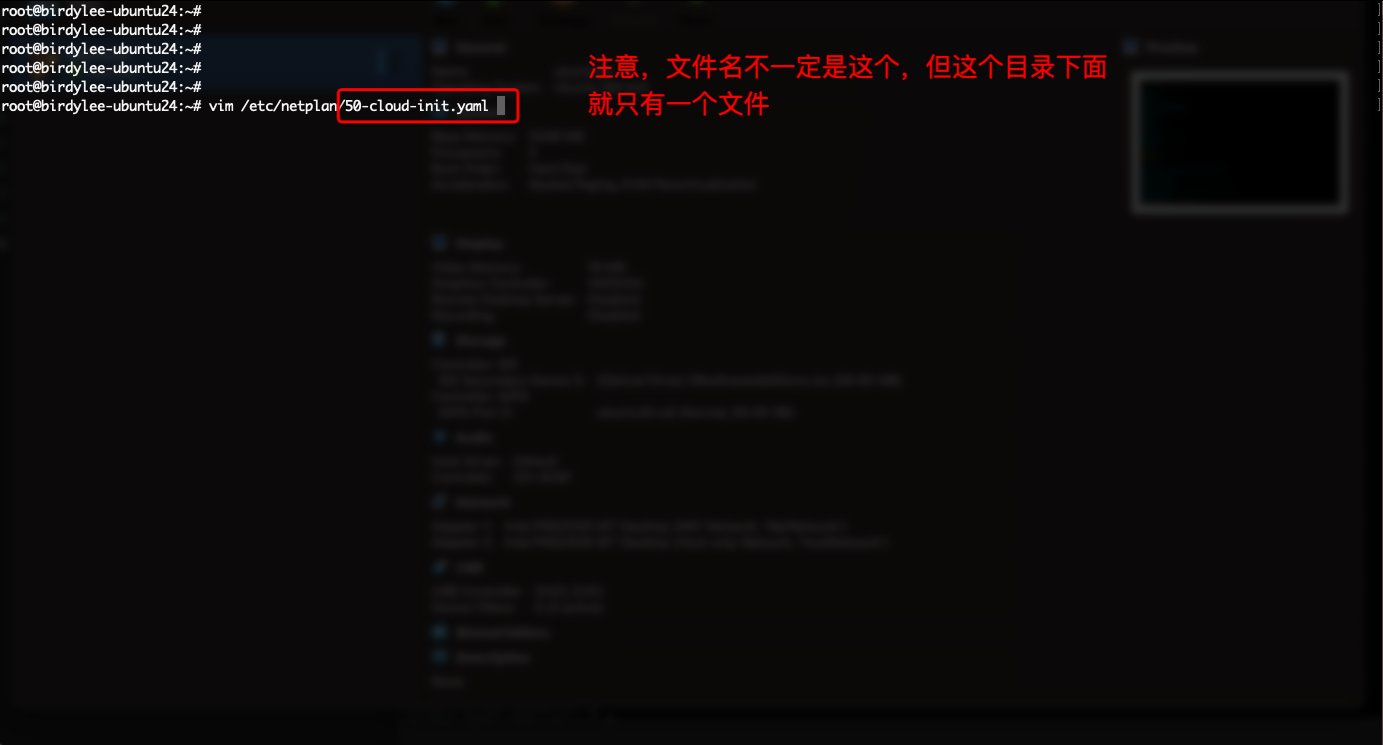
vim /etc/netplan/50-cloud-init.yaml
这是配置好的内容
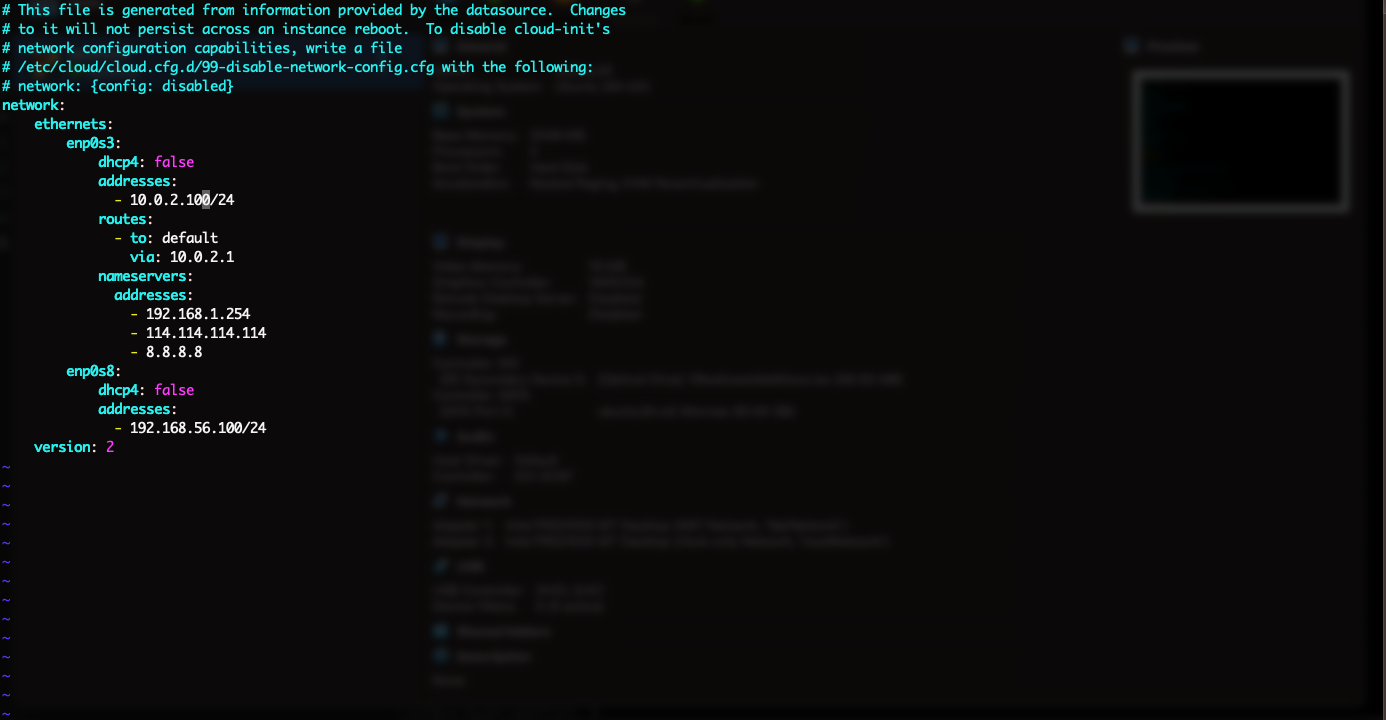
可以根据自己的实际情况作调整
network:
    ethernets:
        enp0s3:
            dhcp4: false
            addresses:
              - 10.0.2.100/24
            routes:
              - to: default
                via: 10.0.2.1
            nameservers:
              addresses:
                - 192.168.1.254
                - 114.114.114.114
                - 8.8.8.8
        enp0s8:
            dhcp4: false
            addresses:
              - 192.168.56.100/24
    version: 2
保存文件,重载网络配置
netplan apply
但很奇怪,我通过上面的命令重载网络配置,是没有生效的!后面是通过重启系统解决的
reboot
至此,网络配置已完成
更换软件的镜像源
国内的网络环境比较差,如果要安装或者更新软件要么慢,要么失败,所以需要更换镜像源
备份配置文件
cp /etc/apt/sources.list.d/ubuntu.sources /tmp/ubuntu.sources.bak
修改配置文件
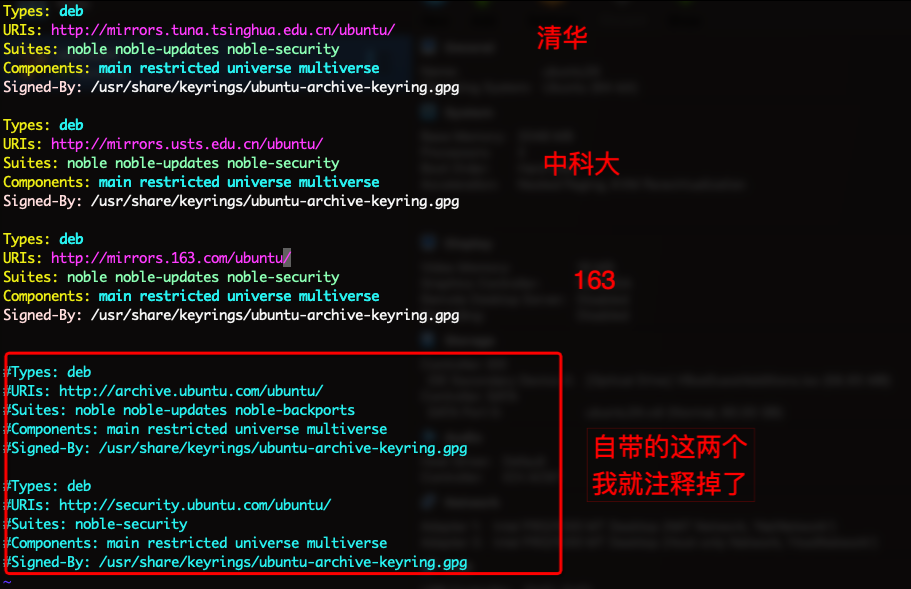
Types: deb
URIs: http://mirrors.tuna.tsinghua.edu.cn/ubuntu/
Suites: noble noble-updates noble-security
Components: main restricted universe multiverse
Signed-By: /usr/share/keyrings/ubuntu-archive-keyring.gpg

Types: deb
URIs: http://mirrors.usts.edu.cn/ubuntu/
Suites: noble noble-updates noble-security
Components: main restricted universe multiverse
Signed-By: /usr/share/keyrings/ubuntu-archive-keyring.gpg

Types: deb
URIs: http://mirrors.163.com/ubuntu/
Suites: noble noble-updates noble-security
Components: main restricted universe multiverse
Signed-By: /usr/share/keyrings/ubuntu-archive-keyring.gpg


#Types: deb
#URIs: http://archive.ubuntu.com/ubuntu/
#Suites: noble noble-updates noble-backports
#Components: main restricted universe multiverse
#Signed-By: /usr/share/keyrings/ubuntu-archive-keyring.gpg

#Types: deb
#URIs: http://security.ubuntu.com/ubuntu/
#Suites: noble-security
#Components: main restricted universe multiverse
#Signed-By: /usr/share/keyrings/ubuntu-archive-keyring.gpg
更新数据源列表
apt-get update
宿主机ssh访问虚拟机
因为VirtualBox在虚拟机的操作,鼠标和键盘的操作非常不方法,因此在宿主机的终端通过ssh访问虚拟机是比较好的
ubuntu安装ssh服务端
安装
apt update
apt install openssh-server
启动ssh服务
systemctl start ssh
加入到开机启动
systemctl enable ssh
确认SSH服务是否已安装并运行
systemctl status ssh
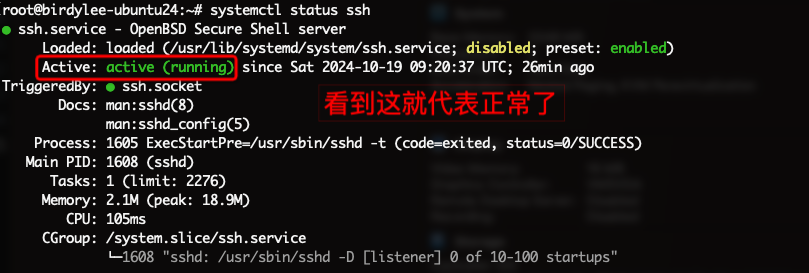
关闭防火墙
都自己虚拟机了,就不需要防火墙了吧
ufw disable
如果你实在想折腾防火墙,也可以
启动防火墙
ufw enable
允许SSH流量通过22端口
ufw allow 22/tcp
检查防火墙状态和规则
ufw status
应该会看到这些
输出应类似于以下内容:

Status: activeTo                         Action      From
--                         ------      ----
22/tcp                     ALLOW       Anywhere
22/tcp (v6)                ALLOW       Anywhere (v6)
确认22端口已开放
ss -tuln | grep :22

因为我直接用root登录ssh的,还要开放root的ssh登录
vim /etc/ssh/sshd_config
找到PermitRootLogin关键字,然后配置打开
# allow root to login
LoginGraceTime 2m
PermitRootLogin yes
StrictModes yes
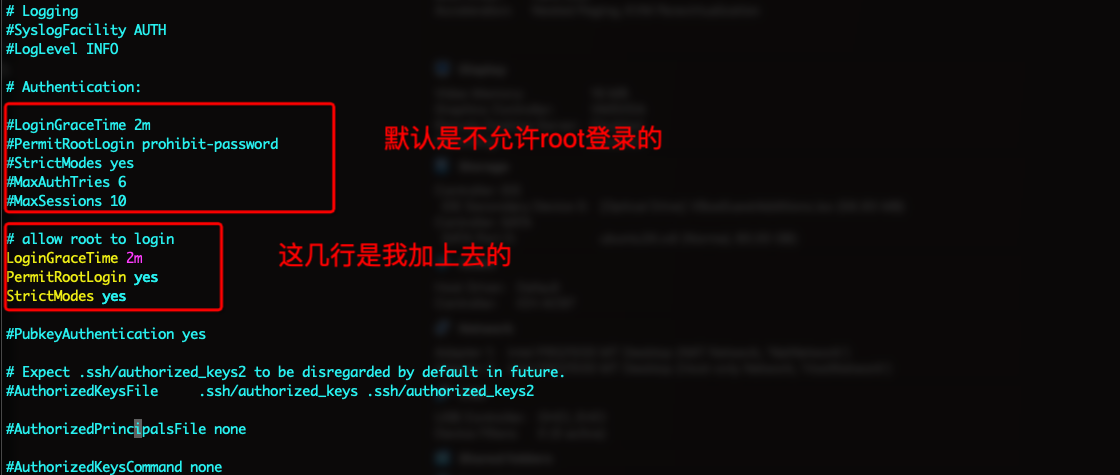
重启ssh,使配置生效
service ssh restart
至此,可以愉快的在宿主机通过ssh登录虚拟机了
ssh root@192.168.56.100
安装VirtualBox增强功能
确认一下已经将增加光盘加载到光驱
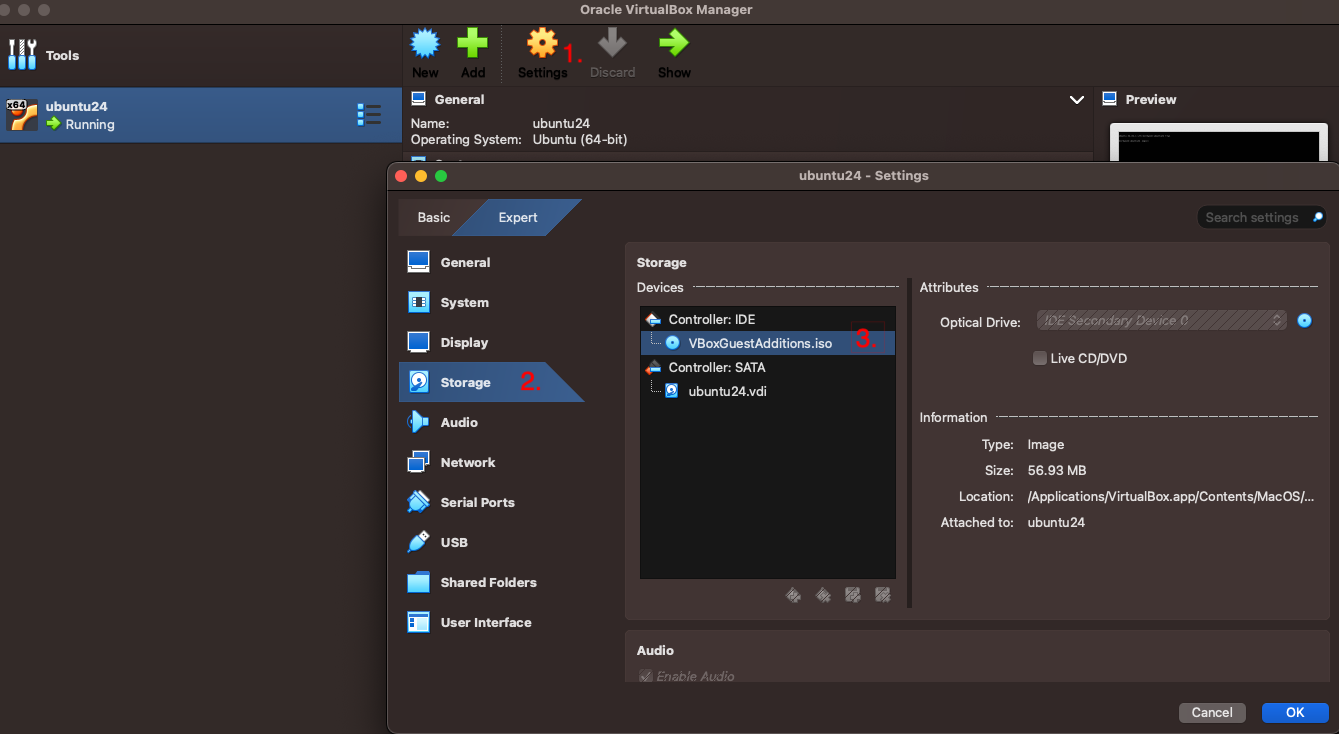
挂载VBoxGuestAddition.iso镜像文件
mount /dev/cdrom /mnt
此时会出现提示:
mount: /mnt: WARNING: source write-protected, mounted read-only.
此提示无需理会。
安装
/mnt/VBoxLinuxAdditions.run
会提示缺少了一些软件
Verifying archive integrity...  100%   MD5 checksums are OK. All good.
Uncompressing VirtualBox 7.1.4 Guest Additions for Linux  100%
bzip2 not found.  Please install: bzip2 tar; and try again.
安装即可
apt update
apt install bzip2 tar
再次执行安装
/mnt/VBoxLinuxAdditions.run
又失败了
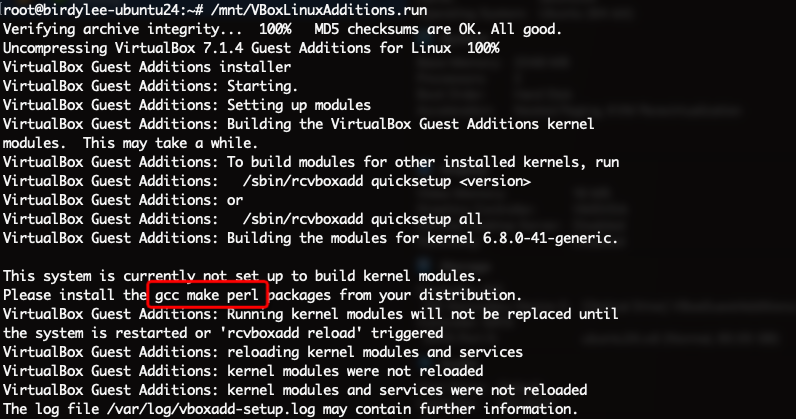
还要安装软件
apt install gcc make perl
再次执行安装
/mnt/VBoxLinuxAdditions.run
安装完后,重启
reboot
开启虚拟化
注意,这个命令是在宿主机操作的
VBoxManage modifyvm ubuntu24 --nested-hw-virt on
说明
VBoxManage modifyvm <虚拟机的UUID|虚拟机的名称> --nested-hw-virt on
虚拟机名字在这里可以看到
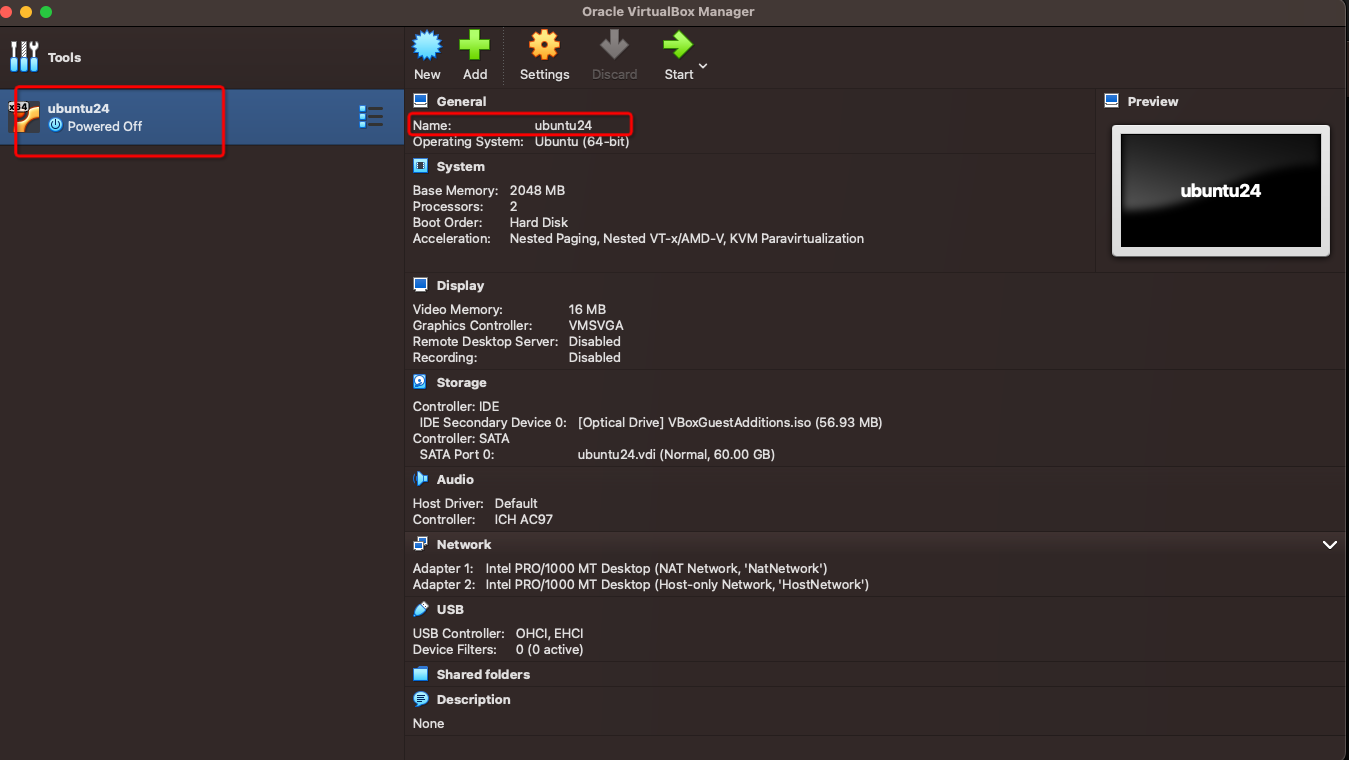
共享文件夹
前提是要先装了VirtualBox增强功能,参考上面的操作
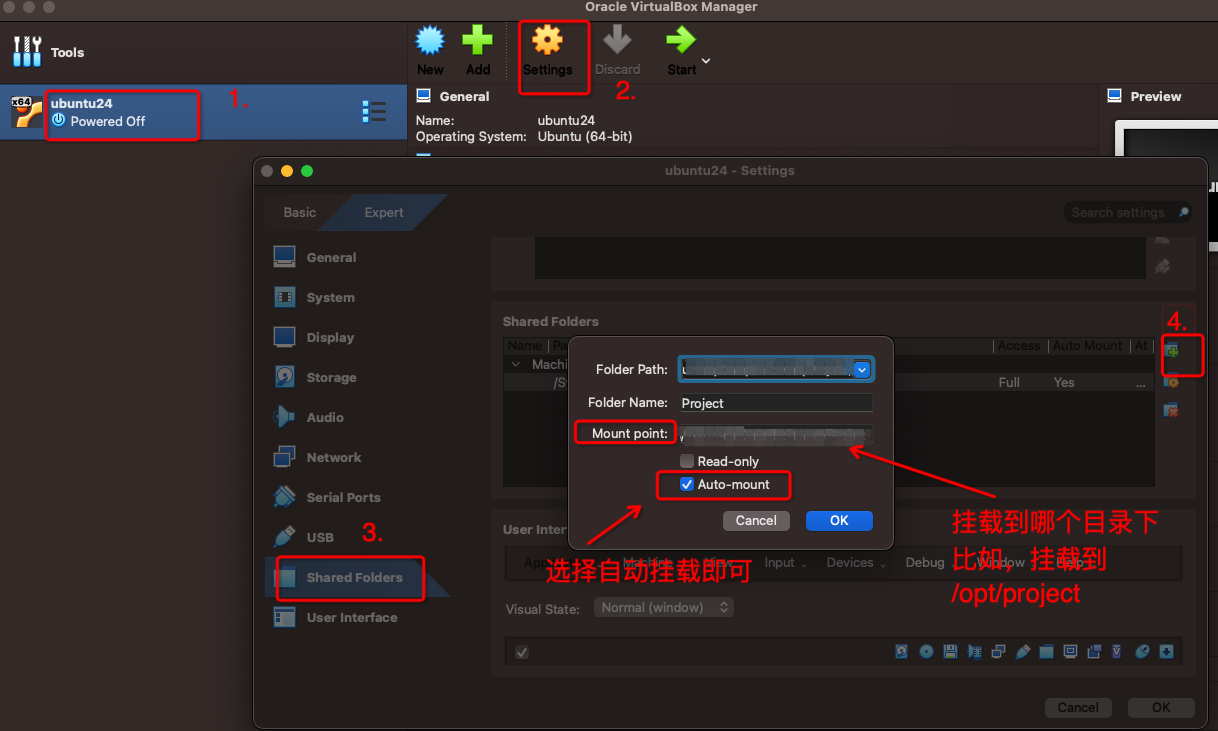
命令行启动虚拟机
查看所有虚拟机
VBoxManage list vms
通过界面启动虚拟机
VBoxManage startvm ubuntu24 --type gui
通过后台启动虚拟机
VBoxManage startvm ubuntu24 --type headless
其它常用命令
VBoxManage list runningvms # 列出运行中的虚拟机
VBoxManage controlvm ubuntu24 acpipowerbutton #关闭虚拟机,等价于点击系统关闭按钮,正常关机
VBoxManage controlvm ubuntu24 poweroff # 关闭虚拟机,等价于直接关闭电源,非正常关机
VBoxManage controlvm ubuntu24 pause # 暂停虚拟机的运行
VBoxManage controlvm ubuntu24 resume # 恢复暂停的虚拟机
VBoxManage controlvm ubuntu24 savestate # 保存当前虚拟机的运行状态


