ingress-nginx 安装配置

对外暴露集群服务

前面我们学习了在 Kubernetes 集群内部使用 kube-dns 实现服务发现的功能,那么我们部署在 Kubernetes 集群中的应用如何暴露给外部的用户使用呢?我们知道可以使用 NodePortLoadBlancer 类型的 Service 可以把应用暴露给外部用户使用,除此之外,Kubernetes 还为我们提供了一个非常重要的资源对象可以用来暴露服务给外部用户,那就是 Ingress。对于小规模的应用我们使用 NodePort 或许能够满足我们的需求,但是当你的应用越来越多的时候,你就会发现对于 NodePort 的管理就非常麻烦了,这个时候使用 Ingress 就非常方便了,可以避免管理大量的端口。

Ingress 其实就是从 Kuberenets 集群外部访问集群的一个入口,将外部的请求转发到集群内不同的 Service 上,其实就相当于 nginx、haproxy 等负载均衡代理服务器,可能你会觉得我们直接使用 nginx 就实现了,但是只使用 nginx 这种方式有很大缺陷,每次有新服务加入的时候怎么改 Nginx 配置?不可能让我们去手动更改或者滚动更新前端的 Nginx Pod 吧?那我们再加上一个服务发现的工具比如 consul 如何?貌似是可以,对吧?Ingress 实际上就是这样实现的,只是服务发现的功能自己实现了,不需要使用第三方的服务了,然后再加上一个域名规则定义,路由信息的刷新依靠 Ingress Controller 来提供。

Ingress Controller 可以理解为一个监听器,通过不断地监听 kube-apiserver,实时的感知后端 Service、Pod 的变化,当得到这些信息变化后,Ingress Controller 再结合 Ingress 的配置,更新反向代理负载均衡器,达到服务发现的作用。其实这点和服务发现工具 consul、 consul-template 非常类似。
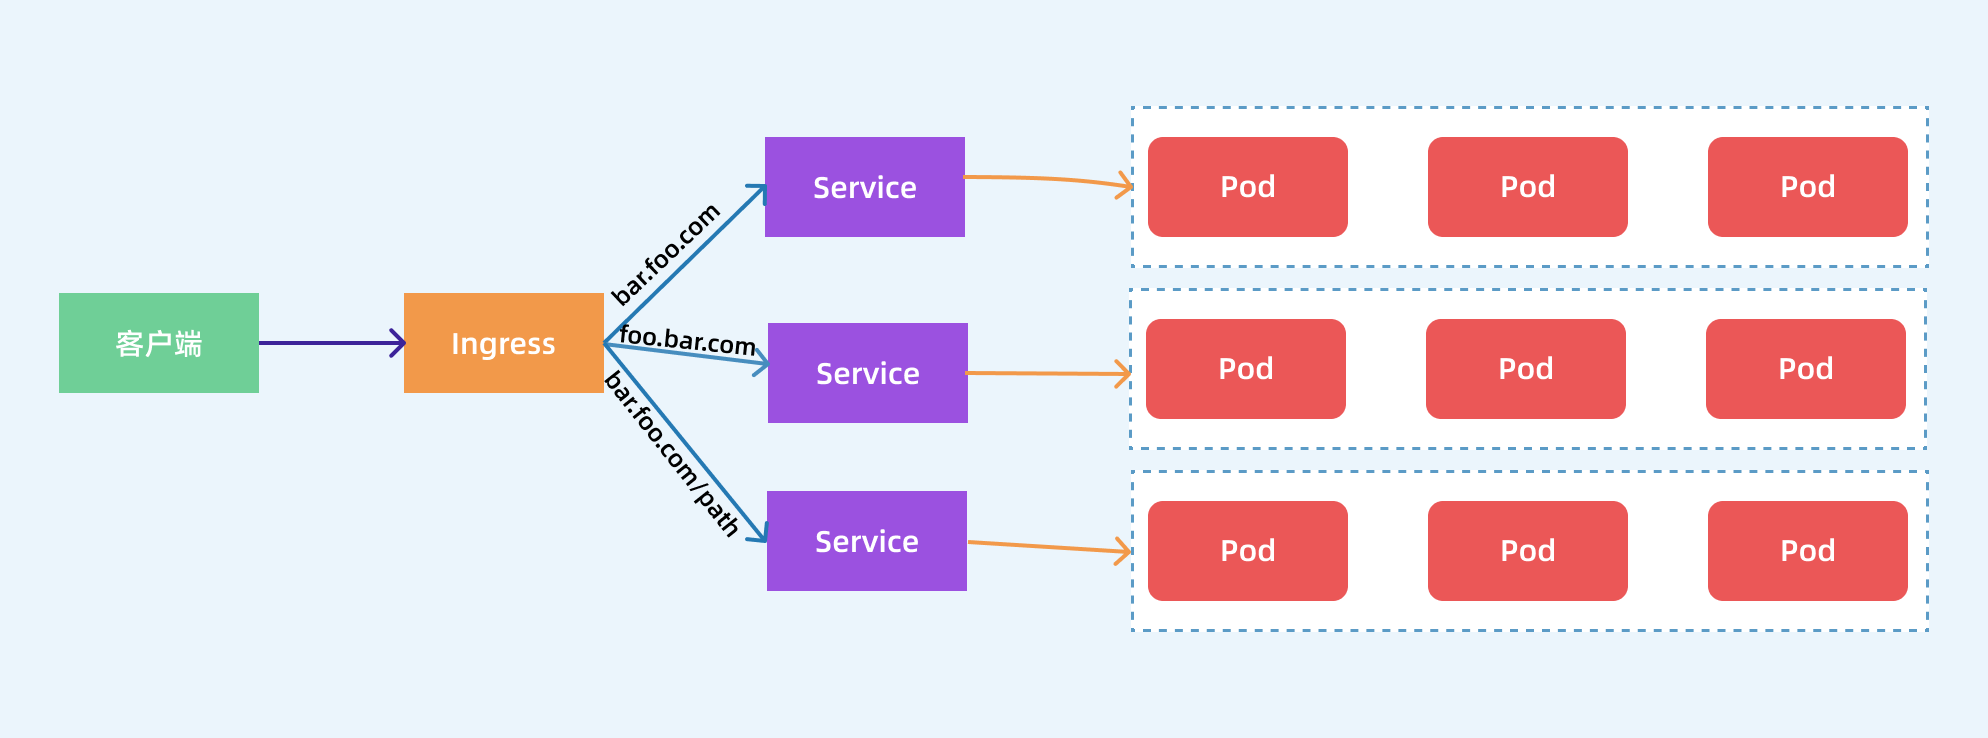
ingress flow

现在可以供大家使用的 Ingress Controller 有很多,比如 traefik、nginx-controller、Kubernetes Ingress Controller for Kong、HAProxy Ingress controller,当然你也可以自己实现一个 Ingress Controller,现在普遍用得较多的是 traefik 和 nginx-controller,traefik 的性能较 nginx-controller 差,但是配置使用要简单许多,我们这里会重点给大家介绍 nginx-controller 以及 traefik 的使用。

安装

NGINX Ingress Controller 是使用 Kubernetes Ingress 资源对象构建的,用 ConfigMap 来存储 Nginx 配置的一种 Ingress Controller 实现。

要使用 Ingress 对外暴露服务,就需要提前安装一个 Ingress Controller,我们这里就先来安装 NGINX Ingress Controller,由于 nginx-ingress 所在的节点需要能够访问外网,这样域名可以解析到这些节点上直接使用,所以需要让 nginx-ingress 绑定节点的 80 和 443 端口,所以可以使用 hostPort 来进行访问,当然对于线上环境来说为了保证高可用,一般是需要运行多个 nginx-ingress 实例的,然后可以用一个 nginx/haproxy 作为入口,通过 keepalived 来访问边缘节点的 vip 地址。

边缘节点

所谓的边缘节点即集群内部用来向集群外暴露服务能力的节点,集群外部的服务通过该节点来调用集群内部的服务,边缘节点是集群内外交流的一个Endpoint。

安装 helm

export helmversion=3.7.2
wget https://get.helm.sh/helm-v${helmversion}-linux-amd64.tar.gz
tar -xvf helm-v${helmversion}-linux-amd64.tar.gz
mv linux-amd64/helm /usr/bin/
helm completion bash
# 将输出的文件拷贝到 ``/etc/bash_completion.d/helm.sh`` 文件中
source /etc/bash_completion.d/helm.sh
 

安装 ingress-nginx

helm repo add ingress-nginx https://kubernetes.github.io/ingress-nginx
helm repo update
helm pull ingress-nginx/ingress-nginx --version 3.40.0
tar -xvf ingress-nginx-3.40.0.tgz
 

备份并修改 values.yaml

主要修改内容如下:

  • 注释 digest
  • 修改 dnsPolicy 为 ClusterFirstWithHostNet
  • 修改 hostNetwork 为 true
  • 修改 publishService.enabled 为 false
  • 修改 kind 为 DaemonSet
  • 新增 nodeSelector 的标签 ingress: "true"
  • 修改 service.enable 为 false
  • 修改 defaultBackend.enabled 为 true
controller:
  name: controller
  image:
    registry: k8s.gcr.io
    image: ingress-nginx/controller
    tag: "v0.50.0"
    #digest: sha256:f46fc2d161c97a9d950635acb86fb3f8d4adcfb03ee241ea89c6cde16aa3fdf8
    pullPolicy: IfNotPresent
    runAsUser: 101
    allowPrivilegeEscalation: true
  existingPsp: ""
  containerName: controller
  containerPort:
    http: 80
    https: 443
  config: {}
  configAnnotations: {}
  proxySetHeaders: {}
  addHeaders: {}
  dnsConfig: {}
  hostname: {}
  dnsPolicy: ClusterFirstWithHostNet
  reportNodeInternalIp: false
  allowSnippetAnnotations: true
  hostNetwork: true
  hostPort:
    enabled: false
    ports:
      http: 80
      https: 443
  electionID: ingress-controller-leader
  ingressClass: nginx
  ingressClassResource:
    enabled: false
    default: false
    parameters: {}
  podLabels: {}
  podSecurityContext: {}
  sysctls: {}
  publishService:
    enabled: false
    pathOverride: ""
  scope:
    enabled: false
    namespace: ""   # defaults to .Release.Namespace
  configMapNamespace: ""   # defaults to .Release.Namespace
    configMapNamespace: ""   # defaults to .Release.Namespace
    annotations: {}
  udp:
    configMapNamespace: ""   # defaults to .Release.Namespace
    annotations: {}
  maxmindLicenseKey: ""
  extraArgs: {}
  extraEnvs: []
  kind: DaemonSet
  annotations: {}
  labels: {}
  updateStrategy: {}
  minReadySeconds: 0
  affinity: {}
  nodeSelector:
    ingress: "true"
    kubernetes.io/os: linux
  livenessProbe:
    httpGet:
      path: "/healthz"
      port: 10254
      scheme: HTTP
    initialDelaySeconds: 10
    periodSeconds: 10
    successThreshold: 1
    failureThreshold: 5
  readinessProbe:
    httpGet:
      path: "/healthz"
      port: 10254
      scheme: HTTP
    initialDelaySeconds: 10
    periodSeconds: 10
    successThreshold: 1
    failureThreshold: 3
  healthCheckPath: "/healthz"
  podAnnotations: {}
  replicaCount: 1
  minAvailable: 1
  resources:
    requests:
      cpu: 100m
      memory: 90Mi
  autoscaling:
    enabled: false
    minReplicas: 1
    maxReplicas: 11
    behavior: {}
  autoscalingTemplate: []
  keda:
    apiVersion: "keda.sh/v1alpha1"
    enabled: false
    minReplicas: 1
    maxReplicas: 11
    pollingInterval: 30
    cooldownPeriod: 300
    restoreToOriginalReplicaCount: false
    scaledObject:
      annotations: {}
    behavior: {}
  enableMimalloc: true
  customTemplate:
    configMapName: ""
    configMapKey: ""
  service:
    enabled: false
    annotations: {}
    labels: {}
    externalIPs: []
    loadBalancerSourceRanges: []
    enableHttp: true
    enableHttps: true
    ports:
      http: 80
      https: 443
      http: http
      https: https
    nodePorts:
      http: ""
      https: ""
      udp: {}
    internal:
      enabled: false
      annotations: {}
      loadBalancerSourceRanges: []
  extraContainers: []
  extraVolumeMounts: []
  extraVolumes: []
  extraInitContainers: []
  admissionWebhooks:
    annotations: {}
    enabled: true
    failurePolicy: Fail
    port: 8443
    certificate: "/usr/local/certificates/cert"
    key: "/usr/local/certificates/key"
    namespaceSelector: {}
    objectSelector: {}
    existingPsp: ""
    service:
      annotations: {}
      externalIPs: []
      loadBalancerSourceRanges: []
      servicePort: 443
    createSecretJob:
      resources: {}
    patchWebhookJob:
      resources: {}
    patch:
      enabled: true
      image:
        registry: docker.io
        image: jettech/kube-webhook-certgen
        pullPolicy: IfNotPresent
      priorityClassName: ""
      podAnnotations: {}
      nodeSelector:
        kubernetes.io/os: linux
      runAsUser: 2000
  metrics:
    port: 10254
    enabled: false
    service:
      annotations: {}
      externalIPs: []
      loadBalancerSourceRanges: []
      servicePort: 10254
    serviceMonitor:
      enabled: false
      additionalLabels: {}
      namespace: ""
      namespaceSelector: {}
      scrapeInterval: 30s
      metricRelabelings: []
    prometheusRule:
      enabled: false
      additionalLabels: {}
      rules: []
  lifecycle:
    preStop:
      exec:
        command:
          - /wait-shutdown
  priorityClassName: ""
revisionHistoryLimit: 10
defaultBackend:
  enabled: true
  name: defaultbackend
  image:
    registry: k8s.gcr.io
    image: defaultbackend-amd64
    pullPolicy: IfNotPresent
    runAsUser: 65534
    runAsNonRoot: true
    readOnlyRootFilesystem: true
    allowPrivilegeEscalation: false
  existingPsp: ""
  extraArgs: {}
  serviceAccount:
    create: true
    name: ""
    automountServiceAccountToken: true
  extraEnvs: []
  port: 8080
  livenessProbe:
    failureThreshold: 3
    initialDelaySeconds: 30
    periodSeconds: 10
    successThreshold: 1
  readinessProbe:
    failureThreshold: 6
    initialDelaySeconds: 0
    periodSeconds: 5
    successThreshold: 1
  affinity: {}
  podSecurityContext: {}
  podLabels: {}
  nodeSelector:
    kubernetes.io/os: linux
  podAnnotations: {}
  replicaCount: 1
  minAvailable: 1
  resources: {}
  extraVolumeMounts: []
  extraVolumes: []
  autoscaling:
    annotations: {}
    enabled: false
    minReplicas: 1
    maxReplicas: 2
  service:
    annotations: {}
    externalIPs: []
    loadBalancerSourceRanges: []
    servicePort: 80
  priorityClassName: ""
rbac:
  create: true
  scope: false
podSecurityPolicy:
  enabled: false
serviceAccount:
  create: true
  name: ""
  automountServiceAccountToken: true
imagePullSecrets: []
udp: {}
dhParam:
 

然后使用如下命令安装 ingress-nginx 应用到 ingress-nginx 的命名空间中:

kubectl create ns ingress-nginx
kubectl label nodes nodeNmae ingress=true
helm -n ingress-nginx install ingress-nginx ./
 

镜像请提前下载好,并传到指定 node 上

部署完成后查看 Pod 的运行状态:

# kubectl get svc -n ingress-nginx
NAME                                 TYPE        CLUSTER-IP     EXTERNAL-IP   PORT(S)   AGE
ingress-nginx-controller-admission   ClusterIP   10.70.81.243   <none>        443/TCP   3h14m
ingress-nginx-defaultbackend         ClusterIP   10.70.81.196   <none>        80/TCP    3h14m
# kubectl get pods -n ingress-nginx
NAME                                            READY   STATUS    RESTARTS   AGE
ingress-nginx-controller-9q4gr                  1/1     Running   0          3h6m
ingress-nginx-controller-gvk4z                  1/1     Running   0          3h6m
ingress-nginx-defaultbackend-7b65f5957c-vbg9l   1/1     Running   0          3h15m
# POD_NAME=$(kubectl get pods -l app.kubernetes.io/name=ingress-nginx -n ingress-nginx -o jsonpath='{.items[0].metadata.name}')
 # kubectl exec -it $POD_NAME -n ingress-nginx -- /nginx-ingress-controller --version
-------------------------------------------------------------------------------
NGINX Ingress controller
  Release:       v0.50.0
  Build:         34a35a24cfef17aa1392b7fb2280f323b253c6b2
  Repository:    https://github.com/kubernetes/ingress-nginx
  nginx version: nginx/1.19.9

-------------------------------------------------------------------------------
 

当看到上面的信息证明 ingress-nginx 部署成功了。

Ingress-demo

安装成功后,现在我们来为一个 nginx 应用创建一个 Ingress 资源,如下所示:

apiVersion: apps/v1
kind: Deployment
metadata:
  name: my-nginx
spec:
  selector:
    matchLabels:
      app: my-nginx
  template:
    metadata:
      labels:
        app: my-nginx
    spec:
      containers:
      - name: my-nginx
        image: nginx
        ports:
        - containerPort: 80
---
apiVersion: v1
kind: Service
metadata:
  name: my-nginx
  labels:
    app: my-nginx
spec:
  ports:
  - port: 80
    protocol: TCP
    name: http
  selector:
    app: my-nginx
---
apiVersion: extensions/v1beta1
kind: Ingress
metadata:
  name: my-nginx
  annotations:
    kubernetes.io/ingress.class: "nginx"
spec:
  rules:
  - host: test.bbc.com  # 将域名映射到 my-nginx 服务
    http:
      paths:
      - path: /
        backend:
          serviceName: my-nginx  # 将所有请求发送到 my-nginx 服务的 80 端口
          servicePort: 80     # 不过需要注意大部分Ingress controller都不是直接转发到Service
                            # 而是只是通过Service来获取后端的Endpoints列表,直接转发到Pod,这样可以减少网络跳转,提高性能
 

直接创建上面的资源对象:

# kubectl apply -f ngdemo.yaml
deployment.apps "my-nginx" created
service "my-nginx" created
ingress.extensions "my-nginx" created
 

注意我们在 Ingress 资源对象中添加了一个 annotations:kubernetes.io/ingress.class: "nginx",这就是指定让这个 Ingress 通过 nginx-ingress 来处理。

上面资源创建成功后,然后我们可以将域名 test.bbc.com  解析到 ingress-nginx 所在的边缘节点中的任意一个,当然也可以在本地/etc/hosts中添加对应的映射也可以,然后就可以通过域名进行访问了。

下图显示了客户端是如果通过 Ingress Controller 连接到其中一个 Pod 的流程,客户端首先对 test.bbc.com 执行 DNS 解析,得到 Ingress Controller 所在节点的 IP,然后客户端向 Ingress Controller 发送 HTTP 请求,然后根据 Ingress 对象里面的描述匹配域名,找到对应的 Service 对象,并获取关联的 Endpoints 列表,将客户端的请求转发给其中一个 Pod。

Todo: 把 helm charts 归档到git,保存 commit 记录即可,不要每次都一个个手动改参数

posted @ 2024-07-09 13:56  david_cloud  阅读(48)  评论(0编辑  收藏  举报