Linux centosVMware 自动化运维Ansible介绍、Ansible安装、远程执行命令、拷贝文件或者目录、远程执行脚本、管理任务计划、安装rpm包/管理服务、 playbook的使用、 playbook中的循环、 playbook中的条件判断、 playbook中的handlers、playbook实战-nginx安装、管理配置文件
一、Ansible介绍
不需要安装客户端,通过sshd去通信
基于模块工作,模块可以由任何语言开发
不仅支持命令行使用模块,也支持编写yaml格式的playbook,易于编写和阅读
安装十分简单,centos上可直接yum安装
有提供UI(浏览器图形化)www.ansible.com/tower,收费的
官方文档 http://docs.ansible.com/ansible/latest/index.html
ansible已经被redhat公司收购,它在github上是一个非常受欢迎的开源软件,github地址https://github.com/ansible/ansible
一本不错的入门电子书 https://ansible-book.gitbooks.io/ansible-first-book/
二、Ansible安装
准备两台机器,前面我们做实验的两台机器davery01 davery02
只需要在davery01上安装ansible
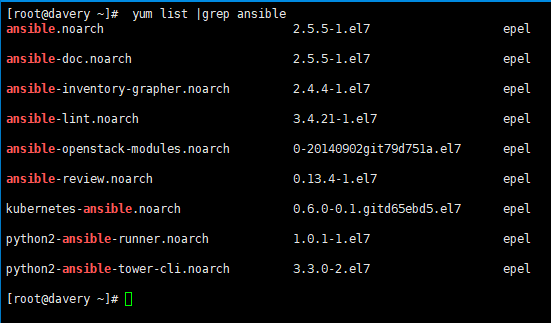
yum list |grep ansible 可以看到自带源里就有2.4版本的ansible
[root@davery01 ~]# yum install -y ansible-doc

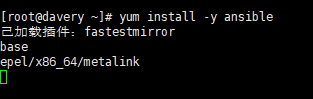
yum install -y ansible

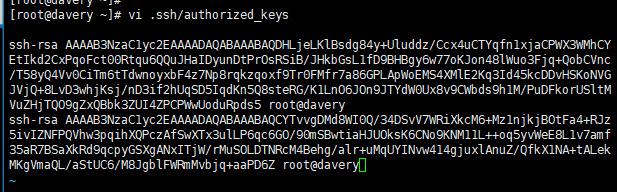
davery01上生成密钥对 ssh-keygen -t rsa
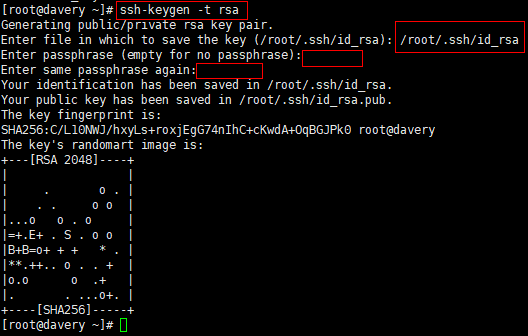
[root@davery01 ~]# cat /root/.ssh/id_rsa.pub
ssh-rsa
AAAAB3NzaC1yc2EAAAADAQABAAABAQCYTvvgDMd8WI0Q/34DSvV7WRiXkcM6+Mz1njkjBOtFa4+RJz5ivIZNFPQVhw3pqihXQPczAfSwXTx3ulLP6qc6GO/90mSBwtiaHJUOksK6CNo9KNM11L++oq5yvWeE8L1v7amf35aR7BSaXkRd9qcpyGSXgANxITjW/rMuSOLDTNRcM4Behg/alr+uMqUYINvw414gjuxlAnuZ/QfkX1NA+tALekMKgVmaQL/aStUC6/M8JgblFWRmMvbjq+aaPD6Z root@davery
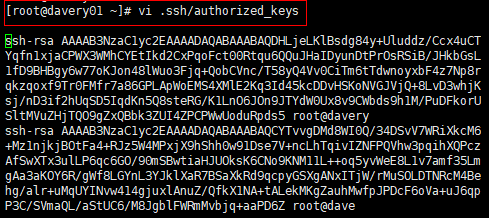
把公钥放到davery02上,设置密钥认证
[root@davery02 ~]# vi .ssh/authorized_keys
[root@davery02 ~]#
测试是否能用公钥登陆
ssh davery02

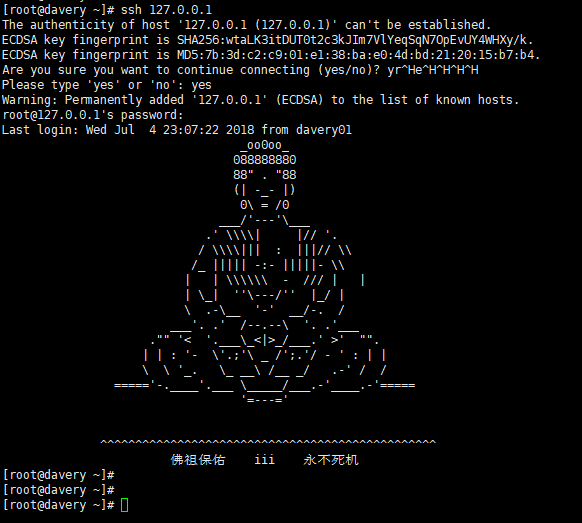
davery主机同样需要认证
[root@davery01 ~]# vi .ssh/authorized_keys
登陆
ssh 127.0.0.1
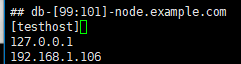
vi /etc/ansible/hosts //增加 为了配置主机组
[testhost]
192.168.1.107
192.168.1.106
说明: testhost为主机组名字,自定义的。 下面两个ip为组内的机器ip。
三、Ansible远程执行命令
ansible testhost -m command -a 'w'
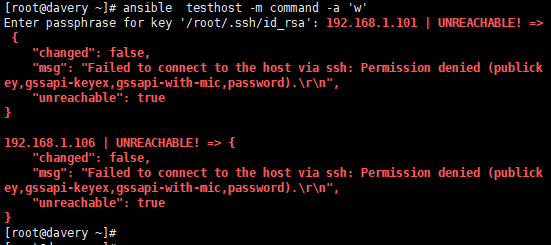
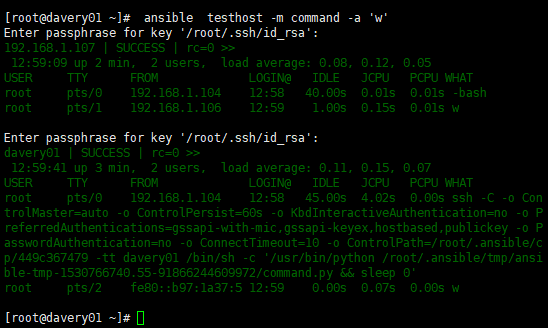
这样就可以批量执行命令了。这里的testhost 为主机组名,-m后边是模块名字,-a后面是命令。当然我们也可以直接写一个ip,针对某一台机器来执行命令。
ansible 127.0.0.1 -m command -a 'hostname'

错误: "msg": "Aborting, target uses selinux but python bindings (libselinux-python) aren't installed!"
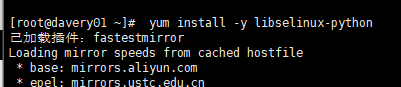
解决: yum install -y libselinux-python
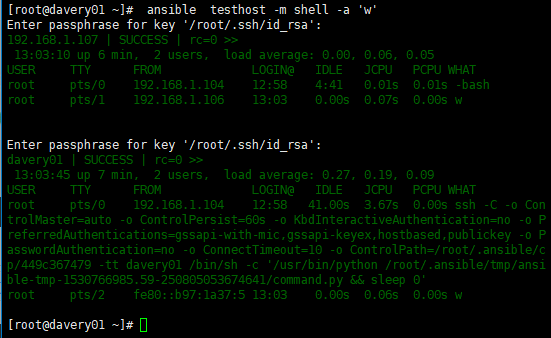
还有一个模块就是shell同样也可以实现
ansible testhost -m shell -a 'w'
四、Ansible拷贝文件或者目录
ansible davery01 -m copy -a "src=/etc/ansible dest=/tmp/ansibletest owner=root group=root mode=0755"
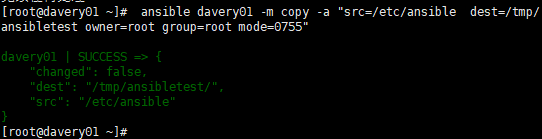
注意:源目录会放到目标目录下面去,如果目标指定的目录不存在,它会自动创建。如果拷贝的是文件,dest指定的名字和源如果不同,并且它不是已经存在的目录,相当于拷贝过去后又重命名。但相反,如果desc是目标机器上已经存在的目录,则会直接把文件拷贝到该目录下面。
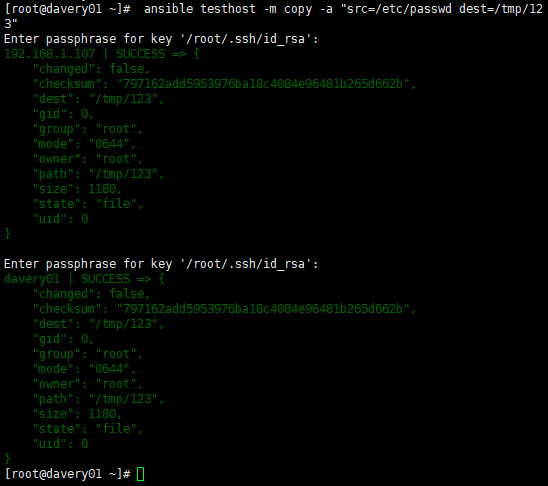
ansible testhost -m copy -a "src=/etc/passwd dest=/tmp/123"
这里的/tmp/123和源机器上的/etc/passwd是一致的,但如果目标机器上已经有/tmp/123目录,则会再/tmp/123目录下面建立passwd文件
五、Ansible远程执行脚本
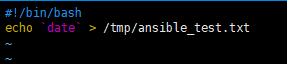
首先创建一个shell脚本
vim /tmp/test.sh //加入内容
#!/bin/bash
echo `date` > /tmp/ansible_test.txt
然后把该脚本分发到各个机器上
src 源 dest目标
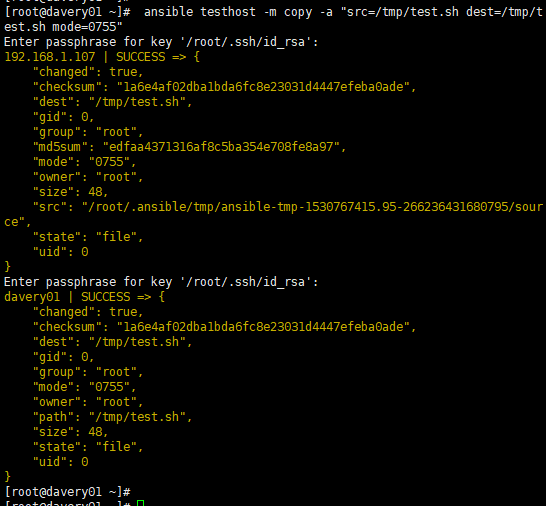
ansible testhost -m copy -a "src=/tmp/test.sh dest=/tmp/test.sh mode=0755"
最后是批量执行该shell脚本
ansible testhost -m shell -a "/tmp/test.sh"
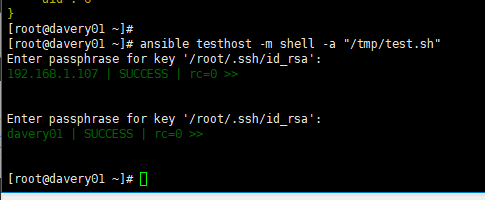
执行脚本后就会把当前date输入到/tmp/ansible_test.txt,执行脚本过程会自动创建目录文件
cat /tmp/ansible_test.txt

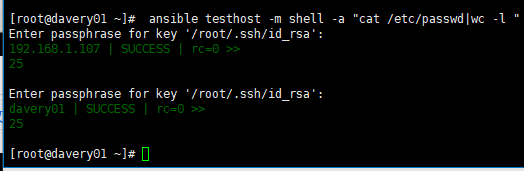
shell模块,还支持远程执行命令并且带管道
ansible testhost -m shell -a "cat /etc/passwd|wc -l "
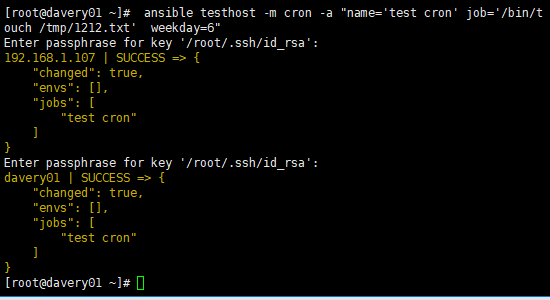
六、Ansible管理任务计划
ansible testhost -m cron -a "name='test cron' job='/bin/touch /tmp/1212.txt' weekday=6"
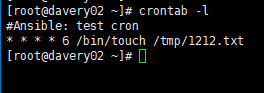
crontab -l
若要删除该cron 只需要加一个字段 state=absent
ansible testhost -m cron -a "name='test cron' state=absent"
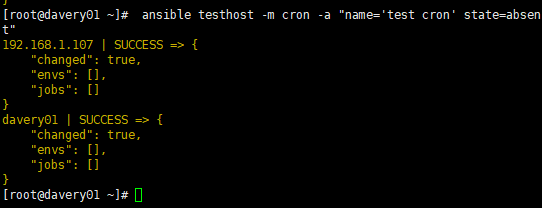
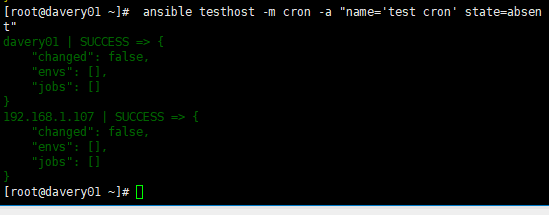
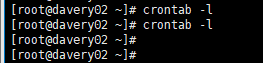
执行如下命令,就会发现任务没有了
[root@davery02 ~]# crontab -l
[root@davery02 ~]#
不能随便手动更改
其他的时间表示:分钟 minute 小时 hour 日期 day 月份 month
七、Ansible安装rpm包/管理服务
ansible testhost -m yum -a "name=httpd"
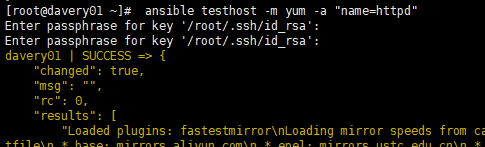
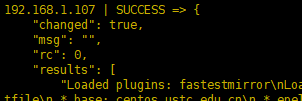
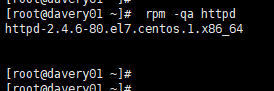
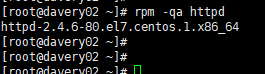
[root@davery02 ~]# rpm -qa httpd 产看是否安装成功
在name后面还可以加上state=installed/removed就会卸载了
启动
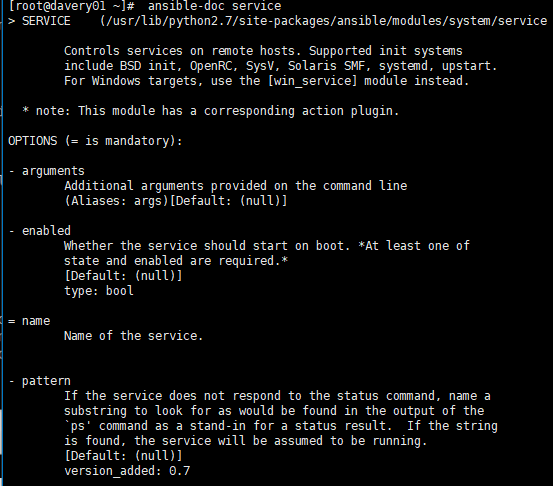
ansible testhost -m service -a "name=httpd state=started enabled=yes"
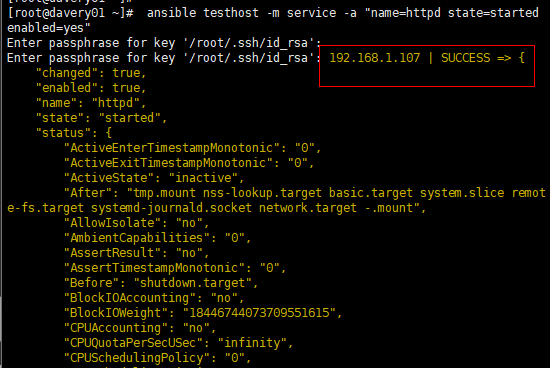
查看是否启动
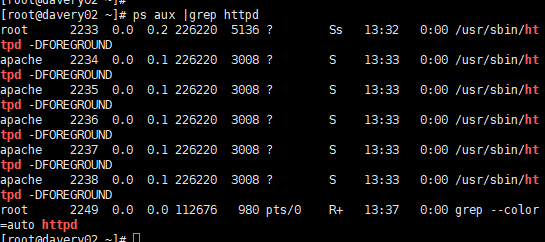
[root@davery02 ~]# ps aux |grep httpd
查看监听端口
[root@davery02 ~]# netstat -lntp |grep httpd

这里的name是centos系统里的服务名,可以通过chkconfig --list查到。
Ansible文档的使用
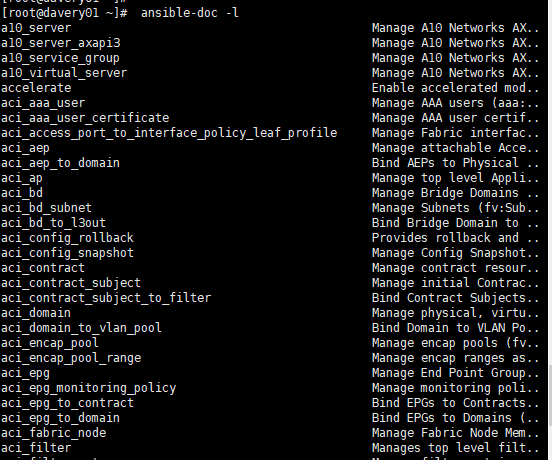
ansible-doc -l 列出所有的模块
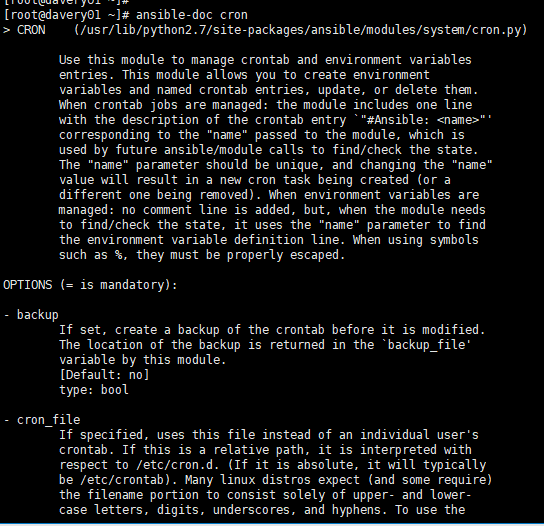
ansible-doc cron 查看指定模块的文档
八、Ansible playbook的使用
相当于把模块写入到配置文件里面,例:
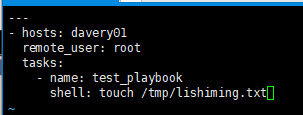
vi /etc/ansible/test.yml //加入如下内容
---
- hosts: davery01
remote_user: root
tasks:
- name: test_playbook
shell: touch /tmp/lishiming.txt
cat !$
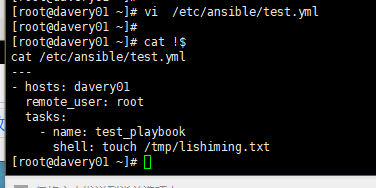
[root@davery01 ~]# cat !$
cat /etc/ansible/test.yml
---
- hosts: davery01
remote_user: root
tasks:
- name: test_playbook
shell: touch /tmp/lishiming.txt
[root@davery01 ~]#
说明: 第一行需要有三个杠,hosts参数指定了对哪些主机进行参作,如果是多台机器可以用逗号作为分隔,也可以使用主机组,
在/etc/ansible/hosts里定义;

user参数指定了使用什么用户登录远程主机操作;
tasks指定了一个任务,其下面的name参数同样是对任务的描述,在执行过程中会打印出来,shell是ansible模块名字
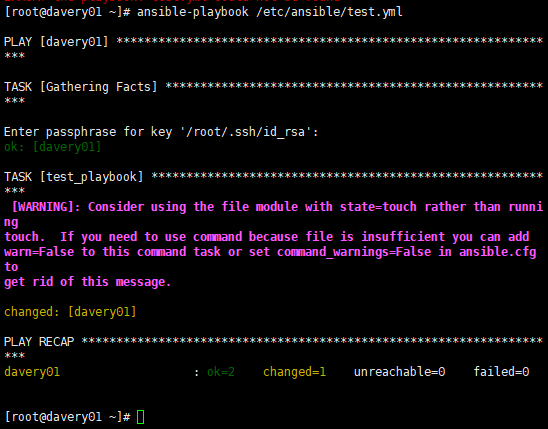
执行: ansible-playbook /etc/ansible/test.yml
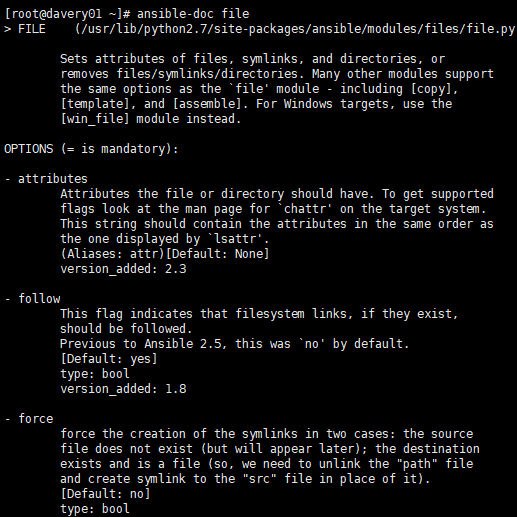
ansible-doc file
[root@davery01 ~]# ls -l /tmp/lishiming.txt

再来一个创建用户的例子:
vi /etc/ansible/create_user.yml //加入如下内容
---
- name: create_user
hosts: davery01
user: root
gather_facts: false
vars:
- user: "test"
tasks:
- name: create user
user: name="{{ user }}"
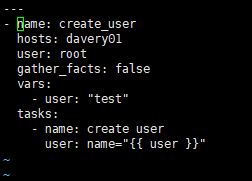
说明:name参数对该playbook实现的功能做一个概述,后面执行过程中,会打印 name变量的值 ,可以省略;
gather_facts参数指定了在以下任务部分执行前,是否先执行setup模块获取主机相关信息,这在后面的task会使用到setup获取的信息时用到;
vars参数,指定了变量,这里指字一个user变量,其值为test ,需要注意的是,变量值一定要用引号引住;
user提定了调用user模块,name是user模块里的一个参数,而增加的用户名字调用了上面user变量的值。
ansible-playbook /etc/ansible/create_user.yml
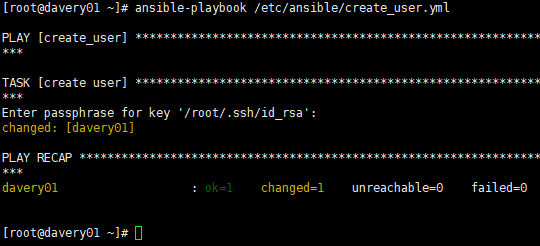
id test

九、Ansible playbook中的循环
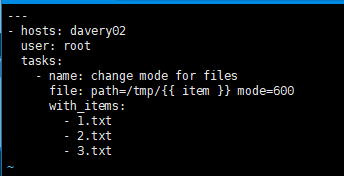
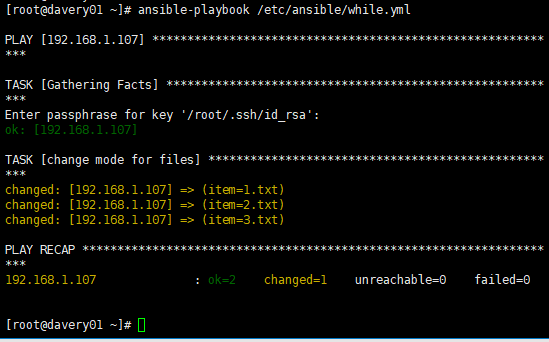
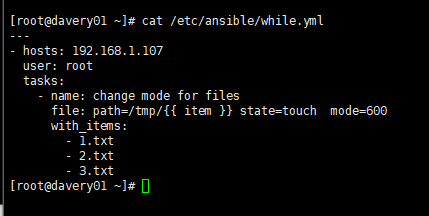
vi /etc/ansible/while.yml //加入如下内容
---
- hosts: davery02
user: root
tasks:
- name: change mode for files
file: path=/tmp/{{ item }} mode=600
with_items:
- 1.txt
- 2.txt
- 3.txt
说明: with_items为循环的对象
执行 ansible-playbook /etc/ansible/while.yml
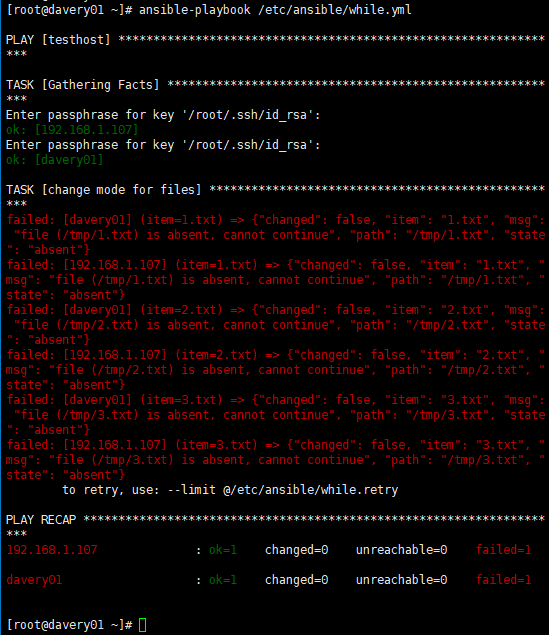
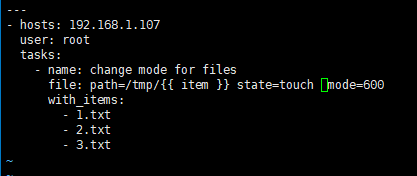
改脚本如下state=touch
再次执行就会出现如下结果
[root@davery01 ~]# ansible-playbook /etc/ansible/while.yml
十、Ansible playbook中的条件判断
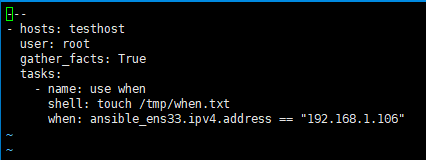
vi /etc/ansible/when.yml //加入如下内容
---
- hosts: testhost
user: root
gather_facts: True
tasks:
- name: use when
shell: touch /tmp/when.txt
when: ansible_ens33.ipv4.address == "192.168.1.106"
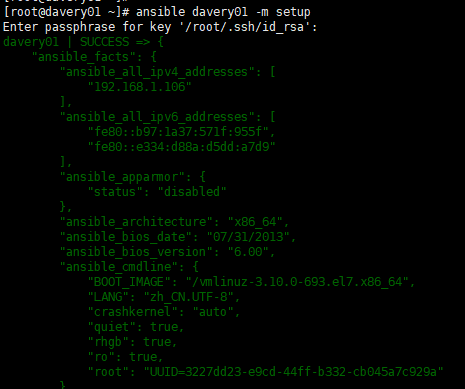
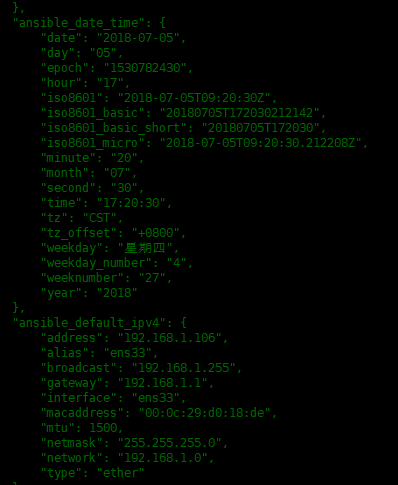
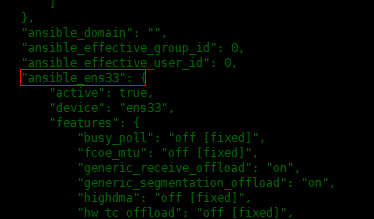
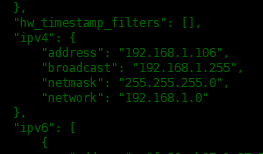
说明:ansible davery01 -m setup 可以查看到所有的facter信息
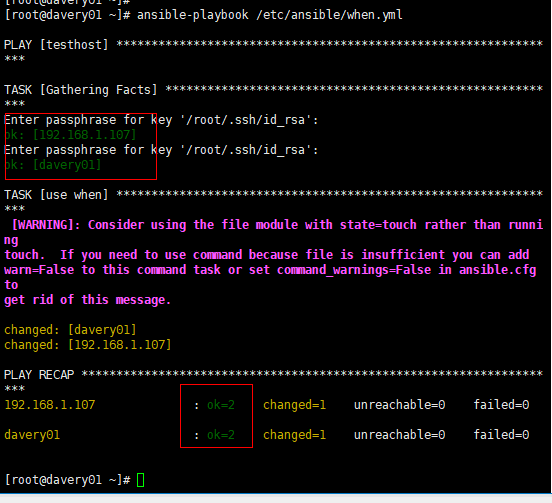
[root@davery01 ~]# ansible-playbook /etc/ansible/when.yml 107机器脚本没有定义就不会有输出
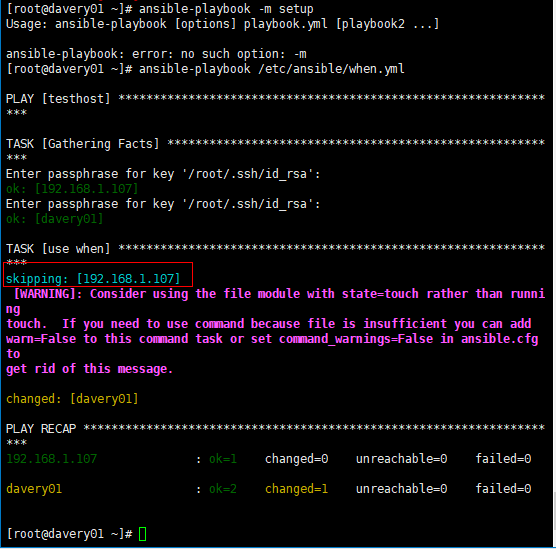
把脚本when条件注释掉,所有机器就会输出了
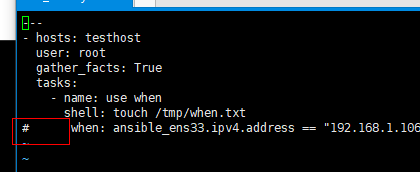
[root@davery01 ~]# ansible-playbook /etc/ansible/when.yml
十一、Ansible playbook中的handlers,类似于shell中的&&,适用于更新配置文件
执行task之后,服务器发生变化之后要执行的一些操作,比如我们修改了配置文件后,需要重启一下服务
vi /etc/ansible/handlers.yml//加入如下内容
---
- name: handlers test
hosts: testhost
user: root
tasks:
- name: copy file
copy: src=/etc/passwd dest=/tmp/aaa.txt
notify: test handlers
handlers:
- name: test handlers
shell: echo "111111" >> /tmp/aaa.txt
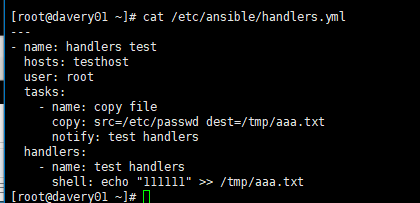
说明,只有copy模块真正执行后,才会去调用下面的handlers相关的操作。也就是说如果1.txt和2.txt内容是一样的,并不会去执行handlers里面的shell相关命令。 这种比较适合配置文件发生更改后,重启服务的操作。
[root@davery01 ~]#
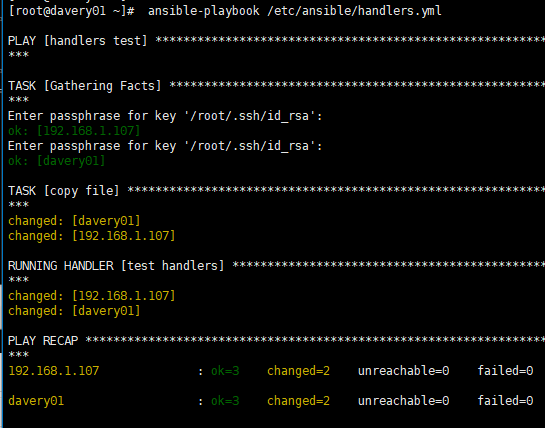
[root@davery01 ~]# ansible-playbook /etc/ansible/handlers.yml
[root@davery01 ~]# cat /etc/ansible/handlers.yml
---
- name: handlers test
hosts: testhost
user: root
tasks:
- name: copy file
copy: src=/etc/passwd dest=/tmp/aaa.txt
notify: test handlers
handlers:
- name: test handlers
shell: echo "111111" >> /tmp/aaa.txt
[root@davery01 ~]#
[root@davery01 ~]# ls -l /tmp/*.txt
-rw-r--r-- 1 root root 1279 7月 5 17:36 /tmp/aaa.txt
-rw-r--r-- 1 root root 43 7月 5 13:12 /tmp/ansible_test.txt
-rw-r--r-- 1 root root 0 7月 5 13:55 /tmp/lishiming.txt
-rw-r--r-- 1 root root 0 7月 5 17:31 /tmp/when.txt
[root@davery01 ~]#
[root@davery01 ~]# tail /tmp/aaa.txt
chrony:x:998:996::/var/lib/chrony:/sbin/nologin
davery:x:1000:1000::/home/davery:/bin/bash
rpc:x:32:32:Rpcbind Daemon:/var/lib/rpcbind:/sbin/nologin
rpcuser:x:29:29:RPC Service User:/var/lib/nfs:/sbin/nologin
nfsnobody:x:65534:65534:Anonymous NFS User:/var/lib/nfs:/sbin/nologin
mysql:x:1001:1001::/home/mysql:/bin/bash
nginx:x:997:995:Nginx web server:/var/lib/nginx:/sbin/nologin
apache:x:48:48:Apache:/usr/share/httpd:/sbin/nologin
test:x:1002:1002::/home/test:/bin/bash
111111
[root@davery01 ~]#
十二、playbook实战-nginx安装
自己定义安装,统一配置好了再分配到下边机器,不同与yum安装
思路:先在一台机器上编译安装好nginx、打包,然后再用ansible去下发
cd /etc/ansible 进入ansible配置文件目录
mkdir nginx_install 创建一个nginx_install的目录,方便管理
cd nginx_install
mkdir -p roles/{common,install}/{handlers,files,meta,tasks,templates,vars}
[root@davery01 ~]# cd /etc/ansible/
[root@davery01 ansible]#
[root@davery01 ansible]#
[root@davery01 ansible]# ls
ansible.cfg handlers.yml roles when.yml while.yml
create_user.yml hosts test.yml while.retry
[root@davery01 ansible]#
[root@davery01 ansible]# mkdir nginx_install
[root@davery01 ansible]#
[root@davery01 ansible]# cd nginx_install/
[root@davery01 nginx_install]#
[root@davery01 nginx_install]# mkdir -p roles/{common,install}/{handlers,files,meta,tasks,templates,vars}
[root@davery01 nginx_install]#
[root@davery01 nginx_install]# ls roles/
common install
[root@davery01 nginx_install]#
[root@davery01 nginx_install]# ls roles/install
files handlers meta tasks templates vars
[root@davery01 nginx_install]#

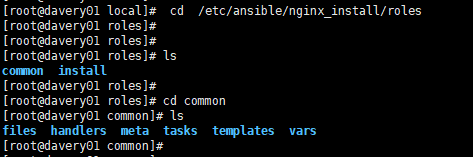
说明:roles目录下有两个角色,common为一些准备操作,install为安装nginx的操作。
每个角色下面又有几个目录,handlers下面是当发生改变时要执行的操作,通常用在配置文件发生改变,重启服务
files为安装时用到的一些文件,meta为说明信息,说明角色依赖等信息,tasks里面是核心的配置文件,templates通常存一些配置文件,启动脚本等模板文件,vars下为定义的变量
需要事先准备好安装用到的文件,具体如下:
在一台机器上事先编译安装好nginx,配置好启动脚本,配置好配置文件
源码包下载( wget http://nginx.org/download/nginx-1.12.1.tar.gz)
vim /etc/init.d/nginx
配置nginx启动脚本(https://coding.net/u/aminglinux/p/aminglinux-book/git/blob/master/D15Z/etc_init.d_nginx)
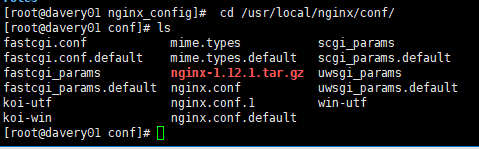
vim /usr/local/nginx/conf/
编辑配置文件脚本(https://coding.net/u/aminglinux/p/aminglinux-book/git/blob/master/D15Z/nginx.conf)
具体安装过程见LNMP架构搭建过程
安装好后程如下
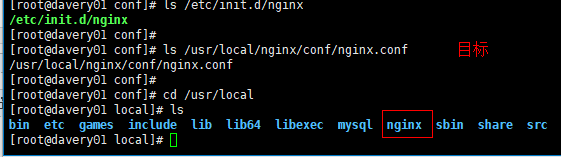
ls /usr/local/nginx

[root@davery01 conf]# ls /etc/init.d/nginx 启动脚本
/etc/init.d/nginx
[root@davery01 conf]#
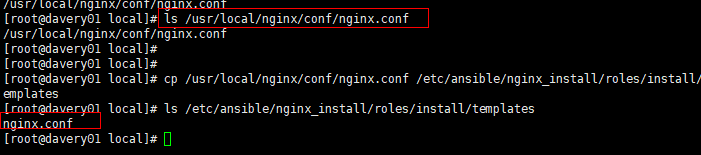
[root@davery01 conf]# ls /usr/local/nginx/conf/nginx.conf 配置文件
/usr/local/nginx/conf/nginx.conf
[root@davery01 conf]#
我们需要把nginx目录打包,并放到/etc/ansible/nginx_install/roles/install/files/下面,名字为nginx.tar.gz
[root@davery01 local]# tar -czvf nginx.tar.gz --exclude "nginx.conf" nginx/ 打包过滤掉ndinx.conf
nginx/
nginx/sbin/
nginx/sbin/nginx
nginx/conf/
nginx/conf/koi-win
nginx/conf/koi-utf
nginx/conf/win-utf
nginx/conf/mime.types
nginx/conf/mime.types.default
nginx/conf/fastcgi_params
nginx/conf/fastcgi_params.default
nginx/conf/fastcgi.conf
nginx/conf/fastcgi.conf.default
nginx/conf/uwsgi_params
nginx/conf/uwsgi_params.default
nginx/conf/scgi_params
nginx/conf/scgi_params.default
nginx/conf/nginx.conf.default
nginx/conf/nginx.conf.1
nginx/conf/nginx-1.12.1.tar.gz
nginx/logs/
nginx/logs/error.log
nginx/logs/nginx.pid
nginx/logs/nginx_error.log
nginx/logs/access.log
nginx/html/
nginx/html/50x.html
nginx/html/index.html
nginx/client_body_temp/
nginx/proxy_temp/
nginx/fastcgi_temp/
nginx/uwsgi_temp/
nginx/scgi_temp/
[root@davery01 local]#
[root@davery01 local]# ls
bin etc games include lib lib64 libexec mysql nginx nginx.tar.gz sbin share src
[root@davery01 local]#

把打包的nginx移动到刚才创建的目录 /etc/ansible/nginx_install/roles/install/files/下边
[root@davery01 local]# mv nginx.tar.gz /etc/ansible/nginx_install/roles/install/files/ 移动到该目录下
[root@davery01 local]# ls /etc/ansible/nginx_install/roles/install/files/
nginx.tar.gz
[root@davery01 local]#

nginx启动脚本、配置文件都要放到/etc/ansible/nginx_install/roles/install/templates下面
配置文件移动
[root@davery01 local]# cp /usr/local/nginx/conf/nginx.conf /etc/ansible/nginx_install/roles/install/templates
[root@davery01 local]#
[root@davery01 local]# ls /etc/ansible/nginx_install/roles/install/templates
nginx.conf
[root@davery01 local]#
启动脚本移动
[root@davery01 local]# cp /etc/init.d/nginx /etc/ansible/nginx_install/roles/install/templates 把启动脚本放到该目录下
[root@davery01 local]# ls /etc/ansible/nginx_install/roles/install/templates
nginx nginx.conf 配置文件和启动文件
[root@davery01 local]# 
进入到刚才创建的目录,定义common,安装nginx需要的依赖包
cd /etc/ansible/nginx_install/roles
[root@davery01 local]# cd /etc/ansible/nginx_install/roles
[root@davery01 roles]# ls
common install
[root@davery01 roles]#
[root@davery01 roles]# cd common
[root@davery01 common]# ls
files handlers meta tasks templates vars
[root@davery01 common]#
定义common的tasks,nginx是需要一些依赖包的
更改权限
[root@davery01 common]# chmod 777 -R /etc/ansible/nginx_install/roles/

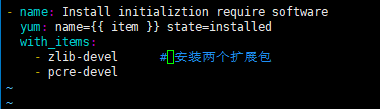
vim ./common/tasks/main.yml //内容如下
- name: Install initializtion require software
yum: name={{ item }} state=installed
with_items:
- zlib-devel 安装两个扩展包
- pcre-devel
定义变量
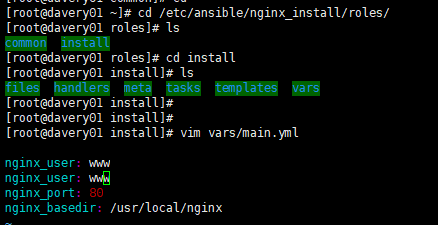
vim /etc/ansible/nginx_install/roles/install/vars/main.yml //内容如下
nginx_user: www
nginx_port: 80
nginx_basedir: /usr/local/nginx
首先要把所有用到的文档拷贝到目标机器
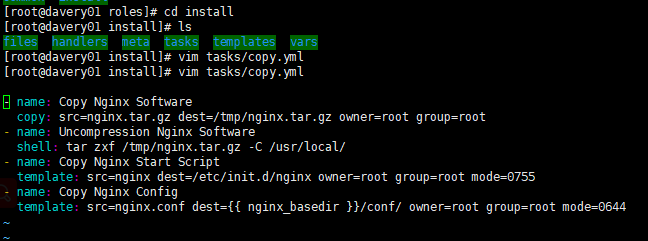
vim /etc/ansible/nginx_install/roles/install/tasks/copy.yml //内容如下
- name: Copy Nginx Software
copy: src=nginx.tar.gz dest=/tmp/nginx.tar.gz owner=root group=root
- name: Uncompression Nginx Software
shell: tar zxf /tmp/nginx.tar.gz -C /usr/local/
- name: Copy Nginx Start Script
template: src=nginx dest=/etc/init.d/nginx owner=root group=root mode=0755 这些它都会自动去寻找
- name: Copy Nginx Config
template: src=nginx.conf dest={{ nginx_basedir }}/conf/ owner=root group=root mode=0644
接下来会建立用户,启动服务,删除压缩包
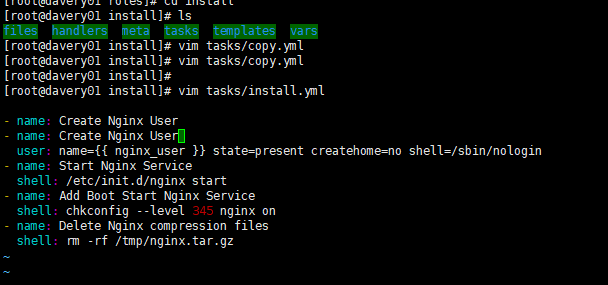
vim /etc/ansible/nginx_install/roles/install/tasks/install.yml //内容如下
- name: Create Nginx User
user: name={{ nginx_user }} state=present createhome=no shell=/sbin/nologin #nginx_user变量在vars有定义
- name: Start Nginx Service
shell: /etc/init.d/nginx start
- name: Add Boot Start Nginx Service
shell: chkconfig --level 345 nginx on
- name: Delete Nginx compression files
shell: rm -rf /tmp/nginx.tar.gz
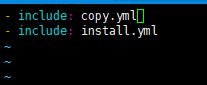
再创建main.yml并且把copy和install调用
vim /etc/ansible/nginx_install/roles/install/tasks/main.yml //内容如下
- include: copy.yml
- include: install.yml
到此两个roles:common和install就定义完成了,接下来要定义一个入口配置文件
[root@davery01 install]# ls tasks
copy.yml install.yml main.yml
[root@davery01 install]#
[root@davery01 install]# ls vars
main.yml
[root@davery01 install]#
[root@davery01 install]# ls templates
nginx nginx.conf
//内容如下,接下来要定义一个入口配置文件
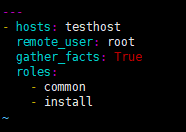
vim /etc/ansible/nginx_install/install.yml
---
- hosts: testhost
remote_user: root
gather_facts: True
roles:
- common
- install

最后一步执行:
ansible-playbook /etc/ansible/nginx_install/install.yml
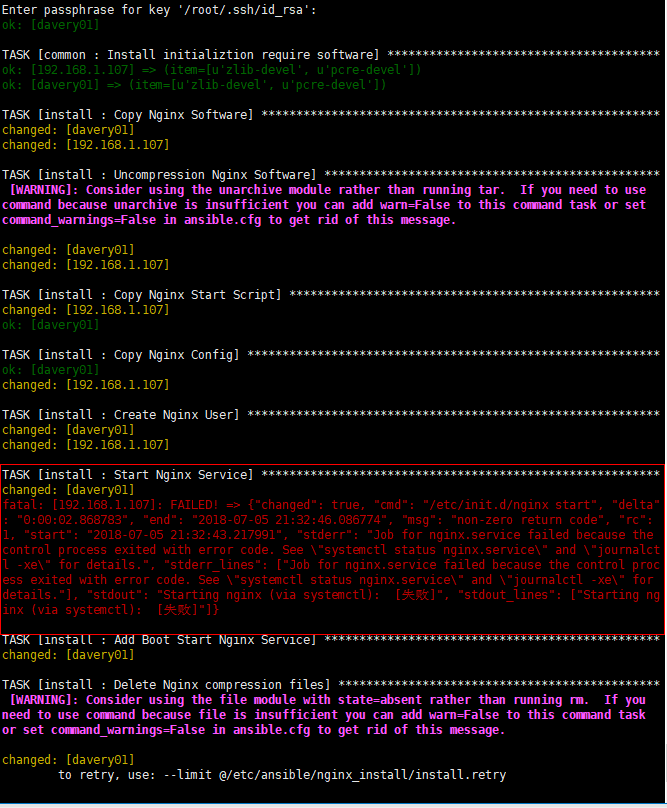
报错是因为davery01 httpd监听了80端口
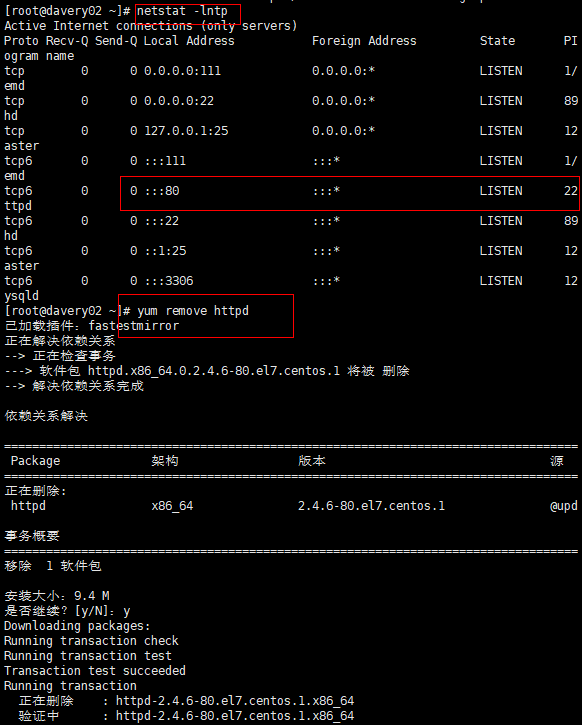
yum remove httpd就可以再次执行
ansible-playbook /etc/ansible/nginx_install/install.yml
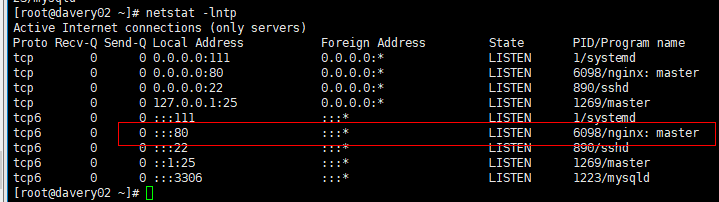
netstat -lntp 就看到80端口不在监听了
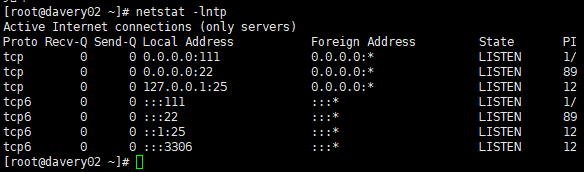
ansible-playbook /etc/ansible/nginx_install/install.yml
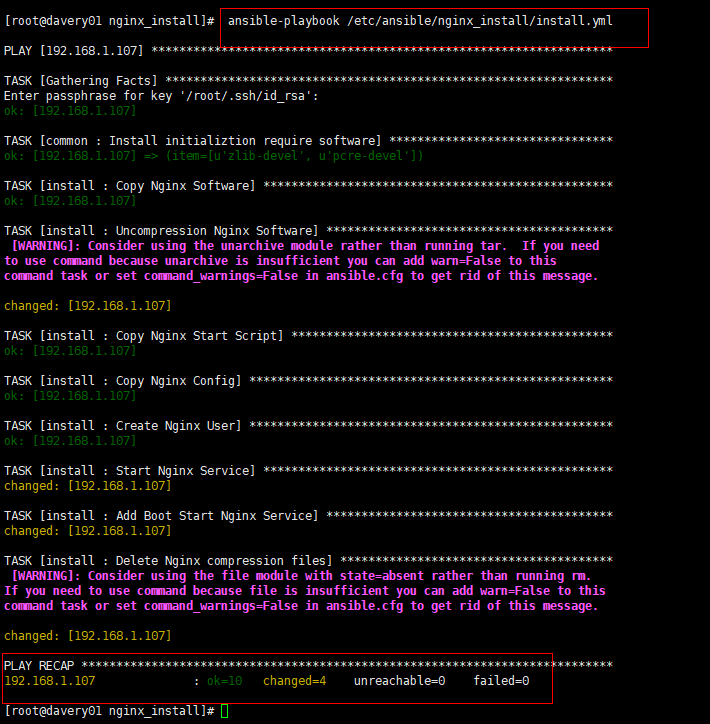
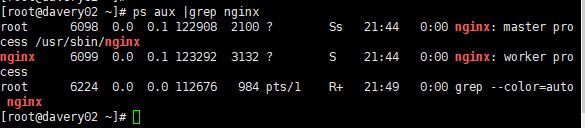
ps aux |grep nginx
netstat -lntp
十三、管理配置文件
生产环境中大多时候是需要管理配置文件的,安装软件包只是在初始化环境的时候用一下。下面我们来写个管理nginx配置文件的playbook
mkdir -p /etc/ansible/nginx_config/roles/{new,old}/{files,handlers,vars,tasks} 创建后需要更改权限777
[root@davery01 ~]# chmod 777 /etc/ansible/nginx_config/roles/{new,old}/{files,handlers,vars,tasks}
[root@davery01 roles]# cd new
[root@davery01 new]# ls
files handlers tasks vars
[root@davery01 new]# cd ..
[root@davery01 roles]# ls
new old
[root@davery01 roles]# chmod 777 new
[root@davery01 roles]# chmod 777 old

其中new为更新时用到的,old为回滚时用到的,files下面为nginx.conf和vhosts目录,handlers为重启nginx服务的命令
关于回滚,需要在执行playbook之前先备份一下旧的配置,所以对于老配置文件的管理一定要严格,千万不能随便去修改线上机器的配置,并且要保证new/files下面的配置和线上的配置一致
先把nginx.conf和vhost目录放到files目录下面
cd /usr/local/nginx/conf/
cp -r nginx.conf vhost /etc/ansible/nginx_config/roles/new/files/
vim /etc/ansible/nginx_config/roles/new/vars/main.yml //定义变量
nginx_basedir: /usr/local/nginx

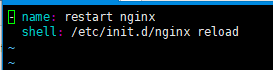
vim /etc/ansible/nginx_config/roles/new/handlers/main.yml //定义重新加载nginx服务
- name: restart nginx
shell: /etc/init.d/nginx reload
vim /etc/ansible/nginx_config/roles/new/tasks/main.yml //这是核心的任务
- name: copy conf file
copy: src={{ item.src }} dest={{ nginx_basedir }}/{{ item.dest }} backup=yes owner=root group=root mode=0644
with_items:
- { src: nginx.conf, dest: conf/nginx.conf }
- { src: vhosts, dest: conf/ }
notify: restart nginx

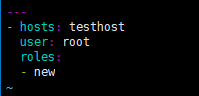
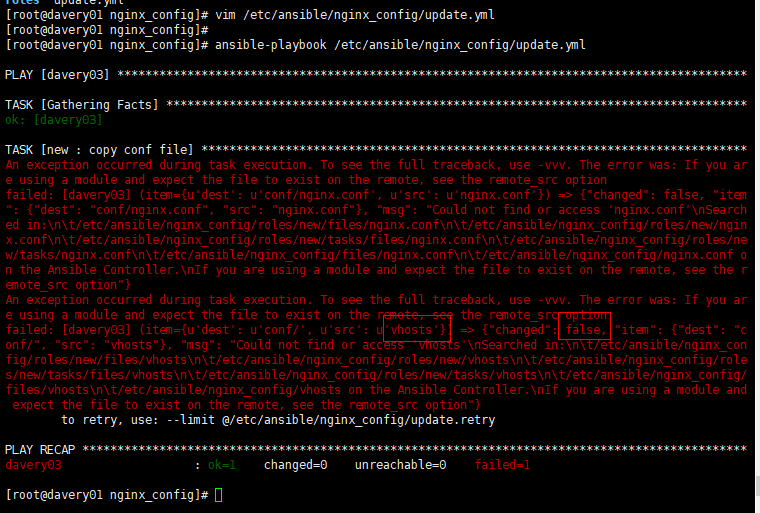
vim /etc/ansible/nginx_config/update.yml // 最后是定义总入口配置
---
- hosts: davery03
user: root
roles:
- new
执行:
ansible-playbook /etc/ansible/nginx_config/update.yml

而回滚的backup.yml对应的roles为old
rsync -av /etc/ansible/nginx_config/roles/new/ /etc/ansible/nginx_config/roles/old/
回滚操作就是把旧的配置覆盖,然后重新加载nginx服务, 每次改动nginx配置文件之前先备份到old里,对应目录为/etc/ansible/nginx_config/roles/old/files
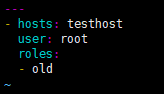
vim /etc/ansible/nginx_config/rollback.yml // 最后是定义总入口配置
---
- hosts: testhost
user: root
roles:
- old
ansible-playbook /etc/ansible/nginx_config/rollback.yml

 浙公网安备 33010602011771号