AndroidStudio中AlertDialog的四种用法(转载)
出处:https://blog.csdn.net/qq_42183184/article/details/82534389
在此对原作者表示感谢!由于不喜欢csdn。故转载到此。
目录
1.默认样式
2.单选弹出框
3.多选弹出框
4.自定义弹出框
补充!!
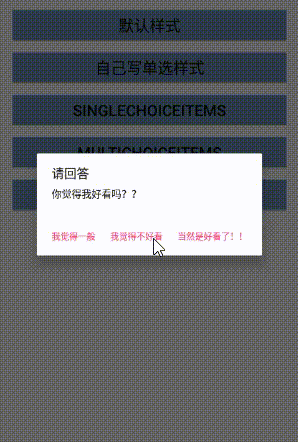
1.默认样式
android.support.v7.app.AlertDialog.Builder builder = new android.support.v7.app.AlertDialog.Builder(AlertDialogActivity.this);
builder.setTitle("请回答");
builder.setMessage("你觉得我好看吗??");
builder.setPositiveButton("当然是好看了!!", new DialogInterface.OnClickListener() {
@Override
public void onClick(DialogInterface dialog, int which) {
Toast.makeText(AlertDialogActivity.this, "嘻嘻嘻",Toast.LENGTH_SHORT).show();
}
});
builder.setNeutralButton("我觉得一般", new DialogInterface.OnClickListener() {
@Override
public void onClick(DialogInterface dialog, int which) {
Toast.makeText(AlertDialogActivity.this,"那你再瞅瞅~",Toast.LENGTH_SHORT).show();
}
});
builder.setNegativeButton("我觉得不好看", new DialogInterface.OnClickListener() {
@Override
public void onClick(DialogInterface dialog, int which) {
Toast.makeText(AlertDialogActivity.this,"嘤嘤嘤",Toast.LENGTH_SHORT).show();
}
});
builder.show();
2.单选弹出框
final String[] gender = new String[]{"帅哥","美女"};
android.support.v7.app.AlertDialog.Builder builder1=new android.support.v7.app.AlertDialog.Builder(AlertDialogActivity.this);
builder1.setTitle("请选择你的性别");
builder1.setItems(gender, new DialogInterface.OnClickListener() {
@Override
public void onClick(DialogInterface dialog, int which) {
ToastUtil.showMsg(AlertDialogActivity.this,gender[which]);
}
});
builder1.show();
android.support.v7.app.AlertDialog.Builder builder2=new android.support.v7.app.AlertDialog.Builder(AlertDialogActivity.this);
builder2.setTitle("你最喜欢吃一下那种菜肴:");
final String[] dish =new String[]{"红烧牛肉","粉蒸排骨","油焖大虾","蒜蓉扇贝"};
builder2.setSingleChoiceItems(dish, 1, new DialogInterface.OnClickListener() {
@Override
public void onClick(DialogInterface dialog, int which) {
ToastUtil.showMsg(AlertDialogActivity.this,dish[which]);
dialog.dismiss();
}
});
builder2.setCancelable(false);
builder2.show();
break;
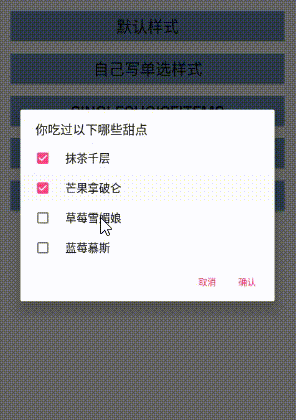
3.多选弹出框
String[] dessert = new String[]{"抹茶千层","芒果拿破仑","草莓雪媚娘","蓝莓慕斯"};
boolean[] begin = new boolean[]{false,false,false,false};
android.support.v7.app.AlertDialog.Builder builder3=new android.support.v7.app.AlertDialog.Builder(AlertDialogActivity.this);
builder3.setTitle("你吃过以下哪些甜点");
builder3.setMultiChoiceItems(dessert, begin, new DialogInterface.OnMultiChoiceClickListener() {
@Override
public void onClick(DialogInterface dialog, int which, boolean isChecked) {
}
});
builder3.setPositiveButton("确认", new DialogInterface.OnClickListener() {
@Override
public void onClick(DialogInterface dialog, int which) {
ToastUtil.showMsg(AlertDialogActivity.this,"好的,我知道啦!");
}
});
builder3.setNegativeButton("取消", new DialogInterface.OnClickListener() {
@Override
public void onClick(DialogInterface dialog, int which) {
ToastUtil.showMsg(AlertDialogActivity.this,"难道你都没有吃过??");
}
});
builder3.show();
break;

4.自定义弹出框
自定义Dialog的xml样式
<?xml version="1.0" encoding="utf-8"?>
<LinearLayout
xmlns:android="http://schemas.android.com/apk/res/android"
android:layout_width="match_parent"
android:layout_height="match_parent"
android:background="#fff"
android:orientation="vertical">
<TextView
android:id="@+id/tv_title"
android:layout_width="match_parent"
android:layout_height="wrap_content"
android:gravity="center"
android:text="提示"
android:textSize="20sp"
android:textColor="#000"
android:textStyle="bold"
android:layout_marginTop="20dp"
/>
<TextView
android:id="@+id/tv_message"
android:layout_width="match_parent"
android:layout_height="wrap_content"
android:gravity="center"
android:text="确定要删除订单吗?"
android:textSize="20sp"
android:textColor="#000"
android:layout_marginTop="20dp"
/>
<View
android:layout_width="match_parent"
android:layout_height="0.5dp"
android:layout_marginTop="20dp"
android:background="#414E5E"
/>
<LinearLayout
android:layout_width="match_parent"
android:layout_height="wrap_content">
<Button
android:id="@+id/bt_cancel"
android:layout_width="0dp"
android:layout_weight="1"
android:text="取消"
android:background="@drawable/bt_dialog"
android:textColor="#14BFB1"
android:textSize="20sp"
android:layout_height="wrap_content" />
<View
android:layout_width="0.5dp"
android:background="#414E5E"
android:layout_height="match_parent" />
<Button
android:id="@+id/bt_confirm"
android:layout_width="0dp"
android:layout_weight="1"
android:text="确认"
android:background="@drawable/bt_dialog"
android:textColor="#14BFB1"
android:textSize="20sp"
android:layout_height="wrap_content" />
</LinearLayout>
</LinearLayout>
自定义Dialog组件,CustomDialog.java
public class CustomDialog extends Dialog implements View.OnClickListener {
//声明xml文件里的组件
private TextView tv_title,tv_message;
private Button bt_cancel,bt_confirm;
//声明xml文件中组件中的text变量,为string类,方便之后改
private String title,message;
private String cancel,confirm;
//声明两个点击事件,等会一定要为取消和确定这两个按钮也点击事件
private IOnCancelListener cancelListener;
private IOnConfirmListener confirmListener;
//设置四个组件的内容
public void setTitle(String title) {
this.title = title;
}
public void setMessage(String message) {
this.message = message;
}
public void setCancel(String cancel,IOnCancelListener cancelListener) {
this.cancel = cancel;
this.cancelListener=cancelListener;
}
public void setConfirm(String confirm,IOnConfirmListener confirmListener){
this.confirm=confirm;
this.confirmListener=confirmListener;
}
//CustomDialog类的构造方法
public CustomDialog(@NonNull Context context) {
super(context);
}
public CustomDialog(@NonNull Context context, int themeResId) {
super(context, themeResId);
}
//在app上以对象的形式把xml里面的东西呈现出来的方法!
@Override
protected void onCreate(Bundle savedInstanceState) {
super.onCreate(savedInstanceState);
//为了锁定app界面的东西是来自哪个xml文件
setContentView(R.layout.custom_dialog);
//设置弹窗的宽度
WindowManager m = getWindow().getWindowManager();
Display d = m.getDefaultDisplay();
WindowManager.LayoutParams p =getWindow().getAttributes();
Point size = new Point();
d.getSize(size);
p.width = (int)(size.x * 0.8);//是dialog的宽度为app界面的80%
getWindow().setAttributes(p);
//找到组件
tv_title=findViewById(R.id.tv_title);
tv_message=findViewById(R.id.tv_message);
bt_cancel=findViewById(R.id.bt_cancel);
bt_confirm=findViewById(R.id.bt_confirm);
//设置组件对象的text参数
if (!TextUtils.isEmpty(title)){
tv_title.setText(title);
}
if (!TextUtils.isEmpty(message)){
tv_message.setText(message);
}
if (!TextUtils.isEmpty(cancel)){
bt_cancel.setText(cancel);
}
//为两个按钮添加点击事件
bt_confirm.setOnClickListener(this);
bt_cancel.setOnClickListener(this);
}
//重写onClick方法
public void onClick(View view) {
switch (view.getId()){
case R.id.bt_cancel:
if(cancelListener!=null){
cancelListener.onCancel(this);
}
dismiss();
break;
case R.id.bt_confirm:
if(confirmListener!=null){
confirmListener.onConfirm(this);
}
dismiss();//按钮按之后会消失
break;
}
}
//写两个接口,当要创建一个CustomDialog对象的时候,必须要实现这两个接口
//也就是说,当要弹出一个自定义dialog的时候,取消和确定这两个按钮的点击事件,一定要重写!
public interface IOnCancelListener{
void onCancel(CustomDialog dialog);
}
public interface IOnConfirmListener{
void onConfirm(CustomDialog dialog);
}
}
使用自定义的弹出框组件
CustomDialog customDialog = new CustomDialog(CustomDialogActivity.this);
customDialog.setTitle("提醒");
customDialog.setMessage("你确定要删除吗?");
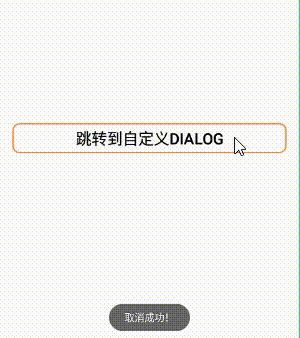
customDialog.setCancel("cancel", new CustomDialog.IOnCancelListener() {
@Override
public void onCancel(CustomDialog dialog) {
Toast.makeText(CustomDialogActivity.this, "取消成功!",Toast.LENGTH_SHORT).show();
}
});
customDialog.setConfirm("confirm", new CustomDialog.IOnConfirmListener(){
@Override
public void onConfirm(CustomDialog dialog) {
Toast.makeText(CustomDialogActivity.this, "确认成功!",Toast.LENGTH_SHORT).show();
}
});
customDialog.show();

以上代码中用到的ToastUtil类,是我自定义的一个类,目的是把Toast的使用稍微封装一下,偷一下懒。代码如下:
public class ToastUtil {
public static Toast toast;
public static void showMsg(Context context,String msg){
if(toast==null){
toast=Toast.makeText(context,msg,Toast.LENGTH_LONG);
}else{
toast.setText(msg);
}
toast.show();
}
}
"作者:" 数据酷软件工作室
"出处:" http://datacool.cnblogs.com
"专注于CMS(综合赋码系统),MES,WCS(智能仓储设备控制系统),WMS,商超,桑拿、餐饮、客房、足浴等行业收银系统的开发,15年+从业经验。因为专业,所以出色。"
+++++++++++++++++++++++++++++++++++++++++++++++++++++++++++++++


