Unity 简易聊天室(基于TCP)(2)
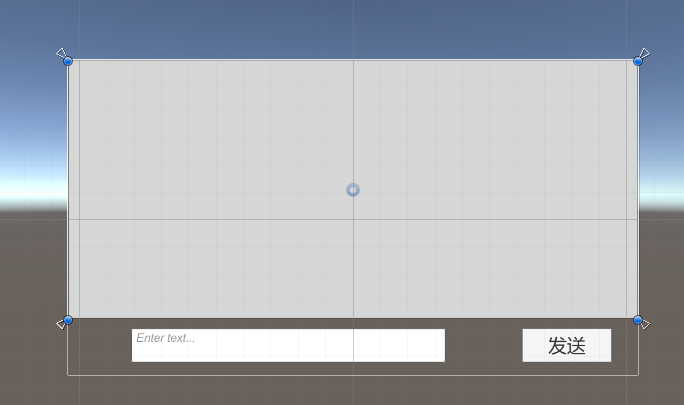
客户端用Unity开发,主要就是搭建一下聊天室的UI界面:输入框,聊天内容显示框,发送按钮


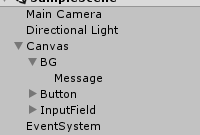
灰色背景的就是Message,也就是聊天内容的显示框,是一个Text类型,这里创建UI方面就不多讲了
在Canvas下挂一个ChatManager脚本
using System;
using UnityEngine;
using System.Net.Sockets;
using System.Net;
using UnityEngine.UI;
using System.Text;
public class ChatManager : MonoBehaviour {
private Socket clientSocket;
private Button btn;
private InputField inputField;
private Text showMessage;
private byte[] data = new byte[1024];
private string msg = "";
void Start()
{
//创建一个socket,绑定和服务器一样的ip和端口号,然后执行Connect就可以连接上服务器了(服务器已经运行)
clientSocket = new Socket(AddressFamily.InterNetwork, SocketType.Stream, ProtocolType.Tcp);
clientSocket.Connect(new IPEndPoint(IPAddress.Parse("127.0.0.1"), 6688));
btn = transform.Find("Button").GetComponent<Button>();
btn.onClick.AddListener(OnSendClick);
inputField = transform.Find("InputField").GetComponent<InputField>();
showMessage = transform.Find("BG/Message").GetComponent<Text>();
ClientStart();
}
void Update()
{
if(msg!=null && msg != "")
{
showMessage.text += msg+"\n";回调函数不能调用Unity的组件、UI;所以只能在Update里用,而不能直接在ReceiveCallBack(回调函数不属于Unity的主线程)
msg = "";
}
}
private void OnSendClick() //绑定到发送按钮的方法
{
if (inputField.text != "")
{
byte[] databytes = Encoding.UTF8.GetBytes(inputField.text);
clientSocket.Send(databytes);
inputField.text = "";
}
}
private void ClientStart() //开始接收从服务器发来的消息
{
clientSocket.BeginReceive(data, 0, 1024,SocketFlags.None, ReceiveCallBack, null);
}
private void ReceiveCallBack(IAsyncResult ar)
{
try
{
if (clientSocket.Connected == false)
{
clientSocket.Close();
return;
}
int len = clientSocket.EndReceive(ar);
string message = Encoding.UTF8.GetString(data, 0, len);
msg = message;
ClientStart(); //重复接收从服务器发来的信息
}
catch(Exception e)
{
Debug.Log("ReceiveCallBack:" + e);
}
}
void OnDestroy()
{
clientSocket.Close();
}
}


 浙公网安备 33010602011771号