服务器/网络/虚拟化/云平台自动化运维-ansible
个人博客地址
ansible与netconf的对比
首先明确一个概念,netconf是协议,ansible是python编写的工具
netconf
使用YANG建模,XML进行数据填充,使用netconf协议进行传输,主要用于控制器南向接口使用,各主流厂商有自定义的YANG模型,可在官网进行下载,不过一些国内厂商对YANG的支持性并不好
https://datatracker.ietf.org/doc/html/rfc6020,公共YANG模型的RFC文档,很有阅读必要
python中主要使用ncclient模块,可以参考之前的一篇文章https://www.cnblogs.com/darkchen/p/15248377.html
ansible
功能更为广泛,可以用于网络自动化,云基础架构自动化,虚拟化和容器自动化
日常用模块底层使用python的paramiko模块通过ssh协议进行数据传输,适配性较好,(当然也可以自定义netconf协议模块调用ansible提供的api进行批量操作)对于不同的网络设备系统可以适配不同的
模块用于提交、查询配置,一些国产设备没有对应的模块,需要自己编写,主要是一些正则的使用,匹配不同的提示符做不同的交互,可以参考华为或思科的进行编写
也有基于各软件厂商所提供的API的模块,如AWS的EC2,zabbix所提供的API等
ansible安装
- 使用apt/yum 安装
yum install epel-release&&ansible -y
- 使用pip安装
pip3 install ansible
两者的区别
使用apt/yum安装后只有一些基础的模块,如command、shell、copy、file、cron等操作linux系统的模块,其他设备厂商模块需要手动下载安装,华为的ansible 模块提供的下载链接更新在n年前,一堆bug不能使用
使用pip安装会有很多各家厂商自定义的模块,如AWS的EC2、S3,zabbix相关模块,cisco的nxos、ios,juniper的junos等,但是没有ansible的配置文件,主机清单等配置,需要自定义
所以为了节省时间,我们可以两者都进行安装-_-
配置文件
/etc/ansible/
├── ansible.cfg
├── hosts
└── roles
配置文件常见参数如下,默认全部注释掉,调用相应模块是会依次查找环境变量
    inventory = /etc/ansible/hosts        #这个参数表示资源清单inventory文件的位置
    library = /usr/share/ansible        #指向存放Ansible模块的目录,支持多个目录方式,只要用冒号(:)隔开就可以
    forks = 5        #并发连接数
    sudo_user = root        #设置默认执行命令的用户
    remote_port = 22        #指定连接被管节点的管理端口,默认为22端口,建议修改,能够更加安全
    host_key_checking = False        #设置是否检查SSH主机的密钥,值为True/False。关闭后第一次连接不会提示配置实例
    timeout = 60        #设置SSH连接的超时时间,单位为秒
    log_path = /var/log/ansible.log        #指定一个存储ansible日志的文件(默认不记录日志)
主机清单,可以定义单个主机也可以定义主机组,两者都可以分别定义变量供playbook使用,示例:
[rs]
10.0.3.105
[rs:vars]
ansible_connection=network_cli
ansible_network_os=ce
ansible_user=test
ansible_ssh_pass = 123456789!@a
[server]
12.5.21.8 ansible_ssh_user=ubuntu ansible_ssh_port=22
12.6.12.3
4.51.15.1
3.20.9.2
13.0.3.1 ansible_ssh_user=test
[server:vars]
ansible_ssh_user = root
ansible_ssh_port = 233
host_name = 1.1.1.1
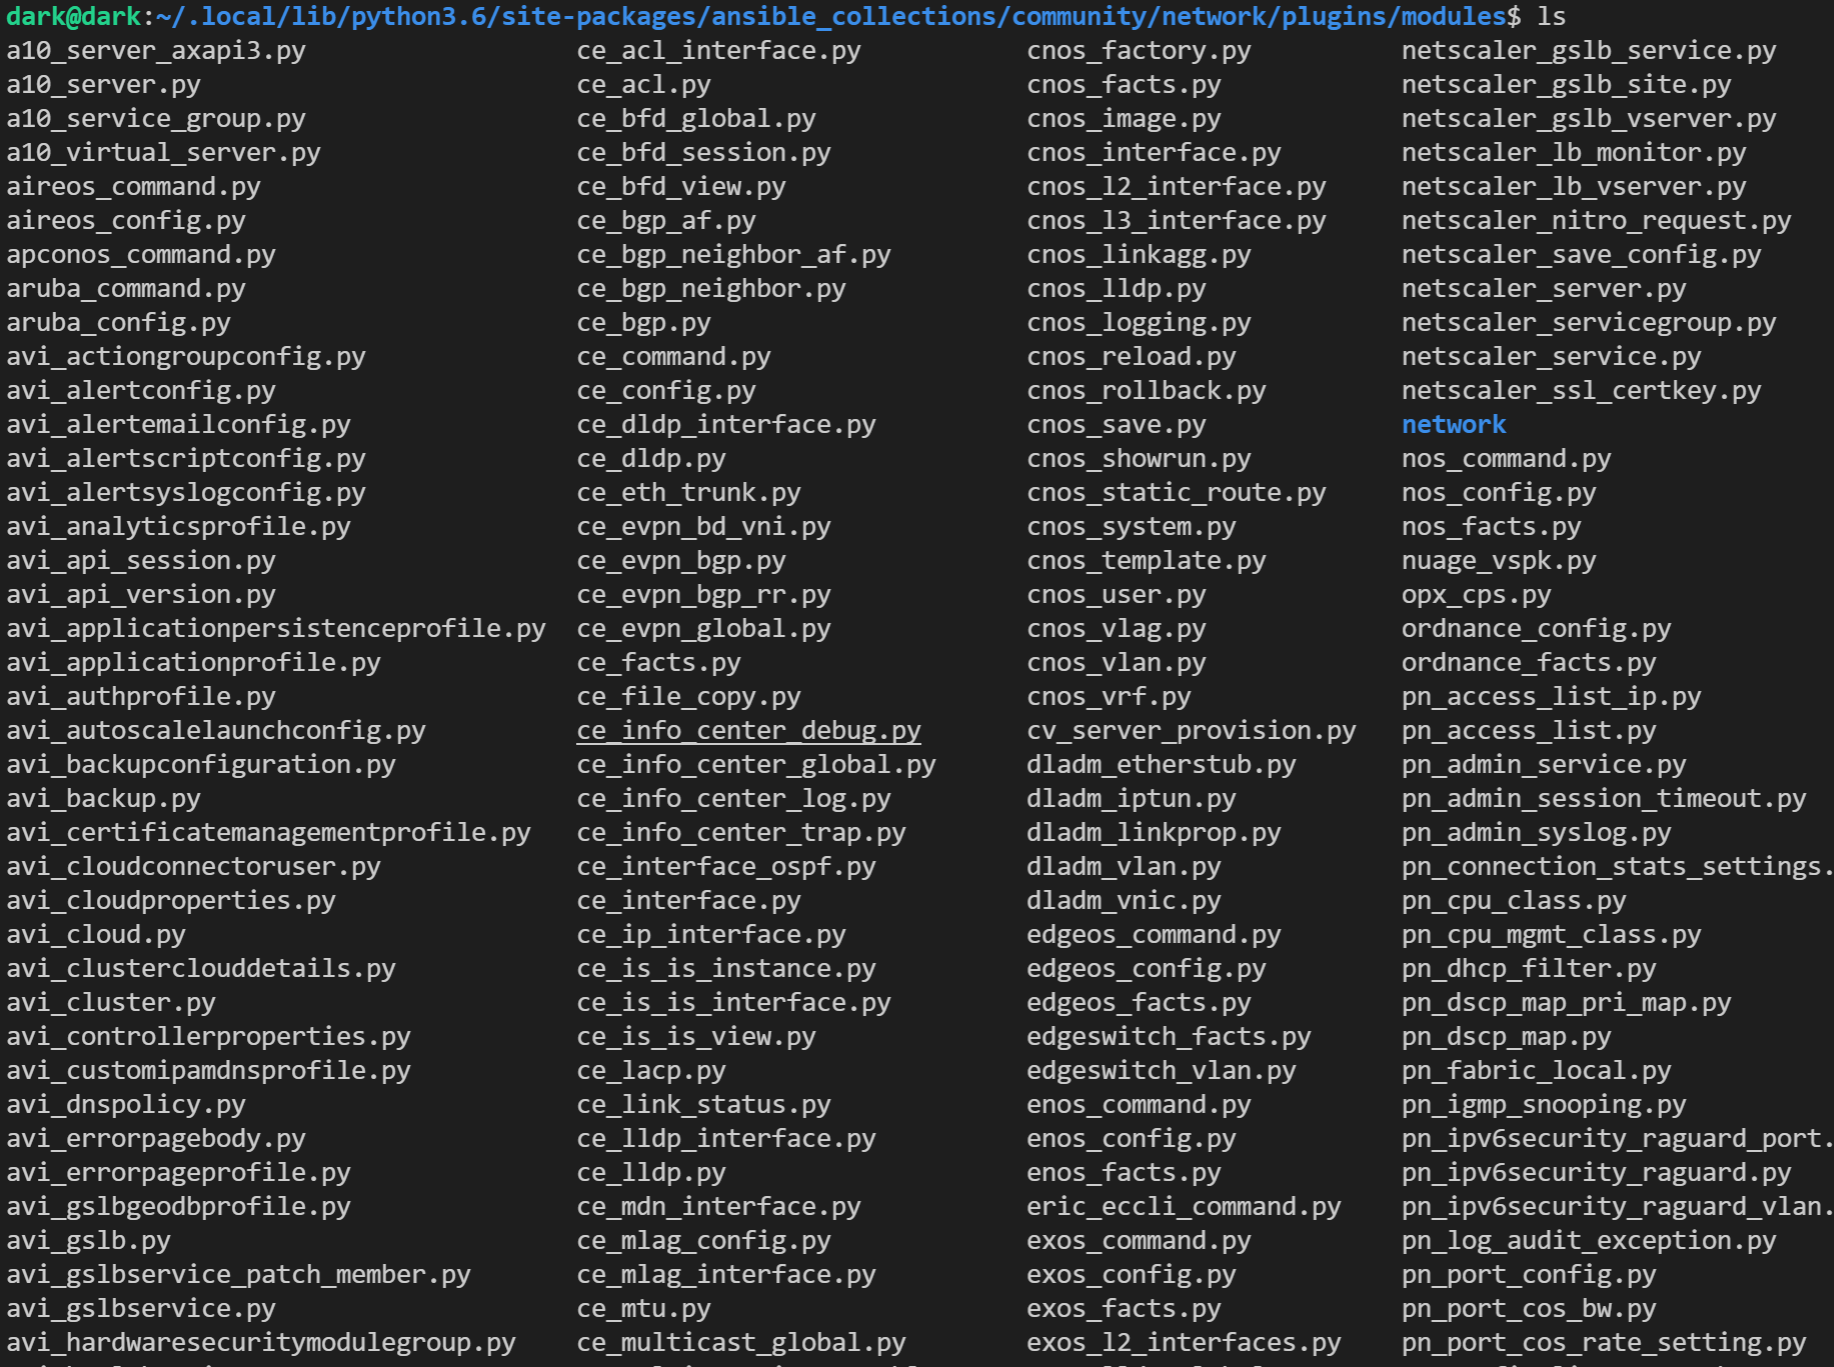
apt/yum安装方式,模块目录,只有以下模块,里面有个test.py是自定义的测试模块

pip安装方式,截取一小部分

可以使用ansible-doc -l 查看所有模块
如,查看华为相关模块,其中左侧一列是模块路径右侧一列是描述
ansible-doc -l | grep HUAWEI 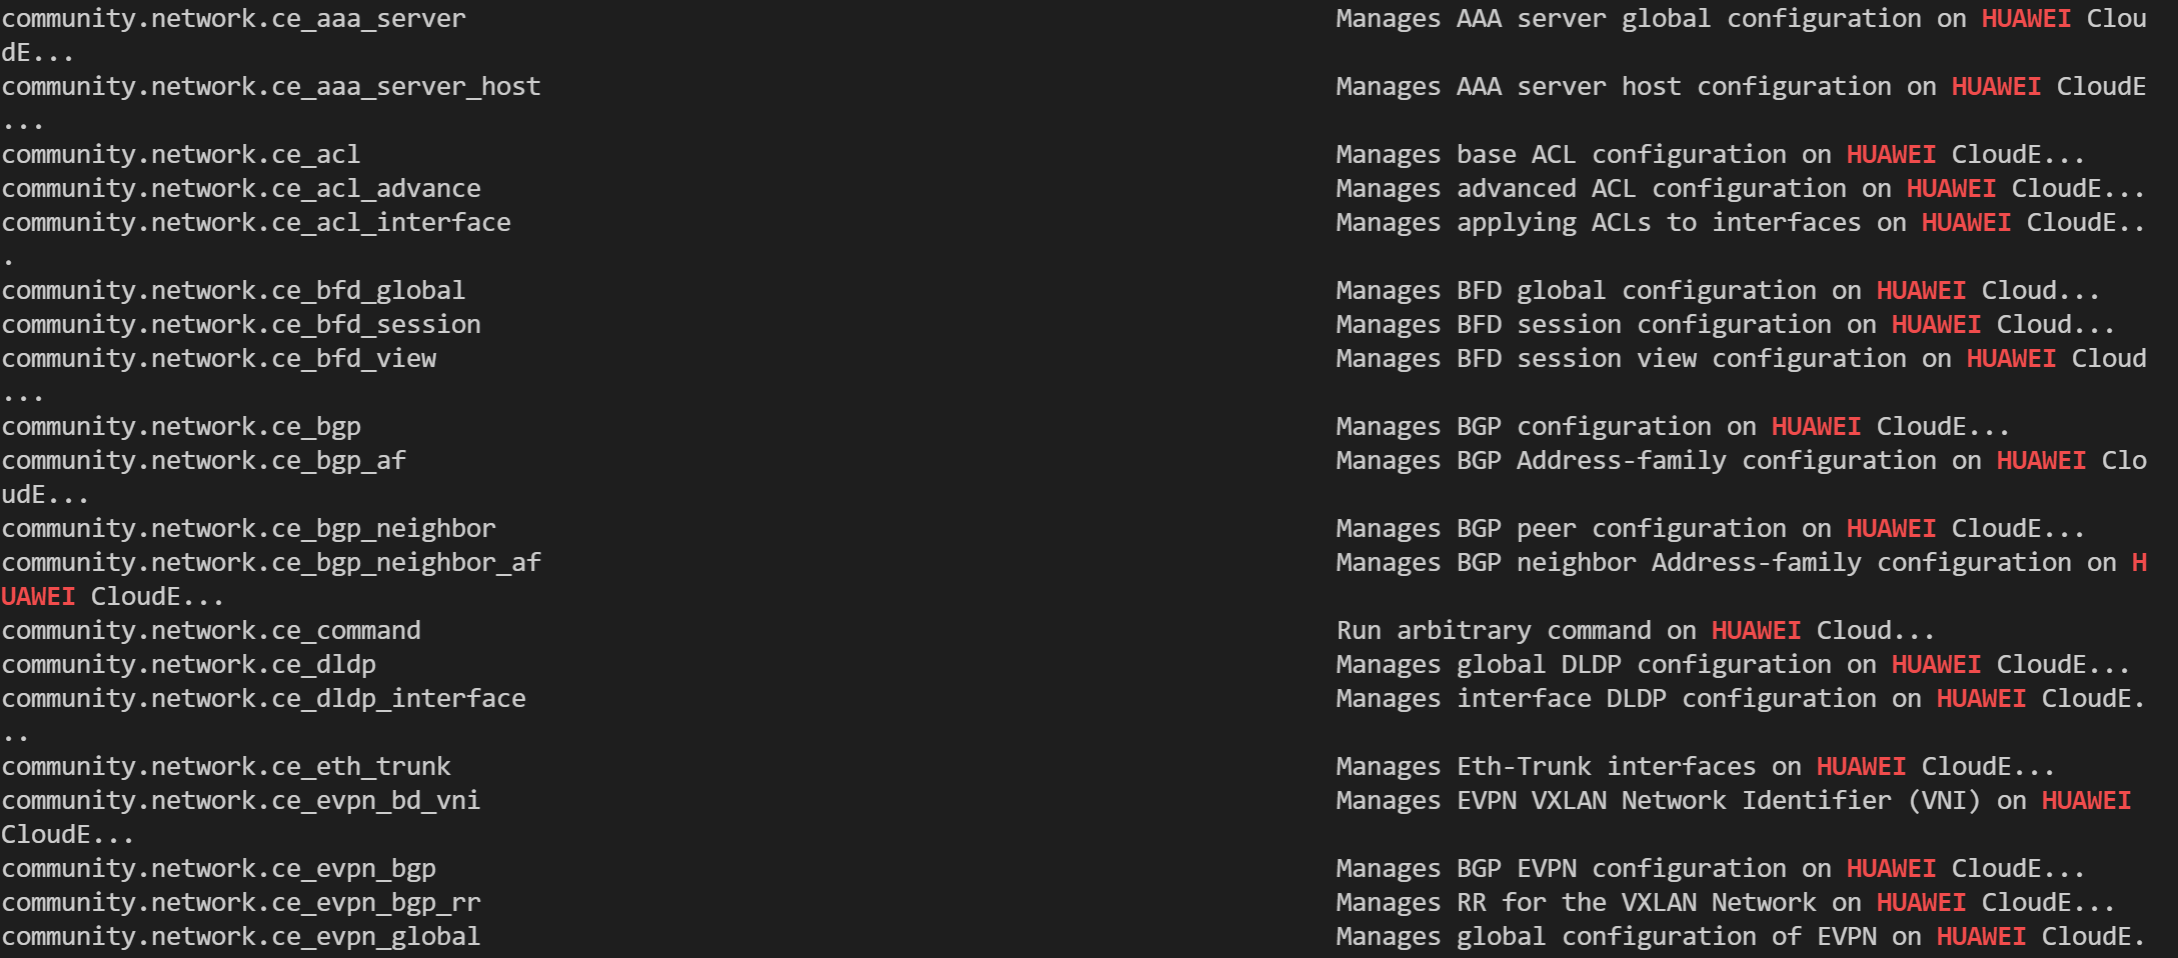
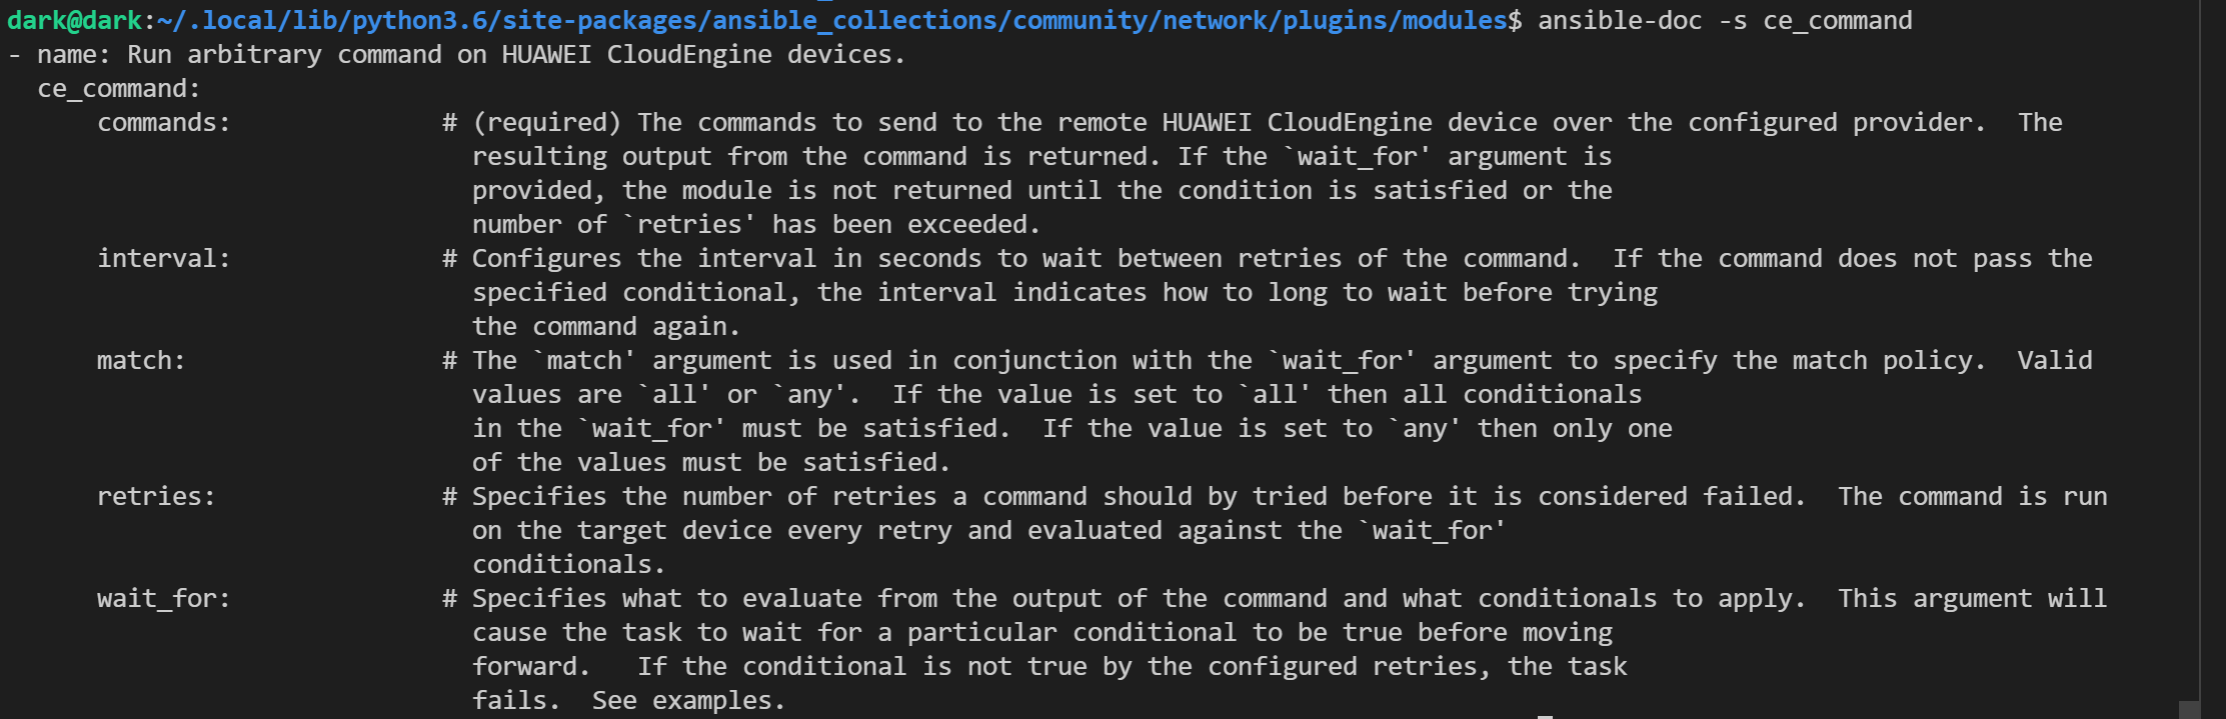
查看模块使用帮助
ansible的使用方式
常用以下三种方式
-
-
- ansible <host-pattern> [-f forks] [-m module_name] [-a args] 直接使用相应模块,传入参数,作用与host或group,该方式比较简单,在后续实例时展示,不再展开
- ansible-playbook 对于一些复杂的操作我们需要定义playbook
- roles 对于一些需要复用的操作,定义多个playbook费时又费力,我们可以通过定义roles来对playbook进行灵活的组合调用,需要定义固定目录与文件,后续展开
-
playbook的格式
Ansible Playbooks 提供了一个可重复、可重用、简单的配置管理和多机部署系统,非常适合部署复杂的应用程序。Playbook 以 YAML 格式表示
示例
---
- name: Update web servers
  hosts: webservers
  remote_user: root
  gather_facts: True
  vars:
    listen_port: 8800
  tasks:
    - name: Ensure apache is at the latest version
      yum:
        name: httpd
        state: latest
      when: ansible_lsb.id == 'Centos'
      apt:
        name: httpd
        state: latest
      when: ansible_lsb.id == 'Ubuntu'
    - name: Write the apache config file
      template:
        src: /srv/httpd.j2
        dest: /etc/httpd.conf
      notify: reload
  handlers:
    - name: reload
      service:
        name: httpd
        state: restarted
  tasks:
  - name: unstall web packages
    yum: name={{ item }} state=absent
    with_items:
    - httpd
    - php
    - php-mysql
以上示例展示了playbook的基本格式和两个关键字的使用when和with,前者是判断语句后者是循环
示例中定义的变量listen_port提供给httpd,j2配置文件使用,配置文件使用模板语句其中listen的值定义为{{ listen_port }},playbook中定义的变量会自动填充,模板使用Jinja2语法,同Django
也可以在执行ansible-playbook 语句时使用 -e listen=8800传入变量
定义变量的几种方式
- 内置变量直接调用
facts组件,ansible在运行模块是默认会调用facts组件来获取远程系统的一些基础信息,如系统版本、cpu内存磁盘使用率,网卡信息等,这些信息会包装在JSON格式的数据结构中,由一个个键值对构成,键就是变量的名字,可以在playbook中直接调用,如上述示例中的gather_facts=True选项,在该playbook中我们可以直接调用ansible_lsb.id变量来获取系统类型,当然如果不需要这些变量值可以设为False,可以极大提高命令执行速度
可以使用setup模块来调用facts组件来来获取所有的系统信息
- Inventory 文件中定义
在主机文件中定义变量,可以在为host单独定义变量,也可以定义主机组变量,示例如下
[rs]
10.0.3.105
[rs:vars]
ansible_connection=network_cli
ansible_network_os=ce
ansible_user=test
ansible_ssh_pass = 123456
[server]
123.58.201.8 ansible_ssh_user=ubuntu ansible_ssh_port=22
162.62.132.3
4.1.5.1
4.20.9.2
13.0.3.1 ansible_ssh_user=dark
[server:vars]
ansible_ssh_user = root
ansible_ssh_port = 2233
host_name = 1.1.1.1
- playbook中定义
在playbook中定义又有多种方式
1. 使用vars定义,该方式定义的变量只能在本play使用不能跨play使用,如下示例
---
- hosts: localhost
  remote_user: root
  gather_facts: no
  vars:
    testvar1: tv1
  tasks:
  - debug:
      msg: "{{testvar1}}"
- hosts: localhost
  remote_user: root
  tasks:
  - debug:
      msg: "{{testvar1}}"
我们来运行看下
dark@dark:~/python/ansible$ ansible-playbook test.yml

PLAY [localhost] *****************************************************************************************************************************************

TASK [debug] *********************************************************************************************************************************************
ok: [localhost] => {
    "msg": "tv1"
}

PLAY [localhost] *****************************************************************************************************************************************

TASK [Gathering Facts] ***********************************************************************************************************************************
ok: [localhost]

TASK [debug] *********************************************************************************************************************************************
fatal: [localhost]: FAILED! => {"msg": "The task includes an option with an undefined variable. The error was: 'testvar1' is undefined\n\nThe error appears to be in '/home/dark/python/ansible/test.yml': line 90, column 5, but may\nbe elsewhere in the file depending on the exact syntax problem.\n\nThe offending line appears to be:\n\n  tasks:\n  - debug:\n    ^ here\n"}

PLAY RECAP ***********************************************************************************************************************************************
localhost                  : ok=2    changed=0    unreachable=0    failed=1    skipped=0    rescued=0    ignored=0
可以看到The error was: 'testvar1' is undefined这个报错信息,testvar1没有定义
2. 使用set_fact来设置变量,可以跨play使用,如下示例
- hosts: localhost
  remote_user: root
  gather_facts: no
  tasks:
  - set_fact:
      testvar1: tv1
      testvar2: tv2
  - debug:
      msg: "{{testvar1}} ----- {{testvar2}}"
- hosts: localhost
  remote_user: root
  tasks:
  - name: other play get testvar2
    debug:
      msg: "{{testvar2}}"
  - name: other play get testvar1
    debug:
      msg: "{{testvar1}}"
执行下
dark@dark:~/python/ansible$ ansible-playbook test.yml

PLAY [localhost] *****************************************************************************************************************************************

TASK [set_fact] ******************************************************************************************************************************************
ok: [localhost]

TASK [debug] *********************************************************************************************************************************************
ok: [localhost] => {
    "msg": "tv1 ----- tv2"
}

PLAY [localhost] *****************************************************************************************************************************************

TASK [Gathering Facts] ***********************************************************************************************************************************
ok: [localhost]

TASK [other play get testvar2] ***************************************************************************************************************************
ok: [localhost] => {
    "msg": "tv2"
}

TASK [other play get testvar1] ***************************************************************************************************************************
ok: [localhost] => {
    "msg": "tv1"
}

PLAY RECAP ***********************************************************************************************************************************************
localhost                  : ok=5    changed=0    unreachable=0    failed=0    skipped=0    rescued=0    ignored=0
3. 使用register注册变量,该变量的值是模块的return值,如下示例
- hosts: localhost
  remote_user: root
  gather_facts: no
  tasks:
  - set_fact:
      testvar1: tv1
      testvar2: tv2
  - shell: "echo tv3"
    register: testvar3
  - debug:
      msg: "{{testvar1}} ----- {{testvar2}}"
- hosts: localhost
  remote_user: root
  tasks:
  - name: other play get testvar3
    debug:
      msg: "{{testvar3.stdout}}"
  - name: other play get testvar2
    debug:
      msg: "{{testvar2}}"
  - name: other play get testvar1
    debug:
      msg: "{{testvar1}}"
运行看下结果
dark@dark:~/python/ansible$ ansible-playbook test.yml

PLAY [localhost] *****************************************************************************************************************************************

TASK [set_fact] ******************************************************************************************************************************************
ok: [localhost]

TASK [shell] *********************************************************************************************************************************************
changed: [localhost]

TASK [debug] *********************************************************************************************************************************************
ok: [localhost] => {
    "msg": "tv1 ----- tv2"
}

PLAY [localhost] *****************************************************************************************************************************************

TASK [Gathering Facts] ***********************************************************************************************************************************
ok: [localhost]

TASK [other play get testvar3] ***************************************************************************************************************************
ok: [localhost] => {
    "msg": "tv3"
}

TASK [other play get testvar2] ***************************************************************************************************************************
ok: [localhost] => {
    "msg": "tv2"
}

TASK [other play get testvar1] ***************************************************************************************************************************
ok: [localhost] => {
    "msg": "tv1"
}

PLAY RECAP ***********************************************************************************************************************************************
localhost                  : ok=7    changed=1    unreachable=0    failed=0    skipped=0    rescued=0    ignored=0
注册变量接收的是模块执行后的return值,是json格式,我们自定义变量如果需要return时也需要dumps成json格式输出,否则ansible无法解析会报错
- 执行语句时传入
执行时使用-e 传参,没什么好解释的
- roles vars/main.yml文件中定义
在写roles时再做介绍
ansible常用模块示例
-
主机联通性测试
使用ping模块来测试主机连通性
dark@dark:~$ ansible zb -m ping
49.23.3.9 | SUCCESS => {
    "ansible_facts": {
        "discovered_interpreter_python": "/usr/bin/python"
    },
    "changed": false,
    "ping": "pong"
}
1.15.9.2 | SUCCESS => {
    "ansible_facts": {
        "discovered_interpreter_python": "/usr/bin/python"
    },
    "changed": false,
    "ping": "pong"
}
-
apt 软件安装
常用参数
allow_unauthenticated= yes/no                       #如果无法验证包,则忽略。这对于管理自己的 apt-key 设置的引导环境很有用。
autoclean= yes/no                                   #如果yes,则清除无法再下载的已检索包文件的本地存储库。
deb=                                                #远程计算机上 .deb 包的路径。如果路径中有 ://,ansible 将在安装前尝试下载 deb
dpkg_options= (default force-confdef,force-confold) #将 dpkg 选项添加到 apt 命令。默认为 '-o "Dpkg::Options::=--force-confdef" -o "Dpkg::Options::=--force-confold"'选项应以逗号分隔的列表形式提供
name=                                               #包名称,如foo,或带有版本的包说明符,如foo=1.0。还支持名称通配符 (fnmatch)apt*和版本通配符,不支持隐式正则表达式匹配
state= latest/absent/present/build-dep(default present)#指示所需的包状态。latest确保安装了最新版本。build-dep确保安装包构建依赖项。
update_cache= yes/no                                    #运行相当于apt-get update之前的操作。可以作为软件包安装的一部分运行,也可以作为单独的步骤运行。
upgrade= no/yes/safe/full/dist                          #yes或safe,执行 aptitude 安全升级。full,则执行 aptitude 全面升级。如果是 dist,则执行 apt-get dist-upgrade。注意:这不会升级特定的包,为此使用 state=latest。注意:从 2.4 开始,如果 aptitude 不存在,则使用 apt-get 作为备用。
示例:
dark@dark:~$ ansible zb -m apt -a 'name=hping3 state=present'
49.23.3.9 | CHANGED => {
    "ansible_facts": {
        "discovered_interpreter_python": "/usr/bin/python"
    },
    "cache_update_time": 1651712595,
    "cache_updated": false,
    "changed": true,
    "stderr": "",
    "stderr_lines": [],
    "stdout": "Reading package lists...\nBuilding dependency tree...\nReading state information...\nThe following packages were automatically installed and are no longer required:\n  apache2-bin apache2-data apache2-utils fontconfig hicolor-icon-theme libapr1\n  libaprutil1 libaprutil1-dbd-sqlite3 libaprutil1-ldap libatk1.0-0\n  libatk1.0-data libavahi-client3 libavahi-common-data libavahi-common3\n  libcairo2 libcups2 libdatrie1 libgdk-pixbuf2.0-0 libgdk-pixbuf2.0-common\n  libgraphite2-3 libgtk2.0-0 libgtk2.0-bin libgtk2.0-common libharfbuzz0b\n  libjbig0 libjpeg-turbo8 libjpeg8 liblua5.1-0 libpango-1.0-0\n  libpangocairo-1.0-0 libpangoft2-1.0-0 libpixman-1-0 libthai-data libthai0\n  libtiff5 libxcb-render0 libxcb-shm0 libxcursor1 ssl-cert\nUse 'apt autoremove' to remove them.\nThe following NEW packages will be installed:\n  hping3\n0 upgraded, 1 newly installed, 0 to remove and 223 not upgraded.\nNeed to get 107 kB of archives.\nAfter this operation, 284 kB of additional disk space will be used.\nGet:1 http://cn.archive.ubuntu.com/ubuntu xenial/universe amd64 hping3 amd64 3.a2.ds2-7 [107 kB]\nFetched 107 kB in 3s (33.0 kB/s)\nSelecting previously unselected package hping3.\r\n(Reading database ... \r(Reading database ... 5%\r(Reading database ... 10%\r(Reading database ... 15%\r(Reading database ... 20%\r(Reading database ... 25%\r(Reading database ... 30%\r(Reading database ... 35%\r(Reading database ... 40%\r(Reading database ... 45%\r(Reading database ... 50%\r(Reading database ... 55%\r(Reading database ... 60%\r(Reading database ... 65%\r(Reading database ... 70%\r(Reading database ... 75%\r(Reading database ... 80%\r(Reading database ... 85%\r(Reading database ... 90%\r(Reading database ... 95%\r(Reading database ... 100%\r(Reading database ... 109472 files and directories currently installed.)\r\nPreparing to unpack .../hping3_3.a2.ds2-7_amd64.deb ...\r\nUnpacking hping3 (3.a2.ds2-7) ...\r\nProcessing triggers for man-db (2.7.5-1) ...\r\nSetting up hping3 (3.a2.ds2-7) ...\r\n",
    "stdout_lines": [
        "Reading package lists...",
        "Building dependency tree...",
        "Reading state information...",
        "The following packages were automatically installed and are no longer required:",
        "  apache2-bin apache2-data apache2-utils fontconfig hicolor-icon-theme libapr1",
        "  libaprutil1 libaprutil1-dbd-sqlite3 libaprutil1-ldap libatk1.0-0",
        "  libatk1.0-data libavahi-client3 libavahi-common-data libavahi-common3",
        "  libcairo2 libcups2 libdatrie1 libgdk-pixbuf2.0-0 libgdk-pixbuf2.0-common",
        "  libgraphite2-3 libgtk2.0-0 libgtk2.0-bin libgtk2.0-common libharfbuzz0b",
        "  libjbig0 libjpeg-turbo8 libjpeg8 liblua5.1-0 libpango-1.0-0",
        "  libpangocairo-1.0-0 libpangoft2-1.0-0 libpixman-1-0 libthai-data libthai0",
        "  libtiff5 libxcb-render0 libxcb-shm0 libxcursor1 ssl-cert",
        "Use 'apt autoremove' to remove them.",
        "The following NEW packages will be installed:",
        "  hping3",
        "0 upgraded, 1 newly installed, 0 to remove and 223 not upgraded.",
        "Need to get 107 kB of archives.",
        "After this operation, 284 kB of additional disk space will be used.",
        "Get:1 http://cn.archive.ubuntu.com/ubuntu xenial/universe amd64 hping3 amd64 3.a2.ds2-7 [107 kB]",
        "Fetched 107 kB in 3s (33.0 kB/s)",
        "Selecting previously unselected package hping3.",
        "(Reading database ... ",
        "(Reading database ... 5%",
        ........."(Reading database ... 100%",
        "(Reading database ... 109472 files and directories currently installed.)",
        "Preparing to unpack .../hping3_3.a2.ds2-7_amd64.deb ...",
        "Unpacking hping3 (3.a2.ds2-7) ...",
        "Processing triggers for man-db (2.7.5-1) ...",
        "Setting up hping3 (3.a2.ds2-7) ..."
    ]
}
1.15.9.2 | CHANGED => {
    "ansible_facts": {
        "discovered_interpreter_python": "/usr/bin/python"
    },
    "cache_update_time": 1651695647,
    "cache_updated": false,
    "changed": true,
    "stderr": "",
    "stderr_lines": [],
    "stdout": "Reading package lists...\nBuilding dependency tree...\nReading state information...\nThe following NEW packages will be installed:\n  hping3\n0 upgraded, 1 newly installed, 0 to remove and 234 not upgraded.\nNeed to get 107 kB of archives.\nAfter this operation, 284 kB of additional disk space will be used.\nGet:1 http://mirrors.tencentyun.com/ubuntu xenial/universe amd64 hping3 amd64 3.a2.ds2-7 [107 kB]\nFetched 107 kB in 0s (3207 kB/s)\nSelecting previously unselected package hping3.\r\n(Reading database ... \r(Reading database ... 5%\r(Reading database ... 10%\r(Reading database ... 15%\r(Reading database ... 20%\r(Reading database ... 25%\r(Reading database ... 30%\r(Reading database ... 35%\r(Reading database ... 40%\r(Reading database ... 45%\r(Reading database ... 50%\r(Reading database ... 55%\r(Reading database ... 60%\r(Reading database ... 65%\r(Reading database ... 70%\r(Reading database ... 75%\r(Reading database ... 80%\r(Reading database ... 85%\r(Reading database ... 90%\r(Reading database ... 95%\r(Reading database ... 100%\r(Reading database ... 108213 files and directories currently installed.)\r\nPreparing to unpack .../hping3_3.a2.ds2-7_amd64.deb ...\r\nUnpacking hping3 (3.a2.ds2-7) ...\r\nProcessing triggers for man-db (2.7.5-1) ...\r\nSetting up hping3 (3.a2.ds2-7) ...\r\n",
    "stdout_lines": [
        "Reading package lists...",
        "Building dependency tree...",
        "Reading state information...",
        "The following NEW packages will be installed:",
        "  hping3",
        "0 upgraded, 1 newly installed, 0 to remove and 234 not upgraded.",
        "Need to get 107 kB of archives.",
        "After this operation, 284 kB of additional disk space will be used.",
        "Get:1 http://mirrors.tencentyun.com/ubuntu xenial/universe amd64 hping3 amd64 3.a2.ds2-7 [107 kB]",
        "Fetched 107 kB in 0s (3207 kB/s)",
        "Selecting previously unselected package hping3.",
        "(Reading database ... ",
        "(Reading database ... 5%",
        ..............."(Reading database ... 100%",
        "(Reading database ... 108213 files and directories currently installed.)",
        "Preparing to unpack .../hping3_3.a2.ds2-7_amd64.deb ...",
        "Unpacking hping3 (3.a2.ds2-7) ...",
        "Processing triggers for man-db (2.7.5-1) ...",
        "Setting up hping3 (3.a2.ds2-7) ..."
    ]
}
playbook形式
---
- hosts: {{ group }}
  remote_user: root
  tasks:
    - name: install hping3 on centos
      yum: name=hping3 state=present
      when: ansible_lsb.id == 'Centos'
    - name: install hping3 on ubuntu
      apt: name=hping3 state=present
      when: ansible_lsb.id == 'Ubuntu'
执行
dark@dark:~/python/ansible$ ansible-playbook  hping3.yml

PLAY [zb] ************************************************************************************************************************************************

TASK [Gathering Facts] ***********************************************************************************************************************************
ok: [49.2.3.9]
ok: [1.15.9.2]

TASK [install hping3 on centos] **************************************************************************************************************************
skipping: [49.2.3.9]
skipping: [1.15.9.2]

TASK [install hping3 on ubuntu] **************************************************************************************************************************
changed: [49.2.3.9]
changed: [1.15.9.2]

PLAY RECAP ***********************************************************************************************************************************************
1.15.9.2                : ok=2    changed=1    unreachable=0    failed=0    skipped=1    rescued=0    ignored=0
49.2.3.9             : ok=2    changed=1    unreachable=0    failed=0    skipped=1    rescued=0    ignored=0
-
command 远程执行命令
概要
-
-
- 该
command模块采用命令名称,后跟以空格分隔的参数列表。 - 给定的命令将在所有选定的节点上执行。它不会通过 shell 处理,因此变量
$HOME和操作,如"<",">",和将不起作用(如果需要这些功能,请使用 shell 模块"|") - 对于 Windows 目标,使用win_command模块
- 该
-
Options:
chdir 在执行命令前先切换至该目录
free_form 所执行的语句,必须包含,但是并没有这个参数名字,所需执行的命令直接跟在模块后,在使用ad-hoc命令时一般用-a代替
creates 一个文件名,用来做判断,当该文件存在时不执行命令
removes 同上取反
示例:
dark@dark:/usr/share/ansible$ ansible zb -m command -a 'ls'
49.2.3.9 | CHANGED | rc=0 >>
dark
dos
l2tp
monitor
ping_log
Python-3.6.3
Python-3.6.3.tgz
root@1.15.97.240
tra
udping.py
zabbix-release_3.2-1+xenial_all.deb
1.15.9.2 | CHANGED | rc=0 >>
ping_log
tcping.py
tcploss.py
udp
udping.py
vpn
zabbix-release_3.2-1+xenial_all.deb
chdir 参数
49.2.3.9 | CHANGED | rc=0 >>
bin
darkping
monitor
myping
zabbix_agentd.conf
zabbix_agentd.d
1.15.9.2 | CHANGED | rc=0 >>
bin
darkping
monitor
myping
zabbix_agentd.conf
zabbix_agentd.d
creates与removes参数
dark@dark:/usr/share/ansible$ ansible zb -m command -a 'chdir=/etc/zabbix creates=/root/dos ls'
1.15.9.2 | CHANGED | rc=0 >>
bin
darkping
monitor
myping
zabbix_agentd.conf
zabbix_agentd.d
49.2.3.9 | SUCCESS | rc=0 >>
skipped, since /root/dos existsDid not run command since '/root/dos' exists


dark@dark:/usr/share/ansible$ ansible zb -m command -a 'chdir=/etc/zabbix removes=/root/dos ls'
49.2.3.9 | CHANGED | rc=0 >>
bin
darkping
monitor
myping
zabbix_agentd.conf
zabbix_agentd.d
1.15.9.2 | SUCCESS | rc=0 >>
skipped, since /root/dos does not existDid not run command since '/root/dos' does not exist
playbook文件
---
- hosts: zb
  remote_user: root
  gather_facts: False
  tasks:
    - name: file list
      command: ls
        chdir=/etc/zabbix
        creates=/root/dos
      register: var
    - debug:
        msg: '{{var.stdout_lines}}'
运行下
dark@dark:~/python/ansible$ ansible-playbook  ls.yml

PLAY [zb] ************************************************************************************************************************************************

TASK [file list] *****************************************************************************************************************************************
changed: [1.15.9.2]
ok: [49.2.3.9]

TASK [debug] *********************************************************************************************************************************************
ok: [49.2.3.9] => {
    "msg": [
        "skipped, since /root/dos exists"
    ]
}
ok: [1.15.9.2] => {
    "msg": [
        "bin",
        "darkping",
        "monitor",
        "myping",
        "zabbix_agentd.conf",
        "zabbix_agentd.d"
    ]
}

PLAY RECAP ***********************************************************************************************************************************************
1.15.9.2                : ok=2    changed=1    unreachable=0    failed=0    skipped=0    rescued=0    ignored=0
49.2.3.9             : ok=2    changed=0    unreachable=0    failed=0    skipped=0    rescued=0    ignored=0
-
shell
选项同command,介绍command时说过它的局限性,例如不会执行命令中的>> | 等shell字符,用法同command,简单示例如下
dark@dark:~/python/ansible$ ansible zb -m shell -a 'more udping.py >> AnsibleShell'
49.2.3.9 | CHANGED | rc=0 >>

1.15.9.2 | CHANGED | rc=0 >>
dark@dark:~/python/ansible$ ansible zb -m shell -a 'ls AnsibleShell'
49.2.3.9 | CHANGED | rc=0 >>
AnsibleShell
1.15.9.2 | CHANGED | rc=0 >>
AnsibleShell
-
copy
复制本地或远程主机文件至远程主机的某个位置
选项
backup: yes/no 非必选项,当文件发生改变时创建一个包含时间戳的备份文件
content: 非必选项,当不使用src指定文件时,可以使用该选项来指定文件的值
dest: 必选项,远程主机的决定路径,如果src是一个目录dest也必须是目录,如果目录不存在则会创建,但如果src是文件,dest的目录不存在会报错
directory_mode: 非必选项,对目录设置权限,默认是系统默认权限
src: 非必选项,要复制到远程服务器的文件的本地路径;可以是绝对的或相对的。如果 path 是一个目录,它会被递归复制。在这种情况下,如果路径以“/”结尾,则仅将该目录的内部内容复制到目标。否则,如果它不以“/”结尾,则复制包含所有内容的目录本身。类似于 Rsync
remote_src: yes/no 如果是yes,会在远程主机上搜索文件,不支持递归
force: yes/no 默认是yes,当内容与源不同时,它将替换远程文件。如果否,则仅当目标不存在时才会传输文件
mode: 设置权限,八进制数(例如 0644)。省略前导零可能会产生意想不到的结果。从版本 1.8 开始,可以将模式指定为符号模式(例如,u+rwx 或 u=rw,g=r,o=r)
示例
复制文件
dark@dark:~/python/ansible$ ansible zb -m copy -a 'src=~/python/ansible/js dest=/root/ansible/'
49.2.3.9 | CHANGED => {
    "ansible_facts": {
        "discovered_interpreter_python": "/usr/bin/python"
    },
    "changed": true,
    "checksum": "31d71223ba89a9e220e7dca3ada0e4c3e000fb7f",
    "dest": "/root/ansible/js",
    "gid": 0,
    "group": "root",
    "md5sum": "11285d0c79e95363f15486ed138c1d0f",
    "mode": "0644",
    "owner": "root",
    "size": 34170,
    "src": "/root/.ansible/tmp/ansible-tmp-1651900741.852927-748-95739589553200/source",
    "state": "file",
    "uid": 0
}
1.15.9.2 | CHANGED => {
    "ansible_facts": {
        "discovered_interpreter_python": "/usr/bin/python"
    },
    "changed": true,
    "checksum": "31d71223ba89a9e220e7dca3ada0e4c3e000fb7f",
    "dest": "/root/ansible/js",
    "gid": 0,
    "group": "root",
    "md5sum": "11285d0c79e95363f15486ed138c1d0f",
    "mode": "0644",
    "owner": "root",
    "size": 34170,
    "src": "/root/.ansible/tmp/ansible-tmp-1651900741.896568-750-21994204903907/source",
    "state": "file",
    "uid": 0
}
不指定src,直接给定文件内容,并设置权限和backup选项
dark@dark:~/python/ansible$ ansible zb -m copy -a "content='this is ansible copy test' dest=/root/ansible/ansible_copy mode=0777"
49.2.3.9 | SUCCESS => {
    "ansible_facts": {
        "discovered_interpreter_python": "/usr/bin/python"
    },
    "changed": false,
    "checksum": "6decc680ae286b0252015da0c2ae02a8845b58f5",
    "dest": "/root/ansible/ansible_copy",
    "gid": 0,
    "group": "root",
    "mode": "0777",
    "owner": "root",
    "path": "/root/ansible/ansible_copy",
    "size": 25,
    "state": "file",
    "uid": 0
}
1.15.9.2 | SUCCESS => {
    "ansible_facts": {
        "discovered_interpreter_python": "/usr/bin/python"
    },
    "changed": false,
    "checksum": "6decc680ae286b0252015da0c2ae02a8845b58f5",
    "dest": "/root/ansible/ansible_copy",
    "gid": 0,
    "group": "root",
    "mode": "0777",
    "owner": "root",
    "path": "/root/ansible/ansible_copy",
    "size": 25,
    "state": "file",
    "uid": 0
}
dark@dark:~/python/ansible$ ansible zb -m copy -a "content='this is other ansible copy test' dest=/root/ansible/ansible_copy mode=0777 backup=yes"
49.2.3.9 | CHANGED => {
    "ansible_facts": {
        "discovered_interpreter_python": "/usr/bin/python"
    },
    "backup_file": "/root/ansible/ansible_copy.24110.2022-05-07@13:25:15~",
    "changed": true,
    "checksum": "6163d92273dc839ef52cbcecccebb686fa96683e",
    "dest": "/root/ansible/ansible_copy",
    "gid": 0,
    "group": "root",
    "md5sum": "ecaf90417dee6b6caa57e48633fb5c03",
    "mode": "0777",
    "owner": "root",
    "size": 31,
    "src": "/root/.ansible/tmp/ansible-tmp-1651901114.3149083-8252-129355433903495/source",
    "state": "file",
    "uid": 0
}
1.15.9.2 | CHANGED => {
    "ansible_facts": {
        "discovered_interpreter_python": "/usr/bin/python"
    },
    "backup_file": "/root/ansible/ansible_copy.25706.2022-05-07@13:25:16~",
    "changed": true,
    "checksum": "6163d92273dc839ef52cbcecccebb686fa96683e",
    "dest": "/root/ansible/ansible_copy",
    "gid": 0,
    "group": "root",
    "md5sum": "ecaf90417dee6b6caa57e48633fb5c03",
    "mode": "0777",
    "owner": "root",
    "size": 31,
    "src": "/root/.ansible/tmp/ansible-tmp-1651901114.3310552-8255-276726218449153/source",
    "state": "file",
    "uid": 0
}
dark@dark:~/python/ansible$ ansible zb -m command -a "ls /root/ansible"
49.2.3.9 | CHANGED | rc=0 >>
ansible_copy
ansible_copy.24110.2022-05-07@13:25:15~
js
1.15.9.2 | CHANGED | rc=0 >>
ansible_copy
ansible_copy.25706.2022-05-07@13:25:16~
js
-
template Jinja2 模板
用法同copy,不同处在于模块文件在经由template模块处理后会解析jinja2语法,替换成处理后的字符串再copy至远程主机
示例
#ansible_template.j2
this is ansible_template file at {{ time }}

dark@dark:~/python/ansible$ ansible zb -m template -a "src=~/python/ansible/ansible_template.j2 dest=/root/ansible/ansible_template.conf" -e time=2022-05-07
49.2.3.9 | CHANGED => {
    "ansible_facts": {
        "discovered_interpreter_python": "/usr/bin/python"
    },
    "changed": true,
    "checksum": "28f9535c00818bcf957494bf6086c1ebfe1c5c31",
    "dest": "/root/ansible/ansible_template.conf",
    "gid": 0,
    "group": "root",
    "md5sum": "e1eb156f348394a92c0fcb3f4fdbb30d",
    "mode": "0644",
    "owner": "root",
    "size": 43,
    "src": "/root/.ansible/tmp/ansible-tmp-1651909317.822977-30778-6091173137916/source",
    "state": "file",
    "uid": 0
}
1.15.9.2 | CHANGED => {
    "ansible_facts": {
        "discovered_interpreter_python": "/usr/bin/python"
    },
    "changed": true,
    "checksum": "28f9535c00818bcf957494bf6086c1ebfe1c5c31",
    "dest": "/root/ansible/ansible_template.conf",
    "gid": 0,
    "group": "root",
    "md5sum": "e1eb156f348394a92c0fcb3f4fdbb30d",
    "mode": "0644",
    "owner": "root",
    "size": 43,
    "src": "/root/.ansible/tmp/ansible-tmp-1651909317.8367376-30780-231793051547939/source",
    "state": "file",
    "uid": 0
}
dark@dark:~/python/ansible$ ansible zb -m command -a "more /root/ansible/ansible_template.conf"
49.2.3.9 | CHANGED | rc=0 >>
this is ansible_template file at 2022-05-07
1.15.9.2 | CHANGED | rc=0 >>
this is ansible_template file at 2022-05-07
palybook
---
- hosts: server
  remote_user: root
  become: yes
  become_method: sudo
  become_user: root
  tasks:
    - name: install {{ rpmname }} on centos
      yum: name={{ rpmname }} state=present
      when: ansible_lsb.id == 'Centos'
    - name: install {{ rpmname }} on ubuntu
      apt: name={{ rpmname }} state=present
      when: ansible_lsb.id == 'Ubuntu'
    - name: copy {{ rpmname }}.conf
      template: src={{ j2 }} dest={{ conf }}
      notify: reload
      tags: reload zabbix-agent
    - name: start {{ rpmname }} service
      service: name={{ rpmname }} state=started
      tags: start {{ rpmname }}
  handlers:
    - name: reload
      service: name={{ rpmname }} state=restarted
以上做了一个简单的示例,模板文件可以调用各种方式定义定义的变量
-
setup
该模块由 playbook 自动调用,以收集有关可在 playbook 中使用的远程主机的有用变量。它也可以直接通过/usr/bin/ansible检查主机可用的变量来执行。
Windows 目标也支持此模块
可以使用filter来做结果的过滤
示例
dark@dark:~/python/ansible$ ansible localhost -m setup -a 'filter=*mem*' --tree ./
localhost | SUCCESS => {
    "ansible_facts": {
        "ansible_memfree_mb": 178,
        "ansible_memory_mb": {
            "nocache": {
                "free": 2525,
                "used": 1389
            },
            "real": {
                "free": 178,
                "total": 3914,
                "used": 3736
            },
            "swap": {
                "cached": 0,
                "free": 3899,
                "total": 3913,
                "used": 14
            }
        },
        "ansible_memtotal_mb": 3914
    },
    "changed": false
}

dark@dark:~/python/ansible$ ansible localhost -m setup -a 'filter=ansible_interfaces'
localhost | SUCCESS => {
    "ansible_facts": {
        "ansible_interfaces": [
            "eno1",
            "enp1s0f0",
            "docker0",
            "veth0789055",
            "br0",
            "virbr0",
            "eno2",
            "enp1s0f2",
            "enp1s0f3",
            "enp1s0f1",
            "virbr0-nic",
            "lo"
        ]
    },
    "changed": false
}
dark@dark:~/python/ansible$ more localhost
{"ansible_facts": {"ansible_memfree_mb": 178, "ansible_memory_mb": {"nocache": {"free": 2525, "used": 1389}, "real": {"free": 178, "total": 3914, "used":
3736}, "swap": {"cached": 0, "free": 3899, "total": 3913, "used": 14}}, "ansible_memtotal_mb": 3914}, "changed": false}
可以使用--tree来保存json格式的结果
-
cli_command
选项
command: 需要执行的命令
示例
dark@dark:/etc/ansible$ ansible rs -m cli_command -a "command='dis version'"
10.0.3.105 | SUCCESS => {
    "changed": false,
    "stdout": "Huawei Versatile Routing Platform Software\nVRP (R) software, Version 5.170 (S6720 V200R019C10SPC500)\nCopyright (C) 2000-2020 HUAWEI TECH Co., Ltd.\nHUAWEI S6720-50L-HI-48S Routing Switch uptime is 1 week, 6 days, 7 hours, 46 minutes\n\nCEM48S4Q2CQP01 0(Master)  : uptime is 1 week, 6 days, 7 hours, 44 minutes\nDDR             Memory Size : 2048  M bytes\nFLASH Total     Memory Size : 1024  M bytes\nFLASH Available Memory Size : 624   M bytes\nPcb           Version   : VER.C\nBootROM       Version   : 0213.0000\nBootLoad      Version   : 0213.0000\nCPLD          Version   : 0106 \nSoftware      Version   : VRP (R) Software, Version 5.170 (V200R019C10SPC500)\nFLASH         Version   : 0000.0000\nPWR2 information\nPcb           Version   : PWR VER.A\nFAN1 information\nPcb           Version   : NA\nFAN2 information\nPcb           Version   : NA",
    "stdout_lines": [
        "Huawei Versatile Routing Platform Software",
        "VRP (R) software, Version 5.170 (S6720 V200R019C10SPC500)",
        "Copyright (C) 2000-2020 HUAWEI TECH Co., Ltd.",
        "HUAWEI S6720-50L-HI-48S Routing Switch uptime is 1 week, 6 days, 7 hours, 46 minutes",
        "",
        "CEM48S4Q2CQP01 0(Master)  : uptime is 1 week, 6 days, 7 hours, 44 minutes",
        "DDR             Memory Size : 2048  M bytes",
        "FLASH Total     Memory Size : 1024  M bytes",
        "FLASH Available Memory Size : 624   M bytes",
        "Pcb           Version   : VER.C",
        "BootROM       Version   : 0213.0000",
        "BootLoad      Version   : 0213.0000",
        "CPLD          Version   : 0106 ",
        "Software      Version   : VRP (R) Software, Version 5.170 (V200R019C10SPC500)",
        "FLASH         Version   : 0000.0000",
        "PWR2 information",
        "Pcb           Version   : PWR VER.A",
        "FAN1 information",
        "Pcb           Version   : NA",
        "FAN2 information",
        "Pcb           Version   : NA"
    ]
}
使用playbook来批量关闭端口
- hosts: rs
  gather_facts: False
  tasks:
  - name: test-rs
    ce_command:
      commands:
        - sys
        - interface range XGigabitEthernet 0/0/25 to XGigabitEthernet 0/0/35
        - shutdown
    register: show
  - name: test-rs
    cli_command:
      command: |
        sys
        interface range XGigabitEthernet 0/0/40 to XGigabitEthernet 0/0/44
        shutdown
    register: show2
  - debug:
      msg={{show}}
  - debug:
      msg={{show2}}
以上使用了cli_command和ce_command两个模块做展示,一个是共用的一个华为私有的,两个模块用法一样只是模块的选项稍有不同,commands和commad
执行命令进行回车换行是可以使用以上两种方法,其中第二种的|符号又分以下三种用法
文中自动换行 + 文末新增一空行
文中自动换行 + 文末新增两空行
文中自动换行 + 文末不新增行
执行下
dark@dark:~/python/ansible$ ansible-playbook test.yml

PLAY [rs] *************************************************************************************************************************************

TASK [test-rs] ********************************************************************************************************************************
ok: [10.0.3.105]

TASK [test-rs] ********************************************************************************************************************************
ok: [10.0.3.105]

TASK [debug] **********************************************************************************************************************************
ok: [10.0.3.105] => {
    "msg": {
        "changed": false,
        "failed": false,
        "stdout": [
            "Enter system view, return user view with Ctrl+Z.",
            "",
            "[test-XGigabitEthernet0/0/25]shutdown\n[test-XGigabitEthernet0/0/26]shutdown\n[test-XGigabitEthernet0/0/27]shutdown\n[test-XGigabitEthernet0/0/28]shutdown\n[test-XGigabitEthernet0/0/29]shutdown\n[test-XGigabitEthernet0/0/30]shutdown\n[test-XGigabitEthernet0/0/31]shutdown\n[test-XGigabitEthernet0/0/32]shutdown\n[test-XGigabitEthernet0/0/33]shutdown\n[test-XGigabitEthernet0/0/34]shutdown\n[test-XGigabitEthernet0/0/35]shutdown"
        ],
        "stdout_lines": [
            [
                "Enter system view, return user view with Ctrl+Z."
            ],
            [
                ""
            ],
            [
                "[test-XGigabitEthernet0/0/25]shutdown",
                "[test-XGigabitEthernet0/0/26]shutdown",
                "[test-XGigabitEthernet0/0/27]shutdown",
                "[test-XGigabitEthernet0/0/28]shutdown",
                "[test-XGigabitEthernet0/0/29]shutdown",
                "[test-XGigabitEthernet0/0/30]shutdown",
                "[test-XGigabitEthernet0/0/31]shutdown",
                "[test-XGigabitEthernet0/0/32]shutdown",
                "[test-XGigabitEthernet0/0/33]shutdown",
                "[test-XGigabitEthernet0/0/34]shutdown",
                "[test-XGigabitEthernet0/0/35]shutdown"
            ]
        ]
    }
}

TASK [debug] **********************************************************************************************************************************
ok: [10.0.3.105] => {
    "msg": {
        "changed": false,
        "failed": false,
        "stdout": "sys\nEnter system view, return user view with Ctrl+Z.\n[test]interface range XGigabitEthernet 0/0/40 to XGigabitEthernet 0/0/44\n[test-XGigabitEthernet0/0/40]shutdown\n[test-XGigabitEthernet0/0/41]shutdown\n[test-XGigabitEthernet0/0/42]shutdown\n[test-XGigabitEthernet0/0/43]shutdown\n[test-XGigabitEthernet0/0/44]shutdown",
        "stdout_lines": [
            "sys",
            "Enter system view, return user view with Ctrl+Z.",
            "[test]interface range XGigabitEthernet 0/0/40 to XGigabitEthernet 0/0/44",
            "[test-XGigabitEthernet0/0/40]shutdown",
            "[test-XGigabitEthernet0/0/41]shutdown",
            "[test-XGigabitEthernet0/0/42]shutdown",
            "[test-XGigabitEthernet0/0/43]shutdown",
            "[test-XGigabitEthernet0/0/44]shutdown"
        ]
    }
}

PLAY RECAP ************************************************************************************************************************************
10.0.3.105                 : ok=4    changed=0    unreachable=0    failed=0    skipped=0    rescued=0    ignored=0
对网络设备的操作只举这一个例子,操作其他配置可以使用不同的细分模块如华为的community.network.ce*
个人感觉ansible对于下发网络设备配置使用场景有限,大多用于设备开局,在网设备下发配置还是多用netconf来做,使用起来更轻量一点
-
zabbix_host
使用zabbix-api创建host,需要先安装zabbix-api
pip3 install zabbix-api
选项
host_groups: #主机组
host_name:  主机名
login_user: #登录用户名,对应zabbix-api的user字段
login_password: #登录密码,对应zabbix-api的password字段
link_templates: #关联模板
macros: #宏
    macro: #定义用户宏,可定义多组
    value: #变量对应的值
interfaces: #主机接口列表,包含以下
    type: #接口类型1 = agent 2 = snmp 3 = ipmi 4 = jmx
    ip: #主机ip
    port: #主机port
state: present/absent#状态,添加更新/删除
status: enabled/disabled#启用/禁用
proxy: #代理
示例
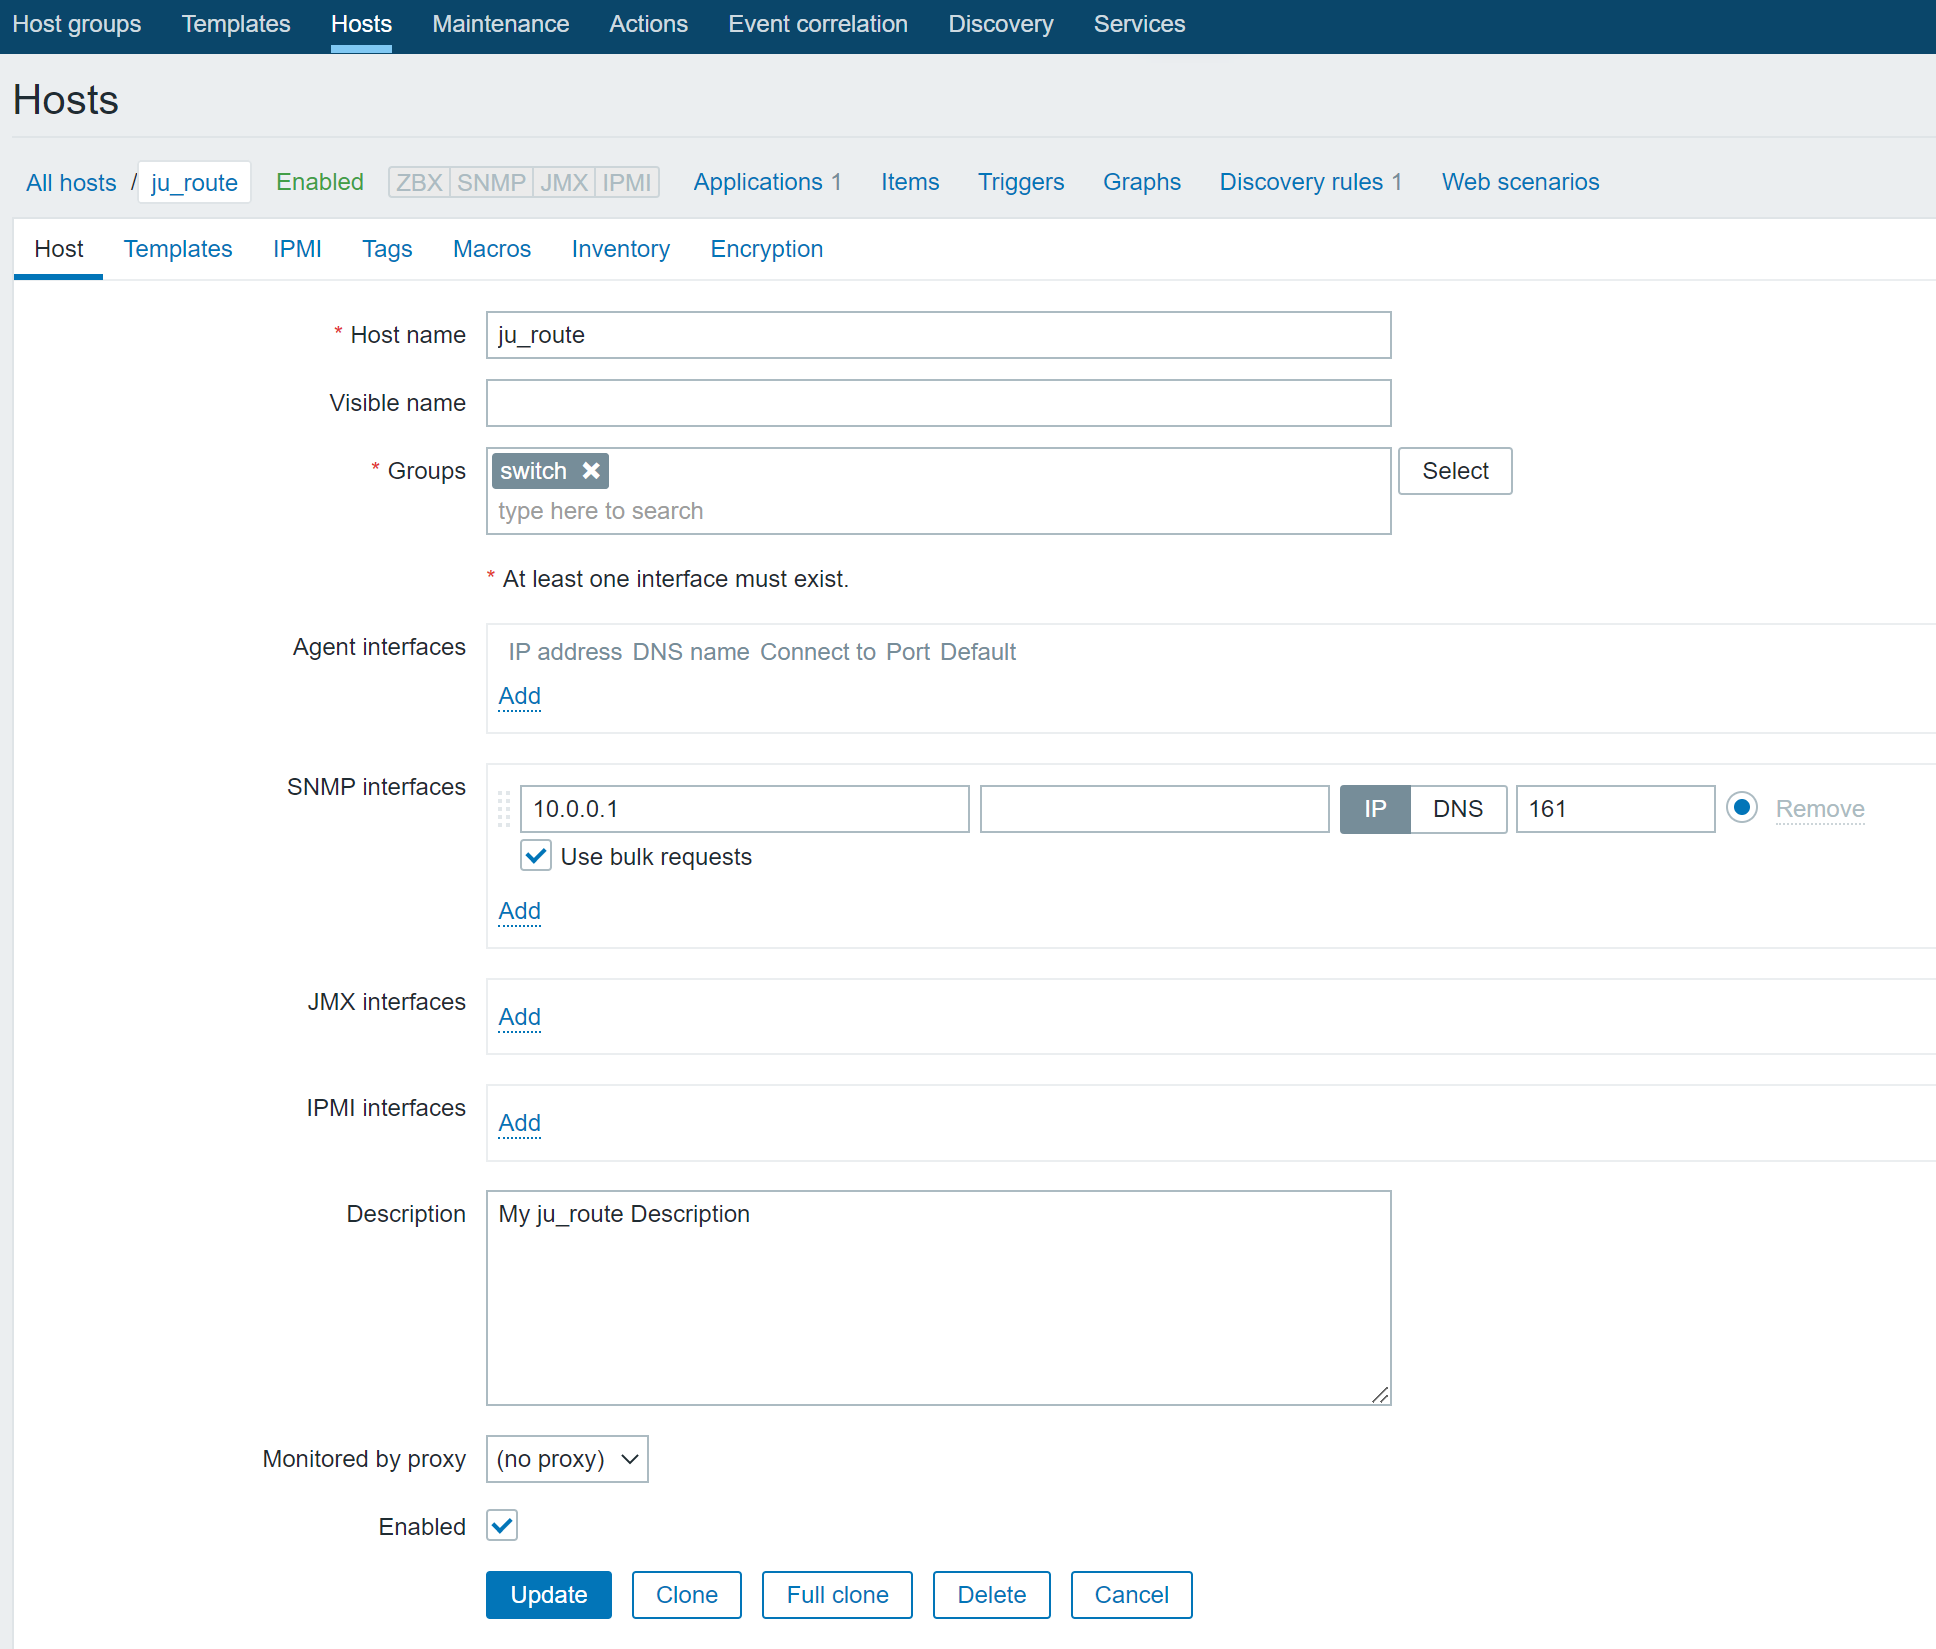
---
- hosts: localhost
  connection: local
  tasks:
  - local_action:
      module: community.zabbix.zabbix_host
      server_url: http://10.0.3.108:6600
      login_user: Admin
      login_password: adminpass
      host_name: ju_route
      visible_name: ju_route
      description: My ju_route Description
      host_groups:
        - switch
      link_templates:
        - Template Module Interfaces SNMPv2
      status: enabled
      state: present
      interfaces:
        - type: 2
          main: 1
          useip: 1
          ip: 10.0.0.1
          dns: ""
          port: "161"
      macros:
        - macro: '{$SNMP_COMMUNITY}'
          value: public
执行
dark@dark:~/python/ansible$ ansible-playbook test.yml

PLAY [localhost] *********************************************************************************************************************

TASK [Gathering Facts] ***************************************************************************************************************
ok: [localhost]

TASK [community.zabbix.zabbix_host] **************************************************************************************************
changed: [localhost -> localhost]

PLAY RECAP ***************************************************************************************************************************
localhost                  : ok=2    changed=1    unreachable=0    failed=0    skipped=0    rescued=0    ignored=0
还有操作云平台的模块,我的AWS免费试用到期了,就不操作了-_-
其他软件的API操作类似zabbix,不再举例,模块示例就到这里,最后介绍下roles的用法
rolesroles的概念类似于定义多个角色,当需要演绎一出电影时,需要哪个角色就按顺序调用哪个
roles的目录是固定的,ansible内部已经做好了import,示例目录结构如下,其中main.yml是必要的,其他的文件根据自己的需求定义
roles目录结构
roles
└── zabbix-agent
├── default
├── files
│ └── darkping
│ ├── log
│ ├── mtr.py
│ └── newpingd.py
├── handlers
│ └── main.yml
├── meta
├── tasks
│ ├── centos-install.yml
│ ├── func.yml
│ ├── main.yml
│ ├── start.yml
│ ├── ubuntu-install.yml
│ └── zabbix_agentd.conf.yml
├── templates
│ └── zabbix_agentd.conf.j2
└── vars
└── main.yml
roles配置
-
定义vars/main.yml
rpmname: zabbix-agent
rpmname_local_conf: zabbix_agentd.conf.j2
rpmname_remote_conf: zabbix_agentd.conf
func_local_conf: darkping
func_remote_conf: /etc/zabbix
-
定义templates/zabbix_agent.conf.j2,只展示自定义脚本行
UserParameter=ping_pkloss[*],python3 /etc/zabbix/myping/newpingd.py     -s {{ ansible_facts.eth0.ipv4.address }} -t $1    -I pkloss
UserParameter=ping_restime[*],python3 /etc/zabbix/myping/newpingd.py    -s {{ ansible_facts.eth0.ipv4.address }} -t $1    -I restime
UserParameter=udp_ping_pkloss[*],/etc/zabbix/myping/newpingd.py    -s {{ ansible_facts.eth0.ipv4.address }}  -T udp -t $1 -p 4789  -I pkloss
UserParameter=udp_ping_restime[*],/etc/zabbix/myping/newpingd.py    -s {{ ansible_facts.eth0.ipv4.address }} -T udp -t $1 -p 4789  -I restime
UserParameter=show_mtr,/etc/zabbix/bin/show_mtr.py
UserParameter=tcp_ping_pkloss[*],/etc/zabbix/myping/newpingd.py -s {{ ansible_facts.eth0.ipv4.address }} -T tcp  -t $1  -p $2  -I pkloss
UserParameter=tcp_ping_restime[*],/etc/zabbix/myping/newpingd.py -s {{ ansible_facts.eth0.ipv4.address }} -T tcp  -t $1  -p $2  -I restime
-
定义handlers
- name: reload
  service: name={{ rpmname }} state=restarted
-
定义tasks
#ubuntu-install.yml
- name: install {{ rpmname }} on centos
  yum: name={{ rpmname }} state=present
  when: ansible_lsb.id == 'Centos'
#start.yml
- name: start {{ rpmname }} service
  service: name={{ rpmname }} state=started
  tags: start {{ rpmname }}
#func.yml
- name: copy func
  copy: src={{ func_local_conf }} dest={{ func_remote_conf }}
#zabbix_agentd.conf.yml
- name: copy {{ rpmname }}.conf
  template: src={{ rpmname_local_conf }} dest={{ rpmname_remote_conf }}
  notify: reload
#main.yml  决定tasks执行顺序
- import_tasks: ubuntu-install.yml
- import_tasks: centos-install.yml
- import_tasks: uzabbix_agentd.conf.yaml
- import_tasks: func.yaml
- import_tasks: start.yaml
-
定义handlers
#handlers
- name: reload
  service: name={{ rpmname }} state=restarted
-
定义rols.yml文件,和zabbix-agent同目录
- hosts: zb
  remote_user: root
  roles:
    - zabbix-agent
执行时直接执行ansible-playbook rols.yml就行
以上做了个简单的roles示例,复杂了怕长时间不用再回头看时看不懂-_-!
还有过滤,自定义模块,此篇过长,下篇再写吧
ending.....
sleeping.......

 浙公网安备 33010602011771号