负载均衡4层
1. 4层 vs 7层
|
负载均衡 |
共同点 |
区别 | 具体使用 |
应用场景 |
|
4层 |
负载均衡 |
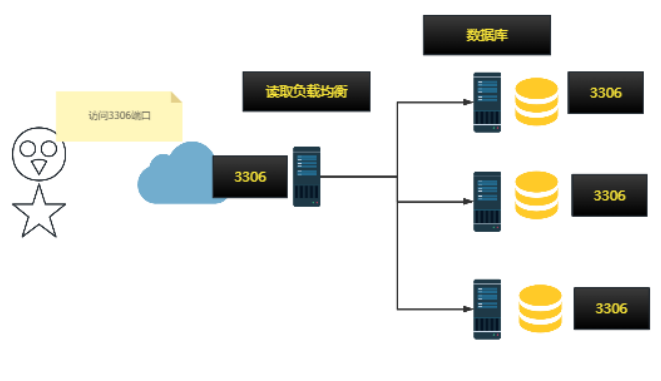
传输层 端口 tcp,udp 对端口进行负载均衡 |
stream_upstream,proxy_pass |
端口转发,推荐lvs |
|
7层 |
负载均衡 |
应用层对http/https请求进行处理,转发server_name,location(匹配uri),UA,XFF(http协议) |
http_upstream,proxy_pass |
http协议相关 |
4层负载均衡
7层负载均衡

2. 4层负载均衡实战
使用流程:
- 检查ngx是否有4层负载均衡的模块.
- 准备环境nc命令创建端口即可.
- 负载均衡配置文件与调试
2.1 检查模块
[root@web01 ~]# nginx -V |& grep stream
configure arguments: --prefix=/etc/nginx --sbin-path=/usr/sbin/nginx --modules-path=/usr/lib64/nginx/modules --conf-path=/etc/nginx/nginx.conf --error-log-path=/var/log/nginx/error.log --http-log-path=/var/log/nginx/access.log --pid-path=/var/run/nginx.pid --lock-path=/var/run/nginx.lock --http-client-body-temp-path=/var/cache/nginx/client_temp --http-proxy-temp-path=/var/cache/nginx/proxy_temp --http-fastcgi-temp-path=/var/cache/nginx/fastcgi_temp --http-uwsgi-temp-path=/var/cache/nginx/uwsgi_temp --http-scgi-temp-path=/var/cache/nginx/scgi_temp --user=nginx --group=nginx --with-compat --with-file-aio --with-threads --with-http_addition_module --with-http_auth_request_module --with-http_dav_module --with-http_flv_module --with-http_gunzip_module --with-http_gzip_static_module --with-http_mp4_module --with-http_random_index_module --with-http_realip_module --with-http_secure_link_module --with-http_slice_module --with-http_ssl_module --with-http_stub_status_module --with-http_sub_module --with-http_v2_module --with-mail --with-mail_ssl_module --with-stream --with-stream_realip_module --with-stream_ssl_module --with-stream_ssl_preread_module --with-cc-opt='-O2 -g -pipe -Wall -Wp,-D_FORTIFY_SOURCE=2 -fexceptions -fstack-protector-strong --param=ssp-buffer-size=4 -grecord-gcc-switches -m64 -mtune=generic -fPIC' --with-ld-opt='-Wl,-z,relro -Wl,-z,now -pie' --add-module=modules/ngx_http_upstream_check_module

--with-stream 有这个即可 不要是--with-stream=dynamic
如果没有重新编译nginx
或者写下4层负载均衡的配置看看是否能识别stream指令,不报错
2.2 创建8848端口
# 使用 nc(Netcat)命令在端口 8000 上启动一个监听服务的步骤如下:

1.打开终端:在你的操作系统中打开命令行界面(Windows 的 CMD,Linux 或 macOS 的终端)。
  运行命令:输入以下命令并按回车:
  nc -kl 8000
  这里的选项含义如下:
    -k:保持监听状态,即使在连接关闭后仍然继续监听。
    -l:表示监听模式。
2. 等待连接:此时,nc 将在端口 8000 上等待连接。任何连接到该端口的客户端都可以发送消息。

3. 接收消息:一旦有客户端连接并发送消息,你将在终端中看到这些消息。

4. 退出监听:要停止 nc,可以使用 Ctrl + C。

# 示例
假设你在一台机器上运行上述命令,然后在另一台机器上使用 telnet 或另一个 nc 实例连接到该端口:

telnet <你的IP地址> 8000
或者:
nc <你的IP地址> 8000
然后你可以输入消息并发送,这些消息将在运行 nc -kl 8000 的终端中显示。

# 注意事项
确保防火墙设置允许通过端口 8000 的流量。
如果在同一台机器上测试,可以使用 localhost 或 127.0.0.1 作为 IP 地址。
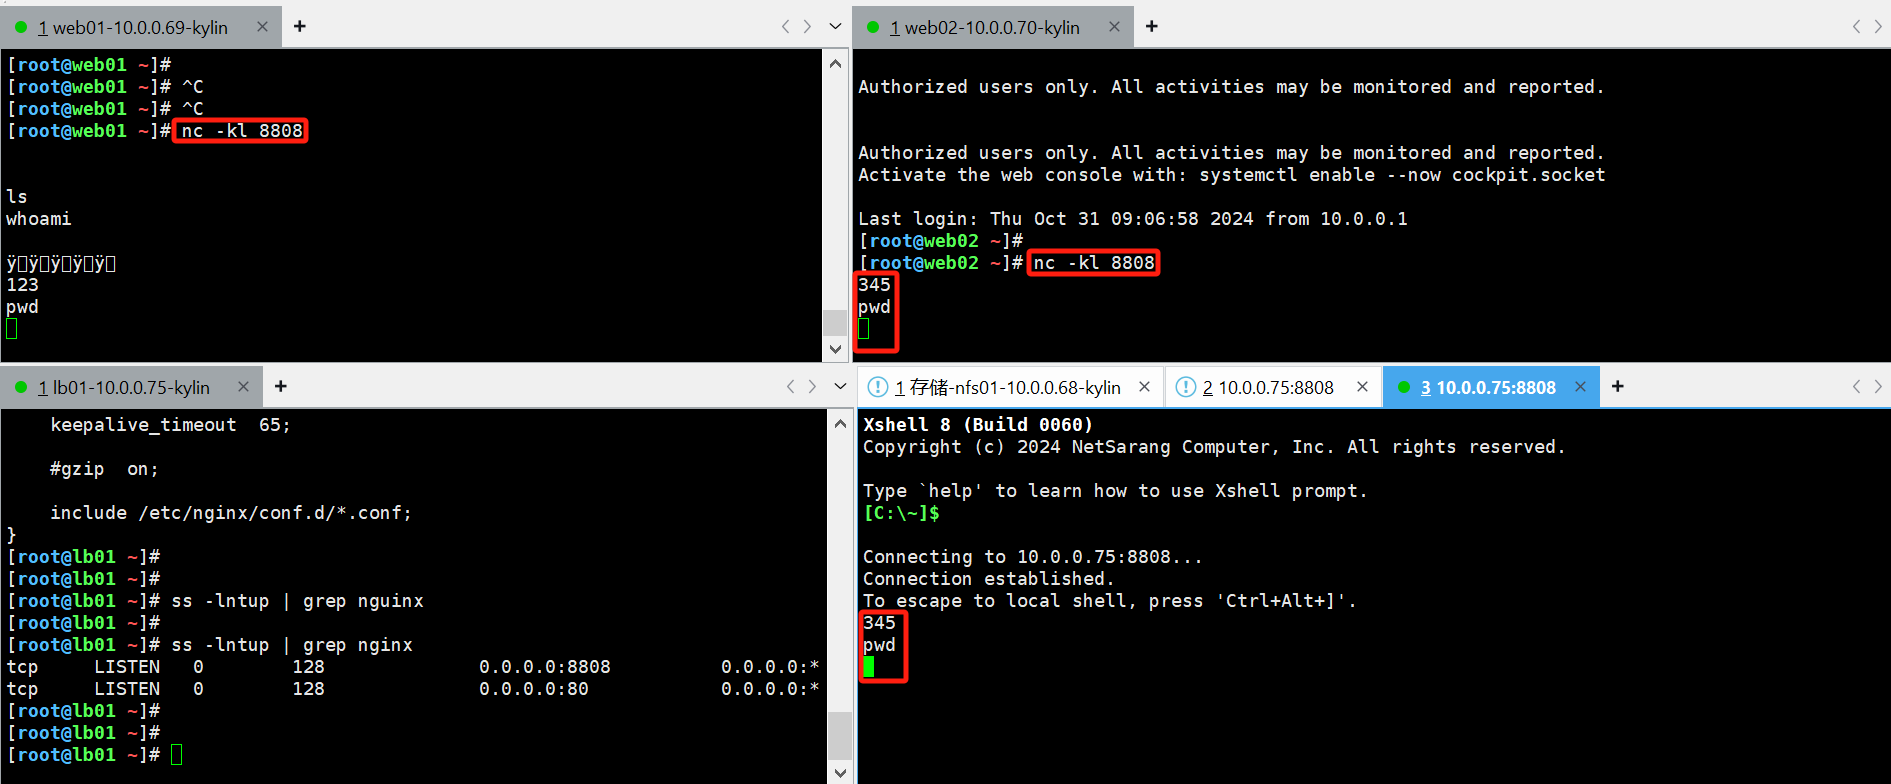
web服务器启动监听服务
root@web01 ~]# nc -kl 8808

root@web01 ~]# nc -kl 8808
2.3 书写负载均衡配置文件
⚠ 不要写到子配置文件中
log_format参考:https://nginx.org/en/docs/stream/ngx_stream_log_module.html
/etc/nginx/nginx.conf
 [root@lb01 ~]# cat /etc/nginx/nginx.conf
user  www;
worker_processes  auto;

error_log  /var/log/nginx/error.log notice;
pid        /var/run/nginx.pid;

events {
    worker_connections  1024;
}

# ----- start-----
stream{
  log_format basic '$remote_addr [$time_local] '
                 '$protocol $status $bytes_sent $bytes_received '
                 '$session_time';

  access_log /var/log/nginx/l4_access.log basic;

  upstream l4_spools {
    server 10.0.0.69:8808;
    server 10.0.0.70:8808;
  }

  server {
    listen 8808;
    proxy_pass l4_spools;
  }
}

# ---- end -----
http {
    include       /etc/nginx/mime.types;
    default_type  application/octet-stream;

    log_format  main  '$remote_addr - $remote_user [$time_local] "$request" '
                      '$status $body_bytes_sent "$http_referer" '
                      '"$http_user_agent" "$http_x_forwarded_for"';

    access_log  /var/log/nginx/access.log  main;

    sendfile        on;
    #tcp_nopush     on;

    keepalive_timeout  65;

    #gzip  on;

    include /etc/nginx/conf.d/*.conf;
}
2.4 测试
其他机器(任何连接到该端口的客户端)执行 telnet 10.0.0.75 8808发送数据


【推荐】国内首个AI IDE,深度理解中文开发场景,立即下载体验Trae
【推荐】编程新体验,更懂你的AI,立即体验豆包MarsCode编程助手
【推荐】抖音旗下AI助手豆包,你的智能百科全书,全免费不限次数
【推荐】轻量又高性能的 SSH 工具 IShell:AI 加持,快人一步
· Manus重磅发布:全球首款通用AI代理技术深度解析与实战指南
· 被坑几百块钱后,我竟然真的恢复了删除的微信聊天记录!
· 没有Manus邀请码?试试免邀请码的MGX或者开源的OpenManus吧
· 园子的第一款AI主题卫衣上架——"HELLO! HOW CAN I ASSIST YOU TODAY
· 【自荐】一款简洁、开源的在线白板工具 Drawnix