SSHD服务
1.sshd服务
1.0 故障案例:openssh删除了
|
本地连接 |
物理服务器 ,通过远程控制卡连接. |
|
本地连接 |
云: 登录web页面,连接. |
|
解决 |
连接后安装openssh,软件包,直接apt/yum安装 |
|
预防 |
删除之前准备好备用方案.Telnet |
1.1 目标
1.修改sshd服务端配置文件修改ssh端口号,修改ssh禁用root远程登录.
2.使用ssh命令远程连接,使用scp传输数据.
3。配置主机的秘钥认证(写成脚本)
1.2 openssh服务简介
- 实现加密的远程连接/传输数据.
- openssh-server 服务端 (sshd,/etc/ssh/sshd_config)
- openssh-clients客户端命令 scp,ssh

1.3 telnet vs openssh
| 服务 |
共同点 |
区别 | 应用场景 |
|
openssh-server 服务 22 |
远程连接 |
数据加密的 | 默认使用openssh |
|
telnet-server 服务 23 |
远程连接 |
数据未加密(明文) |
升级openssh服务的时候,启动telnet服务即可 |
# 麒麟中telnet-server属于telnet软件包
#1.安装服务
yum install -y telnet-server
#2.启动
systemctl disable telnet.socket
systemctl start telnet.socket
#3.本地shell中连接
telnet 10.0.0.71 23
1.4 openssh-server配置文件⭐⭐⭐⭐⭐
核心配置文件: /etc/ssh/sshd_config
/etc/ssh/ssh_config # 客户端配置文件
/etc/ssh/sshd_config # 服务端配置文件

# Openssh服务端配置详解
# 1.连接加速
UseDNS no                      # 是否开启反向解析:ip-->域名或主机名
GSSAPIAuthentication no        # GSS认证功能关闭
# 2.安全优化项目
Port                           # 默认是Port 22 端口范围1-65535 推荐1w以上的端口
PermitRootLogin                # 禁用root用户远程登录权限. 默认是yes(可以让root远程登录) (ubt系统中默认是no) 使用建议:先添加普通用户配置sudo权限,然后再禁用.
ListenAddress                  # 指定监听的ip(ip为当前机器的网卡ip) 只能内网访问22端口. 更加细致的控制交给防火墙或安全组.
PasswordAuthentication yes     # 远程连接是否开启密码登录/验证功能. 未来安全要求严格可以关闭,关闭前先配置好密钥认证.
新的Linux系统ssh远程连接优化配置
##1. 注释掉sshd服务端已有的配置
sed -ri.bak '/^(UseDNS|GSSAPIAuth|Port|PermitRoot)/s@^@#@g' /etc/ssh/sshd_config
##2. 重新配置连接优化,端口,是否准许root的远程登录.
cat >>/etc/ssh/sshd_config<<EOF
UseDNS no
GSSAPIAuthentication no
Port 22
PermitRootLogin yes
EOF
1.5 openssh-clients配置文件
- scp 远程传输文件
- ssh 远程连接
- sftp 远程传输文件(一般开发通过图形化界面使用ftp工具)
1.5.1 scp ⭐⭐⭐⭐⭐
# scp 文件/目录 用户名@ip:路径
-r 递归传输,传输目录
-p 保持属性信息不变
-P(大写) Port 指定端口号,默认是22端口.
[root@web01 ~]# scp -rp -P 22 /etc/hosts root@nfs01:/opt/
The authenticity of host 'nfs01 (172.16.1.68)' can't be established.
ECDSA key fingerprint is SHA256:axJqd8bfgjoW8H0pOHKDpzYBIeUXTbLp3fIcOiAoKEY.
Are you sure you want to continue connecting (yes/no/[fingerprint])? yes
Warning: Permanently added 'nfs01,172.16.1.68' (ECDSA) to the list of known hosts.

Authorized users only. All activities may be monitored and reported.
Permission denied, please try again.
root@nfs01's password:
hosts                                                                                                                                    100%  313   230.1KB/s   00:00
[root@web01 ~]#

[root@nfs01 ~]# ll /opt/
-rw-r--r--   1 root root  313 10月 11 10:33 hosts
[root@nfs01 ~]#
1.5.2 ssh ⭐⭐⭐⭐⭐
'''
功能:
1. 远程连接.
2. 远程连接并执行命令或脚本.(不要执行交互式命令)
'''
# 案例01: 使用root用户远程连接到10.0.0.68的22端口
[root@web01 ~]# ssh -p 22 root@10.0.0.68
The authenticity of host '10.0.0.68 (10.0.0.68)' can't be established.
ECDSA key fingerprint is SHA256:axJqd8bfgjoW8H0pOHKDpzYBIeUXTbLp3fIcOiAoKEY.
Are you sure you want to continue connecting (yes/no/[fingerprint])? yes
Warning: Permanently added '10.0.0.68' (ECDSA) to the list of known hosts.

Authorized users only. All activities may be monitored and reported.
root@10.0.0.68's password:

Authorized users only. All activities may be monitored and reported.
Activate the web console with: systemctl enable --now cockpit.socket

最后一次失败的登录: 一 10月 14 15:08:10 CST 2024 从 172.16.1.69 ssh:notty 上
最后一次成功登录后有 1 次失败的登录尝试。
Last login: Mon Oct 14 14:13:24 2024 from 10.0.0.1
[root@nfs01 ~]#

# 案例02: 使用root用户远程连接到10.0.0.68的22端口并执行whoami命令或ipa 命令
[root@nfs01 ~]# ssh -p 22 root@10.0.0.68 whoami
The authenticity of host '10.0.0.68 (10.0.0.68)' can't be established.
ECDSA key fingerprint is SHA256:axJqd8bfgjoW8H0pOHKDpzYBIeUXTbLp3fIcOiAoKEY.
Are you sure you want to continue connecting (yes/no/[fingerprint])? yes
Warning: Permanently added '10.0.0.68' (ECDSA) to the list of known hosts.

Authorized users only. All activities may be monitored and reported.
root@10.0.0.68's password:
root
[root@nfs01 ~]#

# 案例03: 远程连接10.0.0.31节点并执行多条命令:whoami , pwd, hostname命令
[root@nfs01 ~]# ssh -p 22 root@nfs01 "whoami ; pwd ; hostname -I"
The authenticity of host 'nfs01 (172.16.1.68)' can't be established.
ECDSA key fingerprint is SHA256:axJqd8bfgjoW8H0pOHKDpzYBIeUXTbLp3fIcOiAoKEY.
Are you sure you want to continue connecting (yes/no/[fingerprint])? YES
Warning: Permanently added 'nfs01,172.16.1.68' (ECDSA) to the list of known hosts.

Authorized users only. All activities may be monitored and reported.
root@nfs01's password:
root
/root
10.0.0.68 172.16.1.68
[root@nfs01 ~]# ssh -p 22 root@nfs01 "whoami && pwd && hostname -I"

Authorized users only. All activities may be monitored and reported.
root@nfs01's password:
root
/root
10.0.0.68 172.16.1.68
[root@nfs01 ~]#

# && 并且,命令行中表示前一个命令执行成功再执行后面的命令.
# ; 分号,分隔命令.相当于是1行的结束.
1.5.3 sftp
ftp 文件传输协议.
sftp linux中ftp客户端和lrzsz类似.
lrzsz传输大文件较慢. 推荐使用scp即可.
ftp工具开发人员使用.操作linux的目录和文件.
- ftp文件传输协议,服务和客户端,服务端端口是21和20.
- openssh (sshd)也提供了,ftp功能,sftp,端口是22.
- ftp客户端:常用sftp命令,软件xftp,winscp..........
如果上传大文件建议使用scp
1.6 秘钥认证⭐⭐⭐⭐⭐
1.6.1 概述
- Linux中我们要连接主机,输入用户密码然后连接.
- 我们发现每次连接都要输入密码,对于一些批量操作不方便.
- 我们需要有一种新的认证方法,每次连接不需要输入密码.
- 这个方法叫: 密钥认证(免密码登录,双机互信.)
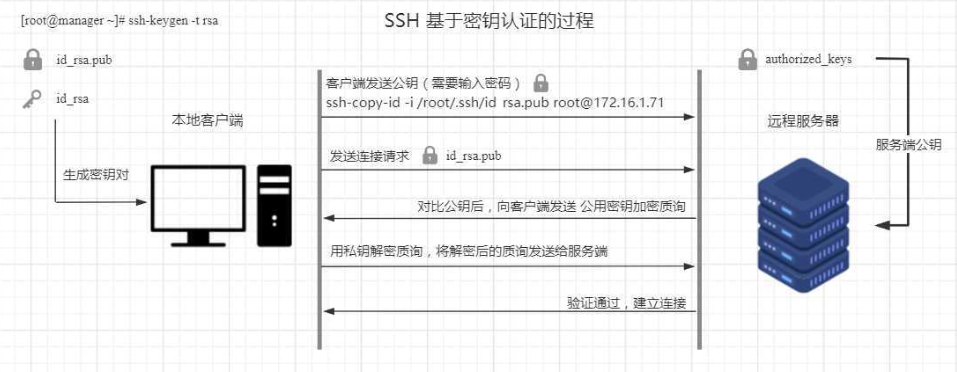
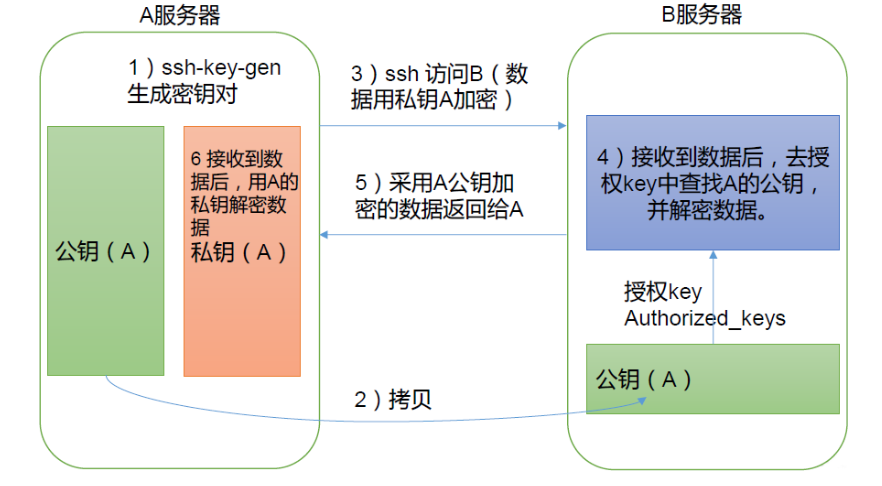
1.6.2 原理
SSH 服务的默认端口是 22。SSH 服务的密钥认证机制主要有两种:基于密码的认证和基于密钥的认证。
基于密钥的认证更为安全,它涉及到两个密钥:公钥和私钥。私钥必须安全地保存在您的本地计算机上,而公钥则需要被放置到你需要登录的服务器上。当你使用私钥登录服务器时,服务器会用之前你放置公钥的那个公钥来加密一个随机数发送给你,你用你的私钥解密这个随机数,然后服务器验证这个随机数就可以确认你的身份。


1.6.3 手动创建与分发秘钥⭐⭐⭐⭐⭐
'''
不要修改.ssh目录权限,家目录权限.
不要修改密钥文件的权限.
known_hosts文件:A通过ssh首次连接到B,B会将公钥1(host key)传递给A,A将公钥1存入known_hosts文件中,以后A再连接B时,B依然会传递给A一个公钥2,
OpenSSH会核对公钥,通过对比公钥1与公钥2 是否相同来进行简单的验证,如果公钥不同,OpenSSH会发出警告, 避免你受到DNS Hijack之类的攻击
'''

# 1.创建秘钥
[root@m01 ~]# ssh-keygen
Generating public/private rsa key pair.
Enter file in which to save the key (/root/.ssh/id_rsa):  # 直接回车表示不改变秘钥存放位置
Created directory '/root/.ssh'.
Enter passphrase (empty for no passphrase): # 直接回车表示不添加密码
Enter same passphrase again:
Your identification has been saved in /root/.ssh/id_rsa
Your public key has been saved in /root/.ssh/id_rsa.pub
The key fingerprint is:
SHA256:KidXnD1JIgwvPaqdTKjUNaPUq0ifUSyDy4PyFEL7bfc root@m01
The key’s randomart image is:
+---[RSA 3072]----+
| .  .            |
|. o o=           |
|.o.+.B* . .      |
|o.=oBo++ = .     |
|o*o=o+ .S +      |
|+++==..o.  .     |
|..o+* +  E       |
|     =           |
|                 |
+----[SHA256]-----+
[root@m01 ~]#
[root@m01 ~]# ls .ssh
id_rsa  id_rsa.pub
[root@m01 ~]#

# 2.分发公钥到对应的节点
[root@m01 ~]# ssh-copy-id -i /root/.ssh/id_rsa.pub root@10.0.0.69
/usr/bin/ssh-copy-id: INFO: Source of key(s) to be installed: "/root/.ssh/id_rsa.pub"
The authenticity of host '10.0.0.69 (10.0.0.69)' can’t be established.
ECDSA key fingerprint is SHA256:axJqd8bfgjoW8H0pOHKDpzYBIeUXTbLp3fIcOiAoKEY.
Are you sure you want to continue connecting (yes/no/[fingerprint])? yes
/usr/bin/ssh-copy-id: INFO: attempting to log in with the new key(s), to filter out any that are already installed
/usr/bin/ssh-copy-id: INFO: 1 key(s) remain to be installed -- if you are prompted now it is to install the new keys

Authorized users only. All activities may be monitored and reported.
root@10.0.0.69’s password:

Number of key(s) added: 1

Now try logging into the machine, with:   "ssh 'root@10.0.0.69'"
and check to make sure that only the key(s) you wanted were added.

[root@m01 ~]#

# 3.检验
[root@m01 ~]# ssh root@10.0.0.69  hostname -I

Authorized users only. All activities may be monitored and reported.
10.0.0.69 172.16.1.69
[root@m01 ~]#

# 4.查看文件夹/文件权限
[root@m01 ~]# ll -d /root/.ssh/
drwx------ 2 root root 57 10月 14 11:08 /root/.ssh/
[root@m01 ~]#

# 5.连接成功后客户端会多一个known_hosts文件
[root@m01 ~]# ll /root/.ssh/
总用量 12
-rw------- 1 root root 2590 10月 14 11:04 id_rsa
-rw-r--r-- 1 root root  562 10月 14 11:04 id_rsa.pub
-rw-r--r-- 1 root root  171 10月 14 11:08 known_hosts
[root@m01 ~]#
[root@m01 ~]# cat /root/.ssh/known_hosts
10.0.0.69 ecdsa-sha2-nistp256 AAAAE2VjZHNhLXNoYTItbmlzdHAyNTYAAAAIbmlzdHAyNTYAAABBBAsjaa1azooj/lj+cNMPAbhuscPnw/Ov3m6XtYXyRHdUJlM2+rDaanqxLdikxnEYV5IySXcUJWiJQ6LG4I9TezY=
[root@m01 ~]#


[root@web01 ~]# ll -d /root/.ssh/
drwx------ 2 root root 29 10月 14 11:08 /root/.ssh/
[root@web01 ~]#
[root@web01 ~]# ll  /root/.ssh/
总用量 4
-rw------- 1 root root 562 10月 14 11:08 authorized_keys
[root@web01 ~]#
1.6.4 如何自动分发公钥
# 自动输入密码的解决方案:
sshpass:推荐简单易用.给ssh相关命令提供密码.
expect:较为复杂,语言,实现把交互转换为非交互.

#sshpass选项
-p指定密码
-f指定密码文件(密码放在文件中)
-e 从SSHPASS环境变量读取
export SSHPASS=xxxx

# 解决yes/no的问题
'''
linux连接新的主机的时候,做了1个主机信息认证(校验),选择yes后信息就会被存放到~/.ssh/known_hosts文件中.希望分发公钥的时候临时关闭这个功能.
HostKeyChecking或StrictHostKeyChecking
彻底关闭yes/no提示. Host key check仅仅在使用ssh-copy-id的时候关闭(临时)
'''
# -o选项本质是ssh命令的选项.禁用主机密钥检查(不推荐,因为这会降低安全性)
sshpass -p1 ssh-copy-id -o StrictHostKeyChecking=no 172.16.1.41

'''
ssh -o 命令是用于指定 SSH(Secure Shell)客户端选项的一种方式(禁用主机密钥检查)。SSH 是一种网络协议,用于加密两台计算机之间的通信,并提供安全通道,
以便安全地执行远程登录和其他网络服务。-o 选项后面跟的是具体的 SSH 配置指令,这些指令可以修改 SSH 客户端的默认行为。
在 -o 选项后面,你需要指定一个配置指令及其值,格式为 选项=值。这些配置指令可以是关于认证、连接、加密、会话管理等方面的设置。
'''
1.6.5 一键创建秘钥对 ⭐️⭐️⭐️⭐️⭐️
ssh-keygen -f /root/.ssh/id_rsa -P ''
-f 指定密钥文件位置和文件名
-P 指定密码短语 "" '' 表示设置为空.
1.6.6 书写一键脚本
- 检查密钥文件是否存在,如果不存在则创建 ~/.ssh/id_rsa
- ip列表(变量,文件,数组)分发公钥
- for+分发命令
- 检查成功,失败
- for+批量执行命令
- for+ssh命令 hostname -I
ssh_rsa_dispense.sh
#!/bin/bash
##############################################################
# File Name:ssh_rsa_dispense.sh
# Version:V1.0
# Author:xk
# Organization:
# Desc:
##############################################################

# vars
ips="172.16.1.68 172.16.1.69"
ssh_rsa="/root/.ssh/id_rsa"
server_pwd="123456"  # 服务器密码

# 检查密钥文件是否存在,如果不存在则创建 /root/.ssh/id_rsa
if [ ! -f $ssh_rsa ];then
  ssh-keygen -f $ssh_rsa -P ""
  [ $? -eq 0 ] && echo "密钥创建成功" || echo "密钥创建失败"
fi

# 命令是否存在
rpm -qa | grep sshpass >/dev/dull 2>&1
[ $? -ne 0 ] && yum install -y sshpass

# ip列表(变量,文件,数组)分发公钥
for ip in $ips
  do
    # for+分发命令
    sshpass -p$server_pwd ssh-copy-id -o StrictHostKeyChecking=no $ip
    # 检查成功,失败
    [ $? -ne 0 ] && echo "主机:172.16.1.$ip 分发失败" ||{
	  echo "主机:172.16.1.$ip 分发成功"
	  # 命令检查
	  ssh -p 22 root@$ip hostname -I
	}
  done
1.7 SSHD小结
openssh服务端: /etc/ssh/sshd_config端口,禁用root远程登录.
openssh 客户端: scp(-rp -P端口) ssh(-p端口)
修改sshd服务端配置文件修改ssh端口号,修改ssh禁用root远程登录.
使用ssh命令远程连接,使用scp传输数据.
2.sshd升级
sshd_update_ubt_kylin.sh
 #!/bin/bash
##############################################################
# File Name:sshd_update_ubt_kylin.sh
# Version:V1.0
# Author:xk
# Organization:
# Desc:
##############################################################

# 定义变量
debian=`egrep -i 'ubuntu|debian' /etc/os-release |wc -l`
redhet=`egrep -i 'centos|kylin' /etc/os-release |wc -l`
dir="/etc/xinetd.d/"  # telnet配置文件路径
sshd_pid=`ps -ef |grep sshd |awk '$3==1 {print $2}'`
version="9.6p1"

# 结束sshd进程
stop_sshd(){
	[ -z "${sshd_pid}" ] || kill ${sshd_pid}
}

# 检查目录
check_dic(){
    [ ! -d $dir ] && mkdir -p $dir
}

#配置telnet
cfg_start_telnet_ubt(){

# telnet 配置文件
cat>/etc/xinetd.d/telnet<<'EOF'
service telnet
{
    disable         = no
    flags           = REUSE
    socket_type     = stream
    wait            = no
    user            = root
    server          = /usr/sbin/in.telnetd
    log_on_failure  += USERID
}
EOF

# 启动telnet
systemctl enable  inetd
systemctl restart  inetd
# systemctl is-enabled  inetd

# 添加用户(telnet配置用户)
useradd xk3
echo "xk3:1" | chpasswd
echo  'xk3 ALL=(ALL)  NOPASSWD: ALL '  >>/etc/sudoers
}

telnet_start_kylin(){
  useradd  xk3
  echo Xk123456 |passwd --stdin  xk3
  echo  'xk3 ALL=(ALL)  NOPASSWD: ALL '  >>/etc/sudoers
  systemctl enable telnet.socket
  systemctl start telnet.socket
}


# 编译安装
make_install_new_sshd_ubt(){
  # 安装依赖
  apt install -y gcc zlib1g zlib1g-dev   libssl-dev  make

  # 下载解压sshd
  wget  https://mirrors.aliyun.com/pub/OpenBSD/OpenSSH/portable/openssh-9.6p1.tar.gz
  tar xf openssh-9.6p1.tar.gz
  cd openssh-9.6p1/
  ll

  # 编译安装
  ./configure  --prefix=/app/tools/openssh-9.6p1/
  nproc
  make -j `nproc`
  make install

  # 创建软连接
  ln -s  /app/tools/openssh-9.6p1/  /app/tools/openssh

  # 结束sshd进程
  stop_sshd
}


make_install_new_sshd_kylin(){
wget  https://mirrors.aliyun.com/pub/OpenBSD/OpenSSH/portable/openssh-$version.tar.gz
tar xf openssh-9.6p1.tar.gz
cd openssh-9.6p1/
ll
./configure
nproc
make -j `nproc`
make install
}

# 配置新的sshd
cfg_start_new_sshd_ubt(){
  # 修改新ssh配置文件
cp /app/tools/openssh/etc/sshd_config{,.bak}
cat >>/app/tools/openssh/etc/sshd_config <<EOF
Port 22
PermitRootLogin yes
PasswordAuthentication yes
#GSSAPIAuthentication no 这个不用配置,默认就关闭了.
UseDNS no
EOF

  # 启动服务测试
  /app/tools/openssh/sbin/sshd

  # 关闭并删除openssh 8.2版本的服务端
  dpkg -l |grep openssh |awk '{print $2}' |xargs dpkg --purge

  # 配置PATH环境变量
  echo 'export PATH=/app/tools/openssh/bin/:/app/tools/openssh/sbin/:$PATH' >>/etc/profile
  source  /etc/profile

  #2.检查命令位置
  which ssh ssh-keygen sshd


  # 将sshd添加到systemctl中
  useradd  -s /sbin/nologin -M  sshd

cat>/usr/lib/systemd/system/sshd.service<<'EOF'
[Unit]
Description=OpenSSH 9.6 server daemon
Documentation=man:sshd(8) man:sshd_config(5)
After=network.target

[Service]
Type=simple
ExecStart=/app/tools/openssh/sbin/sshd -D
ExecReload=/bin/kill -HUP $MAINPID
KillMode=process
Restart=on-failure
RestartSec=42s

[Install]
WantedBy=multi-user.target
EOF

  # 结束sshd进程
  # pkill sshd
  stop_sshd
  systemctl daemon-reload
  systemctl enable  --now  sshd

  # 关闭telnet仅使用sshd
  systemctl disable  --now  inetd
}


cfg_start_new_sshd_kylin(){
#pkill sshd
stop_sshd
cp /usr/local/etc/sshd_config{,.bak}
cat >/usr/local/etc/sshd_config <<EOF
PermitRootLogin yes
AuthorizedKeysFile	.ssh/authorized_keys
PasswordAuthentication yes
Subsystem	sftp	/usr/local/libexec/sftp-server
EOF
/usr/local/sbin/sshd

echo '/usr/local/sbin/sshd  '  >>/etc/rc.local
chmod +x  /etc/rc.d/rc.local

# 关闭并删除openssh 8.2版本的服务端
rpm -qa |grep openssh  |xargs rpm -e  --nodeps

# telnet服务开机自启
#systemctl disable  telnet.socket
# 关闭telnet服务
#systemctl  stop  telnet.socket
}

# 安装部署
if [ $debian -gt 0 ];then
  dpkg -l | egrep 'nfs'
  [ $? -ne 0 ] && apt install -y openbsd-inetd telnetd
  #check_dic
  cfg_start_new_sshd_ubt
  cfg_start_new_sshd_ubt
elif [ $redhet -gt 0 ];then
  [ $? -ne 0 ] && yum install -y telnet-server
  make_install_new_sshd_kylin
  cfg_start_new_sshd_kylin

else
  echo "未知系统"
fi
升级到openssh-9.x版本后ssh-copy-id.无法使用问题解决
ssh-copy-id命令找不到
 #1. 复制源码包里的ssh-copy-id命令到bin目录下
cp openssh-9.9p1/contrib/ssh-copy-id     /app/tools/openssh/bin/

#2.给x权限
 chmod  +x /app/tools/openssh/bin/ssh-copy-id

#3.检查PATH
echo $PATH是否有 上面的bin目录

#4.测试ssh-copy-id是否可用
 ssh-copy-id   web01
/app/tools/openssh/bin/ssh-copy-id: INFO: Source of key(s) to be installed: "/root/.ssh/id_rsa.pub"
/app/tools/openssh/bin/ssh-copy-id: INFO: attempting to log in with the new key(s), to filter out any that are already installed
/app/tools/openssh/bin/ssh-copy-id: INFO: 1 key(s) remain to be installed -- if you are prompted now it is to install the new keys

Authorized users only. All activities may be monitored and reported.
root@web01's password:

Number of key(s) added: 1

Now try logging into the machine, with: "ssh 'web01'"
and check to make sure that only the key(s) you wanted were added.

#5.检查秘钥认证
 ssh web01  hostname -I

Authorized users only. All activities may be monitored and reported.
10.0.0.69 172.16.1.69


【推荐】国内首个AI IDE,深度理解中文开发场景,立即下载体验Trae
【推荐】编程新体验,更懂你的AI,立即体验豆包MarsCode编程助手
【推荐】抖音旗下AI助手豆包,你的智能百科全书,全免费不限次数
【推荐】轻量又高性能的 SSH 工具 IShell:AI 加持,快人一步
· Manus重磅发布:全球首款通用AI代理技术深度解析与实战指南
· 被坑几百块钱后,我竟然真的恢复了删除的微信聊天记录!
· 没有Manus邀请码?试试免邀请码的MGX或者开源的OpenManus吧
· 园子的第一款AI主题卫衣上架——"HELLO! HOW CAN I ASSIST YOU TODAY
· 【自荐】一款简洁、开源的在线白板工具 Drawnix