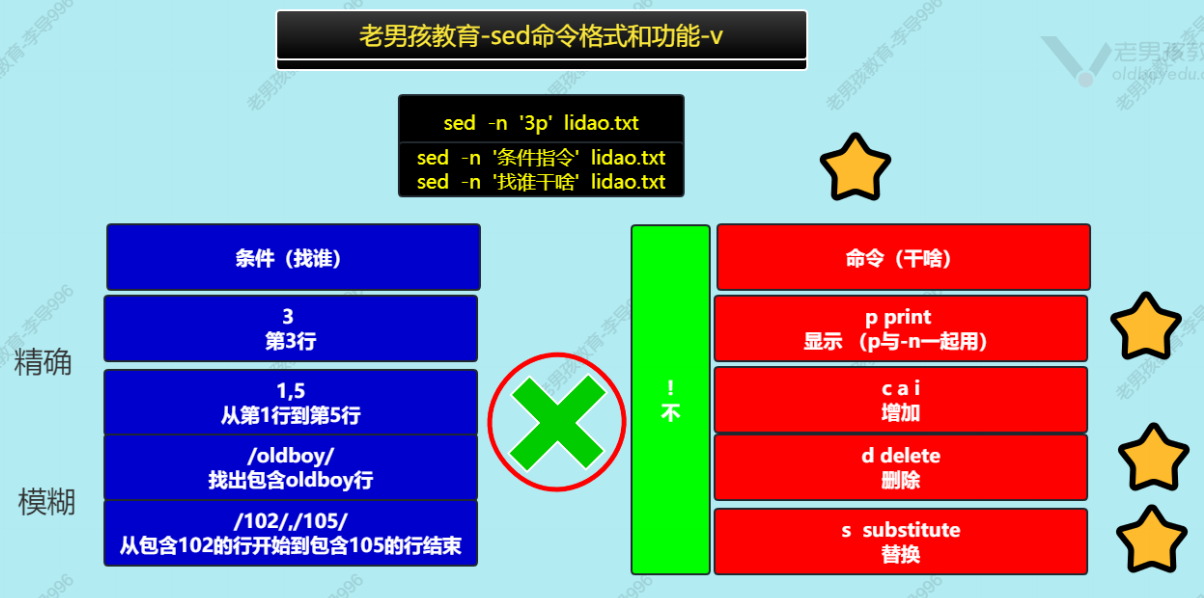
四剑客sed
find
grep/egrep -i -n -E -v -o -l
sed
awk
1. sed命令查找⭐⭐⭐⭐⭐
1.1 根据行号进行过滤
# -n 取消sed命令的默认输出
# p输出print

[root@Kylin-V10-sp3 ~/test]# sed -n '3p' /etc/passwd
daemon:x:2:2:daemon:/sbin:/sbin/nologin
[root@Kylin-V10-sp3 ~/test]#
1.2 根据行号范围进行过滤
#从第1行开始到第3行结束
[root@Kylin-V10-sp3 ~/test]# sed -n '1,3p' /etc/passwd
root:x:0:0:root:/root:/bin/bash
bin:x:1:1:bin:/bin:/sbin/nologin
daemon:x:2:2:daemon:/sbin:/sbin/nologin
[root@Kylin-V10-sp3 ~/test]#

#从第20行到最后一行
[root@Kylin-V10-sp3 ~/test]# sed -n '20,$p' /etc/passwd
rpc:x:32:32:Rpcbind Daemon:/var/lib/rpcbind:/sbin/nologin
dbus:x:81:81:D-Bus:/var/run/dbus:/sbin/nologin
polkitd:x:996:993:User for polkitd:/:/sbin/nologin

#文件最后一行
[root@Kylin-V10-sp3 ~/test]# sed -n '$p' /etc/passwd
nginx:x:990:986:Nginx web server:/var/lib/nginx:/sbin/nologin
[root@Kylin-V10-sp3 ~/test]#
1.3 类似于grep/egrep进行过滤
#过滤指定内容 //
[root@Kylin-V10-sp3 ~/test]# sed -n '/root/p' /etc/passwd
root:x:0:0:root:/root:/bin/bash
operator:x:11:0:operator:/root:/sbin/nologin
[root@Kylin-V10-sp3 ~/test]#
#使用正则 记得加上-r
[root@Kylin-V10-sp3 ~/test]# sed -nr '/root|xk/p' /etc/passwd
root:x:0:0:root:/root:/bin/bash
operator:x:11:0:operator:/root:/sbin/nologin
[root@Kylin-V10-sp3 ~/test]#
1.4 取出文件中某个范围的内容
# seq 3 25 >num.txt
# 从包含5的行到包含15的行
[root@Kylin-V10-sp3 ~/test]# seq 3 25 >num.txt
[root@Kylin-V10-sp3 ~/test]#
# 多个25,/5/匹配配到了25中5,找不到包含15的数字就会一直找到文件最后。
[root@Kylin-V10-sp3 ~/test]# sed -n '/5/ , /15/p' num.txt
5
6
7
8
9
10
11
12
13
14
15
25
[root@Kylin-V10-sp3 ~/test]# sed -n '/^5/ , /^15/p' num.txt
5
6
7
8
9
10
11
12
13
14
15
[root@Kylin-V10-sp3 ~/test]#
日志处理案例access.log过滤出 11点00分开始到11:10分结束的日志
温馨提示:
🅰 先去检查下过滤是否精确.
🅱 检查是否有对应时间点的日志 (开始时间,结束的时间)
# 是否精确
只用06:00 可能会匹配到06:00:00还有可能是06分00秒
06:00:00 多些一点点就行

# 是否存在的问题
[root@Kylin-V10-sp3 /opt/packages]# grep '06:00:00' secure-20161219 | wc -l   # 不存在
0
[root@Kylin-V10-sp3 /opt/packages]# grep '06:50:00' secure-20161219 | wc -l   # 存在多个
5
最后修改为06:30:00 到06:51:00范围的日志
[root@Kylin-V10-sp3 /opt/packages]# grep '06:50:00' secure-20161219
Dec 13 06:50:00 localhost sshd[21072]: Invalid user manager from 91.224.161.71 port 40189
Dec 13 06:50:00 localhost sshd[21072]: input_userauth_request: invalid user manager [preauth]
Dec 13 06:50:00 localhost sshd[21072]: error: Could not get shadow information for NOUSER
Dec 13 06:50:00 localhost sshd[21072]: Failed password for invalid user manager from 91.224.161.71 port 40189 ssh2
Dec 13 06:50:00 localhost sshd[21072]: Connection closed by 91.224.161.71 port 40189 [preauth]
[root@Kylin-V10-sp3 /opt/packages]# sed -n '/06:30:00/,/06:51:00/p' secure-20161219 | wc -l
152

# 过滤出日志
[root@Kylin-V10-sp3 /opt/packages]# sed -n '/16 11:00:00/,/16 11:10:00/p' secure-20161219 | head -5
Dec 16 11:00:00 localhost sshd[2094]: Failed password for root from 112.85.42.103 port 41303 ssh2
Dec 16 11:00:00 localhost sshd[2094]: Failed password for root from 112.85.42.103 port 41303 ssh2
Dec 16 11:00:01 localhost sshd[2094]: Failed password for root from 112.85.42.103 port 41303 ssh2
Dec 16 11:00:01 localhost sshd[2094]: Failed password for root from 112.85.42.103 port 41303 ssh2
Dec 16 11:00:01 localhost sshd[2094]: error: maximum authentication attempts exceeded for root from 112.85.42.103 port 41303 ssh2 [preauth]
[root@Kylin-V10-sp3 /opt/packages]#
# 统计数量
[root@Kylin-V10-sp3 /opt/packages]# sed -n '/16 11:00:00/,/16 11:10:00/p' secure-20161219 | wc -l
1176
[root@Kylin-V10-sp3 /opt/packages]#
# 统计失败的次数
[root@Kylin-V10-sp3 /opt/packages]# sed -n '/16 11:00:00/,/16 11:10:00/p' secure-20161219 | grep -i 'failed password' |wc -l
882
[root@Kylin-V10-sp3 /opt/packages]#
1.5 小结sed取行过滤
- 查找功能:
- 根据行号
- 类似于grep/egrep:进行过滤 //
- 范围的过滤:/从哪里来/,/到哪里去/ 日志过滤
2. sed改(替换) ⭐⭐⭐⭐⭐
2.1 把文件中的we替换为you
用于修改配置文件内容.
's###g'
s sub替换 substitute
g 全局替换global
's###g'
's@@@g'
's///g
点击查看代码
[root@Kylin-V10-sp3 ~/test]# cat >sed.txt<<EOF
> beautifulgirl
> beautifulgirl
> we
> we love
> 12306
> EOF
[root@Kylin-V10-sp3 ~/test]#
# 没有真的替换
[root@Kylin-V10-sp3 ~/test]# sed 's#we#you#g' sed.txt
beautifulgirl
beautifulgirl
you
you love
12306
[root@Kylin-V10-sp3 ~/test]#
# 加上-i 参数后为替换  sed
# 'sg' g的含义 不加上g默认替换第1个,加了全局换
[root@Kylin-V10-sp3 ~/test]# sed -i 's#we#you#g' sed.txt
[root@Kylin-V10-sp3 ~/test]#
[root@Kylin-V10-sp3 ~/test]# cat sed.txt
beautifulgirl
beautifulgirl
you
you love
12306
[root@Kylin-V10-sp3 ~/test]#

# 先备份/etc/ssh/sshd_config到当前目录然后修改
[root@Kylin-V10-sp3 ~/test]# cp /etc/ssh/sshd_config .
[root@Kylin-V10-sp3 ~/test]#
[root@Kylin-V10-sp3 ~/test]# sed -i 's@#Port 22@Port 18326@g' sshd_config
[root@Kylin-V10-sp3 ~/test]#
# 修改之后的查看
[root@Kylin-V10-sp3 ~/test]# egrep -v '^$|#' sshd_config | head -3
Port 18326
HostKey /etc/ssh/ssh_host_rsa_key
HostKey /etc/ssh/ssh_host_ecdsa_key
[root@Kylin-V10-sp3 ~/test]#

# 修改文件之前通过sed命令进行备份,然后再进行修改.
[root@Kylin-V10-sp3 ~/test]# ls
01.txt  2.txt      access.log  num.txt  re.txt  sed.txt      time.log
1.txt   2.txt.bak  msg.log     passwd   secure  sshd_config
[root@Kylin-V10-sp3 ~/test]# sed -i.bak 's@#Port 18326@Port 22@g' sshd_config
[root@Kylin-V10-sp3 ~/test]#
[root@Kylin-V10-sp3 ~/test]# ls
01.txt  2.txt      access.log  num.txt  re.txt  sed.txt      sshd_config.bak
1.txt   2.txt.bak  msg.log     passwd   secure  sshd_config  time.log
[root@Kylin-V10-sp3 ~/test]#
2.2 复制/etc/passwd到当前目录,把passwd文件的第1列和最后一列调换位置
对每一行的内容进行处理.
sed命令反向引用/后向引用.
点击查看代码
# 简单例子
# 把目标通过()括起来进行分组,后面通过\数字进行引用.
[root@Kylin-V10-sp3 ~/test]# echo 123456
123456
[root@Kylin-V10-sp3 ~/test]#
[root@Kylin-V10-sp3 ~/test]# echo 123456 |sed -r 's#(12)(34)(56)#\3\2\1#g'
563412
[root@Kylin-V10-sp3 ~/test]#

# 调换第1列的用户名和最后一列的命令解释器
[root@Kylin-V10-sp3 ~/test]# cat >passwd_test<<EOF
> root:x:0:0:root:/root:/bin/bash
> bin:x:1:1:bin:/bin:/sbin/nologin
> daemon:x:2:2:daemon:/sbin:/sbin/nologin
> adm:x:3:4:adm:/var/adm:/sbin/nologin
> lp:x:4:7:lp:/var/spool/lpd:/sbin/nologin
> EOF
[root@Kylin-V10-sp3 ~/test]#
[root@Kylin-V10-sp3 ~/test]# sed -r 's#^(.*)(:x.*:)(.*)$#\3\2\1#g' passwd_test
/bin/bash:x:0:0:root:/root:root
/sbin/nologin:x:1:1:bin:/bin:bin
/sbin/nologin:x:2:2:daemon:/sbin:daemon
/sbin/nologin:x:3:4:adm:/var/adm:adm
/sbin/nologin:x:4:7:lp:/var/spool/lpd:lp
[root@Kylin-V10-sp3 ~/test]#
2.3 sed替换小结
sed替换格式,选项-i.bak
's###g'
反向引用(后向引用)sed对数据进行精加工: 第1列,最后1列
# 处理日志中的日期
[root@Kylin-V10-sp3 ~/test]# cat >time.log<<EOF
> [22/Nov/2015:11:02:00 +0800]
> [22/Nov/2015:11:02:00 +0800]
> [22/Nov/2015:11:02:00 +0800]
> [22/Nov/2015:11:02:00 +0800]
> [22/Nov/2015:11:02:00 +0800]
> [22/Nov/2015:11:02:00 +0800]
> [22/Nov/2015:11:02:00 +0800]
> [22/Nov/2015:11:02:00 +0800]
> [22/Nov/2015:11:02:00 +0800]
> [22/Nov/2015:11:02:00 +0800]
> EOF
[root@Kylin-V10-sp3 ~/test]#
[root@Kylin-V10-sp3 ~/test]# sed -r 's#^\[([0-9]{2})(/[a-zA-Z]{3}/)([0-9]{4})(:.*)]$#\3\2\1\4#g' time.log
2015/Nov/22:11:02:00 +0800
2015/Nov/22:11:02:00 +0800
2015/Nov/22:11:02:00 +0800
2015/Nov/22:11:02:00 +0800
2015/Nov/22:11:02:00 +0800
2015/Nov/22:11:02:00 +0800
2015/Nov/22:11:02:00 +0800
2015/Nov/22:11:02:00 +0800
2015/Nov/22:11:02:00 +0800
2015/Nov/22:11:02:00 +0800
[root@Kylin-V10-sp3 ~/test]#
3. sed删除
按照行
d === delete删除
点击查看代码
# 第三行删除
[root@Kylin-V10-sp3 ~/test]# sed '3d' num.txt
3
4
6
7
8
9
10
11
12
13
14
15
16
17
18
19
20
21
22
23
24
25
26
27
28
29
30
31
32
33
34
35
[root@Kylin-V10-sp3 ~/test]#
#1开头的行删除
[root@Kylin-V10-sp3 ~/test]# sed '/^1/d' num.txt
3
4
5
6
7
8
9
20
21
22
23
24
25
26
27
28
29
30
31
32
33
34
35
[root@Kylin-V10-sp3 ~/test]#
4. sed增加
在某一行后面/前面增加内容(非最后一行)
- cai 菜
- a append在指定行下面增加1行.
- i insert在指定行上面增加1行.
- c replace/clean 清空指定行,然后写入内容
点击查看代码
[root@Kylin-V10-sp3 ~/test]# seq 10 |sed '3a girl'
1
2
3
girl
4
5
6
7
8
9
10
[root@Kylin-V10-sp3 ~/test]# seq 10 |sed '3i girl'
1
2
girl
3
4
5
6
7
8
9
10
[root@Kylin-V10-sp3 ~/test]# seq 10 |sed '3c girl'
1
2
girl
4
5
6
7
8
9
10
[root@Kylin-V10-sp3 ~/test]#
5. sed小结
- 增删改查


【推荐】国内首个AI IDE,深度理解中文开发场景,立即下载体验Trae
【推荐】编程新体验,更懂你的AI,立即体验豆包MarsCode编程助手
【推荐】抖音旗下AI助手豆包,你的智能百科全书,全免费不限次数
【推荐】轻量又高性能的 SSH 工具 IShell:AI 加持,快人一步
· Manus重磅发布:全球首款通用AI代理技术深度解析与实战指南
· 被坑几百块钱后,我竟然真的恢复了删除的微信聊天记录!
· 没有Manus邀请码?试试免邀请码的MGX或者开源的OpenManus吧
· 园子的第一款AI主题卫衣上架——"HELLO! HOW CAN I ASSIST YOU TODAY
· 【自荐】一款简洁、开源的在线白板工具 Drawnix