Azure DevOps Server 的连接源(Artifacts):八、npm发布和安装包
1. 概述
本文主要介绍如何基于Azure DevOps Server的Artifacts连接源,实现nodejs依赖包的下载、发布管理;使用Azure DevOps Server的Artifacts模块作为企业内网的npm私服。
2. 前期准备
2.1 更改连接源
- 方法一:
安装了node后,系统默认的连接源是npmjs.org ,需要我们手动将本地计算机的连接源设置为DevOps Server中的一个连接源。
我们在这篇wiki《NPM 基础知识》中介绍过如何修改开发人员本地计算机的npm连接源。只需要参考下面的命令更改连接源即可
C:\Users\zhang>npm config get registry
http://registry.npmjs.org/

C:\Users\zhang>npm config set registry http://ads2/DefaultCollection/_packaging/a1%40Local/npm/registry/

C:\Users\zhang>
2.2 配置链接源的权限
- 打开DevOps Server中的连接源,并导航到npm的配置页面,如下图
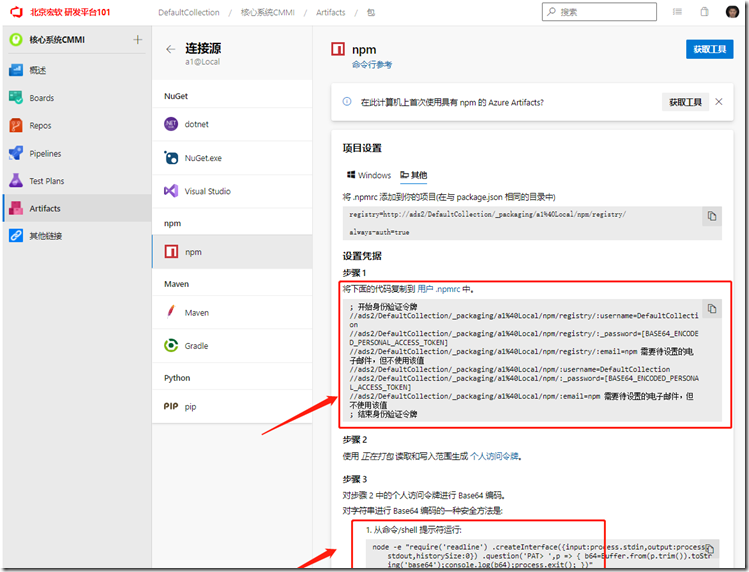
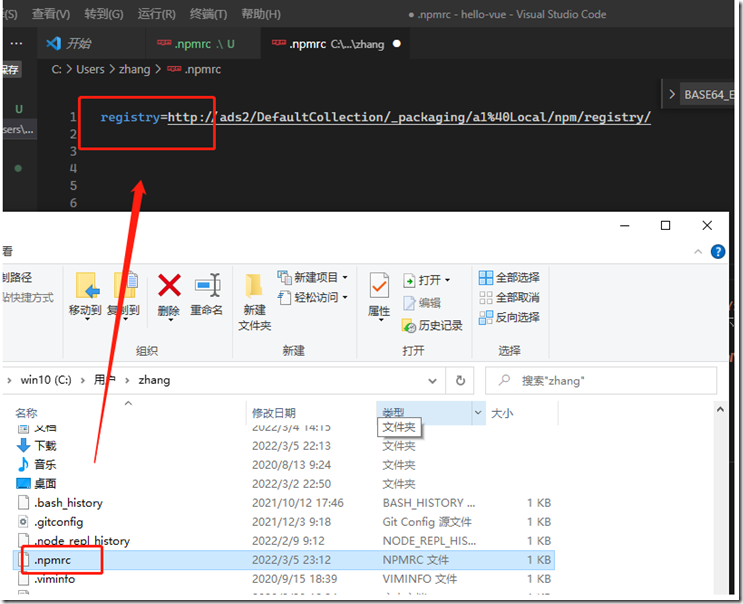
- 参考上面截图中的指导,将身份验证令牌的部分复制到本地计算机的用户配置文件中,文件路径一般是C:\Users\zhang.npmrc
- 在DevOps Server中新建一个令牌
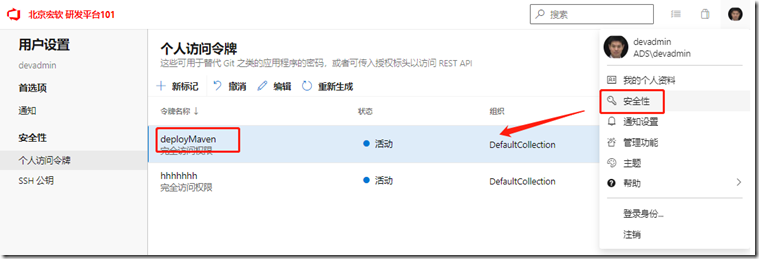
- 参考连接源截图中第二个箭头指示的操作方法,将令牌转换为base64编码(主要目的是加强安全),并将编码后的base64字符替换用户配置文件.npmrc中的[BASE64_ENCODED_PERSONAL_ACCESS_TOKEN]
通过本章节中的操作,以及配置好了本地计算机的连接源,并且配置了连接DevOps Server的认证信息,下面就可以从DevOps下载依赖包,或者将依赖包发布到DevOps Server。
3. 从Artifacts下载依赖包
3.1 将依赖包安装到全局目录
例如,我们要从DevOps Server的连接源()中安装express,并将其安装到全局目录,使用命令
C:\Users\zhang>npm config get registry
http://ads2/DefaultCollection/_packaging/a1/npm/registry/

C:\Users\zhang>npm install express -g
+ express@4.17.3
updated 1 package in 1.733s


C:\Users\zhang>
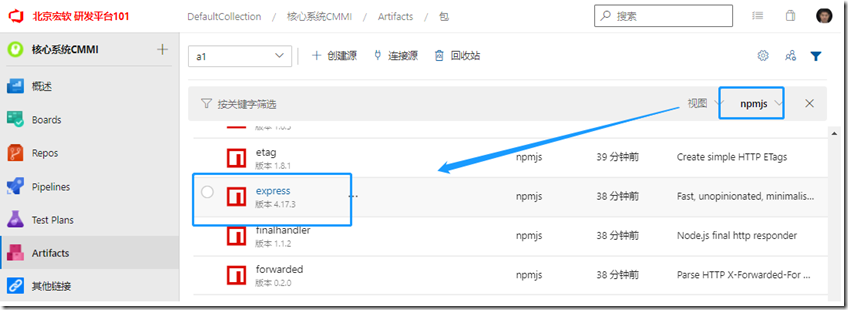
当用户从Azure DevOps Server中下载依赖包的过程中,如果DevOps Server中没有对应版本的依赖包,DevOps Server会自动从上游源(http://registry.npmjs.org )中下载依赖包,并缓存在DevOps Server的这个连接源中,如下图:
注意,从上游源下载依赖包的前提,是DevOps Server的应用层可以通过互联网连接到registry.npmjs.org
4. 将依赖包发布到Artifacts
下面通过示例,创建一个简单的npm包文件,并将其发布到DevOps Server的连接源中。
- 新建npm包
- 新建npm包对应的文件夹D:\temp\bjgreat-soft
- 运行npm init命令初始化一个项目
D:\temp\bjgreat-soft>npm init
This utility will walk you through creating a package.json file.
It only covers the most common items, and tries to guess sensible defaults.

See `npm help json` for definitive documentation on these fields
and exactly what they do.

Use `npm install <pkg>` afterwards to install a package and
save it as a dependency in the package.json file.

Press ^C at any time to quit.
package name: (bjgreat-soft)
version: (1.0.0) 1.0.1
description: 北京宏软科技有限公司(简称“宏软科技”)是一家专业从事软件研发运维一体化服务(DevOps)和应用软件生命周期管 理(ALM)服务的技术方案提供商。
entry point: (index.js)
test command:
git repository:
keywords: 宏软科技
author: 张洪君
license: (ISC)
About to write to D:\temp\bjgreat-soft\package.json:

{
  "name": "bjgreat-soft",
  "version": "1.0.1",
  "description": "北京宏软科技有限公司",
  "main": "index.js",
  "scripts": {
    "test": "echo \"Error: no test specified\" && exit 1"
  },
  "keywords": [
    "宏软科技"
  ],
  "author": "张洪君",
  "license": "ISC"
}


Is this OK? (yes)

D:\temp\bjgreat-soft>
上面的命令会在当前目录下,自动生成一个文件package.json.
- 接下来就是编写自己的程序,这里省略;你还可以在依赖包中增加一个README.md的说明文件,例如我在这里随意粘贴了一些说明文件,文字的格式是MarkDown语法;同时需要修改上面的package.json,将README.md添加到包中,文件的内容如下:
{
  "name": "bjgreat-soft",
  "version": "1.0.1",
  "description": "北京宏软科技有限公司",
  "main": "index.js",
  "scripts": {
    "test": "echo \"Error: no test specified\" && exit 1"
  },
  "keywords": [
    "宏软科技"
  ],
  "author": "张洪君",
  "license": "ISC",
  "files": [
    "README.md"
  ]
}
- 执行发布命令npm publish
D:\temp\bjgreat-soft>npm publish
npm notice
npm notice package: bjgreat-soft@1.0.4
npm notice === Tarball Contents ===
npm notice 320B  package.json
npm notice 1.6kB README.md
npm notice === Tarball Details ===
npm notice name:          bjgreat-soft
npm notice version:       1.0.4
npm notice package size:  1.2 kB
npm notice unpacked size: 1.9 kB
npm notice shasum:        b9658da9382d92ec0d339bfeb93e3153b497a8f4
npm notice integrity:     sha512-Q35+8/NnXyquL[...]dxcg0iTxsoZKQ==
npm notice total files:   2
npm notice
+ bjgreat-soft@1.0.4
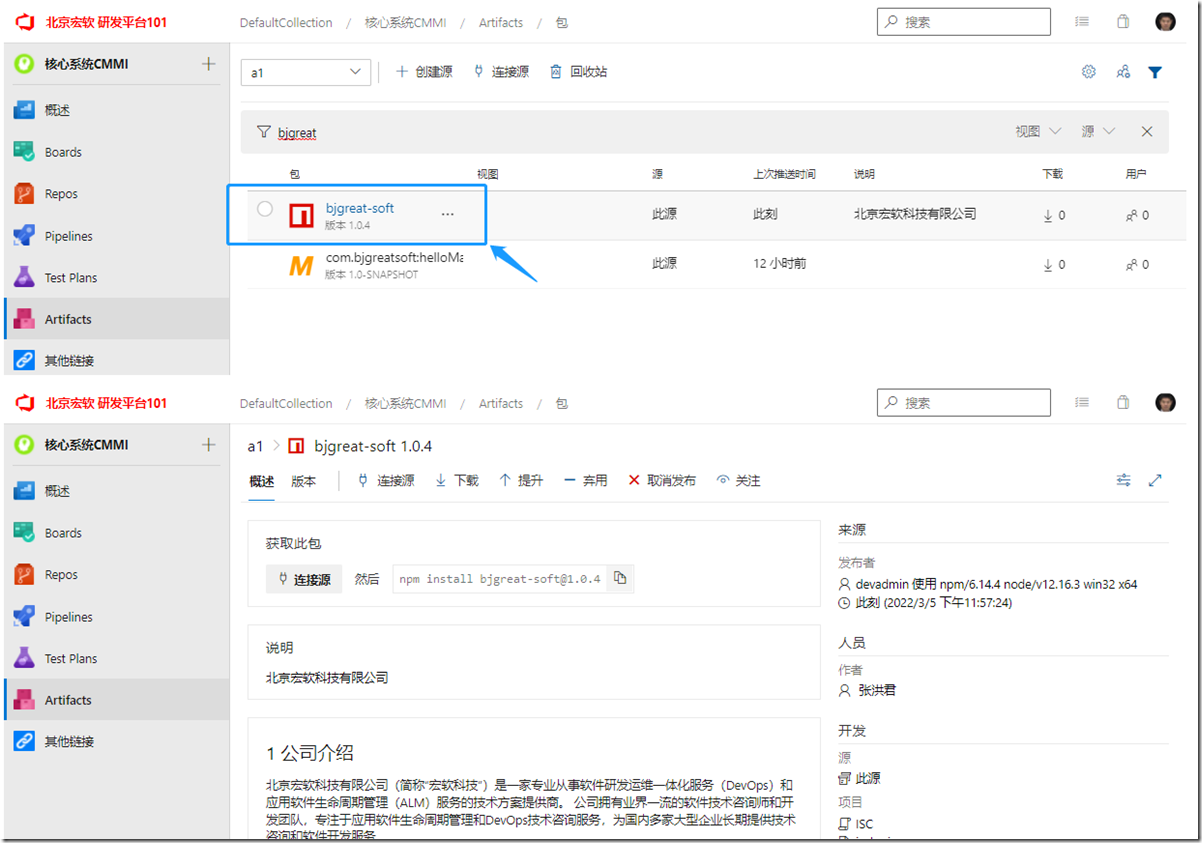
当上面的操作正常结束后,我们就可以在DevOps Server的Artifacts连接源中看到刚刚发布的npm包:
5. 相关文章
- Azure DevOps Server 的连接源(Artifacts):一、概述
- Azure DevOps Server 的连接源(Artifacts):二、nuget包管理
- Azure DevOps Server 的连接源(Artifacts):三、从Artifacts中下载Nuget包
- Azure DevOps Server 的连接源(Artifacts):四、python基础(Django、Flask)
- Azure DevOps Server 的连接源(Artifacts):五、python包管理pip和twine
- Azure DevOps Server 的连接源(Artifacts):六、发布python程序(Twine pip)
- Azure DevOps Server 的连接源(Artifacts):七、NPM 基础知识
- Azure DevOps Server 的连接源(Artifacts):八、 npm发布和安装包
- Azure DevOps Server 的连接源(Artifacts):九、vue示例和自动打包
如果需要,你还可以从微软Azure DevOps Server 的在线文档,查询更多的权威资料,也欢迎通过下面的联系方式与我沟通,相互学习,相互提高!
https://www.cnblogs.com/danzhang
Azure DevOps MVP 张洪君


