
keras模型的构建、训练、加载(模型不刷屏)
设置模型不刷屏
让模型训练时不刷屏,但是要动态显示训练过程
- 推荐方法
import ipykernel # 设置keras训练、预测的verbose=1 - 尝试方法
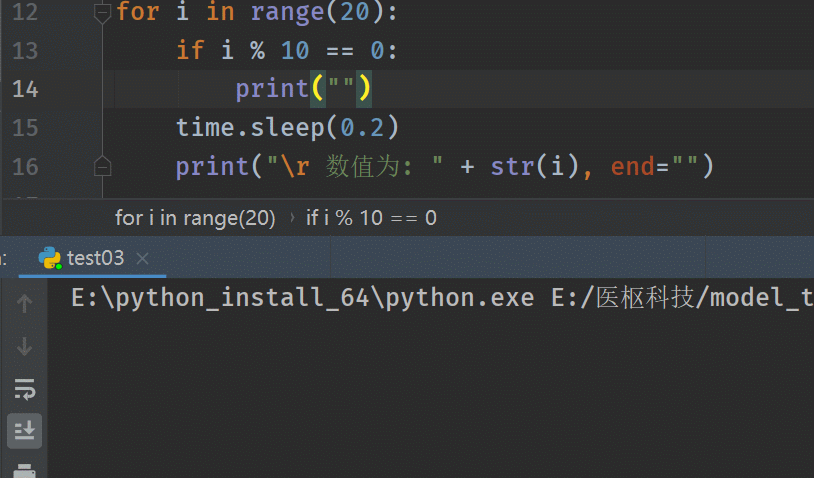
输出结果:# 使用print("\r ……") for i in range(20): if i % 10 == 0: print("") time.sleep(0.2) print("\r 数值为: " + str(i), end="")
keras模型构建与训练
搭建深度学习模型
keras搭建模型使用import ipykernel。而使得模型的输出进度条不会刷屏!
以手写数字识别为例,搭建深度学习识别模型!
@staticmethod
def get_h5():
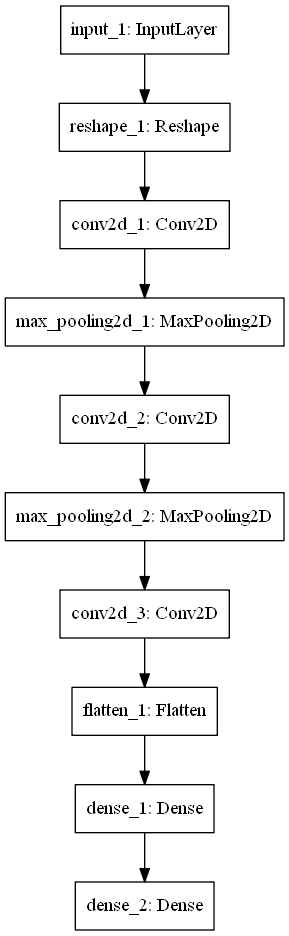
x = keras.Input([28, 28])
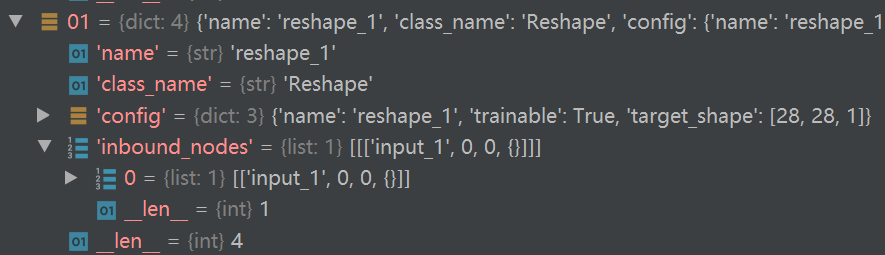
reshape1 = keras.layers.Reshape([28, 28, 1])(x)
Conv2D_1 = keras.layers.Conv2D(32, (3, 3), activation="relu")(reshape1)
MaxPooling_1 = keras.layers.MaxPool2D((2, 2))(Conv2D_1)
Conv2D_2 = keras.layers.Conv2D(64, (3, 3), activation="relu")(MaxPooling_1)
MaxPooling_2 = keras.layers.MaxPool2D((2, 2))(Conv2D_2)
Conv2D_3 = keras.layers.Conv2D(64, (3, 3), activation="relu")(MaxPooling_2)
flatten_1 = keras.layers.Flatten()(Conv2D_3)
Dense_1 = keras.layers.Dense(64, activation="relu")(flatten_1)
Dense_2 = keras.layers.Dense(10, activation="softmax")(Dense_1)
model = keras.Model(x, Dense_2)
print(model.summary())
return model
if __name__ == '__main__':
model_1 = get_h5()
print(model_1.summary())
打印模型架构信息:
_________________________________________________________________
Layer (type)                 Output Shape              Param #
=================================================================
input_1 (InputLayer)         (None, 28, 28)            0
_________________________________________________________________
reshape_1 (Reshape)          (None, 28, 28, 1)         0
_________________________________________________________________
conv2d_1 (Conv2D)            (None, 26, 26, 32)        320
_________________________________________________________________
max_pooling2d_1 (MaxPooling2 (None, 13, 13, 32)        0
_________________________________________________________________
conv2d_2 (Conv2D)            (None, 11, 11, 64)        18496
_________________________________________________________________
max_pooling2d_2 (MaxPooling2 (None, 5, 5, 64)          0
_________________________________________________________________
conv2d_3 (Conv2D)            (None, 3, 3, 64)          36928
_________________________________________________________________
flatten_1 (Flatten)          (None, 576)               0
_________________________________________________________________
dense_1 (Dense)              (None, 64)                36928
_________________________________________________________________
dense_2 (Dense)              (None, 10)                650
=================================================================
Total params: 93,322
Trainable params: 93,322
Non-trainable params: 0
_________________________________________________________________
None
数据准备
手写数字识别数据集是一个经典的数据集,这里我们直接获取或使用keras.datasets.mnist.load_data()获取。第一次执行,本地没有会下载,第二次会直接加载本地的数据!
    @staticmethod
    def load_data():
        # 先下载数据(http://yann.lecun.com/exdb/mnist/)到一个文件夹;若使用下面的命令
        # 直接下载,数据默认会保存到用户目录下的 .keras/datasets/ 里面;当然你也可以指定缓
        # 存的路径,如 "./mnist_data"
        (x_train, y_train), (x_test, y_test) = keras.datasets.mnist.load_data("./mnist_data")
        return x_train, y_train, x_test, y_test
模型编译、训练
    def compile(self):
        model = self.model
        model.compile(keras.optimizers.Adam(),
                      # loss=tf.keras.losses.categorical_crossentropy(),
                      loss="binary_crossentropy",
                      metrics=["acc", "poisson"])
        return model
    # 注:metrics里你可以添加自己需要的监控指标!
# ------------------------------------------------------------------------------
    def fit(self):
        model = self.compile()
        checkpoint = keras.callbacks.ModelCheckpoint("checkpoint/best_model.h5", save_best_only=True)
        model.fit(self.train_x, keras.utils.np_utils.to_categorical(self.data[1], 10),
                  batch_size=8, epochs=20, verbose=1,
                  callbacks=[checkpoint], validation_split=0.3,
                  shuffle=True)
        model.save("./checkpoint/mnist_model.h5")
        return model
模型预测
使用plot_model会有一些问题,建议参考传送门! 我这边查遍了所有可查的资源也没有解决可视化的bug,先留着吧,以后研究。
	def inference(self):
        if os.path.exists(os.getcwd() + "/checkpoint/best_model.h5"):
            model = keras.models.load_model(os.getcwd() + "/checkpoint/best_model.h5")
        else:
            model = self.fit()
        # keras.utils.plot_model(model, to_file="./model.png")
        pred_x = model.predict(self.test_x)
        return pred_x
使用笔记本电脑测试输出模型架构:
# 测试代码:
model = keras.models.load_model(os.getcwd() + "/checkpoint/best_model.h5")
keras.utils.plot_model(model, to_file="./model.png")
测试结果:
输出预测的数值
    h5_c = KerasH5()
    test_pred = h5_c.inference()
    # 获取预测的test图片数字
    test_pred = np.argmax(test_pred, axis=1)
    print(test_pred - h5_c.data[3])
完整代码
class KerasH5:

    def __init__(self):
        self.model = self.get_h5()
        self.data = self.load_data()
        self.handle_data()

    @staticmethod
    def get_h5():
        x = keras.Input([28, 28])
        reshape1 = keras.layers.Reshape([28, 28, 1])(x)
        Conv2D_1 = keras.layers.Conv2D(32, (3, 3), activation="relu")(reshape1)
        MaxPooling_1 = keras.layers.MaxPool2D((2, 2))(Conv2D_1)
        Conv2D_2 = keras.layers.Conv2D(64, (3, 3), activation="relu")(MaxPooling_1)
        MaxPooling_2 = keras.layers.MaxPool2D((2, 2))(Conv2D_2)
        Conv2D_3 = keras.layers.Conv2D(64, (3, 3), activation="relu")(MaxPooling_2)
        flatten_1 = keras.layers.Flatten()(Conv2D_3)
        Dense_1 = keras.layers.Dense(64, activation="relu")(flatten_1)
        Dense_2 = keras.layers.Dense(10, activation="softmax")(Dense_1)
        model = keras.Model(x, Dense_2)
        print(model.summary())
        return model

    @staticmethod
    def load_data():
        # 先下载数据(http://yann.lecun.com/exdb/mnist/)到一个文件夹;若使用下面的命令
        # 直接下载,数据默认会保存到用户目录下的 .keras/datasets/ 里面;当然你也可以指定缓
        # 存的路径,如 "./mnist_data"
        (x_train, y_train), (x_test, y_test) = keras.datasets.mnist.load_data("./mnist_data")
        return x_train, y_train, x_test, y_test

    def handle_data(self):
        self.train_x = self.data[0] / 255
        self.test_x = self.data[2] / 255
        pass

    def compile(self):
        model = self.model
        model.compile(keras.optimizers.Adam(),
                      # loss=tf.keras.losses.categorical_crossentropy(),
                      loss="binary_crossentropy",
                      metrics=["acc", "poisson"])
        return model

    def fit(self):
        model = self.compile()
        checkpoint = keras.callbacks.ModelCheckpoint("checkpoint/best_model.h5", save_best_only=True)
        model.fit(self.train_x, keras.utils.np_utils.to_categorical(self.data[1], 10),
                  batch_size=8, epochs=20, verbose=1,
                  callbacks=[checkpoint], validation_split=0.3,
                  shuffle=True)
        model.save("./checkpoint/mnist_model.h5")
        return model

    def inference(self):
        if os.path.exists(os.getcwd() + "/checkpoint/best_model.h5"):
            model = keras.models.load_model(os.getcwd() + "/checkpoint/best_model.h5")
        else:
        	model = self.fit()
        # keras.utils.plot_model(model, to_file="./model.png")
        pred_x = model.predict(self.test_x)
        return pred_x

    def evaluate(self):
        model = keras.models.load_model(os.getcwd() + "/checkpoint/best_model.h5")
        res = model.evaluate(self.test_x, keras.utils.np_utils.to_categorical(self.data[3], 10),
                             batch_size=100, verbose=1)
        # "Returns the loss value & metrics values for the model in test mode."
        # res = ["loss", "acc", "poisson"] , for my metrics.
        return res


if __name__ == '__main__':
    h5_c = KerasH5()
    test_pred = h5_c.inference()
    test_pred = np.argmax(test_pred, axis=1)
    print(test_pred - h5_c.data[3])
    print(h5_c.evaluate())
h5模型文件加载与分析
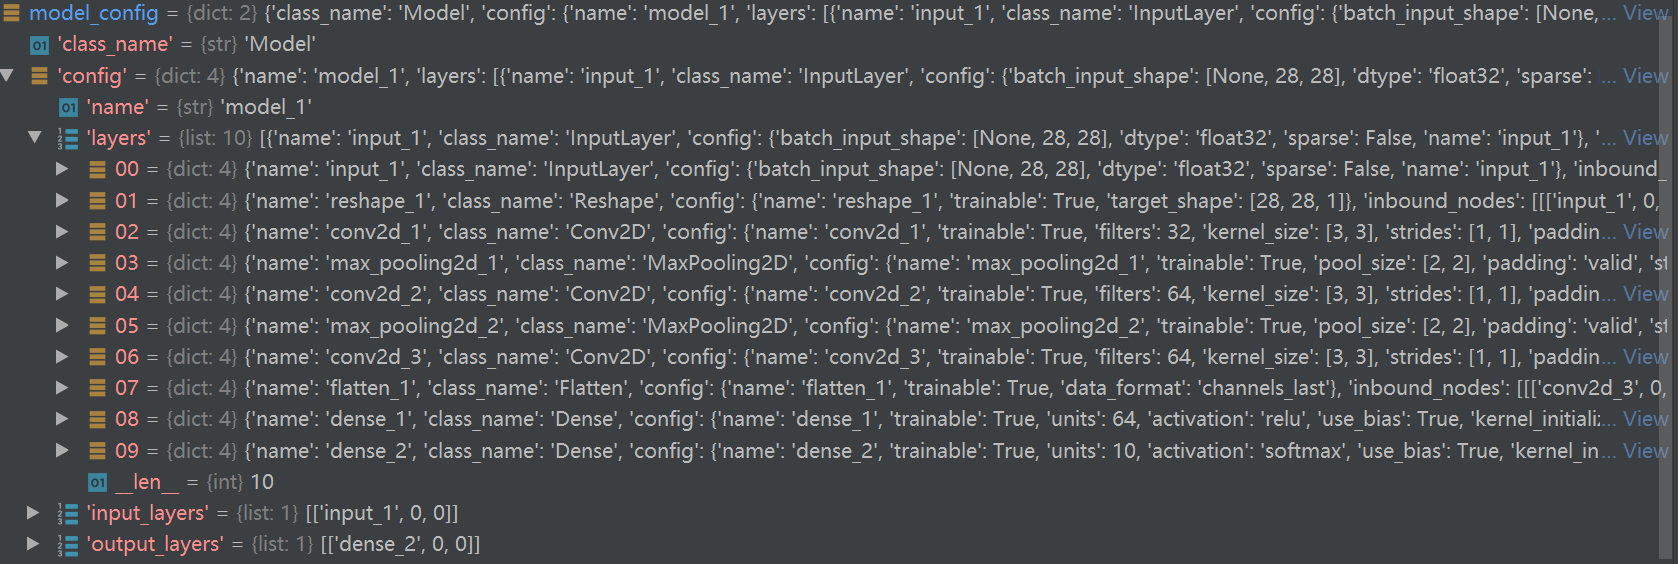
我们生成的模型文件主要有两个关键字:'model_weights' 与 'optimizer_weights',你感兴趣的东西主要在第一个里面!'model_weights'里面主要是node与weight。测试'model_weights'关键字里面的'conv2d_1',"conv2d_1"关键字里面还是嵌套了关键字"conv2d_1",下一级关键字为:bias:0与kernel:0,即模型的权值!这里的0标识了相应的层级输出单元的索引,如某单元有两个输出,那么可能会出现kernel:1。h5文件的结构如下:
  -best_model.h5
  --model_weights
  ---conv2d_1
  ----conv2d_1
  -----bias
  -----kernel
  ……
  --optimizer_weights
best_model的主要node
 左边的顺序是打印的顺序,可以发现其并不是我们模型架构的本身顺序,那么如何还原我们的模型呢?
我们的顺序是"input_1"------>"reshape_1"------>"conv2d_1",如果知道了这些顺序,实际上我们自定义计算路径实现预测。h5文件中的每个过滤器的权值是分开的,HDFView可视化工具只能可视化第一个filter。如图所示:

Conv2d_2有64个3x3x32的filter,也只显示了3x3x32的!
# 输出"conv2d_1"的kernel:0
import h5py

with h5py.File("./checkpoint/best_model.h5", "r") as f:
    i = 0
    for node in f['model_weights']['conv2d_1']['conv2d_1']["kernel:0"]:
        print(f"第{i}个数组:\n", node)
        i += 1
输出结果为:
第0个数组:
 [[[ 0.10564    -0.16097234  0.09915016  0.24613042 -0.08456963
   -0.00454617 -0.05960701  0.06925311 -0.06459317  0.22562805
    0.01301621  0.01064035 -0.20790304  0.04066228 -0.11448191
    0.18316612 -0.17505792  0.1834265  -0.19409508  0.1662196
    0.24422747  0.00287141  0.05400374  0.14116095 -0.4437251
   -0.19318981 -0.1868813  -0.07384571  0.04616514 -0.09265891
   -0.06916037 -0.28320184]]

 [[ 0.24024534  0.03670109 -0.00417878  0.04924528 -0.00590578
    0.06448627  0.13575661  0.07192774 -0.06872132 -0.01627582
   -0.02804667 -0.15541585  0.0873699   0.11507094 -0.04232902
    0.17835136  0.06311885  0.0213728  -0.3960938   0.12034985
   -0.09786782 -0.14218147 -0.1110921   0.1760532   0.04455886
    0.06668992 -0.20053528  0.01761849 -0.23805025  0.0733271
    0.1568982  -0.12684295]]

 [[ 0.0986921   0.00448399  0.10003785 -0.18682715  0.01353289
   -0.11072443 -0.18143338 -0.07571129 -0.00445067 -0.25813603
    0.00260918 -0.080878    0.15965232 -0.23025012  0.3168462
    0.00272685 -0.0179387  -0.24480435 -0.2689363   0.26252237
   -0.29930016  0.08890419 -0.2922434  -0.07410804  0.15559785
   -0.03862172 -0.17935905 -0.33666146 -0.13682601 -0.06384996
   -0.06077206  0.10360008]]]
第1个数组:
 [[[-1.89561710e-01  8.70923400e-02 -1.47527248e-01 -2.86200404e-01
   -2.20933463e-02  4.41786088e-02 -1.72818810e-01 -4.97002229e-02
    1.34274061e-03  1.04595050e-01  1.01386808e-01 -3.04525405e-01
    1.77128479e-01 -6.56002238e-02 -2.25848466e-01 -1.99412674e-01
   -5.70780300e-02  1.16424084e-01 -1.70288030e-02  2.00436041e-01
    2.16925085e-01 -1.99801117e-01  5.98984323e-02  1.81850672e-01
   -1.89085931e-01 -2.12413073e-02  8.51334855e-02  1.15921244e-01
    6.72528148e-02  1.37529252e-02 -1.16040766e-01 -9.02416930e-02]]

 [[ 4.85295467e-02 -8.73176605e-02  1.86447635e-01 -4.45128798e-01
    1.05745822e-01  7.90806860e-02  1.87297508e-01  2.26620194e-02
   -5.34360297e-02  7.66759068e-02 -1.40923887e-01 -6.28831536e-02
    9.31783319e-02  2.10334659e-01 -3.17964345e-01 -1.68596301e-02
    1.50268286e-01  5.58755957e-02 -5.04233837e-02 -2.05894206e-02
   -4.43578288e-02  1.26300499e-01 -6.44076392e-02  5.97948246e-02
    1.02995068e-01  9.61822867e-02  1.38428584e-01  1.52803034e-01
    1.28563449e-01  5.74405119e-02  2.58390248e-01  7.32380375e-02]]

 [[-1.20110594e-01  6.92583397e-02  2.58188009e-01 -1.25160798e-01
   -1.95767395e-02  4.51400131e-02  4.41203974e-02  4.18249443e-02
    7.98251852e-02 -2.23809376e-01  1.39213994e-01  2.15288758e-01
   -1.33189708e-01 -2.56082207e-01  2.64832348e-01 -1.06671266e-01
    1.16286250e-02 -2.82497197e-01 -1.07641041e-01  3.55815107e-04
   -4.32559460e-01  1.26489013e-01 -5.14838053e-03 -5.63367665e-01
    1.28047854e-01 -8.79025981e-02  2.73709178e-01 -2.41094410e-01
    2.20919736e-02 -4.37319390e-02  1.70607254e-01  2.54879922e-01]]]
第2个数组:
 [[[-0.28743413 -0.05039541 -0.32322106 -0.28576022 -0.01186745
   -0.16136153 -0.40770677 -0.03401943  0.04251064  0.17044757
   -0.06370702 -0.25491872 -0.05032514 -0.05304395  0.10895949
   -0.23599699 -0.08287958  0.09605569  0.33950958 -0.3004691
    0.06335799  0.08101434  0.04215294 -0.23539479 -0.30663756
   -0.20703389  0.06114375 -0.23180345 -0.10535791 -0.00877953
   -0.6093956   0.08673523]]

 [[-0.4594167   0.08436025 -0.19094844  0.24358904 -0.07383776
    0.06015397  0.08437141 -0.0696937  -0.01023775 -0.13062379
   -0.11832908  0.15471423 -0.09247598  0.15709819 -0.27268386
   -0.25660586  0.05452353  0.18700227  0.28142843 -0.41201025
   -0.26123935  0.16155057  0.04419636 -0.6761446   0.11539403
   -0.01430293  0.10560115  0.24880193 -0.04546466 -0.06051769
   -0.3192044   0.12822656]]

 [[-0.3266369   0.07745046  0.00325512  0.31925917 -0.20738624
   -0.09920612  0.09558655 -0.00091549 -0.01535833 -0.2739862
   -0.21334378  0.04550457 -0.24382149 -0.0177168  -0.01421373
   -0.3137606  -0.17557812 -0.07298016  0.29398265 -0.18772653
   -0.2527745  -0.01731345 -0.02425755  0.08157137  0.12236273
    0.0889151  -0.11918794  0.15772383  0.01994926  0.04337122
    0.02604716 -0.05431315]]]
conv2d_1的卷积权值主要由3个数组组成,每个数组的shape为 3x1x32 ,即kernel:0的shape大小为: 3x3x1x32 。这与理论值是符合的,但是这里没有按过滤器进行切片分层,而是按shape的顺序进行切片的!相信有不少的同学在刚刚接触shape时,都知道卷积层的shape维度分别为 "卷积核的高"、"卷积核的宽"、输入通道数、过滤器的数量(pytorch不一样,注意区分)。
这里我为什么不直接输出kernel:0?因为直接输出看不见值,输出是一个封装的对象!如果你一定要直接输出可以采样命令:print(f['model_weights']['conv2d_1']['conv2d_1']["kernel:0"].value),但是很有可能会给你下面的警告:
H5pyDeprecationWarning: dataset.value has been deprecated. Use dataset[()] instead.
下面我们看一下weight的bias权值:
import h5py

with h5py.File("./checkpoint/best_model.h5", "r") as f:
    print(f['model_weights']['conv2d_1']['conv2d_1']["bias:0"])
    print(f['model_weights']['conv2d_1']['conv2d_1']["bias:0"].value)
输出结果为:
# H5pyDeprecationWarning: dataset.value has been deprecated. Use dataset[()] instead.
#  print(f['model_weights']['conv2d_1']['conv2d_1']["bias:0"].value)
<HDF5 dataset "bias:0": shape (32,), type "<f4">
[-0.01121292 -0.23676746 -0.07182489  0.0063485  -0.1473221  -0.20649968
 -0.13457218 -0.18226808 -0.16741337 -0.05513388 -0.15839782 -0.05088074
 -0.10574292 -0.17863815 -0.03026129  0.02034929 -0.22656491 -0.06224731
 -0.00224195 -0.01806859 -0.04112944 -0.16773042 -0.20201148 -0.006715
 -0.05799676 -0.20864251 -0.08409153 -0.11148676 -0.14344956 -0.15199727
 -0.08022476 -0.17667659]
从node与weight还原模型
回顾建立mnist数据集的建模过程,我们在预测、评估时,是直接加载的"./checkpoint/best_model.h5"模型,然后就进行了相应的预测,那么keras是怎么知道先将数据接入Input、再将数据传到reshape后传到conv2d_1呢?难道它有魔法吗?如果我们知道其原理,那么完全可以摆脱架构的束缚,直接基于权值文件建立一个模型,有什么用?降低环境要求,轻量级,计算提速,可控!理论上只要模型文件保存了模型结构与权值,那么呢都能够还原模型,不然要它有何用!就为了让keras这些库加载一下吗?
keras是怎么读取文件的?
    # load_model的代码块
    if h5py is None:
        raise ImportError('`load_model` requires h5py.')
    model = None
    opened_new_file = not isinstance(filepath, h5py.Group)
    f = h5dict(filepath, 'r')
    try:
        model = _deserialize_model(f, custom_objects, compile)
    finally:
        if opened_new_file:
            f.close()
目光如炬的你应该发现了,模型加载实际上最辛苦的崽是 _deserialize_model ,这个家伙是个内嵌函数,下面先分析一下它!
-
这个崽主要是进行模型结构复现与编译!
-
第一步,配置模型config文件:
model_config = f['model_config']
    if model_config is None:
        raise ValueError('No model found in config.')
从上面我们不难发现,'model_config'这个key是很关键的,没有它我们就没有办法重建模型结构!在上一小节中,我们只输出了'model_weights' 与 'optimizer_weights'关键字,实际上你可以在 "f.attrs.items()" 里找到相关的配置!
-
根据config生成模型结构
model_config = json.loads(model_config.decode('utf-8'))
model = model_from_config(model_config, custom_objects=custom_objects)
model_config 加载为json数据,model_from_config函数将json格式的配置文件转为keras的模型!
可以看见layers是按模型的顺序罗列的,且"inbound_nodes"记录了当前节点的输入来自于哪里!这个非常重要,有这个信息才能将模型复现!
后面就是一堆的判断与构造,你可以查看源代码理解其如何构造!
