
验证码识别 一
验证码识别分类
1.字符型验证码
2.滑动验证码
3.点击类验证码
PIL库是图片处理的一个库(pillow),一般pycharm里可以直接安装pillow,或者在cmd里用pip安装
图片的模式有RGB和L(灰度)模式;基本信息:
1 from PIL import Image
2 image = Image.open('code.jpg')
3 image.show()
4 im = image.convert('L')  # 转成灰度模式
5 image.show()
6 print(image.getbands())  # 获取image的通道信息,返回一个元组
7 print(image.info)  # 获取image的信息,以字典返回
8 image = Image.new('RGB', (120, 120), 'red')  # 创建一个图片对象
9 image.show()
图片剪切,获取大小和像素值(RGB三个通道的值),模式切换:
 1 from PIL import Image
 2 image = Image.open('code.jpg')
 3 print(image.getpixel((10, 20)))  # 获取坐标为(10, 20)的像素值
 4 print(image.size)  # 打印image的大小
 5 im = image.crop((0, 0, 100, 50))  # 参数要以元组传入
 6 im.show()
 7 image = Image.new('RGB',(125,632),'green')
 8 image.show()
 9 im = image.convert('L')
10 im.show()
11 ---------------允许结果-----------------
12 (184, 181, 176)
13 (240, 60)
14 #  注意上面的代码关于图像的效果请测试
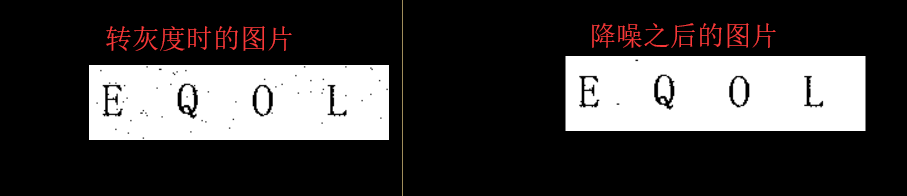
图片的简单处理:
 1 from PIL import Image
 2 def binary_action(img, threshold=127):
 3     """
 4     对传入的图像进行灰度处理、二值化处理
 5     :param img:
 6     :param threshold:
 7     :return:
 8     """
 9     img = img.convert('L')
10     pix_data = img.load()
11     w, h = img.size
12     for y in range(h):
13         for x in range(w):
14             if pix_data[x, y] < threshold:
15                 pix_data[x, y] = 0
16             else:
17                 pix_data[x, y] = 255
18     return img
19 def noise_reduction(img, threshold=245):
20     """
21     对传入的图像进进行降噪
22     :param img:
23     :param threshold:
24     :return:
25     """
26     img = img.convert('L')
27     pix_data = img.load()
28     w, h = img.size
29     for y in range(1, h-1):
30         for x in range(1, w-1):
31             count = 0
32             if pix_data[x, y-1] > threshold:
33                 count += 1
34             if pix_data[x, y+1] > threshold:
35                 count += 1
36             if pix_data[x-1, y] > threshold:
37                 count += 1
38             if pix_data[x+1, y] > threshold:
39                 count += 1
40             if count > 3:
41                 pix_data[x, y] = 255
42     return img
43 image = Image.open('code.jpg')
44 im = binary_action(image, 150)
45 im.show()
46 im = noise_reduction(im)
47 im.show()
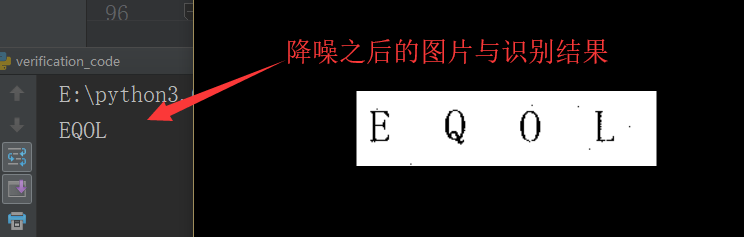
识别上面的验证码:
 1 from PIL import Image
 2 from pytesser3 import image_to_string
 3 def binary_action(img, threshold=140):
 4     """
 5     对传入的图像进行灰度处理、二值化处理
 6     :param img:
 7     :param threshold:
 8     :return:
 9     """
10     img = img.convert('L')
11     pix_data = img.load()
12     w, h = img.size
13     for y in range(h):
14         for x in range(w):
15             if pix_data[x, y] < threshold:
16                 pix_data[x, y] = 0
17             else:
18                 pix_data[x, y] = 255
19     return img
20 image = Image.open('code.jpg')
21 im = binary_action(image)
22 im.show()
23 print(image_to_string(im))
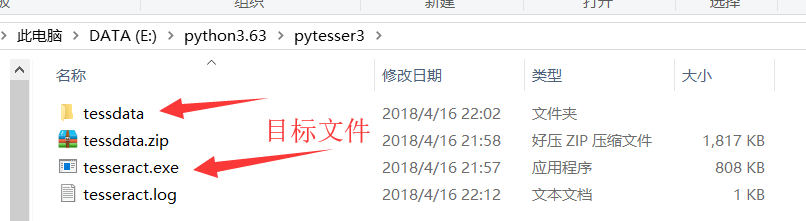
这里要注意 pytesser3 库的修改,我们要修改它的 __init__ 初始化里面的路径,要将下面两个文件的路径给它:

pytesser3的安装步骤:
1.通过pip Instll pytesser3 下载包
2.下载Tesseract OCR 文件
3.修改pytesser3包下面__init__文件内tesseract_exe_name的值为你的tesseract.exe的路径
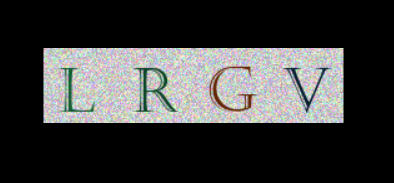
验证码的简单生成
 1 # 图像验证码的生成
 2 import random
 3 from PIL import Image, ImageDraw, ImageFont
 4
 5
 6 class VerificationCode(object):
 7     """
 8     用于生成一张验证码图片
 9     """
10     def __init__(self, width, high):
11         self.width = width
12         self.high = high
13         self.image = Image.new('RGB', (self.width, self.high), (255, 255, 255))
14
15     # 随机生成字母
16     @staticmethod
17     def random_char():
18         return chr(random.randint(65, 90))
19
20     # 随机获取颜色
21     @staticmethod
22     def random_color():
23         return (random.randint(150,255), random.randint(150,255), random.randint(150,255))
24
25     @staticmethod
26     def random_color2():
27         return (random.randint(0,100), random.randint(0,110), random.randint(0,90))
28
29     def main(self):
30
31         font = ImageFont.truetype('CASTELAR.TTF', 50)
32         # 创建一个画布
33         draw = ImageDraw.Draw(self.image)
34         for x in range(self.width):
35             for y in range(self.high):
36                 draw.point((x, y), fill=self.random_color())
37         for t in range(4):
38             draw.text((60*t+10, 5), self.random_char(), font=font, fill=self.random_color2())
39
40
41 if __name__ == '__main__':
42     code = VerificationCode(240, 60)
43     code.main()
44     code.image.show()
运行结果:
清澈的爱,只为中国
