

unsafe unlink
unsafe unlink
0x00 unlink介绍
unlink就是一个“glibc malloc”的内存回收机制,顾名思义,把一个free的chunk从链表中拆取出来。显然,这种利用Unlink的手段针对的是除fastbin以外的其他几个bin链,因为fastbin是个单链表。
什么场合会用到unlink?当需要合并双向链表中相邻的两个free chunk的时候就要用到unlink。这里的合并又分向后合并、向前合并两种情况。
unlink攻击技术就是利用unlink过程把free函数的got表项覆盖成为shellcode地址。在后续调用free的时候就可以执行shellcode代码。
0x01 unlink过程源码介绍
一旦涉及到free内存,那么就意味着有新的chunk由allocated状态变成了free状态,此时glibc malloc就需要进行合并操作,就是包括前面所说的两种合并情况。
在这里通过libc源码得到更好的理解,注意以下合并源码操作的chunk都是非 mmaped 块
向前合并
程序的大概逻辑就是先检测free chunk 的上一个chunk是否为mmaped chunk,通过chunk_is_mmapped(p)判断。再者检测前一个chunk是否为free状态,通过prev_inuse(p)来知晓。
注意在默认情况下,堆内存的第一个chunk的prev_inuse位永远是1,表示被分配的状态。第一个的前一个chunk是不存在的,但这不影响prev_inuse位想表示出的状态。
-
当前一个chunk是allocated状态,显然就不合条件跳过if
-
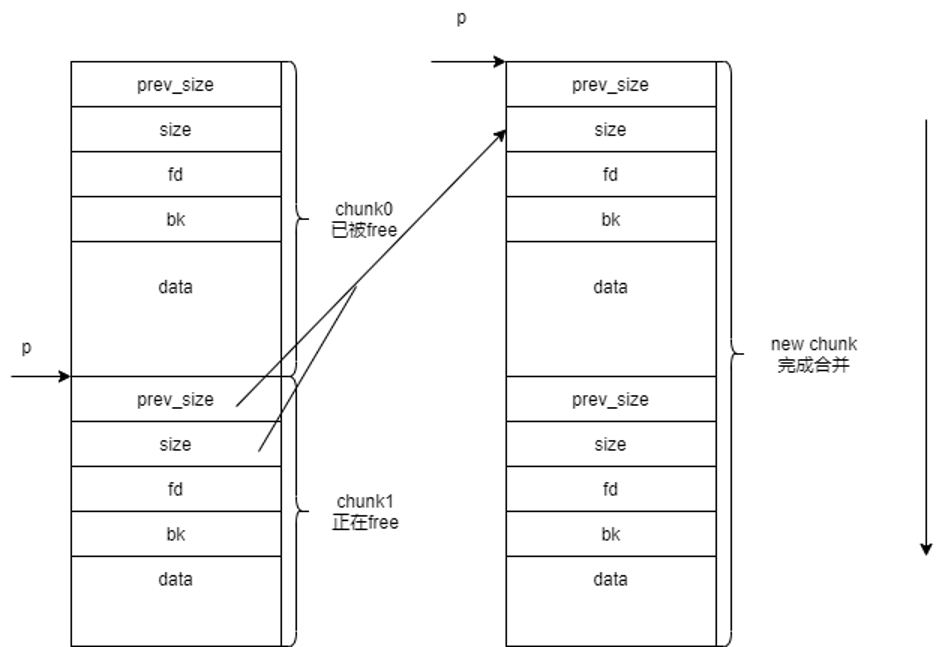
当前一个chunk是free状态,就开始向前合并:
- 把size扩大为size+prev_size
- 修改指向当前chunk的指针p,让其指向前一个chunk
- 使用unlink宏,将p所指向的合并后的freechunk从双向列表中移除
向后合并
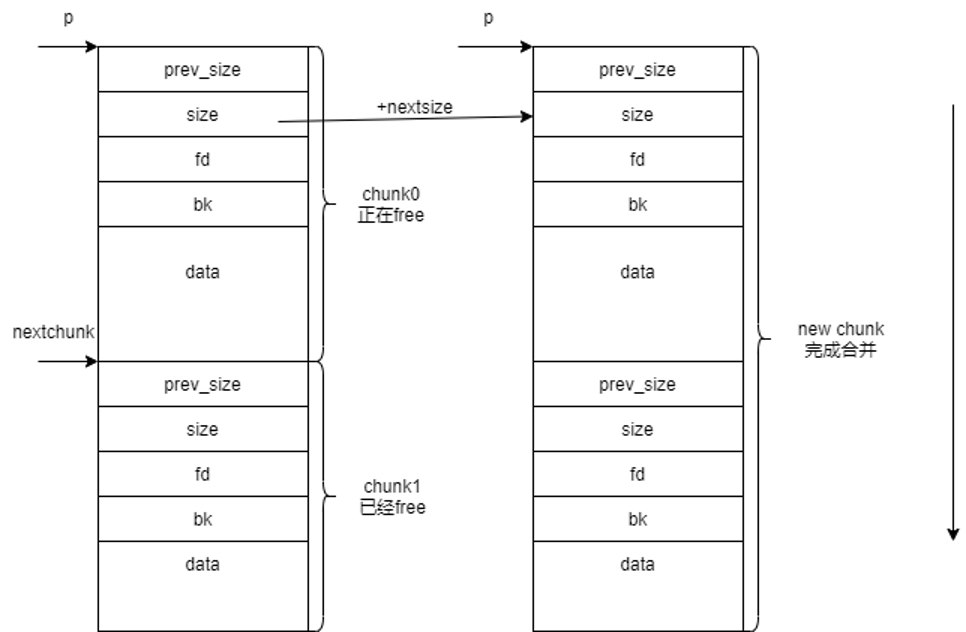
与向前合并不一样的就是对指针的操作,这里用的是nextchunk而不再是p指针,p还是指向当前freechunk,操作的nextchunk指向p指向的下一个freechunk,总体操作上与向前合并大致一致。
- 当next chunk是free状态,开始向后合并
- 将nextchunk从链表中移除
- 把szie扩大为size+nextsize
以上就是两种合并的具体介绍
接下来就要了解合并后(或者因不满足条件没合并)的chunk是如何进一步处理?
当然这对攻击来说并没有多大关系,但这里扩展了解一下:
上述代码的逻辑大概就是:把当前chunk插入到unsorted bin的第头节点与第1个节点之间。分别更改头节点的bk与第一个节点(现在第2节点)的fd,都改成p,设置当前chunk的size,并将前一个chunk标记为已使用,再将后一个chunk的prev_size设置为当前chunk的size。这样就完善成一个新的unsorted链表。
注意:上一段中描述的”前一个“与”后一个“chunk,是指的由chunk的prev_size与size字段隐式连接的chunk,即它们在内存中是连续、相邻的!而不是通过chunk中的fd与bk字段组成的bin(双向链表)中的前一个与后一个chunk,切记!
0x02 实验1
前面已经很详细的讲解了实现unlink以及其上下文的过程。
看一下下面这道题:
程序源代码:
很明显存在一个堆溢出的漏洞,当输入的argv[1]的大小比first所申请到的666字节还要大的时候,就可以把接下去的内容进行覆盖。而实现攻击操作的核心就在于unlink攻击。
假设要覆盖的second chunk header的数据如下(这里告知一下是在32位系统):
1)prev_size =一个偶数,这样就使得p位是0表示first chunk处于free状态。
2)nextszie =-4
3)fd = free@got的地址 - 12,
4)bk = shellcode地址
所以当程序在第4步,调用free(first)后发生什么?向后or向后合并?
frist是处于链表的第一个chunk,前面头节点永远是allocated状态。不会发生向前合并。
那向后合并呢?结合前面的源码,nextchunk就是second chunk。在检测nextchunk是否是free状态的代码如下
从上面的代码可以知道,它把nextchunk指针加了一个nextsize,指向了nextchunk的下一个chunk,就是second chunk的下个chunk,按照正常来说就是top块。但我们把nextsize设置成-4,这样在检测的时候,gllibc malloc 就会把second chunk的prev_size字段看成second chunk的next chunk的size字段。而我们已经将second chunk的prev_size字段设置为一个偶数,这样一来inuse_bit_at_offset(nextchunk, nextsize)获得的nextchunk的prev_insue位是0,即nextchunk为free状态,就是second chunk是free状态。
这样就符合向后合并的要求,就要调用unlink函数——unlink(secondchunk, bck, fwd)。
还记得之前的unlink的源代码吗,我把他们原意加以注释
操作开始了,构造的数据要发挥巨大作用了,盯紧这三个参数
P=secondchunk, BK=bck, FD=fwd
- FD = P->fd = free@got - 12
- BK = P->bk = shellcode地址
- FD->bk = (free@got - 12)->bk = free@got = BK = shellcode地址
- BK->fd = shellcode地址->fd = FD=free@got - 12
画个图
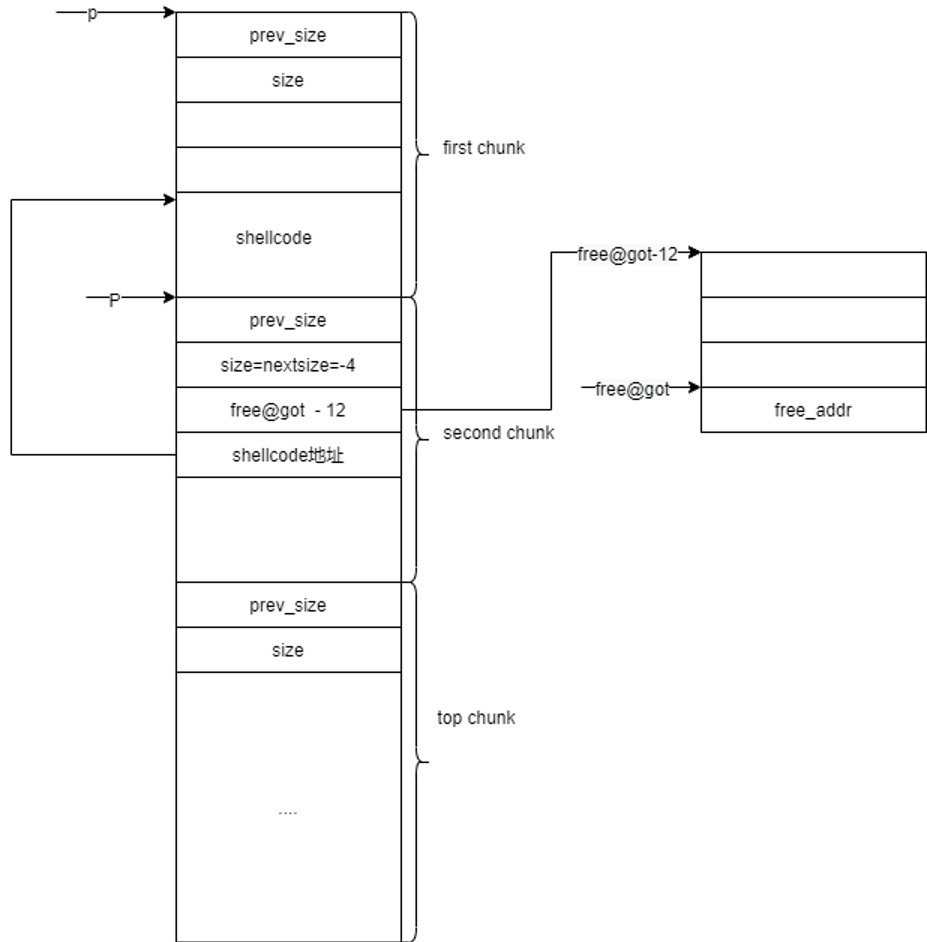
图一画一些关键的就一目了然了。free@got-12就是把这一段空间当作chunk赋予的首地址指针。这个“chunk”的bk自然就是free的地址。所以free的地址在执行完unlink之后就会被赋值为shellcode的地址。所以在之后执行第5步free(second)就是在调用sellcode。
0x03 unlink攻击对抗
glibc malloc在不断更新,添加了如下的检查机制来防止unlink攻击技巧。
-
不允许double free:对一个已经free的chunk进行再次的free是不允许的。通过检查prev_inuse来实现。
所以对于这道题攻击者将size设置成为-4时,就意味着size的prev_inuse位是0,那么在free(first)的时候检查second的size域,发现处于free状态,立马报错。
-
invalid nextchunk size :nextchunk的大小应该在8(16)字节到arena的全部系统内存之间。
所以在设置second的size为-4的时候就绕不过nextchunk的size检查,报错
-
双向列表指针被破坏:在执行unlink操作的时候,链表中的前一个chunk的fd和下一个chunk的bk应该指向当前即将unlink的chunk
很显然,替换second的fd和bk内容会立马影响,报错
在有上述unlink防御的操作之下,攻击者还是能找到漏洞,攻击者的脑洞永远比天大。看一下下面这道题。
0x04 实验2--note2
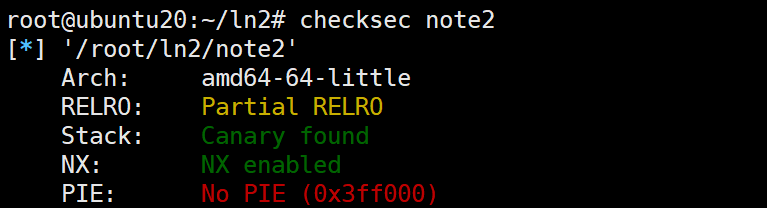
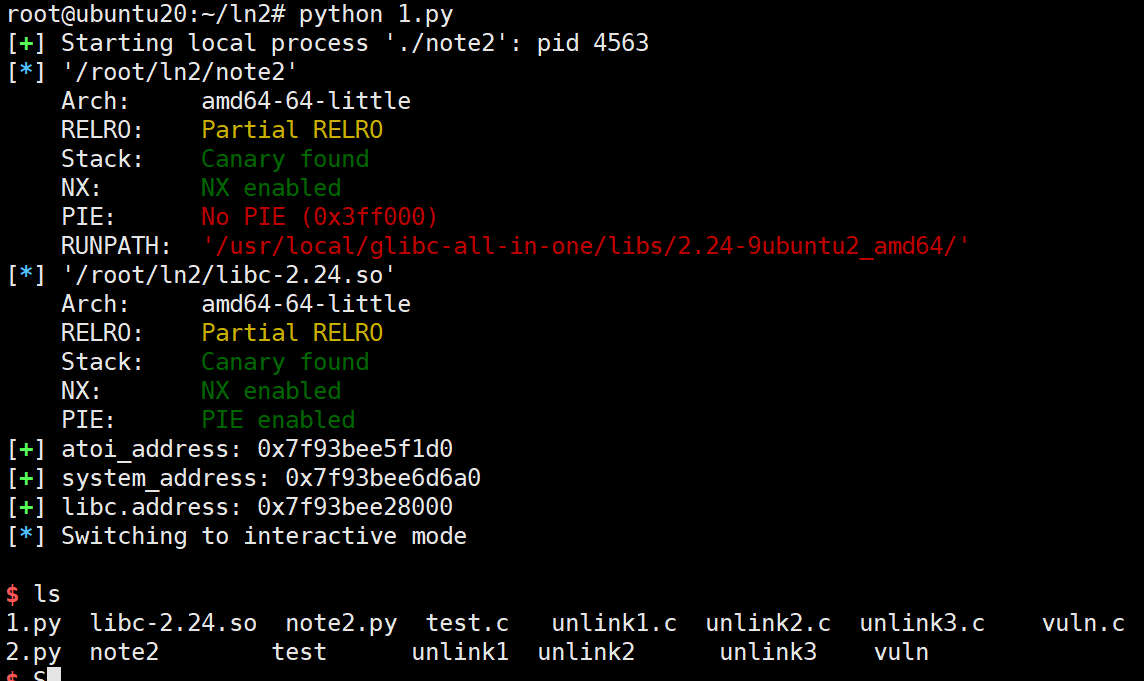
0x000 试玩
可以看到是很经典的菜单,是一道经典的堆题。
先ida反编译
1.main函数:
getstr自定义,点击打开。
可以看到这里定义的i是unsigned __int64无符号整型变量,而a2是__int64是有符号整型变量
当 a2 - 1 > i,他们进行比较的时候,C语言会把有符号的整型变量转变为无符号的变量进而进行比较。所以当a2可控,让a2=0时;a2-1将时负数,在转化为无符号的整型变量时将会变得很大,足以使得for的该条件永远成立。这就是整数溢出漏洞。
2.new函数的代码
这里得getstr的size可控。那么当我们输入 size 为 0 时,glibc 根据其规定,会分配 0x20 个字节,但是程序读取的内容却并不受到限制,故而会产生堆溢出。
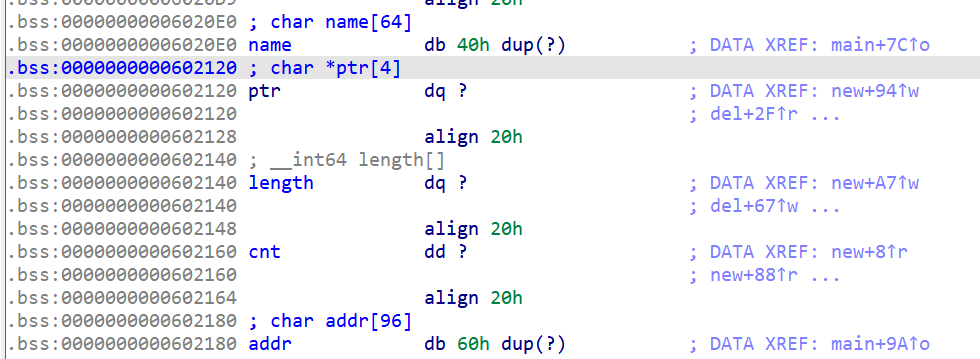
明确一点像出现得ptr、length、cnt等都是全局变量,他们的地址可以在bss看到
3.show函数代码
4.edit函数代码
注意这里申请的临时chunk是0xa0固定大小。
在free之后并没有把指针清零,出现uaf漏洞。
5.del函数代码
0x001 漏洞利用
思路如下:
-
绕过三个检查机制
-
创建3个chunk分别是chunk0、chunk1、chunk2。其中chunk0读入的是构造伪造的fake chunk的数据(包括chunk头和fd、bk域)。
-
为了堆溢出,输入chunk1的size是0,size虽是0但实际上在glibc malloc默认分配0x20大小的空间。申请完三个chunk后,对chunk1直接free,就会回收到fastbin链中去,再通过重新new,获得该空间的控制,就可以利用整数溢出,输入大于0x20字节的数据实现对chunk2头部的覆盖
-
最后free(chunk2),这样就会有unlink过程,在检查上一个chunk,即fake chunk的时候发现其满足条件,此时就会向前合并。
-
unlink为的不是要合并的结果;要的是中间巧妙的四句
严格来讲是前三句,简化就是P->fd->bk=P->bk,最后成功把指针指向修改
具体内存情况如下:
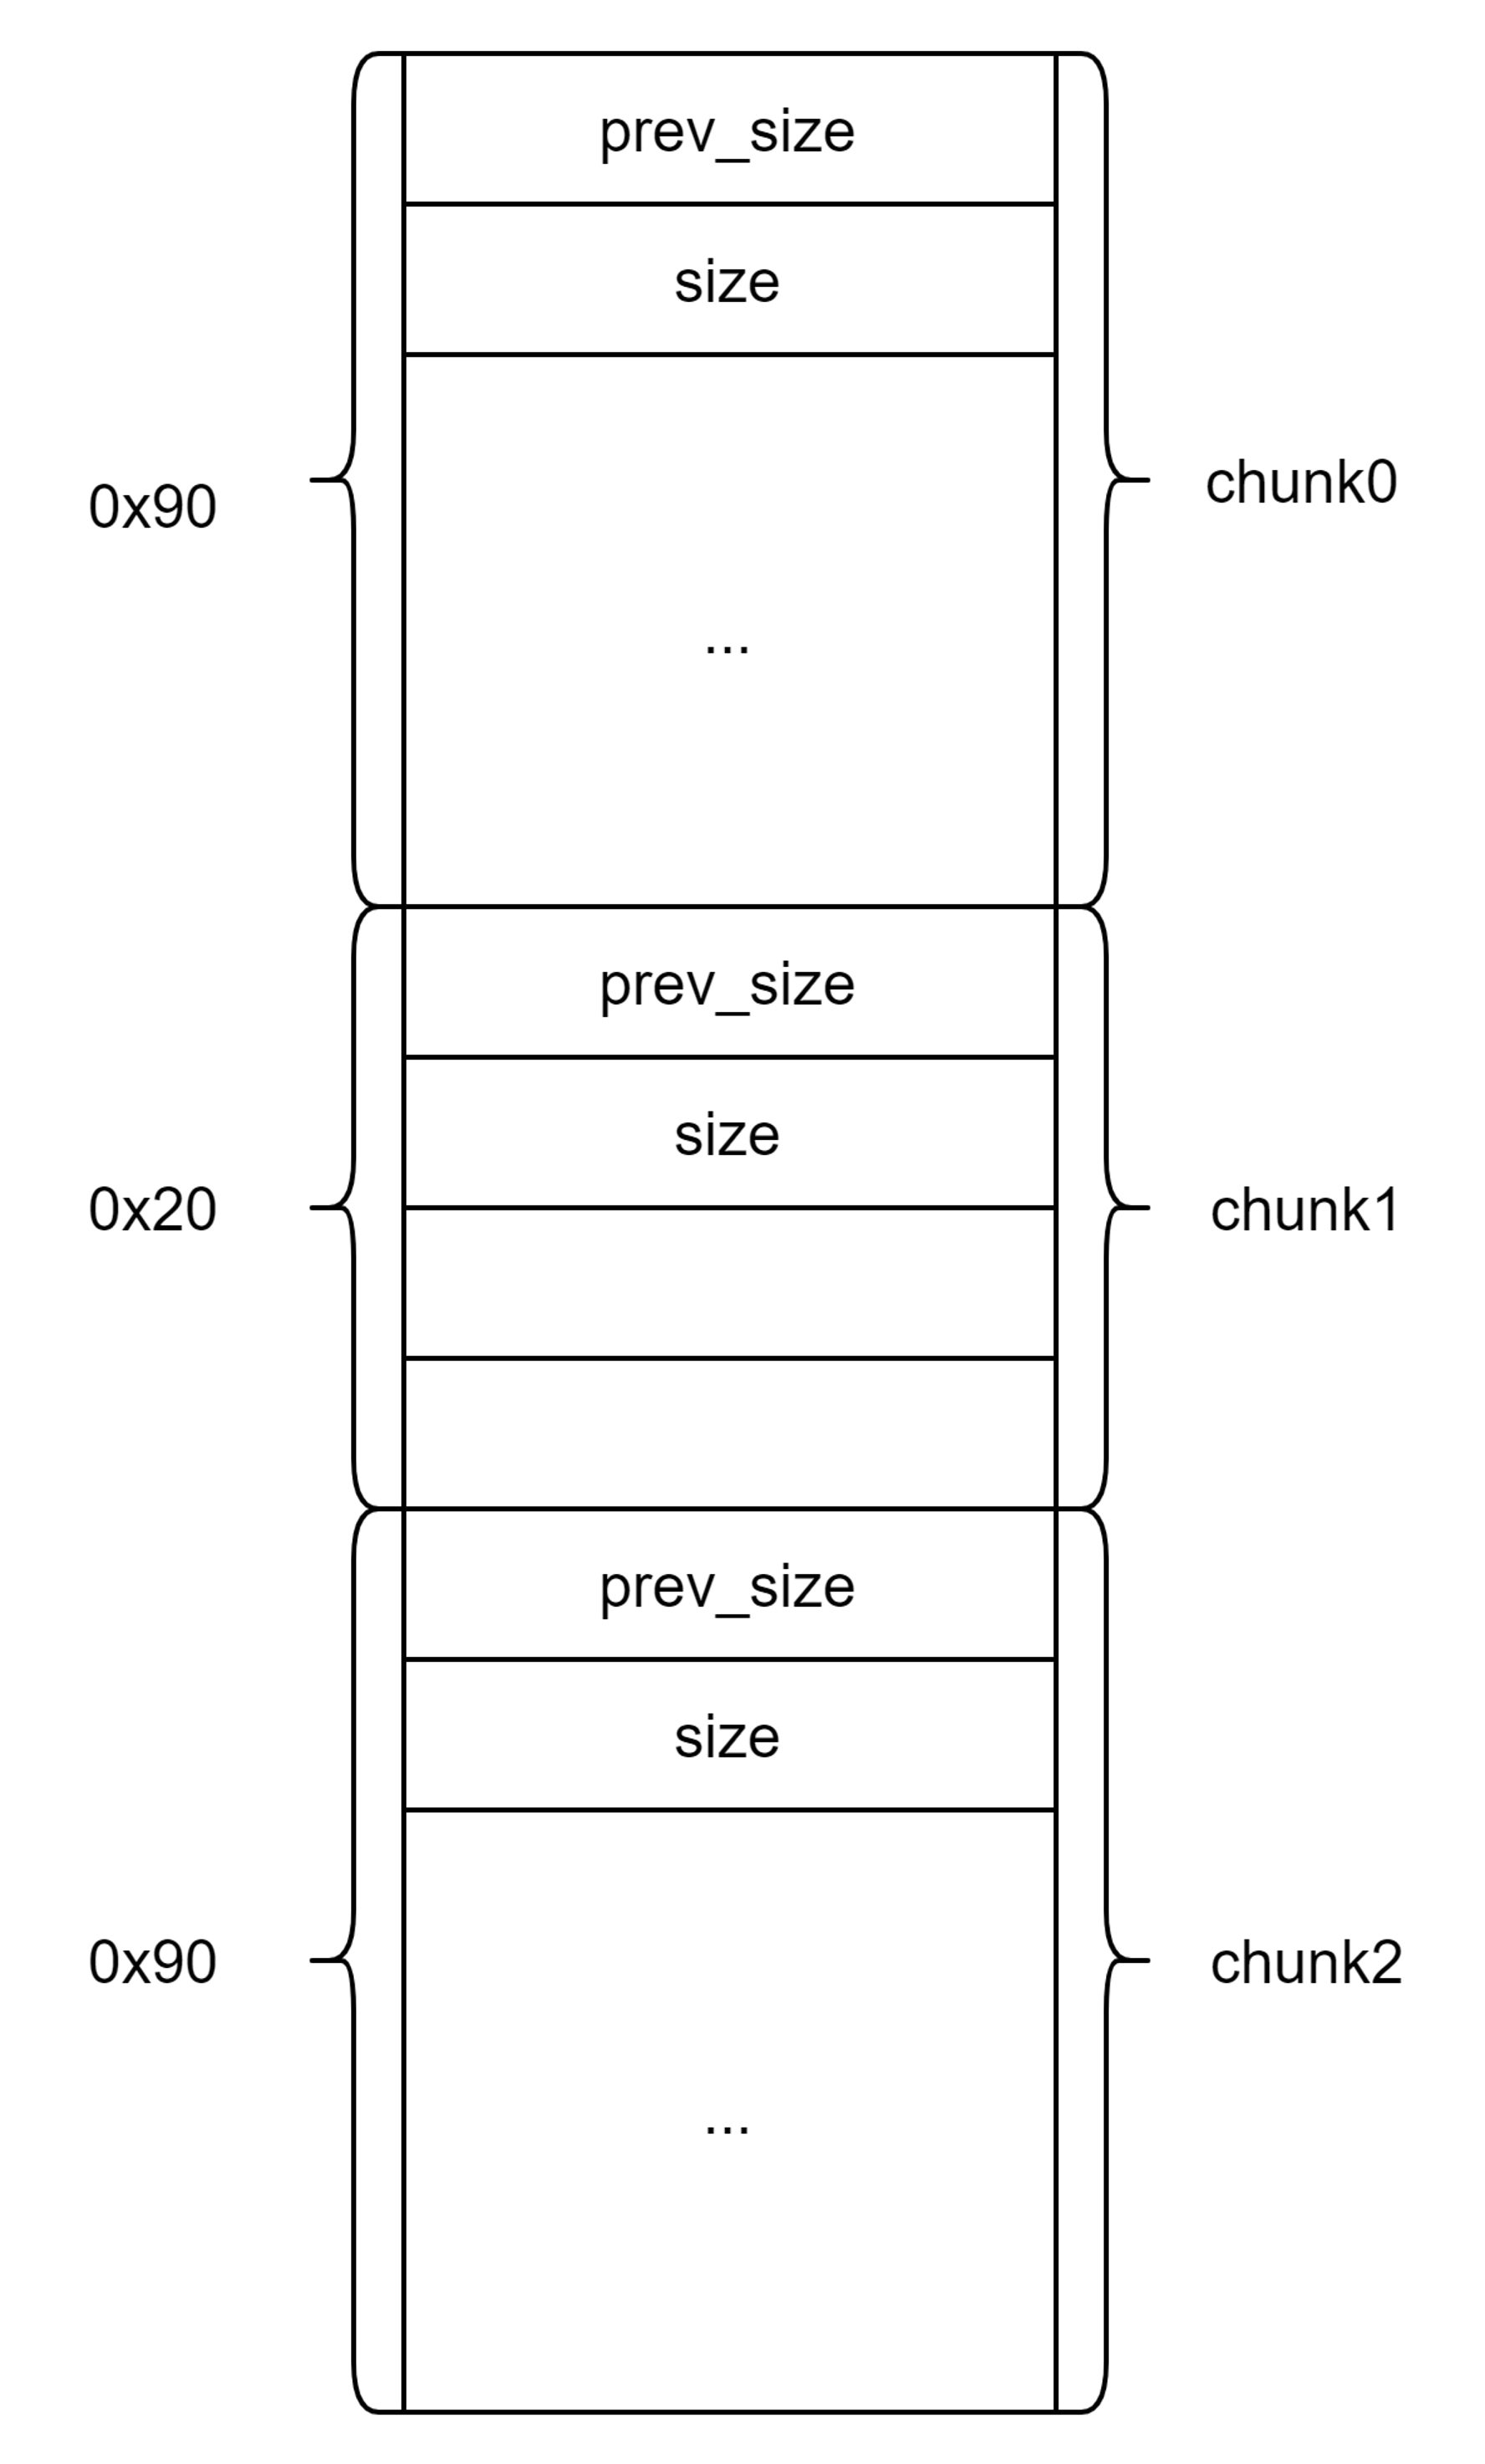
申请的三个chunk:
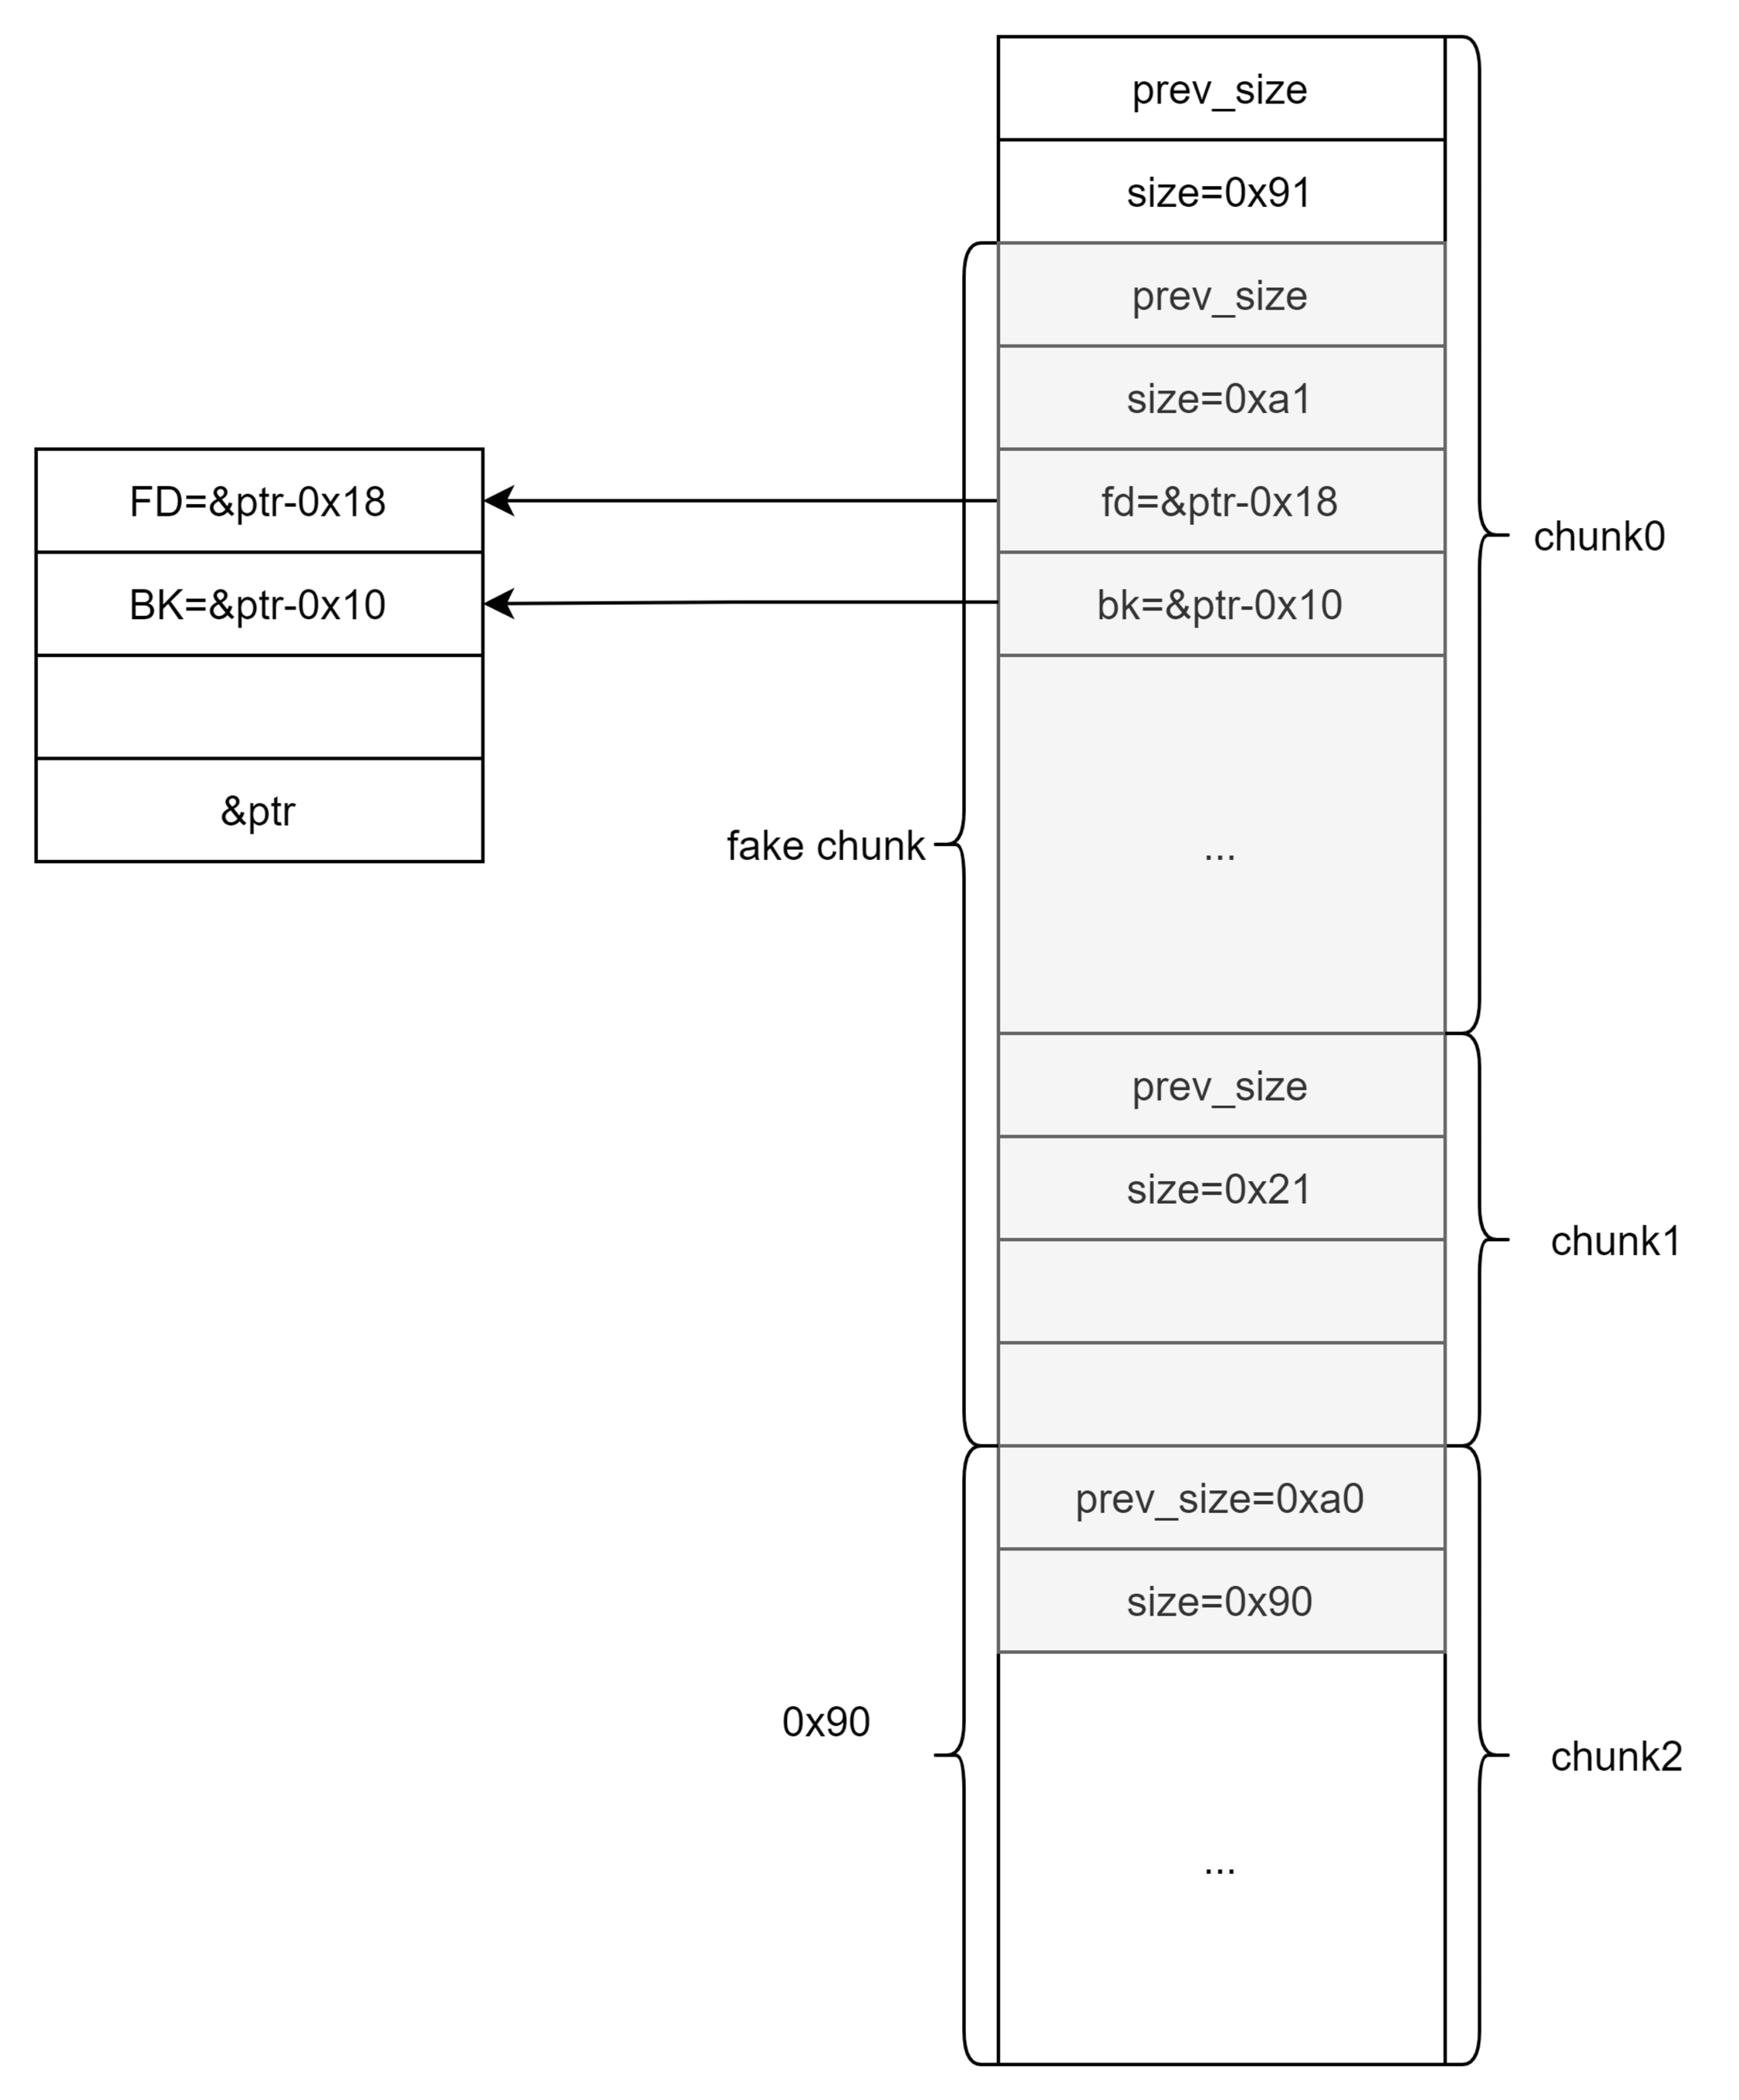
伪造后的chunk:
unlink后:
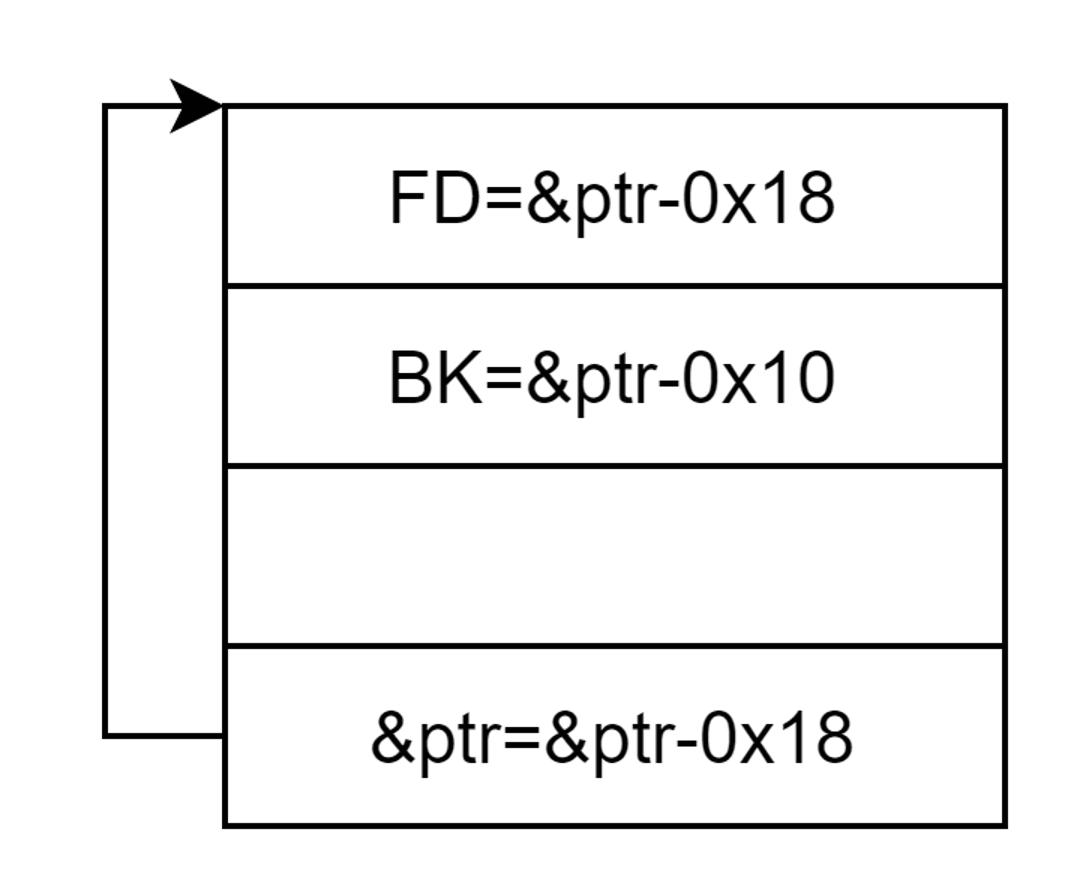
- unlink后实现对ptr指针的控制,使得ptr[0]=&ptr[0]-0x18,然后修改ptr[0][3]为atoi@got,让ptr[0]指向atoi@got,通过show函数就可以让atoi的真实地址输出,再结合偏移,就可以拿到libc的基地址,进而拿到system函数的基地址。
这里有个地方注意:
为什么chunk1不能第一遍new的时候,直接在输入内容覆盖,要放到fastbin里new回来再覆盖?
因为第一遍的时候chunk2还未申请,若直接覆盖,将会是改变top chunk的chunk头。而top_chunk的size也不是随意更改的,因为在sysmalloc中对这个值还要做校验
- 接下来就是通过修改ptr[0],就是atoi@got为system函数的地址,这样调用atoi的时候就是调用system。
- menu函数里面getint函数就有atoi调用,那么在要用户输入菜单选项的时候,直接输入"/bin/sh\0x00"将会执行system含函数并返回shell
完整脚本
__EOF__
本文链接:https://www.cnblogs.com/damoxilai/p/15706064.html
关于博主:网安小萌新一名,希望从今天开始慢慢提高,一步步走向技术的高峰!
版权声明:达摩西来
声援博主:达摩西来


【推荐】国内首个AI IDE,深度理解中文开发场景,立即下载体验Trae
【推荐】编程新体验,更懂你的AI,立即体验豆包MarsCode编程助手
【推荐】抖音旗下AI助手豆包,你的智能百科全书,全免费不限次数
【推荐】轻量又高性能的 SSH 工具 IShell:AI 加持,快人一步
· SQL Server 2025 AI相关能力初探
· Linux系列:如何用 C#调用 C方法造成内存泄露
· AI与.NET技术实操系列(二):开始使用ML.NET
· 记一次.NET内存居高不下排查解决与启示
· 探究高空视频全景AR技术的实现原理
· 阿里最新开源QwQ-32B,效果媲美deepseek-r1满血版,部署成本又又又降低了!
· AI编程工具终极对决:字节Trae VS Cursor,谁才是开发者新宠?
· 开源Multi-agent AI智能体框架aevatar.ai,欢迎大家贡献代码
· Manus重磅发布:全球首款通用AI代理技术深度解析与实战指南
· 被坑几百块钱后,我竟然真的恢复了删除的微信聊天记录!