SpringSecurity图形验证码认证
图形验证码认证
1.添加过滤器认证

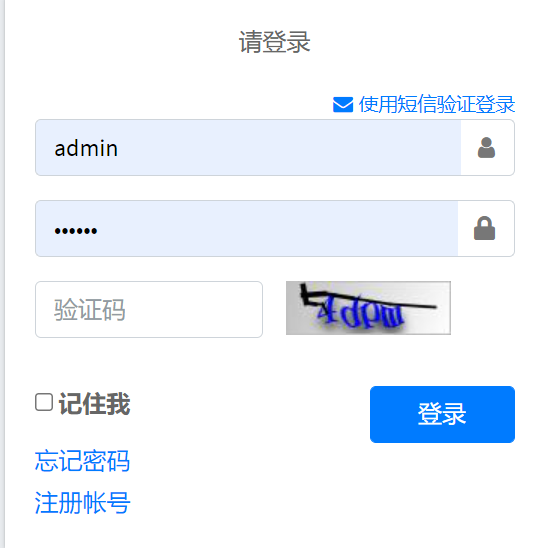
1.1 生成一张图形验证码
Kaptcha 是谷歌提供的一个生成图形验证码的 jar 包, 只要简单配置属性就可以生成。
参考 :https://github.com/penggle/kaptcha
- 添加Kaptcha依赖
<!--短信验证码-->
    <dependency>
      <groupId>com.github.penggle</groupId>
      <artifactId>kaptcha</artifactId>
    </dependency>
- 生成验证码配置类,在模块中创建KaptchaImageCodeConfig
@Configuration
public class KaptchaImageCodeConfig {
  @Bean
  public DefaultKaptcha getDefaultKaptcha(){
    DefaultKaptcha defaultKaptcha = new DefaultKaptcha();
    Properties properties = new Properties();
    properties.setProperty(Constants.KAPTCHA_BORDER, "yes");
    properties.setProperty(Constants.KAPTCHA_BORDER_COLOR, "192,192,192");
    properties.setProperty(Constants.KAPTCHA_IMAGE_WIDTH, "110");
    properties.setProperty(Constants.KAPTCHA_IMAGE_HEIGHT, "36");
    properties.setProperty(Constants.KAPTCHA_TEXTPRODUCER_FONT_COLOR, "blue");
    properties.setProperty(Constants.KAPTCHA_TEXTPRODUCER_FONT_SIZE, "28");
    properties.setProperty(Constants.KAPTCHA_TEXTPRODUCER_FONT_NAMES, "宋体");
    properties.setProperty(Constants.KAPTCHA_TEXTPRODUCER_CHAR_LENGTH, "4");
    // 图片效果
    properties.setProperty(Constants.KAPTCHA_OBSCURIFICATOR_IMPL,
"com.google.code.kaptcha.impl.ShadowGimpy");
    Config config = new Config(properties);
    defaultKaptcha.setConfig(config);
    return defaultKaptcha;
 }
}
- 在CustomLoginController 提供请求接口,将验证码图片数据流写出
 @Autowired
  private DefaultKaptcha defaultKaptcha;
  /**
  * 获取图形验证码
  */
  @RequestMapping("/code/image")
  public void imageCode(HttpServletRequest request, HttpServletResponse response) throws
IOException {
    // 1. 获取验证码字符串
    String code = defaultKaptcha.createText();
    logger.info("生成的图形验证码是:" + code);
    // 2. 字符串把它放到session中
    request.getSession().setAttribute(SESSION_KEY , code);
    // 3. 获取验证码图片
    BufferedImage image = defaultKaptcha.createImage(code);
    // 4. 将验证码图片把它写出去
    ServletOutputStream out = response.getOutputStream();
    ImageIO.write(image, "jpg", out);
 }
- 在 SpringSecurityConfig.configure(HttpSecurity http) 放行 /code/image 资源权限
.antMatchers(securityProperties.getAuthentication().getLoginPage(),
      "/code/image").permitAll()
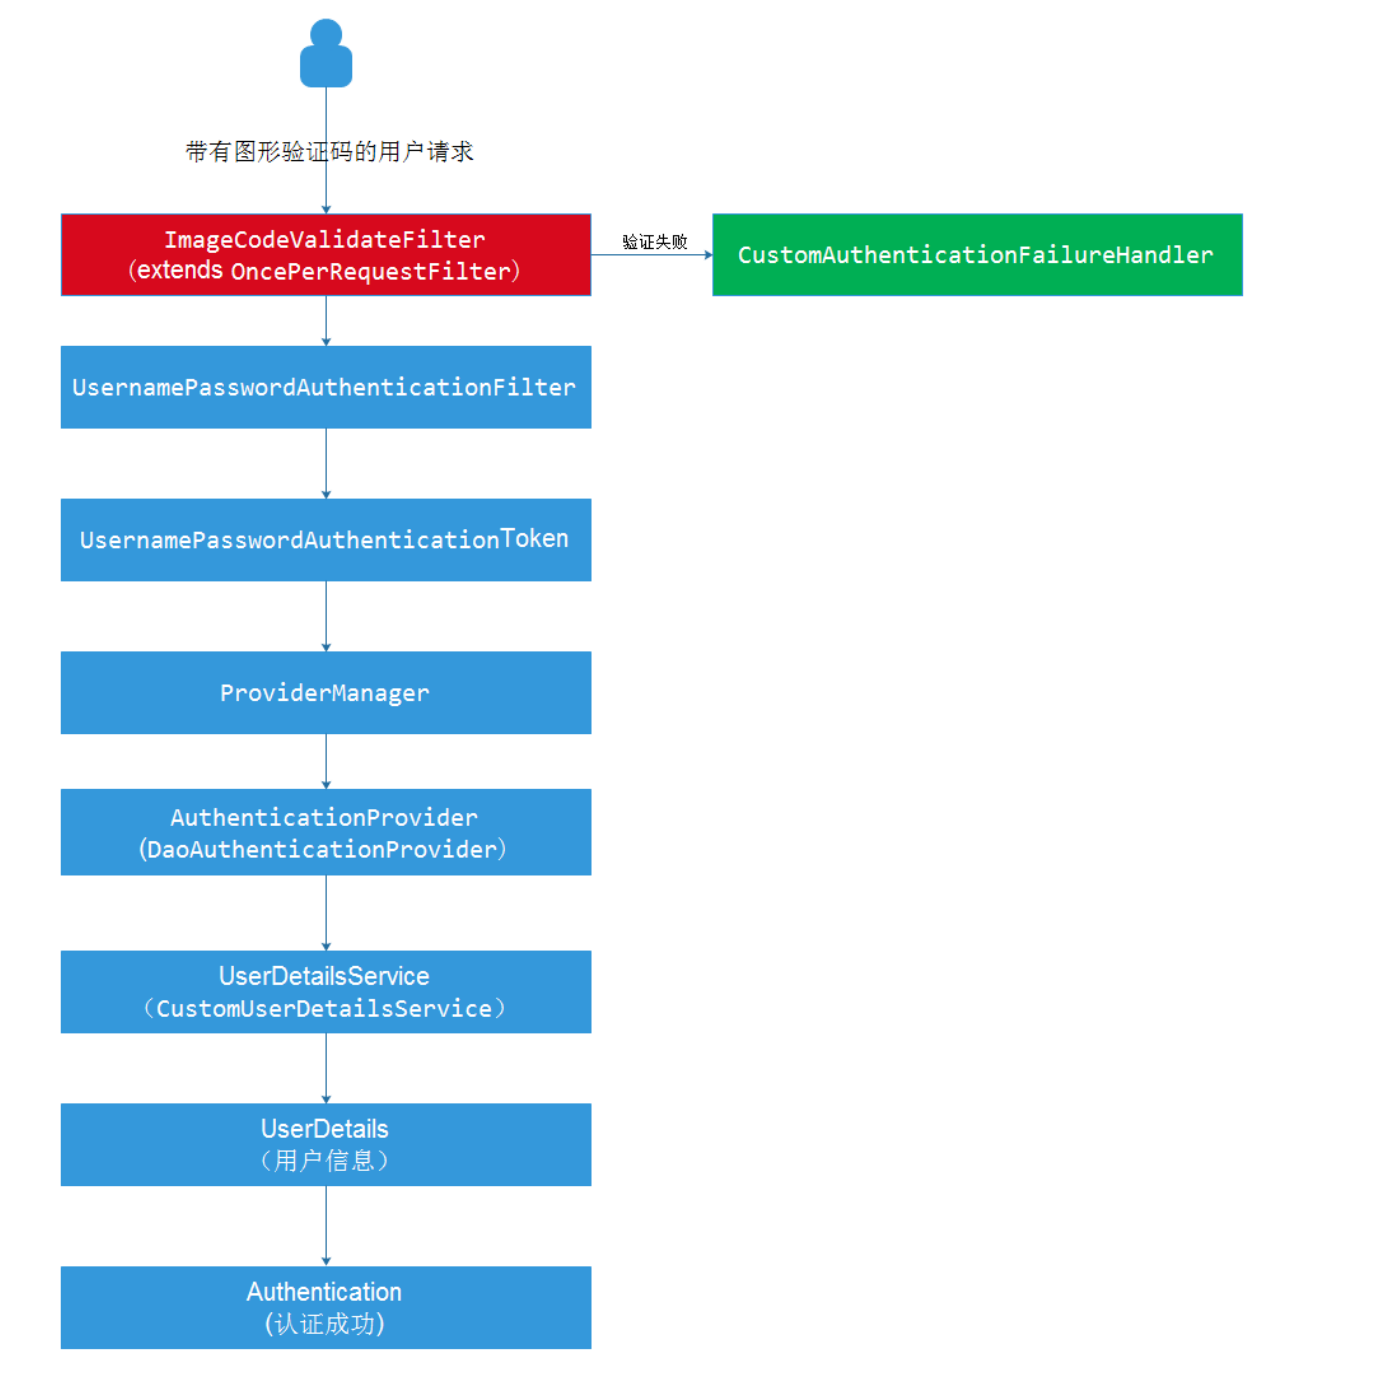
1.2 实现验证码校验过滤器
- 创建ImageCodeValidateFilter,继承OncePerRequestFilter (在所有请求前都被调用一次)
- 如果是登录请求(请求地址:/login/form,请求方式:post),校验验证码输入是否正确校验不合法时,提示信息通过自定义异常 ValidateCodeExcetipn抛出,此异常要继承org.springframework.security.core.AuthenticationException,它是认证的父异常类。
捕获ImageCodeException异常,交给失败处理器 CustomAuthenticationFailureHandler。 - 如果非登录请求,则放行请求 filterChain.doFilter(request, response)
/**
 * @author WGR
 * @create 2021/5/7 -- 16:08
 */
@Component
public class ImageCodeValidateFilter extends OncePerRequestFilter {

    @Autowired
    SecurityProperties securityProperties;
    @Autowired

    CustomAuthenticationFailureHandler customAuthenticationFailureHandler;

    @Override
    protected void doFilterInternal(HttpServletRequest request, HttpServletResponse response, FilterChain filterChain) throws ServletException, IOException {
        // 1. 如果是post方式 的登录请求,则校验输入的验证码是否正确
        if (securityProperties.getAuthentication().getLoginProcessingUrl()
                .equals(request.getRequestURI())
                && request.getMethod().equalsIgnoreCase("post")) {
            try {
               // 校验验证码合法性
                validate(request);
            } catch (AuthenticationException e) {
                // 交给失败处理器进行处理异常
                customAuthenticationFailureHandler.onAuthenticationFailure(request, response, e);
                // 一定要记得结束
                return;
            }
        }
        // 放行请求
        filterChain.doFilter(request, response);
    }

    private void validate(HttpServletRequest request) {
        // 先获取seesion中的验证码
        String sessionCode = (String) request.getSession().getAttribute(CustomLoginController.SESSION_KEY);
         // 获取用户输入的验证码
        String inpuCode = request.getParameter("code");
        // 判断是否正确
        if (StringUtils.isBlank(inpuCode)) {
            throw new ValidateCodeException("验证码不能为空");
        }
        if (!inpuCode.equalsIgnoreCase(sessionCode)) {
            throw new ValidateCodeException("验证码输入错误");
        }
    }
}
1.3 创建验证码异常类
创建ValidateCodeExcetipn 异常类,它继承AuthenticationException特别注意是:org.springframework.security.core.AuthenticationException
/**
 * @author WGR
 * @create 2021/5/7 -- 16:15
 */
public class ValidateCodeException extends AuthenticationException {
    public ValidateCodeException(String msg, Throwable t) {
        super(msg, t);
    }

    public ValidateCodeException(String msg) {
        super(msg);
    }
}
1.4 重构SpringSecurityConfig
将校验过滤器 imageCodeValidateFilter 添加到UsernamePasswordAuthenticationFilter 前面
http.addFilterBefore(imageCodeValidateFilter,
          UsernamePasswordAuthenticationFilter.class)
 .formLogin()

2.自定义认证
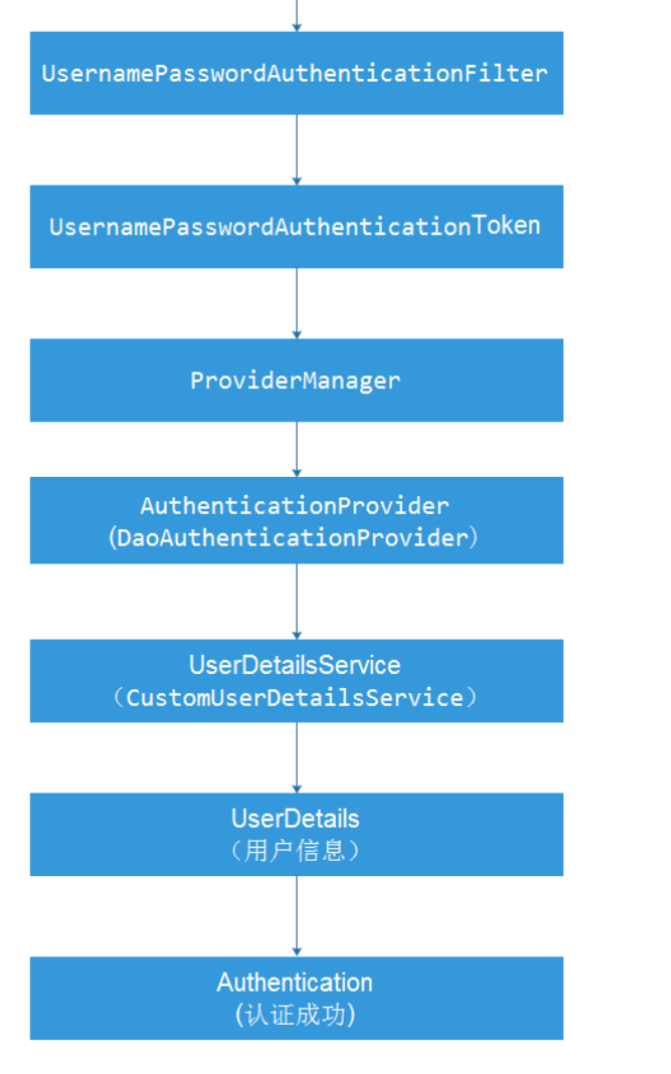
2.1 请求的简单流程
请求过程如图

说明:
Authentication中包含主体权限列表,主体凭据,主体的详细信息,及是否验证成功等。
AuthenticationProvider被SpringSecurity定义为一个验证过程。
ProviderManager管理多个AuthenticationProvider。
当我们自定义的时候,Authentication还可以携带额外的数据
public interface Authentication extends Principal, Serializable {

	Collection<? extends GrantedAuthority> getAuthorities();

	Object getCredentials();

    //允许携带任意对象
	Object getDetails();

	Object getPrincipal();

	boolean isAuthenticated();

	void setAuthenticated(boolean isAuthenticated) throws IllegalArgumentException;
}
其中ProviderManager是由UsernamePasswordAuthenticationFilter调用的,也就是说所有AuthenticationProvider包含的Authentication都来源于UsernamePasswordAuthenticationFilter。
public Authentication attemptAuthentication(HttpServletRequest request,
			HttpServletResponse response) throws AuthenticationException {
		if (postOnly && !request.getMethod().equals("POST")) {
			throw new AuthenticationServiceException(
					"Authentication method not supported: " + request.getMethod());
		}

		String username = obtainUsername(request);
		String password = obtainPassword(request);

		if (username == null) {
			username = "";
		}

		if (password == null) {
			password = "";
		}

		username = username.trim();

		UsernamePasswordAuthenticationToken authRequest = new UsernamePasswordAuthenticationToken(
				username, password);

		// Allow subclasses to set the "details" property
		setDetails(request, authRequest);

		return this.getAuthenticationManager().authenticate(authRequest);
	}

	protected void setDetails(HttpServletRequest request,
			UsernamePasswordAuthenticationToken authRequest) {
		authRequest.setDetails(authenticationDetailsSource.buildDetails(request));
	}
从上面的源码中看出,用户的详细信息是由authenticationDetailsSource构建的
public class WebAuthenticationDetailsSource implements
		AuthenticationDetailsSource<HttpServletRequest, WebAuthenticationDetails> {

	// ~ Methods
	// ========================================================================================================

	/**
	 * @param context the {@code HttpServletRequest} object.
	 * @return the {@code WebAuthenticationDetails} containing information about the
	 * current request
	 */
	public WebAuthenticationDetails buildDetails(HttpServletRequest context) {
		return new WebAuthenticationDetails(context);
	}
}
	public WebAuthenticationDetails(HttpServletRequest request) {
		this.remoteAddress = request.getRemoteAddr();

		HttpSession session = request.getSession(false);
		this.sessionId = (session != null) ? session.getId() : null;
	}
携带了session和ip地址。
2.2 代码
/**
 * @author WGR
 * @create 2021/5/8 -- 10:48
 */
public class MyWebAuthenticationDetails extends WebAuthenticationDetails {

    private boolean imageCodeIsRight = false;

    public boolean isImageCodeIsRight() {
        return imageCodeIsRight;
    }


    public MyWebAuthenticationDetails(HttpServletRequest request) {

        super(request);
        // 先获取seesion中的验证码
        String sessionCode = (String) request.getSession().getAttribute(CustomLoginController.SESSION_KEY);
        // 获取用户输入的验证码
        String inpuCode = request.getParameter("code");
        System.out.println(inpuCode);
        System.out.println(sessionCode);
        if(inpuCode.equals(sessionCode)){
            imageCodeIsRight = true;
        }
        System.out.println(imageCodeIsRight);

    }
}

/**
 * @author WGR
 * @create 2021/5/8 -- 10:55
 */
@Component
public class MyWebAuthenticationDetailsSource implements
        AuthenticationDetailsSource<HttpServletRequest, WebAuthenticationDetails> {
    @Override
    public WebAuthenticationDetails buildDetails(HttpServletRequest context) {
        return new MyWebAuthenticationDetails(context);
    }
}


/**
 * @author WGR
 * @create 2021/5/8 -- 10:41
 */
@Component
public class MyAuthenticationProvider extends DaoAuthenticationProvider {

    public MyAuthenticationProvider(UserDetailsService userDetailsService, PasswordEncoder passwordEncoder) {
        this.setUserDetailsService(userDetailsService);
        this.setPasswordEncoder(passwordEncoder);

    }

    @Override
    protected void additionalAuthenticationChecks(UserDetails userDetails, UsernamePasswordAuthenticationToken authentication) throws AuthenticationException {
        MyWebAuthenticationDetails  details = (MyWebAuthenticationDetails)authentication.getDetails();
        if(!details.isImageCodeIsRight()){
            throw new ValidateCodeException("验证码输入错误");
        }
        super.additionalAuthenticationChecks(userDetails, authentication);
    }
}
修改配置类
@Configuration
@EnableWebSecurity // 开启springsecurity过滤链 filter
public class SpringSecurityConfig2 extends WebSecurityConfigurerAdapter {
    Logger logger = LoggerFactory.getLogger(getClass());

    @Autowired
    private SecurityProperties securityProperties;


    @Autowired
    private CustomAuthenticationSuccessHandler2 customAuthenticationSuccessHandler;

    @Autowired
    private CustomAuthenticationFailureHandler2 customAuthenticationFailureHandler;


    @Autowired
    AuthenticationDetailsSource<HttpServletRequest, WebAuthenticationDetails> myAuthenticationDetailsSource;

    @Autowired
    AuthenticationProvider authenticationProvider;

    @Autowired
    private DataSource dataSource;

    @Bean
    public PasswordEncoder passwordEncoder() {
        // 明文+随机盐值》加密存储
        return new BCryptPasswordEncoder();
    }

    @Bean
    public JdbcTokenRepositoryImpl jdbcTokenRepository(){
       JdbcTokenRepositoryImpl jdbcTokenRepository = new JdbcTokenRepositoryImpl();
       jdbcTokenRepository.setDataSource(dataSource);
       return jdbcTokenRepository;
    }

    /**
     * 认证管理器:
     * 1. 认证信息(用户名,密码)
     *
     * @param auth
     * @throws Exception
     */
    @Override
    protected void configure(AuthenticationManagerBuilder auth) throws Exception {
        auth.authenticationProvider(authenticationProvider);
    }


    @Override
    protected void configure(HttpSecurity http) throws Exception {
//        http.httpBasic() // 采用 httpBasic认证方式
        http.formLogin().authenticationDetailsSource(myAuthenticationDetailsSource) // 表单登录方式
                .loginPage(securityProperties.getAuthentication().getLoginPage())
                .loginProcessingUrl(securityProperties.getAuthentication().getLoginProcessingUrl()) // 登录表单提交处理url, 默认是/login
                .usernameParameter(securityProperties.getAuthentication().getUsernameParameter()) //默认的是 username
                .passwordParameter(securityProperties.getAuthentication().getPasswordParameter())  // 默认的是 password
                .successHandler(customAuthenticationSuccessHandler)
                .failureHandler(customAuthenticationFailureHandler)
                .and()
                .authorizeRequests() // 认证请求
                .antMatchers(securityProperties.getAuthentication().getLoginPage(),"/code/image").permitAll() // 放行/login/page不需要认证可访问
                 //这里图片不放行的话就会看不见
                .anyRequest().authenticated() //所有访问该应用的http请求都要通过身份认证才可以访问
                .and()
        .rememberMe().tokenRepository(jdbcTokenRepository()).tokenValiditySeconds(60*60*24*7)
        ; // 注意不要少了分号
    }

    /**
     * * 释放静态资源
     * * @param web
     *
     */
    @Override
    public void configure(WebSecurity web) {
        web.ignoring().antMatchers("/dist/**", "/modules/**", "/plugins/**");
    }


}


 浙公网安备 33010602011771号