Scrapy爬取豆瓣电影top250的电影数据、海报,MySQL存储
从GitHub得到完整项目(https://github.com/daleyzou/douban.git)
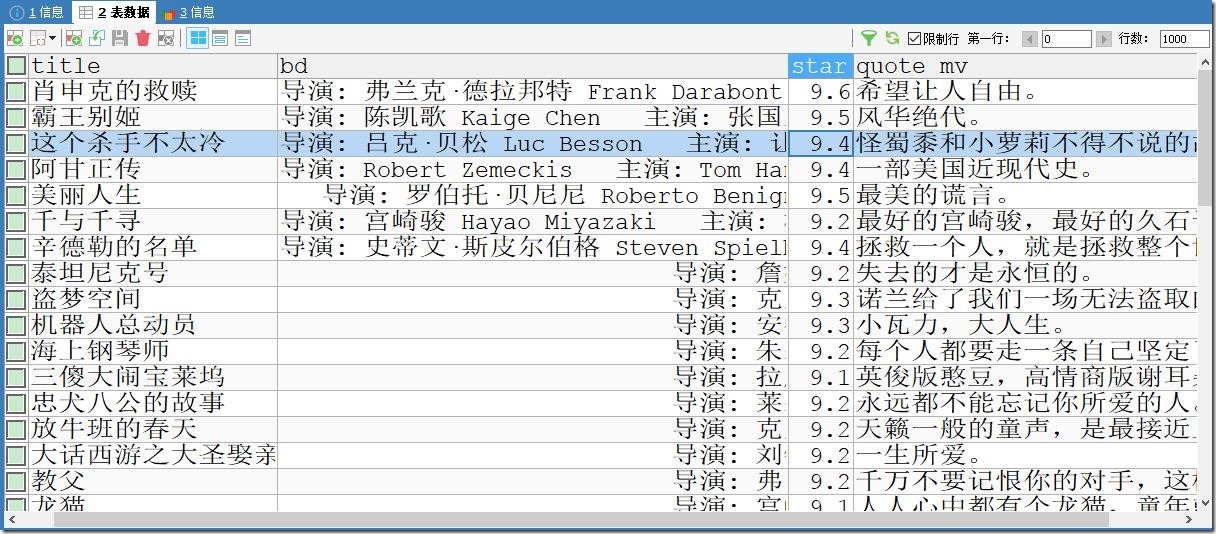
1、成果展示
数据库
本地海报图片
2、环境
(1)已安装Scrapy的Pycharm
(2)mysql
(3)连上网络的电脑
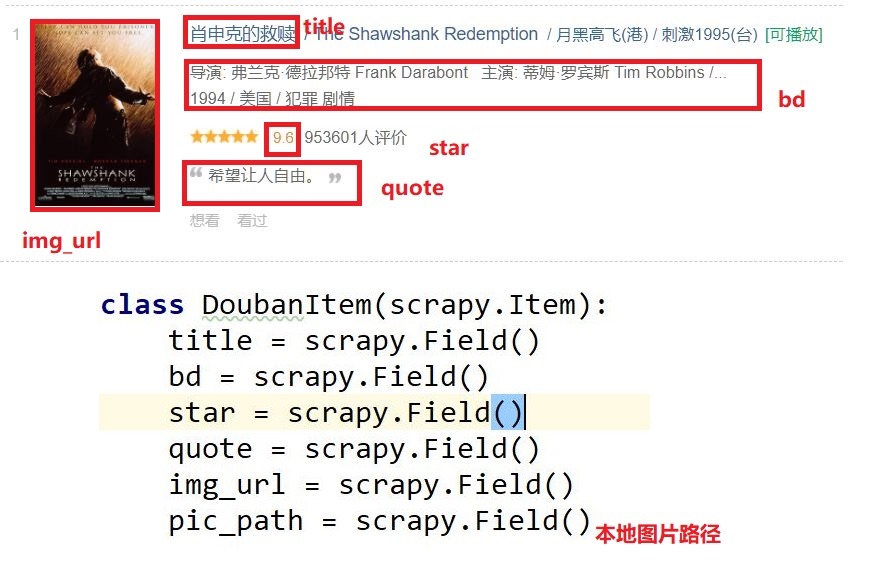
3、实体类设计
4、代码
items.py
  1 class DoubanItem(scrapy.Item):
  2     title = scrapy.Field()
  3     bd = scrapy.Field()
  4     star = scrapy.Field()
  5     quote = scrapy.Field()
  6     img_url = scrapy.Field()
  7     pic_path = scrapy.Field()
doubanmovie.py(爬虫类)
  1 # -*- coding: utf-8 -*-
  2 import scrapy
  3
  4 # noinspection PyUnresolvedReferences
  5 from douban.items import DoubanItem
  6 import sys
  7 reload(sys)
  8 sys.setdefaultencoding('utf-8')
  9
 10
 11 class DoubanmovieSpider(scrapy.Spider):
 12     name = 'doubanmovie'
 13     allowed_domains = ['douban.com']
 14     offset = 0
 15     url = "https://movie.douban.com/top250?start="
 16     start_urls = [url + str(offset),]
 17
 18     def parse(self, response):
 19         item = DoubanItem()
 20         movies = response.xpath("//div[ @class ='info']")
 21         links = response.xpath("//div[ @class ='pic']//img/@src").extract()
 22         for (each, link) in zip(movies,links):
 23             # 标题
 24             item['title'] = each.xpath('.//span[@class ="title"][1]/text()').extract()[0]
 25             # 信息
 26             item['bd'] = each.xpath('.//div[@ class ="bd"][1]/p/text()').extract()[0]
 27             # 评分
 28             item['star'] = each.xpath('.//div[@class ="star"]/span[@ class ="rating_num"]/text()').extract()[0]
 29             # 简介
 30             quote = each.xpath('.//p[@ class ="quote"] / span / text()').extract()
 31             # quote可能为空,因此需要先进行判断
 32             if quote:
 33                 quote = quote[0]
 34             else:
 35                 quote = ''
 36             item['quote'] = quote
 37             item['img_url'] = link
 38
 39             yield item
 40         if self.offset < 225:
 41             self.offset += 25
 42             yield scrapy.Request(self.url+str(self.offset), callback=self.parse)
 43
pipelines.py
  1 # -*- coding: utf-8 -*-
  2
  3 import MySQLdb
  4
  5
  6 from scrapy import Request
  7 from scrapy.pipelines.images import ImagesPipeline
  8
  9
 10 class DoubanPipeline(object):
 11
 12     def __init__(self):
 13         self.conn = MySQLdb.connect(host='localhost', port=3306, db='douban', user='root', passwd='root', charset='utf8')
 14         self.cur = self.conn.cursor()
 15
 16     def process_item(self, item, spider):
 17         print '--------------------------------------------'
 18         print item['title']
 19         print '--------------------------------------------'
 20         try:
 21             sql = "INSERT IGNORE INTO doubanmovies(title,bd,star,quote_mv,img_url) VALUES(\'%s\',\'%s\',%f,\'%s\',\'%s\')" %(item['title'], item['bd'], float(item['star']), item['quote'], item['title']+".jpg")
 22             self.cur.execute(sql)
 23             self.conn.commit()
 24         except Exception, e:
 25             print "----------------------inserted faild!!!!!!!!-------------------------------"
 26             print e.message
 27         return item
 28
 29     def close_spider(self, spider):
 30         print '-----------------------quit-------------------------------------------'
 31         # 关闭数据库连接
 32         self.cur.close()
 33         self.conn.close()
 34
 35
 36 # 下载图片
 37 class DownloadImagesPipeline(ImagesPipeline):
 38     def get_media_requests(self, item, info):
 39         image_url = item['img_url']
 40         # 添加meta是为了下面重命名文件名使用
 41         yield Request(image_url,meta={'title': item['title']})
 42
 43     def file_path(self, request, response=None, info=None):
 44         title = request.meta['title']  # 通过上面的meta传递过来item
 45         image_guid = request.url.split('.')[-1]
 46         filename = u'{0}.{1}'.format(title, image_guid)
 47         print '++++++++++++++++++++++++++++++++++++++++++++++++'
 48         print filename
 49         print '++++++++++++++++++++++++++++++++++++++++++++++++'
 50         return filename
 51
 52
 53
middlewares.py
  1 import random
  2 import base64
  3 from settings import USER_AGENTS
  4 from settings import PROXIES
  5
  6 class RandomUserAgent(object):
  7     def process_request(self, request, spider):
  8         useragent = random.choice(USER_AGENTS)
  9         request.headers.setdefault("User-Agent",useragent)
 10
 11
 12 class RandomProxy(object):
 13     def process_request(self, request, spider):
 14         proxy = random.choice(PROXIES)
 15         print '---------------------'
 16         print proxy
 17         if proxy['user_passwd'] is None:
 18             # 如果没有代理账户验证
 19             request.meta['proxy'] = "http://" + proxy['ip_port']
 20         else:
 21             base64_userpasswd = base64.b64encode(proxy['user_passwd'])
 22             # 对账户密码进行base64编码转换
 23             request.meta['proxy'] = "http://" + proxy['ip_port']
 24             # 对应到代理服务器的信令格式里
 25             request.headers['Proxy-Authorization'] = 'Basic '+ base64_userpasswd
 26
解释HTTP代理使用base64编码
为什么HTTP代理要使用base64编码:
HTTP代理的原理很简单,就是通过HTTP协议与代理服务器建立连接,
协议信令中包含要连接到的远程主机的IP和端口号,如果有需要身份验证的话还需要加上授权信息,
服务器收到信令后首先进行身份验证,通过后便与远程主机建立连接,连接成功之后会返回给客户端200,
表示验证通过,就这么简单,下面是具体的信令格式:
CONNECT 59.64.128.198:21 HTTP/1.1
Host: 59.64.128.198:21
Proxy-Authorization: Basic bGV2I1TU5OTIz
User-Agent: OpenFetion
其中Proxy-Authorization是身份验证信息,
Basic后面的字符串是用户名和密码组合后进行base64编码的结果,
也就是对username:password进行base64编码。
HTTP/1.0 200 Connection established
OK,客户端收到收面的信令后表示成功建立连接,
接下来要发送给远程主机的数据就可以发送给代理服务器了,
代理服务器建立连接后会在根据IP地址和端口号对应的连接放入缓存,
收到信令后再根据IP地址和端口号从缓存中找到对应的连接,将数据通过该连接转发出去。
settings.py
  1 USER_AGENTS = [
  2 'Mozilla/5.0 (Windows; U; Windows NT 5.2) Gecko/2008070208 Firefox/3.0.1',
  3 'Mozilla/5.0 (Windows; U; Windows NT 5.1) Gecko/20070309 Firefox/2.0.0.3',
  4 'Mozilla/5.0 (Windows; U; Windows NT 5.1) Gecko/20070803 Firefox/1.5.0.12',
  5 'Mozilla/4.0 (compatible; MSIE 8.0; Windows NT 6.0)',
  6 'Mozilla/4.0 (compatible; MSIE 7.0; Windows NT 5.2)',
  7 'Opera/9.27 (Windows NT 5.2; U; zh-cn)',
  8 'Opera/8.0 (Macintosh; PPC Mac OS X; U; en)',
  9 'Mozilla/5.0 (Macintosh; PPC Mac OS X; U; en) Opera 8.0 ',
 10 'Mozilla/5.0 (Windows; U; Windows NT 5.2) AppleWebKit/525.13 (KHTML, like Gecko) Version/3.1 Safari/525.13',
 11 'Mozilla/5.0 (iPhone; U; CPU like Mac OS X) AppleWebKit/420.1 (KHTML, like Gecko) Version/3.0 Mobile/4A93 Safari/419.3',
 12 'Mozilla/5.0 (Linux; U; Android 4.0.3; zh-cn; M032 Build/IML74K) AppleWebKit/534.30 (KHTML, like Gecko) Version/4.0 Mobile Safari/534.30'
 13 ]
 14
 15 PROXIES = [
 16    {"ip_port":"202.103.14.155:8118","user_passwd":""},
 17    {"ip_port":"110.73.11.21:8123","user_passwd":""}
 18 ]
 19 # Enable or disable extensions
 20 # See https://doc.scrapy.org/en/latest/topics/extensions.html
 21 #EXTENSIONS = {
 22 #    'scrapy.extensions.telnet.TelnetConsole': None,
 23 #}
 24
 25 # Configure item pipelines
 26 # See https://doc.scrapy.org/en/latest/topics/item-pipeline.html
 27 ITEM_PIPELINES = {
 28    'douban.pipelines.DoubanPipeline': 1,
 29    'douban.pipelines.DownloadImagesPipeline': 100
 30 }
IMAGES_STORE = 'D:\Python\Scrapy\douban\Images'
5、运行
(1)打开本地MySQL数据库
(2)创建一个douban的数据库,并新建一个doubanmovie的表
(3)更改代码中连接到数据库代码中的端口、用户名、密码
(4)切换到项目目录下的/douban/douban/spiders中
(5)运行scrapy crawl doubanmovie


