基于Mongodb进行分布式数据存储
注:本文是研究Mongodb分布式数据存储的副产品,通过本文的相关步骤可以将一个大表中的数据分布到几个mongo服务器上。
MongoDB的1.6版本中auto-sharding功能基本稳定并可以尝试放到生产环境下使用。因为其是auto-sharding,即mongodb通过mongos(一个自动分片模块,用于构建一个大规模的可扩展的数据库集群,这个集群可以并入动态增加的机器)自动建立一个水平扩展的数据库集群系统,将数据库分表存储在sharding的各个节点上。
一个mongodb集群包括一些shards(包括一些mongod进程),mongos路由进程,一个或多个config服务器
(注:本文的测试用例需求64位的mongo程序,因为我在32位的mongo没成功过)。
下面是一些相关词汇说明:
Shards : 每一个shard包括一个或多个服务和存储数据的mongod进程(mongod是MongoDB数据的核心进程)典型的每个shard开启多个服务来提高服务的可用性。这些服务/mongod进程在shard中组成一个复制集
Chunks: Chunk是一个来自特殊集合中的一个数据范围,(collection,minKey,maxKey)描叙一个chunk,它介于minKey和maxKey范围之间。例如chunks 的maxsize大小是100M,如果一个文件达到或超过这个范围时,会被切分到2个新的chunks中。当一个shard的数据过量时,chunks将会被迁移到其他的shards上。同样,chunks也可以迁移到其他的shards上
Config Servers : Config服务器存储着集群的metadata信息,包括每个服务器,每个shard的基本信息和chunk信息Config服务器主要存储的是chunk信息。每一个config服务器都复制了完整的chunk信息。
接着看一下要配置的测试环境信息:
模拟2个shard服务和一个config服务, 均运行在10.0.4.85机器上,只是端口不同
Shard1:27020
Shard2:27021
Config:27022
Mongos启动时默认使用的27017端口
在C,D,E磁盘下分别建立如下文件夹:
mongodb\bin
mongodb\db
然后用CMD命令行依次打开相应文件夹下的mongd文件:
c:\mongodb\bin\mongod --dbpath c:\mongodb\db\ --port 27020
d:\mongodb\bin\mongod --dbpath d:\mongodb\db\ --port 27021
e:\mongodb\bin\mongod --configsvr --dbpath e:\mongodb\db\ --port 27022 (注:config配置服务器)
启动mongos时,默认开启了27017端口
e:\mongodb\bin\mongos --configdb 10.0.4.85:27022
然后打开mongo:
E:\mongodb\bin>mongo 回车 (有时加端口会造成下面的addshard命令出问题)
> use admin
switched to db admin
> db.runCommand( { addshard : "10.0.4.85:27020", allowLocal : 1, maxSize:2 , minKey:1, maxKey:10} )
--添加sharding,maxsize单位是M,此处设置比较小的数值只为演示sharding效果
{ "shardAdded" : "shard0000", "ok" : 1 }
> db.runCommand( { addshard : "10.0.4.85:27021", allowLocal : 1, minKey:1000} )
{ "shardAdded" : "shard0001", "ok" : 1 }
注:如果要移除sharding,可用下面写法
db.runCommand( { removeshard : "localhost:10000" } );
> db.runCommand({listshards:1}); 查看shard节点列表

"shards" : [
{
"_id" : "shard0000",
"host" : "10.0.4.85:27020"
},
{
"_id" : "shard0001",
"host" : "10.0.4.85:27021"
}
],
"ok" : 1
}
接下来创建相应数据库并设置其"可以sharding",新建自动切片的库user001:
> config = config.getSisterDB("config")
> dnt_mongodb=db.getSisterDB("dnt_mongodb");
dnt_mongodb
> db.runCommand({enablesharding:"dnt_mongodb"})
{ "ok" : 1 }
> db.printShardingStatus();

sharding version: { "_id" : 1, "version" : 3 }
shards:
{ "_id" : "shard0000", "host" : "10.0.4.85:27020" }
{ "_id" : "shard0001", "host" : "10.0.4.85:27021" }
databases:
{ "_id" : "admin", "partitioned" : false, "primary" : "config" }
{ "_id" : "dnt_mongodb", "partitioned" : true, "primary" : "shard0000" }

如果要进行GridFS sharding,则需进行如下设置:
db.runCommand( { shardcollection : "dnt_mongodb.attach_gfstream.chunks", key : { files_id : 1 } } )
{"ok" : 1} ,更多内容参见http://eshilin.blog.163.com/blog/static/13288033020106215227346/

sharding version: { "_id" : 1, "version" : 3 }
shards:
{ "_id" : "shard0000", "host" : "localhost:27020" }
{ "_id" : "shard0001", "host" : "localhost:27021" }
databases:
{ "_id" : "admin", "partitioned" : false, "primary" : "config" }
{ "_id" : "user001", "partitioned" : true, "primary" : "shard0000" }
dnt_mongodb.posts1e chunks:
{ "name" : { $minKey : 1 } } -->> { "name" : { $maxKey :
1 } } on : shard0000 { "t" : 1000, "i" : 0

Tue Sep 07 12:13:15 [conn14] config change: { _id: "4_85-2010-09-07T04:13:15-0", server: "4_85", time: new Date(1283832795994), what: "split", ns: "dnt_mongodb.posts1", details: { before: { min: { _id: MinKey }, max: { _id: MaxKey } }, left: { min: { _id: MinKey }, max: { _id: 19 } }, right: { min: { _id: 19 }, max: {_id: MaxKey } } } }
Tue Sep 07 12:13:16 [conn14] moving chunk (auto): ns:dnt_mongodb.posts1 at: shard0000:10.0.4.85:27020 lastmod: 1|1 min: { _id: MinKey } max: { _id: 19 } to: shard0001:10.0.4.85:27021 #objects: 0
Tue Sep 07 12:13:16 [conn14] moving chunk ns: dnt_mongodb.posts1 moving ( ns:dnt_mongodb.posts1 at: shard0000:10.0.4.85:27020 lastmod: 1|1 min: { _id: MinKey }max: { _id: 19 }) shard0000:10.0.4.85:27020 -> shard0001:10.0.4.85:27021
Tue Sep 07 12:13:23 [WriteBackListener] ~ScopedDBConnection: _conn != null
Tue Sep 07 12:13:23 [WriteBackListener] ERROR: splitIfShould failed: ns: dnt_mongodb.posts1 findOne has stale config
Tue Sep 07 12:13:28 [WriteBackListener] autosplitting dnt_mongodb.posts1 size: 54106804 shard: ns:dnt_mongodb.posts1 at: shard0000:10.0.4.85:27020 lastmod: 2|1min: { _id: 19 } max: { _id: MaxKey } on: { _id: 71452 }(splitThreshold 47185920)
Tue Sep 07 12:13:28 [WriteBackListener] config change: { _id: "4_85-2010-09-07T04:13:28-1", server: "4_85", time: new Date(1283832808738), what: "split", ns: "dnt_mongodb.posts1", details: { before: { min: { _id: 19 }, max: { _id: MaxKey }}, left: { min: { _id: 19 }, max: { _id: 71452 } }, right: { min: { _id: 71452 }, max: { _id: MaxKey } } } }
switched to db dnt_mongodb
> show collections
posts1
system.indexes
> db.posts1.stats()

"sharded" : true,
"ns" : "dnt_mongodb.posts1",
"count" : 161531,
"size" : 195882316,
"avgObjSize" : 1212.6608267143768,
"storageSize" : 231467776,
"nindexes" : 1,
"nchunks" : 5,
"shards" : {
"shard0000" : {
"ns" : "dnt_mongodb.posts1",
"count" : 62434,
"size" : 54525632,
"avgObjSize" : 873.3323509626165,
"storageSize" : 65217024,
"numExtents" : 10,
"nindexes" : 1,
"lastExtentSize" : 17394176,
"paddingFactor" : 1,
"flags" : 1,
"totalIndexSize" : 2179072,
"indexSizes" : {
"_id_" : 2179072
},
"ok" : 1
},
"shard0001" : {
"ns" : "dnt_mongodb.posts1",
"count" : 99097,
"size" : 141356684,
"avgObjSize" : 1426.4476623913943,
"storageSize" : 166250752,
"numExtents" : 12,
"nindexes" : 1,
"lastExtentSize" : 37473024,
"paddingFactor" : 1,
"flags" : 1,
"totalIndexSize" : 3424256,
"indexSizes" : {
"_id_" : 3424256
},
"ok" : 1
}
},
"ok" : 1
}
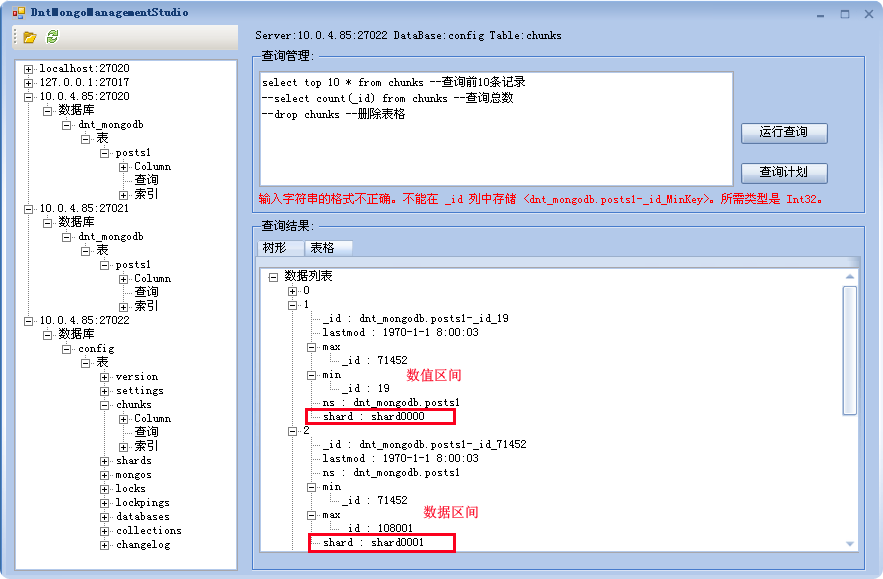
通过上面的结果,可以出现16万条记录均分在了两个sharding上,其中shard0000中有62434条,shard0001中有99097条。下面看一下这两个sharding-chunk的分布情况(图中的错误提示‘输入字符串格式不正确’主要因为运行环境与编译程序使用的环境不同,一个是64,一个是32位系统):

可以看到数据被按区间自动分割开了,有点像sqlserver的数据分区表,只不过这是自动完成的(目前我没找到可以手工指定区间上下限的方式,如有知道的TX可以跟我说一下)。当然在本文中的测试中,共有5个chunk,其中4个位于shard0001,这种情况可以在每次测试过程中会发生变化,包括两个sharding被分配的记录数。另外就是在mongodb移动过程前后会在shard0000上生成一个文件夹,里面包括一些bson文件,名字形如(表格+日期等信息):
post-cleanup.2010-09-07T04-13-31.1.bson
该文件主要包括一些数据库,表结构及相关记录等信息,我想应该是用于数据恢复备份啥的。
好的,今天的内容就先到这里了。


【推荐】国内首个AI IDE,深度理解中文开发场景,立即下载体验Trae
【推荐】编程新体验,更懂你的AI,立即体验豆包MarsCode编程助手
【推荐】抖音旗下AI助手豆包,你的智能百科全书,全免费不限次数
【推荐】轻量又高性能的 SSH 工具 IShell:AI 加持,快人一步
· 开发者必知的日志记录最佳实践
· SQL Server 2025 AI相关能力初探
· Linux系列:如何用 C#调用 C方法造成内存泄露
· AI与.NET技术实操系列(二):开始使用ML.NET
· 记一次.NET内存居高不下排查解决与启示
· Manus重磅发布:全球首款通用AI代理技术深度解析与实战指南
· 被坑几百块钱后,我竟然真的恢复了删除的微信聊天记录!
· 没有Manus邀请码?试试免邀请码的MGX或者开源的OpenManus吧
· 园子的第一款AI主题卫衣上架——"HELLO! HOW CAN I ASSIST YOU TODAY
· 【自荐】一款简洁、开源的在线白板工具 Drawnix
2007-09-07 Discuz!NT控件剖析 之 ColorPicker(颜色拾取) 和Calendar(日历) [原创: 附源码]