电商设计1
产品经理:设计需求原型
测试:
前端:大前端。node
后端:
移动端:
项目开发流程图:

-
商城是一个母婴类的电商购物网站(B2B)。
-
用户可以在线购买商品、加入购物车、下单、秒杀商品
-
可以评论已购买商品
-
管理员可以在后台管理商品的上下架、促销活动
-
管理员可以监控商品销售状况
-
客服可以在后台处理退款操作
-
希望未来3到5年可以支持千万用户的使用
2.2.1.架构图
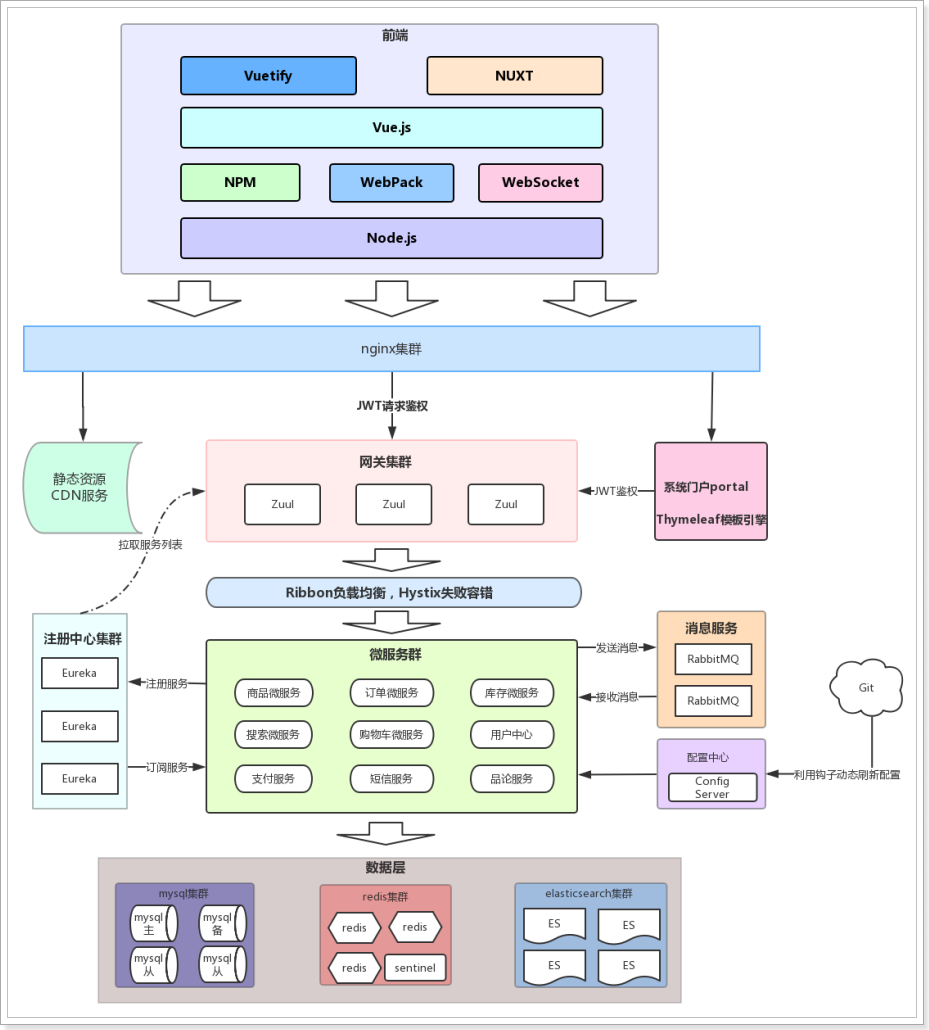
整个商城可以分为两部分:后台管理系统、前台门户系统。
-
后台管理:
-
后台系统主要包含以下功能:
-
商品管理,包括商品分类、品牌、商品规格等信息的管理
-
销售管理,包括订单统计、订单退款处理、促销活动生成等
-
用户管理,包括用户控制、冻结、解锁等
-
权限管理,整个网站的权限控制,采用JWT鉴权方案,对用户及API进行权限控制
-
统计,各种数据的统计分析展示
-
-
后台系统会采用前后端分离开发,而且整个后台管理系统会使用Vue.js框架搭建出单页应用(SPA)。
-
-
前台门户面向的是客户,包含与客户交互的一切功能。例如:
-
搜索商品
-
加入购物车
-
下单
-
评价商品等等
-
-
前台系统我们会使用Thymeleaf模板引擎技术来完成页面开发。出于SEO优化的考虑,我们将不采用单页应用。
-
商品微服务:商品及商品分类、品牌、库存等的服务
-
搜索微服务:实现搜索功能
-
订单微服务:实现订单相关
-
购物车微服务:实现购物车相关功能
-
用户中心:用户的登录注册等功能
-
Eureka注册中心
-
Zuul网关服务
-
Spring Cloud Config配置中心
3.1.技术选型
前端技术:
-
基础的HTML、CSS、JavaScript(基于ES6标准)
-
JQuery
-
Vue.js 2.0以及基于Vue的框架:Vuetify
-
前端构建工具:WebPack
-
前端安装包工具:NPM
-
Vue脚手架:Vue-cli
-
Vue路由:vue-router
-
ajax框架:axios
-
基于Vue的富文本框架:quill-editor
后端技术:
-
基础的SpringMVC、Spring 5.0和MyBatis3
-
Spring Boot 2.0.1版本
-
Spring Cloud 最新版 Finchley.RC1
-
Redis-4.0
-
RabbitMQ-3.4
-
Elasticsearch-5.6.8
-
nginx-1.10.2:
-
FastDFS - 5.0.8
-
MyCat
-
Thymeleaf
3.2.开发环境
为了保证开发环境的统一,希望每个人都按照统一环境来配置:
-
IDE:我们使用Idea 2017.3 版本
-
JDK:统一使用JDK1.8
-
项目构建:maven3.3.9以上版本即可
-
版本控制工具:git
我们在开发的过程中,为了保证以后的生产、测试环境统一。尽量都采用域名来访问项目。
二级域名:manage.aiyingshi.com , api.aiyingshi.com
我们可以通过switchhost工具来修改自己的host对应的地址,只要把这些域名指向127.0.0.1,那么跟你用localhost的效果是完全一样的。
创建统一的父工程:aiyingshi,用来管理依赖及其版本,注意是创建project,而不是moudle
父工程不需要代码,只是管理依赖,因此我们不选择任何SpringCloud的依赖
跳过依赖选择。
填写保存的位置信息:
然后将pom文件修改成我这个样子:
<?xml version="1.0" encoding="UTF-8"?>
<project xmlns="http://maven.apache.org/POM/4.0.0" xmlns:xsi="http://www.w3.org/2001/XMLSchema-instance"
    xsi:schemaLocation="http://maven.apache.org/POM/4.0.0 http://maven.apache.org/xsd/maven-4.0.0.xsd">
    <modelVersion>4.0.0</modelVersion>

    <groupId>com.aiyingshi.parent</groupId>
    <artifactId>aiyingshi</artifactId>
    <version>1.0.0-SNAPSHOT</version>
    <packaging>pom</packaging>

    <name>leyou</name>
    <description>Demo project for Spring Boot</description>

    <parent>
        <groupId>org.springframework.boot</groupId>
        <artifactId>spring-boot-starter-parent</artifactId>
        <version>2.0.1.RELEASE</version>
        <relativePath/> <!-- lookup parent from repository -->
    </parent>

    <properties>
        <project.build.sourceEncoding>UTF-8</project.build.sourceEncoding>
        <project.reporting.outputEncoding>UTF-8</project.reporting.outputEncoding>
        <java.version>1.8</java.version>
        <spring-cloud.version>Finchley.RC1</spring-cloud.version>
        <mybatis.starter.version>1.3.2</mybatis.starter.version>
        <mapper.starter.version>2.0.2</mapper.starter.version>
        <druid.starter.version>1.1.9</druid.starter.version>
        <mysql.version>5.1.32</mysql.version>
        <pageHelper.starter.version>1.2.3</pageHelper.starter.version>
        <leyou.latest.version>1.0.0-SNAPSHOT</leyou.latest.version>
        <fastDFS.client.version>1.26.1-RELEASE</fastDFS.client.version>
    </properties>

    <dependencyManagement>
        <dependencies>
            <!-- springCloud -->
            <dependency>
                <groupId>org.springframework.cloud</groupId>
                <artifactId>spring-cloud-dependencies</artifactId>
                <version>${spring-cloud.version}</version>
                <type>pom</type>
                <scope>import</scope>
            </dependency>
            <!-- mybatis启动器 -->
            <dependency>
                <groupId>org.mybatis.spring.boot</groupId>
                <artifactId>mybatis-spring-boot-starter</artifactId>
                <version>${mybatis.starter.version}</version>
            </dependency>
            <!-- 通用Mapper启动器 -->
            <dependency>
                <groupId>tk.mybatis</groupId>
                <artifactId>mapper-spring-boot-starter</artifactId>
                <version>${mapper.starter.version}</version>
            </dependency>
            <!-- 分页助手启动器 -->
            <dependency>
                <groupId>com.github.pagehelper</groupId>
                <artifactId>pagehelper-spring-boot-starter</artifactId>
                <version>${pageHelper.starter.version}</version>
            </dependency>
            <!-- mysql驱动 -->
            <dependency>
                <groupId>mysql</groupId>
                <artifactId>mysql-connector-java</artifactId>
                <version>${mysql.version}</version>
            </dependency>
            <!--FastDFS客户端-->
            <dependency>
                <groupId>com.github.tobato</groupId>
                <artifactId>fastdfs-client</artifactId>
                <version>${fastDFS.client.version}</version>
            </dependency>
          </dependencies>
    </dependencyManagement>

    <build>
        <plugins>
            <plugin>
                <groupId>org.springframework.boot</groupId>
                <artifactId>spring-boot-maven-plugin</artifactId>
            </plugin>
        </plugins>
    </build>

    <repositories>
        <repository>
            <id>spring-milestones</id>
            <name>Spring Milestones</name>
            <url>https://repo.spring.io/milestone</url>
            <snapshots>
                <enabled>false</enabled>
            </snapshots>
        </repository>
    </repositories>
</project>
最后,删除自动生成的LeyouApplication启动类、测试类以及application.properties文件,我们不需要。
3.5.1.创建工程
我们的注册中心,起名为:ays-registry
这次我们就不Spring使用提供的脚手架了。直接创建maven项目,自然会继承父类的依赖:
选择新建module:
添加EurekaServer的依赖:
<?xml version="1.0" encoding="UTF-8"?>
<project xmlns="http://maven.apache.org/POM/4.0.0"
         xmlns:xsi="http://www.w3.org/2001/XMLSchema-instance"
         xsi:schemaLocation="http://maven.apache.org/POM/4.0.0 http://maven.apache.org/xsd/maven-4.0.0.xsd">
    <parent>
        <artifactId>aiyingshi</artifactId>
        <groupId>com.aiyinshi.parent</groupId>
        <version>1.0.0-SNAPSHOT</version>
    </parent>
    <modelVersion>4.0.0</modelVersion>

    <groupId>com.leyou.common</groupId>
    <artifactId>ly-registry</artifactId>
    <version>1.0.0-SNAPSHOT</version>

    <dependencies>
        <dependency>
            <groupId>org.springframework.cloud</groupId>
            <artifactId>spring-cloud-starter-netflix-eureka-server</artifactId>
        </dependency>
    </dependencies>
</project>
@SpringBootApplication
@EnableEurekaServer
public class AYSRegistry {
    public static void main(String[] args) {
        SpringApplication.run(AYSRegistry.class, args);
    }
}
server:
  port: 10086
spring:
  application:
    name: ays-registry
eureka:
  client:
    fetch-registry: false
    register-with-eureka: false
    service-url:
      defaultZone: http://127.0.0.1:${server.port}/eureka
  server:
    enable-self-preservation: false # 关闭自我保护
    eviction-interval-timer-in-ms: 5000 # 每隔5秒进行一次服务列表清理
3.6.1.创建工程
与上面类似,选择maven方式创建Module,然后填写项目名称,我们命名为:ays-api-gateway
这里我们需要添加Zuul和EurekaClient的依赖:
<?xml version="1.0" encoding="UTF-8"?>
<project xmlns="http://maven.apache.org/POM/4.0.0"
         xmlns:xsi="http://www.w3.org/2001/XMLSchema-instance"
         xsi:schemaLocation="http://maven.apache.org/POM/4.0.0 http://maven.apache.org/xsd/maven-4.0.0.xsd">
    <parent>
        <artifactId>aiyingshi</artifactId>
        <groupId>com.aiyingshi.parent</groupId>
        <version>1.0.0-SNAPSHOT</version>
    </parent>
    <modelVersion>4.0.0</modelVersion>

    <groupId>com.aiyingshi.common</groupId>
    <artifactId>ays-api-gateway</artifactId>
    <version>1.0.0-SNAPSHOT</version>

    <dependencies>
        <dependency>
            <groupId>org.springframework.cloud</groupId>
            <artifactId>spring-cloud-starter-netflix-zuul</artifactId>
        </dependency>
        <dependency>
            <groupId>org.springframework.cloud</groupId>
            <artifactId>spring-cloud-starter-netflix-eureka-client</artifactId>
        </dependency>
        <!--是springboot提供的微服务检测接口,默认对外提供几个接口:/info-->
        <dependency>
            <groupId>org.springframework.boot</groupId>
            <artifactId>spring-boot-starter-actuator</artifactId>
        </dependency>
    </dependencies>
</project>
@SpringBootApplication
@EnableDiscoveryClient
@EnableZuulProxy
public class aysApiGateway {
    public static void main(String[] args) {
        SpringApplication.run(aysApiGateway.class, args);
    }
}
server:
  port: 10010
spring:
  application:
    name: api-gateway
eureka:
  client:
    service-url:
      defaultZone: http://127.0.0.1:10086/eureka
    registry-fetch-interval-seconds: 5
  instance:
    prefer-ip-address: true
    ip-address: 127.0.0.1
    instance-id: ${spring.application.name}:${server.port}
zuul:
  prefix: /api # 添加路由前缀
  retryable: true
ribbon:
  ConnectTimeout: 250 # 连接超时时间(ms)
  ReadTimeout: 2000 # 通信超时时间(ms)
  OkToRetryOnAllOperations: true # 是否对所有操作重试
  MaxAutoRetriesNextServer: 1 # 同一服务不同实例的重试次数
  MaxAutoRetries: 1 # 同一实例的重试次数
hystrix:
  command:
    default:
      execution:
        isolation:
          thread:
            timeoutInMillisecond: 10000 # 熔断超时时长:10000ms
目前,aiyingshi下有两个子模块:
-
ays-registry:服务的注册中心(EurekaServer)
-
ays-api-gateway:服务网关(Zuul)
截止到这里,我们已经把基础服务搭建完毕,为了便于开发,统一配置中心(ConfigServer)我们留待以后添加。
既然是一个母婴类的电商购物平台,那么核心自然就是商品。因此我们要搭建的第一个服务,就是商品微服务。其中会包含对于商品相关的一系列内容的管理,包括:
-
商品分类管理
-
品牌管理
-
商品规格参数管理
-
商品管理
-
库存管理
我们先完成项目的搭建:
因为与商品的品类相关,我们的工程命名为ays-item.
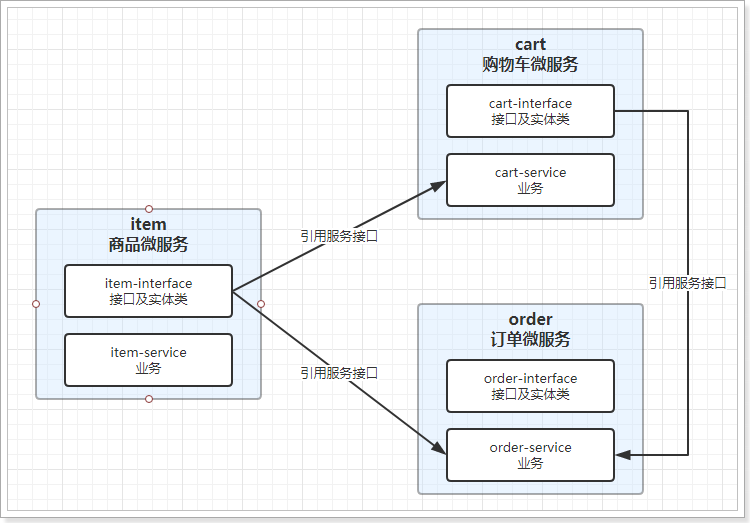
需要注意的是,我们的ays-item是一个微服务,那么将来肯定会有其它系统需要来调用服务中提供的接口,因此肯定也会使用到接口中关联的实体类。
因此这里我们需要使用聚合工程,将要提供的接口及相关实体类放到独立子工程中,以后别人引用的时候,只需要知道坐标即可。
我们会在ays-item中创建两个子工程:
-
ays-item-interface:主要是对外暴露的接口及相关实体类
-
ays-item-service:所有业务逻辑及内部使用接口
调用关系如图所示

依然是使用maven构建:
保存的位置:
不需要任何依赖,我们可以把项目打包方式设置为pom
<?xml version="1.0" encoding="UTF-8"?>
<project xmlns="http://maven.apache.org/POM/4.0.0"
         xmlns:xsi="http://www.w3.org/2001/XMLSchema-instance"
         xsi:schemaLocation="http://maven.apache.org/POM/4.0.0 http://maven.apache.org/xsd/maven-4.0.0.xsd">
    <parent>
        <artifactId>aiyingshi</artifactId>
        <groupId>com.aiyingshi.parent</groupId>
        <version>1.0.0-SNAPSHOT</version>
    </parent>
    <modelVersion>4.0.0</modelVersion>

    <groupId>com.aiyingshi.service</groupId>
    <artifactId>ays-item</artifactId>
    <version>1.0.0-SNAPSHOT</version>
    <!-- 打包方式为pom -->
    <packaging>pom</packaging>
</project>
在ays-item工程上点击右键,选择new > module:
依然是使用maven构建,注意父工程是ays-item:
与ays-item-interface类似,我们选择在ays-item上右键,新建module,然后填写项目信息:
接下来我们给ays-item-service中添加依赖:
我们需要
-
Eureka客户端
-
web启动器
-
mybatis启动器
-
通用mapper启动器
-
分页助手启动器
-
连接池,我们用默认的Hykira
-
mysql驱动
-
千万不能忘了,我们自己也需要
ays-item-interface中的实体类
这些依赖,我们在顶级父工程:aiyingshi中已经添加好了。所以直接引入即可:
<?xml version="1.0" encoding="UTF-8"?>
<project xmlns="http://maven.apache.org/POM/4.0.0"
         xmlns:xsi="http://www.w3.org/2001/XMLSchema-instance"
         xsi:schemaLocation="http://maven.apache.org/POM/4.0.0 http://maven.apache.org/xsd/maven-4.0.0.xsd">
    <parent>
        <artifactId>ays-item</artifactId>
        <groupId>com.aiyingshi.service</groupId>
        <version>1.0.0-SNAPSHOT</version>
    </parent>
    <modelVersion>4.0.0</modelVersion>

    <groupId>com.aiyingshi.service</groupId>
    <artifactId>ays-item-service</artifactId>
    <version>1.0.0-SNAPSHOT</version>

    <dependencies>
        <!--Eureka客户端-->
        <dependency>
            <groupId>org.springframework.cloud</groupId>
            <artifactId>spring-cloud-starter-netflix-eureka-client</artifactId>
        </dependency>
        <!--web启动器-->
        <dependency>
            <groupId>org.springframework.boot</groupId>
            <artifactId>spring-boot-starter-web</artifactId>
        </dependency>
        <!-- mybatis启动器 -->
        <dependency>
            <groupId>org.mybatis.spring.boot</groupId>
            <artifactId>mybatis-spring-boot-starter</artifactId>
            <version>${mybatis.starter.version}</version>
        </dependency>
        <!-- 通用Mapper启动器 -->
        <dependency>
            <groupId>tk.mybatis</groupId>
            <artifactId>mapper-spring-boot-starter</artifactId>
            <version>${mapper.starter.version}</version>
        </dependency>
        <!-- 分页助手启动器 -->
        <dependency>
            <groupId>com.github.pagehelper</groupId>
            <artifactId>pagehelper-spring-boot-starter</artifactId>
            <version>${pageHelper.starter.version}</version>
        </dependency>
        <!-- mysql驱动 -->
        <dependency>
            <groupId>mysql</groupId>
            <artifactId>mysql-connector-java</artifactId>
            <version>${mysql.version}</version>
        </dependency>
        <dependency>
            <groupId>com.aiyingshi.service</groupId>
            <artifactId>ays-item-interface</artifactId>
            <version>${aiyingshi.latest.version}</version>
        </dependency>
        <dependency>
            <groupId>org.springframework.boot</groupId>
            <artifactId>spring-boot-starter-actuator</artifactId>
        </dependency>
    </dependencies>
</project>
在整个ays-item工程中,只有ays-item-service是需要启动的。因此在其中编写启动类即可:
@SpringBootApplication
@EnableDiscoveryClient
public class aysItemService {
    public static void main(String[] args) {
        SpringApplication.run(aysItemService.class, args);
    }
}
然后是全局属性文件:
server:
  port: 8081
spring:
  application:
    name: item-service
  datasource:
    url: jdbc:mysql://localhost:3306/aiyingshi
    username: root
    password: 123
    hikari:
      maximum-pool-size: 30
      minimum-idle: 10
eureka:
  client:
    service-url:
      defaultZone: http://127.0.0.1:10086/eureka
  instance:
    lease-renewal-interval-in-seconds: 5 # 每隔5秒发送一次心跳
    lease-expiration-duration-in-seconds: 10 # 10秒不发送就过期
    prefer-ip-address: true
    ip-address: 127.0.0.1
    instance-id: ${spring.application.name}:${server.port}
既然商品微服务已经创建,接下来肯定要添加路由规则到Zuul中,我们不使用默认的路由规则。
zuul:
  prefix: /api # 添加路由前缀
  retryable: true
  routes:
    item-service: /item/** # 将商品微服务映射到/item/**
我们分别启动:ays-registry,ays-api-gateway,ays-item-service
查看Eureka面板:
为了测试路由规则是否畅通,我们是不是需要在item-service中编写一个controller接口呢?
其实不需要,Spring提供了一个依赖:actuator
只要我们添加了actuator的依赖,它就会为我们生成一系列的访问接口:
-
/info
-
/health
-
/refresh
-
...
添加依赖:
<dependency>
    <groupId>org.springframework.boot</groupId>
    <artifactId>spring-boot-starter-actuator</artifactId>
</dependency>
重启后访问Eureka控制台:
鼠标悬停在item-service上,会显示一个地址:
这就是actuator提供的接口,我们点击访问:
http://127.0.0.1:8081/actuator/info
接下来我们通过路由访问试试,根据路由规则,我们需要访问的地址是:
http://127.0.0.1:10010/api/item/actuator/info
有些工具或通用的约定内容,我们希望各个服务共享,因此需要创建一个工具模块:ays-common
使用maven来构建module:


