
Hbase入门
大纲
-
了解什么是Hbase
-
了解列式数据库与行式数据库的区别
-
了解hbase的架构
-
掌握Hbase的部署和安装
-
掌握Hbase的CRUD操作
-
实现京东的“规格和包装”功能案例
-
Hbase高级部分
1、了解Hbase
1.1、什么是Hbase

HBase是一个使用Java语言实现的,构建于Hadoop分布式文件系统(HDFS)上的分布式数据库。
Hbase是参考谷歌的BigTable的论文开发实现的,Hadoop 生态系统引入了Bigtable的大部分功能。
Hadoop生态圈: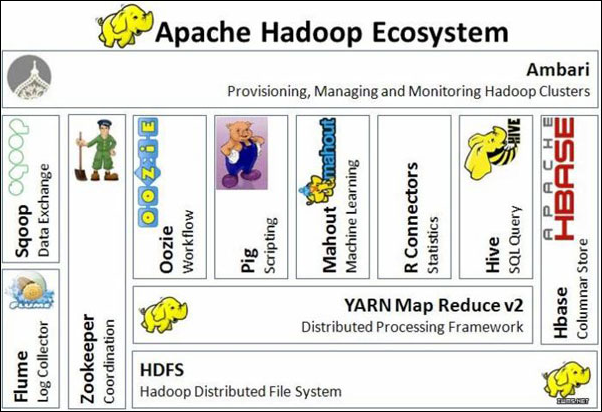
1.2、Hbase的特点
-
海量存储
-
Hbase单表可以有百亿行,百万列,相对计较传统关系型数据库而言,存储能力非常强悍。
-
-
列式存储
-
创建表时,无需指定具体的列,根据数据的插入动态插入。在关系型数据库创建表时必须先定义好列。
-
可以针对列进行权限控制和读取。
-
-
多版本
-
可以为数据添加版本信息,如用户信息的logo变更历史。
-
-
稀疏性
-
为空的列不占用实际存储空间。
-
传统数据库,为空的列依然要占用存储空间。
-
-
高扩展、高可用性
-
底层基于HDFS,高可用和扩展性得到的了保障。
-
1.3、列式存储和行式存储
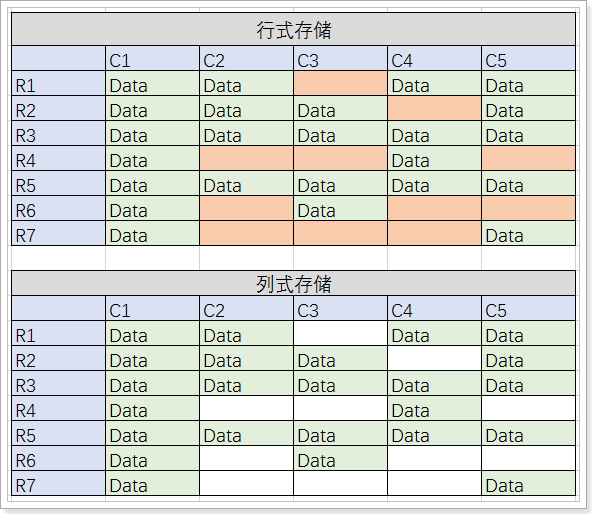
有上图可以看出:
-
行式存储数据库中,表结构是固定的,每行的每一列都站位,无论有无数据。
-
读取数据时,需要将所有列的数据读取到内存中进行处理,再返回结果。
-
-
列式存储数据库中,列的机构是不固定的,如果行的数据某一列没有数据,那么将不占用空间。
-
读取数据时,可以直接定位到所需要的列,进行返回数据。
-
行式、列式存储底层结构的区别:

从上图可以看到,在行式存储下,一张表的数据都是放在一起的,但列式存储下都被分开保存了。
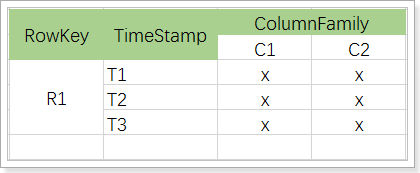
1.4、Hbase中表结构模型
-
表(table):用于存储管理数据,具有稀疏的、面向列的特点。HBase中的每一张表,就是所谓的大表(Bigtable)。
-
行键(RowKey):类似于MySQL中的主键,HBase根据行键来快速检索数据,一个行键对应一条记录。与MySQL主键不同的是,HBase的行键是天然固有的,每一行数据都存在行键。
-
列族(簇)(ColumnFamily):是列的集合。列族在表定义时需要指定,而列在插入数据时动态指定。列中的数据都是以二进制形式存在,没有数据类型。在物理存储结构上,每个表中的每个列族单独以一个文件存储(参见图1.2)。一个表可以有多个列族。
-
时间戳(TimeStamp):是列的一个属性,是一个64位整数。由行键和列确定的单元格,可以存储多个数据,每个数据含有时间戳属性,数据具有版本特性。可根据版本(VERSIONS)或时间戳来指定查询历史版本数据,如果都不指定,则默认返回最新版本的数据。
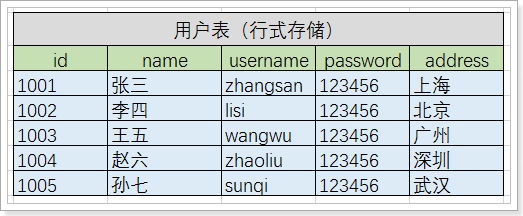
举例,将传统表转成Hbase的存储:
转换后的结果:
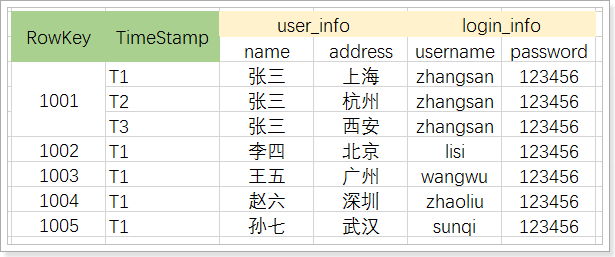
其中:
-
将原有数据列,拆分成2个列族,分别是user_info和login_info
-
1001用户有三个版本数据,从数据上可以看出,该用户设置了3个地址
2、Hbase系统架构
全局架构:
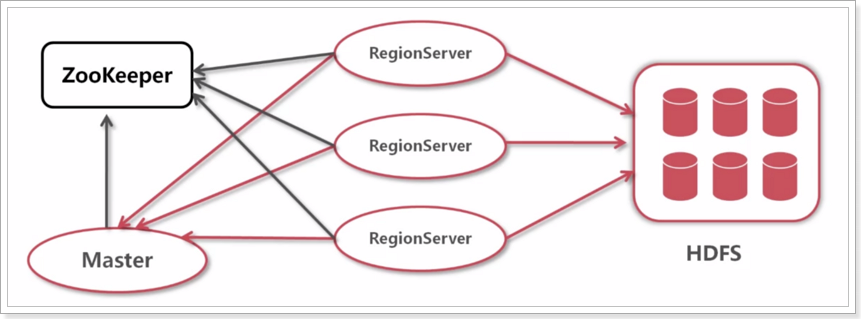
有此可以看出,Hbase需要依赖于ZooKeeper和HDFS。
-
Zookeeper
-
保证任何时候,集群中只有一个running master,避免单点问题;
-
存贮所有Region的寻址入口,包括-ROOT-表地址、HMaster地址;
-
实时监控Region Server的状态,将Region server的上线和下线信息,实时通知给Master;
-
存储Hbase的schema,包括有哪些table,每个table有哪些column family。
-
-
Master
-
可以启动多个HMaster,通过Zookeeper的Master Election机制保证总有一个Master运行。
-
-
RegionServer
-
HBase中最核心的模块,主要负责响应用户I/O请求,向HDFS文件系统中读写数据。
-
维护Master分配给它的region,处理对这些region的IO请求;
-
负责切分在运行过程中变得过大的region。
-
-
-
HDFS
-
负责存储数据。
-
3、Hbase的部署安装
Hbase的安装有2种方式,一种是单机部署,一种是集群部署。
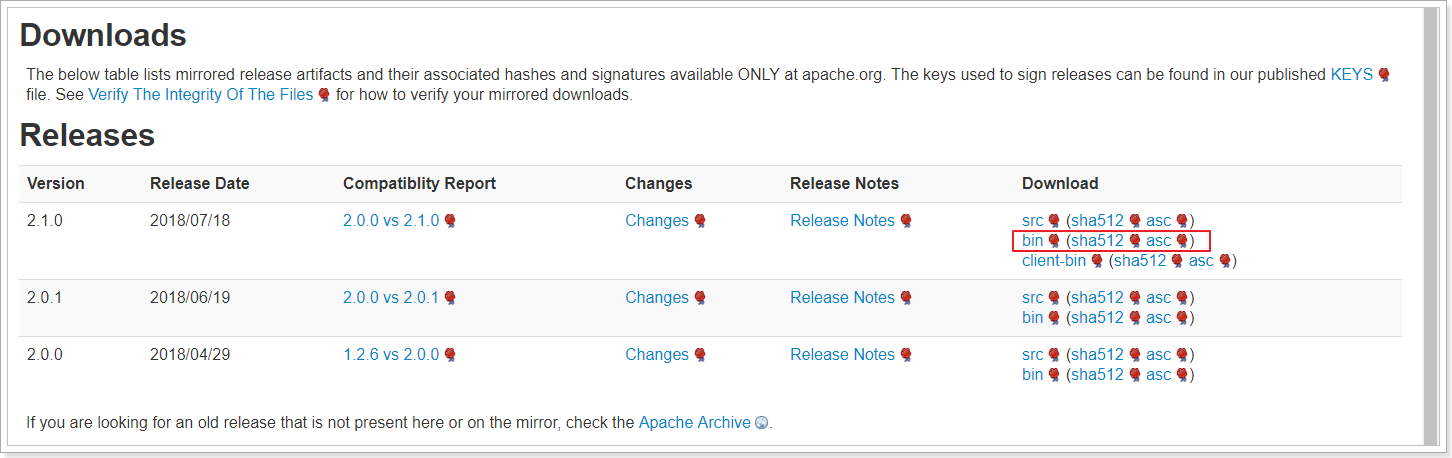
3.1、下载
https://hbase.apache.org/downloads.html
3.2、单机部署
tar -xvf hbase-2.1.0-bin.tar.gz -C /export/servers/
cd /export/servers/hbase-2.1.0
rm -rf docs
#配置环境变量
vim /etc/profile
export HBASE_HOME=/export/servers/hbase-2.1.0
export PATH=${HBASE_HOME}/bin:$PATH
修改配置文件:
cd /export/servers/hbase-2.1.0/conf/
vim hbase-site.xml
---- 输入如下内容
<configuration>
<property>
<name>hbase.rootdir</name>
<!--采用本地文件系统存储-->
<value>file:///export/data/hbase</value>
</property>
<property>
<name>hbase.zookeeper.property.dataDir</name>
<!--hbase快照存储的路径-->
<value>/export/data/zookeeper/</value>
</property>
<property>
<name>hbase.unsafe.stream.capability.enforce</name>
<!--使用本地文件系统设置为false,使用hdfs设置为true-->
<value>false</value>
</property>
</configuration>
启动:
start-hbase.sh
[root@node01 zookeeper]# jps
3878 HMaster
4542 Jps
通过hbase shell命令检查是否启动成功:
[root@node01 zookeeper]# hbase shell
……
hbase(main):001:0>
hbase(main):002:0*
hbase(main):003:0* list
TABLE
0 row(s)
Took 0.6230 seconds
=> []
hbase(main):004:0>
看到list命令正常执行,说明以及启动成功了。
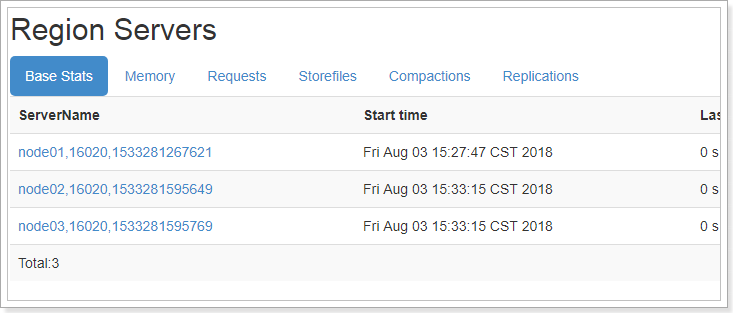
3.3、Hbase的web管理界面
Hbase启动成功后通过访问http://node01:16010/即可查看web管理界面。
cdh hbase 端口是 60010
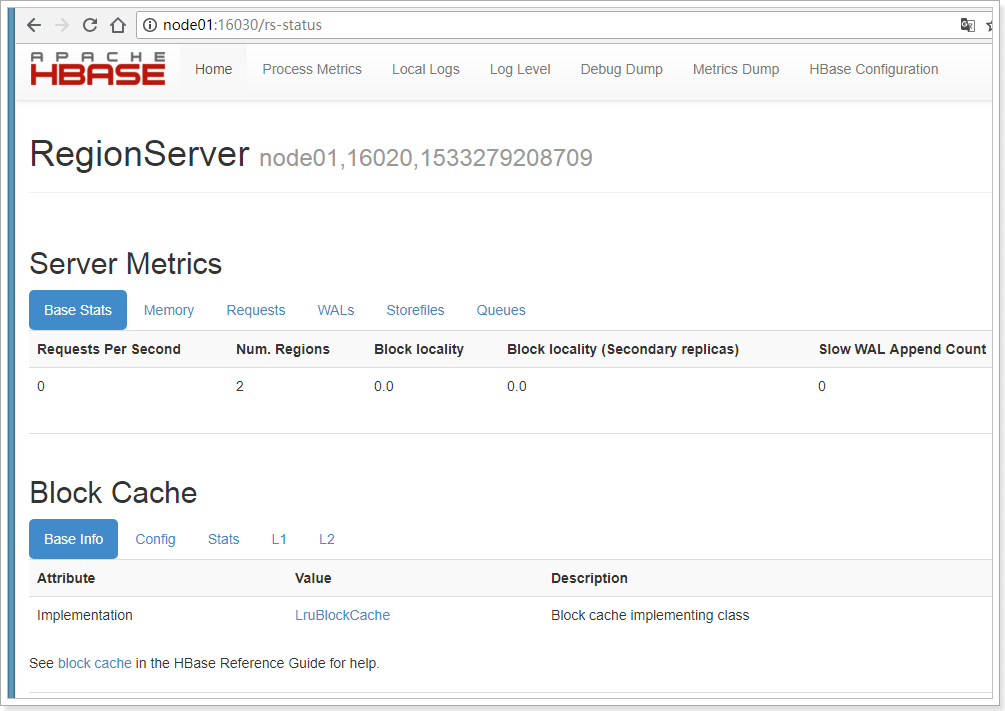
可以查看RegionServer、服务指标、块的缓存、系统参数信息等。
3.4、集群部署
集群部署需要ZooKeeper和HDFS的支持,所以需要先启动这2个服务。
将Hbase部署到node01、node02、node03节点。
startzk.sh
start-dfs.sh
[root@node01 zookeeper]# jps
5424 DataNode
5638 Jps
5287 NameNode
5146 QuorumPeerMain
修改Hbase的配置文件:
第一步,修改hbase-env.sh
vim hbase-env.sh
export JAVA_HOME=/export/servers/jdk1.8.0_141
#自己不维护ZooKeeper,需要外部配置
export HBASE_MANAGES_ZK=false
第二步,修改hbase-site.xml
<configuration>
  <property>
    <name>hbase.rootdir</name>
    <value>hdfs://node01:8020/hbase</value>
  </property>
 <property>
     <name>hbase.cluster.distributed</name>
     <value>true</value>
  </property>
  <property>
    <name>hbase.zookeeper.property.dataDir</name>
    <value>/export/data/hbase/zookeeper/</value>
  </property>
  <property>
    <name>hbase.zookeeper.quorum</name>
    <value>node01,node02,node03</value>
  </property>
  <property>
    <name>hbase.zookeeper.property.clientPort</name>
    <value>2181</value>
  </property>
  <property>
    <name>hbase.unsafe.stream.capability.enforce</name>
        <!--使用本地文件系统设置为false,使用hdfs设置为true-->
    <value>true</value>
  </property>
</configuration>
第三步,修改regionservers
node01
node02
node03
第四步,分发到node02、node03
cd /export/servers
scp -r hbase-2.1.0 node02:/export/servers/
scp -r hbase-2.1.0 node03:/export/servers/
scp /etc/profile node02:/etc/
scp /etc/profile node03:/etc/
#分别到node02、node03执行
source /etc/profile
第五步,启动:
start-hbase.sh
[root@node01 servers]# start-hbase.sh
SLF4J: Class path contains multiple SLF4J bindings.
SLF4J: Found binding in [jar:file:/export/servers/hadoop-2.7.4/share/hadoop/common/lib/slf4j-log4j12-1.7.10.jar!/org/slf4j/impl/StaticLoggerBinder.class]
SLF4J: Found binding in [jar:file:/export/servers/hbase-2.1.0/lib/client-facing-thirdparty/slf4j-log4j12-1.7.25.jar!/org/slf4j/impl/StaticLoggerBinder.class]
SLF4J: See http://www.slf4j.org/codes.html#multiple_bindings for an explanation.
SLF4J: Actual binding is of type [org.slf4j.impl.Log4jLoggerFactory]
master running as process 5810. Stop it first.
node03: running regionserver, logging to /export/servers/hbase-2.1.0/bin/../logs/hbase-root-regionserver-node03.out
node02: running regionserver, logging to /export/servers/hbase-2.1.0/bin/../logs/hbase-root-regionserver-node02.out
node01: regionserver running as process 5924. Stop it first.
测试:
集群启动成功。
4、Hbase的CRUD操作
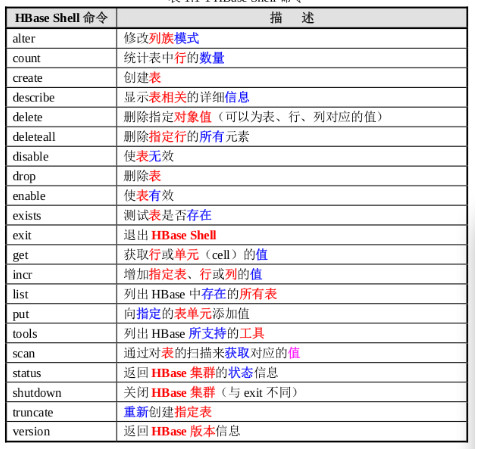
通过hbase shell命令进行命令行模式进行操作。
4.1、创建表
#指定表名,列族名
create 'user' , 'user_info', 'login_info'
list
describe 'user'
create命令用法如下:
hbase(main):023:0> help "create"
Creates a table. Pass a table name, and a set of column family
specifications (at least one), and, optionally, table configuration.
Column specification can be a simple string (name), or a dictionary
(dictionaries are described below in main help output), necessarily
including NAME attribute.
Examples:
Create a table with namespace=ns1 and table qualifier=t1
hbase> create 'ns1:t1', {NAME => 'f1', VERSIONS => 5}
Create a table with namespace=default and table qualifier=t1
hbase> create 't1', {NAME => 'f1'}, {NAME => 'f2'}, {NAME => 'f3'}
hbase> # The above in shorthand would be the following:
hbase> create 't1', 'f1', 'f2', 'f3'
hbase> create 't1', {NAME => 'f1', VERSIONS => 1, TTL => 2592000, BLOCKCACHE => true}
hbase> create 't1', {NAME => 'f1', CONFIGURATION => {'hbase.hstore.blockingStoreFiles' => '10'}}
hbase> create 't1', {NAME => 'f1', IS_MOB => true, MOB_THRESHOLD => 1000000, MOB_COMPACT_PARTITION_POLICY => 'weekly'}
Table configuration options can be put at the end.
Examples:
hbase> create 'ns1:t1', 'f1', SPLITS => ['10', '20', '30', '40']
hbase> create 't1', 'f1', SPLITS => ['10', '20', '30', '40']
hbase> create 't1', 'f1', SPLITS_FILE => 'splits.txt', OWNER => 'johndoe'
hbase> create 't1', {NAME => 'f1', VERSIONS => 5}, METADATA => { 'mykey' => 'myvalue' }
hbase> # Optionally pre-split the table into NUMREGIONS, using
hbase> # SPLITALGO ("HexStringSplit", "UniformSplit" or classname)
hbase> create 't1', 'f1', {NUMREGIONS => 15, SPLITALGO => 'HexStringSplit'}
hbase> create 't1', 'f1', {NUMREGIONS => 15, SPLITALGO => 'HexStringSplit', REGION_REPLICATION => 2, CONFIGURATION => {'hbase.hregion.scan.loadColumnFamiliesOnDemand' => 'true'}}
hbase> create 't1', {NAME => 'f1', DFS_REPLICATION => 1}
You can also keep around a reference to the created table:
hbase> t1 = create 't1', 'f1'
Which gives you a reference to the table named 't1', on which you can then
call methods.
4.2、插入数据
put 'user', '1001', 'user_info:name','张三'
put 'user', '1001', 'user_info:address', '上海'
put 'user', '1001', 'login_info:user_name', 'zhangsan'
put 'user', '1001', 'login_info:password', '123456'
put 'user', '1002', 'user_info:name','李四'
put 'user', '1002', 'user_info:address', '北京'
put 'user', '1002', 'login_info:user_name', 'lisi'
put 'user', '1002', 'login_info:password', '123456'
4.4、查询数据
Hbase只支持2种查询数据,单行查询,全表查询。
get 'user', '1001'
#查询全部数据
scan 'user'
#查询一条数据
scan 'user', {LIMIT => 1}
get查询:
  hbase> t.get 'r1'
  hbase> t.get 'r1', {TIMERANGE => [ts1, ts2]}
  hbase> t.get 'r1', {COLUMN => 'c1'}
  hbase> t.get 'r1', {COLUMN => ['c1', 'c2', 'c3']}
  hbase> t.get 'r1', {COLUMN => 'c1', TIMESTAMP => ts1}
  hbase> t.get 'r1', {COLUMN => 'c1', TIMERANGE => [ts1, ts2], VERSIONS => 4}
  hbase> t.get 'r1', {COLUMN => 'c1', TIMESTAMP => ts1, VERSIONS => 4}
  hbase> t.get 'r1', {FILTER => "ValueFilter(=, 'binary:abc')"}
  hbase> t.get 'r1', 'c1'
  hbase> t.get 'r1', 'c1', 'c2'
  hbase> t.get 'r1', ['c1', 'c2']
  hbase> t.get 'r1', {CONSISTENCY => 'TIMELINE'}
  hbase> t.get 'r1', {CONSISTENCY => 'TIMELINE', REGION_REPLICA_ID => 1}
scan查询:
hbase> scan 'hbase:meta'
hbase> scan 'hbase:meta', {COLUMNS => 'info:regioninfo'}
hbase> scan 'ns1:t1', {COLUMNS => ['c1', 'c2'], LIMIT => 10, STARTROW => 'xyz'}
hbase> scan 't1', {COLUMNS => ['c1', 'c2'], LIMIT => 10, STARTROW => 'xyz'}
hbase> scan 't1', {COLUMNS => 'c1', TIMERANGE => [1303668804000, 1303668904000]}
hbase> scan 't1', {REVERSED => true}
hbase> scan 't1', {ALL_METRICS => true}
hbase> scan 't1', {METRICS => ['RPC_RETRIES', 'ROWS_FILTERED']}
hbase> scan 't1', {ROWPREFIXFILTER => 'row2', FILTER => "
(QualifierFilter (>=, 'binary:xyz')) AND (TimestampsFilter ( 123, 456))"}
hbase> scan 't1', {FILTER =>
org.apache.hadoop.hbase.filter.ColumnPaginationFilter.new(1, 0)}
hbase> scan 't1', {CONSISTENCY => 'TIMELINE'}
For setting the Operation Attributes
hbase> scan 't1', { COLUMNS => ['c1', 'c2'], ATTRIBUTES => {'mykey' => 'myvalue'}}
hbase> scan 't1', { COLUMNS => ['c1', 'c2'], AUTHORIZATIONS => ['PRIVATE','SECRET']}
For experts, there is an additional option -- CACHE_BLOCKS -- which
switches block caching for the scanner on (true) or off (false). By
default it is enabled. Examples:
hbase> scan 't1', {COLUMNS => ['c1', 'c2'], CACHE_BLOCKS => false}
4.5、删除数据
#删除一行中的一列数据
delete 'user','1002', 'user_info:name'
#删除一行数据
deleteall 'user','1002'
#清空表
truncate 'user'
4.6、修改数据
#修改用1001的密码为888888,直接put覆盖即可
put 'user', '1001', 'login_info:password', '888888'
#删除列族
alter 'user' , {NAME=>'user_info', METHOD => 'delete'}
#增加列族
alter 'user', 'user_info'
alter 'user', {NAME => 'user_info_2' , VERSIONS => 5}
4.7、删除表
#删除表之前先要禁用表,再删除
disable 'user'
drop 'user'
4.8、多版本
#设置user_info的版本为3,login_info的版本为5
create 'user' , {NAME => 'user_info', VERSIONS => 3 }, {NAME => 'login_info', VERSIONS => 5 }
put 'user','1001', 'user_info:name', 'zhangsan'
put 'user','1001', 'user_info:name', 'zhangsan1'
#查询最新的数据
get 'user', '1001'
#查询3个版本数据
get 'user', '1001', {COLUMN=>'user_info:name',VERSIONS=>3}
5、Hbase Java Api
Hbase不仅可以通过shell命令行的方式执行,也可以通过JavaAPI方式进行操作。
5.1、导入依赖
5.2、创建表
import org.apache.hadoop.conf.Configuration;
import org.apache.hadoop.hbase.HTableDescriptor;
import org.apache.hadoop.hbase.TableName;
import org.apache.hadoop.hbase.client.*;
import org.apache.hadoop.hbase.util.Bytes;
import org.junit.Before;
import org.junit.Test;
import java.io.IOException;
public class TestHbase {
private Connection connection;
5.3、其它操作
import org.apache.hadoop.conf.Configuration;
import org.apache.hadoop.hbase.Cell;
import org.apache.hadoop.hbase.CellUtil;
import org.apache.hadoop.hbase.CompareOperator;
import org.apache.hadoop.hbase.TableName;
import org.apache.hadoop.hbase.client.*;
import org.apache.hadoop.hbase.filter.*;
import org.apache.hadoop.hbase.util.Bytes;
import org.junit.Before;
import org.junit.Test;
import java.io.IOException;
import java.util.List;
public class TestHbase {
private Connection connection;