Elasticsearch学习(1) Spring boot整合Elasticsearch
本文的Spring Boot版本为1.5.9,Elasticsearch版本为2.4.4,话不多说,直接上代码。
一、启动Elasticsearch
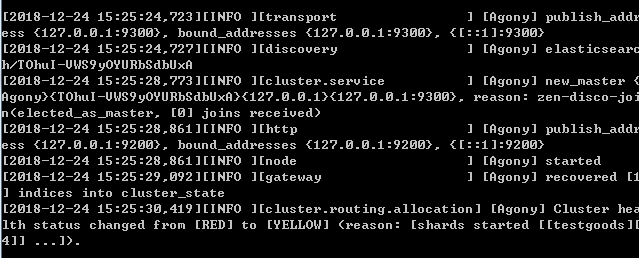
在官网上下载Elasticsearch后,打开bin目录下的elasticsearch.bat,出现下面的图,就证明成功启动了。
二、新建项目,添加依赖
在创建spring boot项目中,可以在nosql中选择添加Elasticsearch的依赖,完整的依赖如下:


<?xml version="1.0" encoding="UTF-8"?>
<project xmlns="http://maven.apache.org/POM/4.0.0" xmlns:xsi="http://www.w3.org/2001/XMLSchema-instance"
    xsi:schemaLocation="http://maven.apache.org/POM/4.0.0 http://maven.apache.org/xsd/maven-4.0.0.xsd">
    <modelVersion>4.0.0</modelVersion>

    <groupId>cmo.jf.cloud</groupId>
    <artifactId>resourceCente</artifactId>
    <version>1.0.0</version>
    <packaging>war</packaging>

    <name>Elasticsearch</name>
    <description>搜索引擎</description>

    <parent>
        <groupId>org.springframework.boot</groupId>
        <artifactId>spring-boot-starter-parent</artifactId>
        <version>1.5.9.RELEASE</version>
        <relativePath/> <!-- lookup parent from repository -->
    </parent>

    <properties>
        <project.build.sourceEncoding>UTF-8</project.build.sourceEncoding>
        <project.reporting.outputEncoding>UTF-8</project.reporting.outputEncoding>
        <java.version>1.8</java.version>
    </properties>

    <dependencies>
        <dependency>
            <groupId>org.springframework.boot</groupId>
            <artifactId>spring-boot-starter-data-elasticsearch</artifactId>
        </dependency>

        <dependency>
            <groupId>org.springframework.boot</groupId>
            <artifactId>spring-boot-starter-web</artifactId>
        </dependency>

        <dependency>
            <groupId>org.springframework.boot</groupId>
            <artifactId>spring-boot-starter-tomcat</artifactId>
            <scope>provided</scope>
        </dependency>
        <dependency>
            <groupId>org.springframework.boot</groupId>
            <artifactId>spring-boot-starter-test</artifactId>
            <scope>test</scope>
        </dependency>
    </dependencies>

    <build>
        <plugins>
            <plugin>
                <groupId>org.springframework.boot</groupId>
                <artifactId>spring-boot-maven-plugin</artifactId>
            </plugin>
        </plugins>
    </build>


</project>
需要注意的是:
1.spring boot2.X版本必须使用Elasticsearch 5.X版本
2.Elasticsearch 2.X的版本必须使用spring boot1.5版本
3.目前spring-boot-starter-data-elasticsearch还不支持Elasticsearch 6.X版本
如果出现版本不兼容,这会出现下面的错误:
NoNodeAvailableException[None of the configured nodes are available: [{#transport#-1}{729dgKKVSF-ti27v2_w68g}{127.0.0.1}{127.0.0.7:9300}]]
三、Elasticsearch的配置文件
和操作数据库一样,我们需要配置好配置文件,才能访问Elasticsearch,配置文件如下:
##端口号
server.port=8888
##es地址
spring.data.elasticsearch.cluster-nodes =127.0.0.1:9300
四、Elasticsearch的实体类
在Elasticsearch中,我们需要创建一个实体类作为索引,简单的理解就是在Elasticsearch中创建数据库和表。
利用@Document注解可以创建数据库和表。其中Document中的参数意义为:
indexName:索引名称 可以理解为数据库名 必须为小写不然会报org.elasticsearch.indices.InvalidIndexNameException异常
type:类型 可以理解为表名
代码如下:
import java.io.Serializable;

import org.springframework.data.elasticsearch.annotations.Document;

//indexName索引名称 可以理解为数据库名 必须为小写 不然会报org.elasticsearch.indices.InvalidIndexNameException异常
//type类型 可以理解为表名
@Document(indexName = "class",type = "user")
public class User implements Serializable {
        //定义成员属性
          private Integer id;
          private String name;
        private  Integer age;
        private String sex;
        public Integer getId() {
            return id;
        }
        public void setId(Integer id) {
            this.id = id;
        }
        public String getName() {
            return name;
        }
        public void setName(String name) {
            this.name = name;
        }
        public Integer getAge() {
            return age;
        }
        public void setAge(Integer age) {
            this.age = age;
        }
        public String getSex() {
            return sex;
        }
        public void setSex(String sex) {
            this.sex = sex;
        }
        public User(Integer id, String name, Integer age, String sex) {
            super();
            this.id = id;
            this.name = name;
            this.age = age;
            this.sex = sex;
        }
        public User() {
            super();
        }

}
五、创建一个数据访问层
同样,和其他的数据库访问操作一样,我们需要创建一个dao层来操作Elasticsearch,这个dao层类似于mongodb的操作,只需要继承ElasticsearchRepository接口就能实现。
import org.springframework.context.annotation.Configuration;
import org.springframework.data.elasticsearch.repository.ElasticsearchRepository;

import cmo.jf.cloud.bean.User;

@Configuration
public interface  UserMapper extends  ElasticsearchRepository<User,Long>{

}
六、创建controller层测试
import org.springframework.beans.factory.annotation.Autowired;
import org.springframework.web.bind.annotation.GetMapping;
import org.springframework.web.bind.annotation.RestController;

import cmo.jf.cloud.bean.User;
import cmo.jf.cloud.dao.UserMapper;

@RestController
public class UserController {
    @Autowired
    UserMapper userMapper;

     // 访问接口地址:localhost:8888/save
    //存储数据
    @GetMapping("save")
    public String save(){
        User user = new User(1,"张三",15,"男");
        userMapper.save(user);
        return "success";
    }

     //访问接口地址:localhost:8888/delete?id=1
    //根据ID删除数据
    @GetMapping("delete")
    public String delete(long id){
        userMapper.delete(id);
        return "success";
    }

    //访问接口地址:localhost:8888/getOne?id=1
    //根据ID查询数据
    @GetMapping("getOne")
    public User getOne(long id){
        User user = userMapper.findOne(id);
        return user;
    }
}
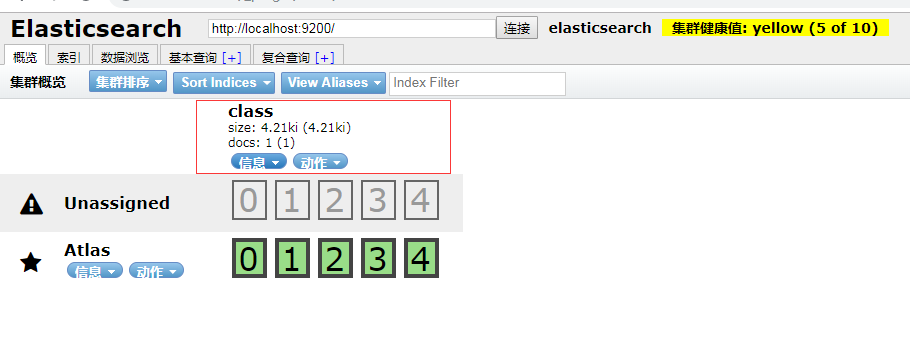
在添加几条数据后我们访问head插件---ES管理界面可以看到我们添加的数据库在页面上
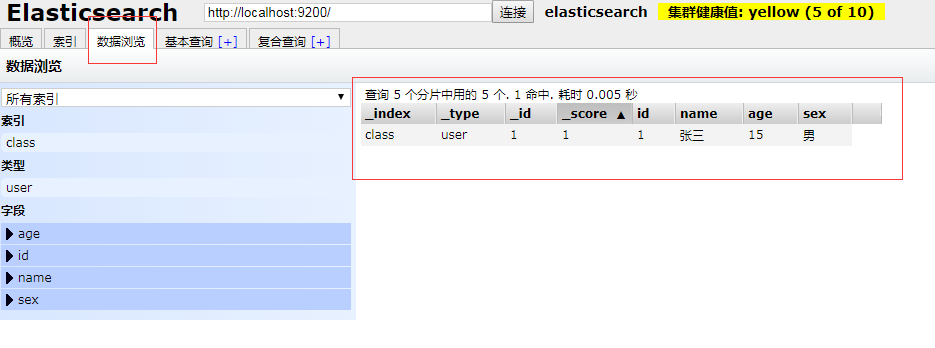
在数据浏览界面中可以看到我们添加的数据
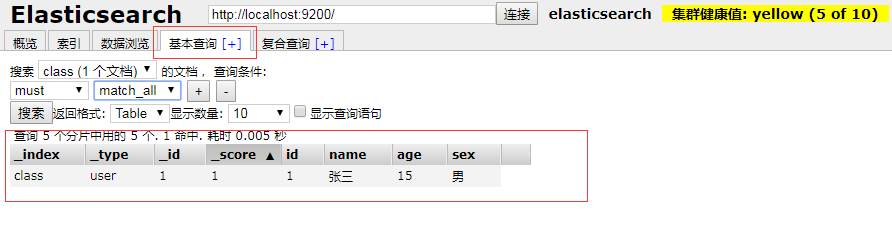
在基本查询中可以根据表名和条件,查询我们刚才插入的数据
七、项目中出现的错误
直接上错误代码:
Description:

Cannot determine embedded database driver class for database type NONE

Action:

If you want an embedded database please put a supported one on the classpath.
If you have database settings to be loaded from a particular profile you may need to active it (no profiles are currently active).
这个错误是由于打开了spring boot的自动配置数据,但是没有配置数据源,所以报错,解决的方案是直接关闭数据源自动配置,
只需要在启动类上加入:@SpringBootApplication(exclude = {DataSourceAutoConfiguration.class})即可
import org.springframework.boot.SpringApplication;
import org.springframework.boot.autoconfigure.SpringBootApplication;
import org.springframework.boot.autoconfigure.jdbc.DataSourceAutoConfiguration;

@SpringBootApplication(exclude = {DataSourceAutoConfiguration.class})
public class ElasticsearchApplication {

    public static void main(String[] args) {
        SpringApplication.run(ElasticsearchApplication.class, args);
    }
}
八、小结
这就是spring boot1.5整合ElasticSearch 2.X的操作,本文作为初级学习起来还是有帮助,但是ElasticSearch 中的一些高级操作如:同步数据库,分词器,高亮等都将在后面的文章中进行书写。ElasticSearch 6.X、ElasticSearch 5.X的API方式也和ElasticSearch 2.X不同,我也会放在后面进行讲解。

 浙公网安备 33010602011771号