03-Day02-ModelForm生成注册字段
目录
一、Django ModelForm
- 本章使用 ModelForm 主要实现一下两种功能:
- 自动生成表单 HTML
- 实现表单验证功能
1.1、创建用于实现注册的Model
(Bug_manager) daizhe@daizhedeMacBook-Pro Bug_manager % cat users_app/models.py
from django.db import models
# Create your models here.

class UserInfo(models.Model):
    """
    CharField : 字符串类型字段
    verbose_name : 字段注释
    max_length : 字段长度
    Django ORM 中也提供了一个 EmailField 但是本质上 还是 CharField,区别在于 template展示效果
    """
    username = models.CharField(verbose_name='用户名', max_length=32)
    email = models.EmailField(verbose_name='邮箱', max_length=32)
    models_phone = models.CharField(verbose_name='手机号', max_length=32)
    password = models.CharField(verbose_name='密码', max_length=32)
- 生成数据库迁移脚本
(Bug_manager) daizhe@daizhedeMacBook-Pro Bug_manager % python3 manage.py makemigrations
Migrations for 'users_app':
  users_app/migrations/0001_initial.py
    - Create model UserInfo
- 迁移表结构
(Bug_manager) daizhe@daizhedeMacBook-Pro Bug_manager % python3 manage.py migrate
Operations to perform:
  Apply all migrations: admin, auth, contenttypes, sessions, users_app
Running migrations:
  Applying contenttypes.0001_initial... OK
  Applying auth.0001_initial... OK
  Applying admin.0001_initial... OK
  Applying admin.0002_logentry_remove_auto_add... OK
  Applying admin.0003_logentry_add_action_flag_choices... OK
  Applying contenttypes.0002_remove_content_type_name... OK
  Applying auth.0002_alter_permission_name_max_length... OK
  Applying auth.0003_alter_user_email_max_length... OK
  Applying auth.0004_alter_user_username_opts... OK
  Applying auth.0005_alter_user_last_login_null... OK
  Applying auth.0006_require_contenttypes_0002... OK
  Applying auth.0007_alter_validators_add_error_messages... OK
  Applying auth.0008_alter_user_username_max_length... OK
  Applying auth.0009_alter_user_last_name_max_length... OK
  Applying auth.0010_alter_group_name_max_length... OK
  Applying auth.0011_update_proxy_permissions... OK
  Applying auth.0012_alter_user_first_name_max_length... OK
  Applying sessions.0001_initial... OK
  Applying users_app.0001_initial... OK
1.2、通过ModelForm实现注册展示示例
- urls用于注册示例的路由
(Bug_manager) daizhe@daizhedeMacBook-Pro Bug_manager % cat Bug_manager/urls.py
"""Bug_manager URL Configuration

The `urlpatterns` list routes URLs to views. For more information please see:
    https://docs.djangoproject.com/en/3.2/topics/http/urls/
Examples:
Function views
    1. Add an import:  from my_app import views
    2. Add a URL to urlpatterns:  path('', views.home, name='home')
Class-based views
    1. Add an import:  from other_app.views import Home
    2. Add a URL to urlpatterns:  path('', Home.as_view(), name='home')
Including another URLconf
    1. Import the include() function: from django.urls import include, path
    2. Add a URL to urlpatterns:  path('blog/', include('blog.urls'))
"""
from django.contrib import admin
from django.urls import path
from django.conf.urls import url
from users_app import views

urlpatterns = [
    path('admin/', admin.site.urls),
    url(r'^send/sms/', views.send_sms),
    # 注册示例
    url(r'^register/', views.register),
]
- views视图,基于ModelForm 定于展示的元数据属性
(Bug_manager) daizhe@daizhedeMacBook-Pro Bug_manager % cat users_app/views.py
from django import forms
from users_app import models
class RegisterModelForm(forms.ModelForm):
    #  model 定义元数据
    class Meta:
        # 对应的Model类
        model = models.UserInfo
        # Model类中哪些字段可以展示,__all__ 表示所有
        fields = '__all__'


def register(request):
    form = RegisterModelForm()
    return render(request, 'register.html', {'form': form})
- template模板,展示Module中字段;
- 开发规范 :
- 将template目录创建在每个APP目录中
- 模板的查找顺序 :
- 首先,查找 项目根目录下 template目录下查找模板,如 Bug_manager/template
- 其次,通过Settings配置文件中的 INSTALLED_APPS 应用注册顺序,去每一个 APP 里面的 template 目录进行模板查找
$ mkdir users_app/templates
$ touch users_app/templates/register.html
$ cat users_app/templates/register.html
<!DOCTYPE html>
<html lang="en">
<head>
    <meta charset="UTF-8">
    <title>Title</title>
</head>
<body>
    <h1>注册</h1>
    {% for field in form %}
        <p> {{ field.label }} : {{ field }} </p>
    {% endfor %}
</body>
</html>

// field.label 去读 ModelForm 中的每一个字段的 labels,但是我们上面 views 中的 ModelForm 没有可渲染的label,所以就会去 根据UserInfo 即ORM 中的 Models 类帮助我们自动生成些 ModelForm 前端渲染的字段
// template字段渲染的查找顺序 :
	// template --> ModuleForm --> ORM(UserInfo)
// 所以目前场景,template中field.label渲染的就是UserInfo中的verbose_name属性
- 启动项目访问URL
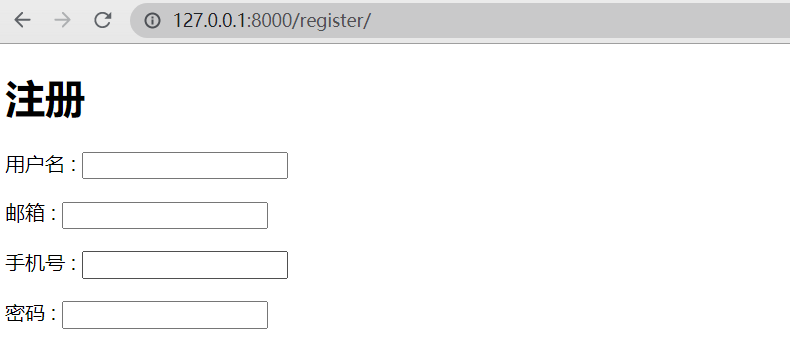
补充 :- 字段类型、长度限制,如,我们在Models中定义的邮箱为 EmailField 字段类型,所以前端填入的字段也会对应生成一个 "正则表达式",所以仅有填入的格式于Form表单一致才可以写入数据库;
- ModulesForm重写 models 字段类型,比如下面示例 :
- 使用 ModelForm 重写 models 中的手机号字段类型;
- 使用 ModelForm 重写 models 中的password字段属性;
(Bug_manager) daizhe@daizhedeMacBook-Pro Bug_manager % cat users_app/views.py
from django import forms
from users_app import models
from django.core.validators import RegexValidator
from django.core.exceptions import ValidationError
class RegisterModelForm(forms.ModelForm):

    # 重写models字段类型
    # models_phone = forms.RegexField(regex=r'^\+?1?\d{9,15}$',     # 正则表达式方式一
    #                                 label='国际标准手机号')
                                                                    # 正则表达式方式二
    models_phone = forms.CharField(label='手机号', validators=[RegexValidator(r'(1[3|4|5|6|7|8|9])\d{9}$', '手机号格式错误'),])
    password = forms.CharField(label='密码',widget=forms.PasswordInput())        # password 展示时会根据 forms.PasswordInput() 插件进行展示


    #  model 定义元数据
    class Meta:
        # 对应的Model类
        model = models.UserInfo
        # Model类中哪些字段可以展示,__all__ 表示所有
        fields = '__all__'


def register(request):
    form = RegisterModelForm()
    return render(request, 'register.html', {'form': form})
- 再次启动项目查看页面
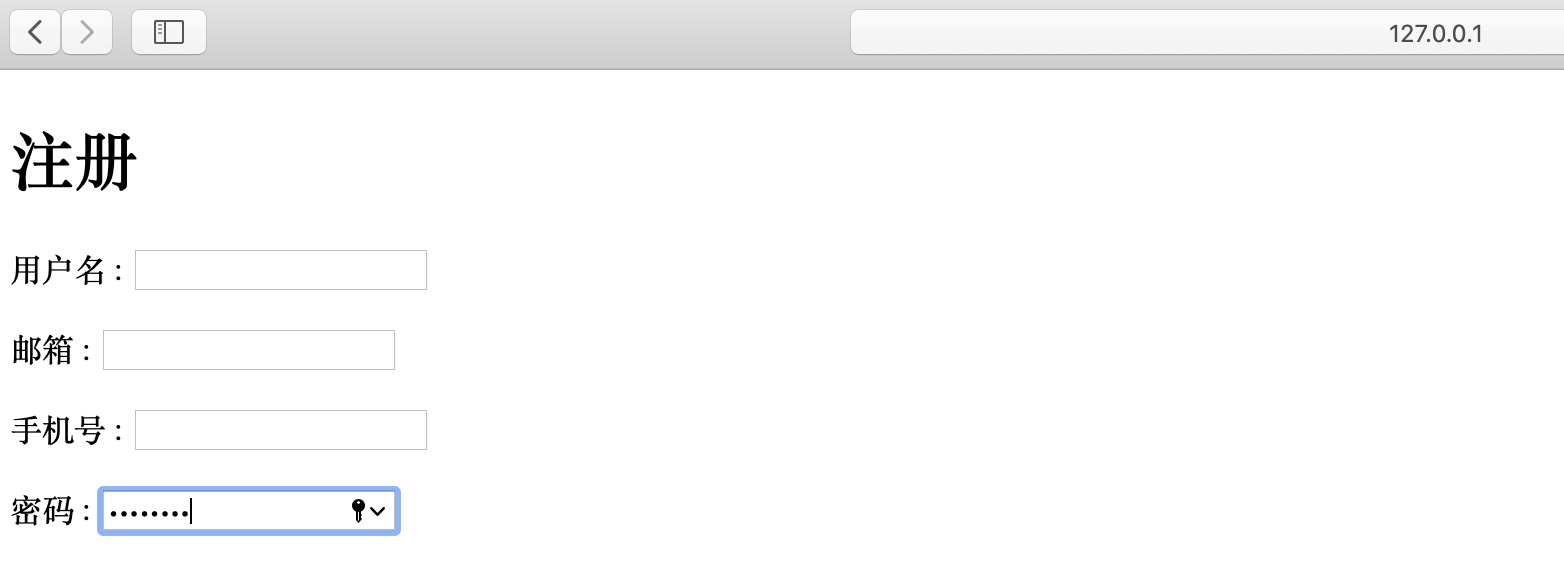
补充 :- ORM 中的 models 会根据verbose_name注释信息属性生成字段,但是我们觉得models中的字段属性不能满足我们的需求,也可以在ModelForm中进行重写;
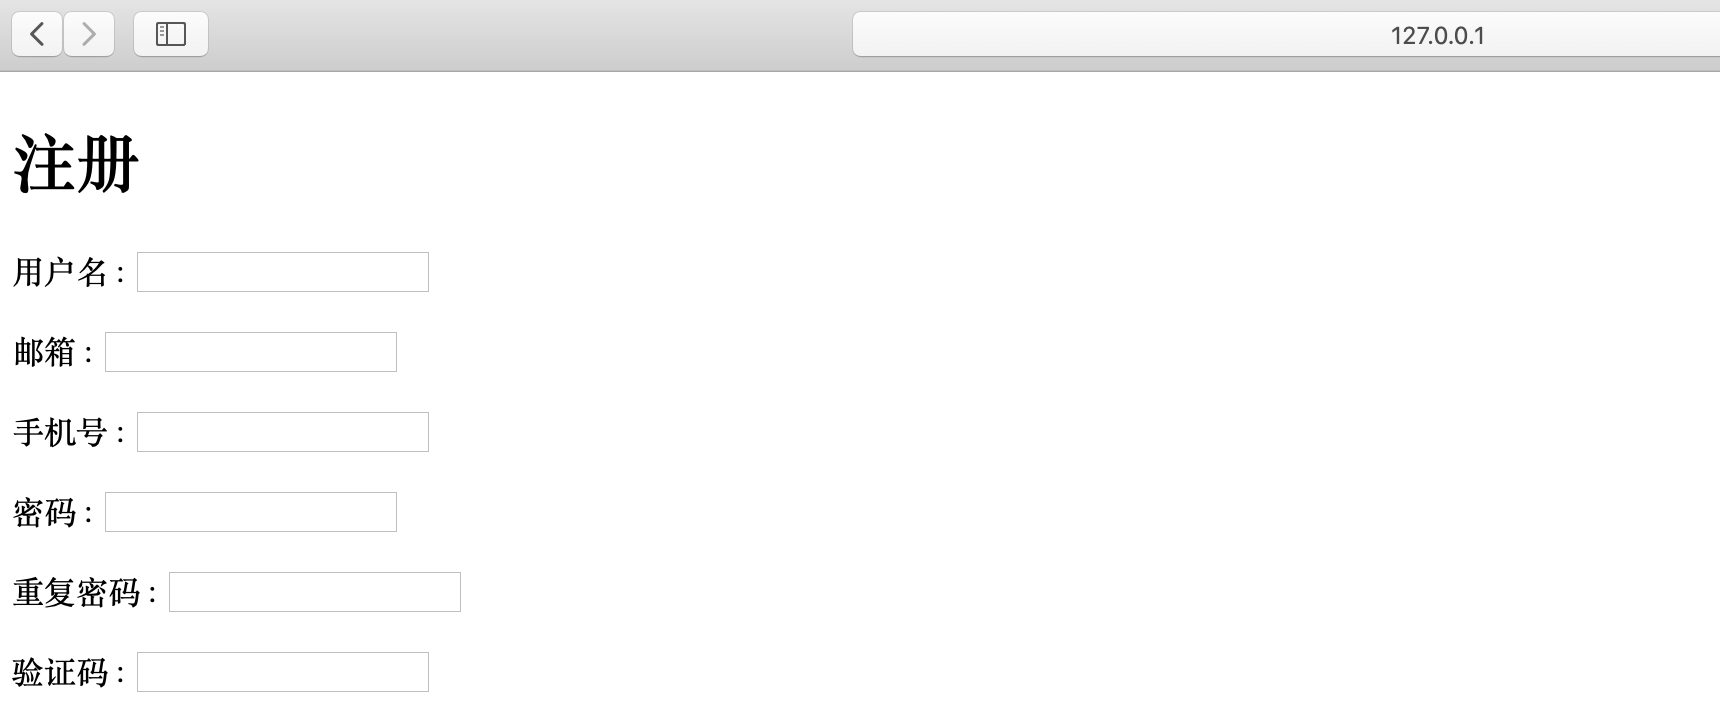
ModuleForm也可以生成一个 models 中没有的字段- 比如下例子 :
- 1、生成一个 确认密码 的字段,但是实际上并非存在数据库中,仅仅用于页面展示及密码校验;
- 2、生成一个 验证码 的字段,但是实际上并非存在数据库中,仅仅用于页面展示及密码校验;
- ModuleForm本身会有自动检测功能 :
- 如果我们定义在 ModelForm 中的字段与 models 中的字段名称重复,则视为 ModuleForm字段覆盖 models 字段属性;
- 如果我们定义在 ModelForm 中的字段与 models 中的字段不重复,则视为新增字段(但是数据库中并非有此新增字段,仅在 ModuleForm 中存在使用);
(Bug_manager) daizhe@daizhedeMacBook-Pro Bug_manager % cat users_app/views.py
...
...
from django import forms
from users_app import models
from django.core.validators import RegexValidator
from django.core.exceptions import ValidationError
class RegisterModelForm(forms.ModelForm):

    # 重写models字段类型
    # models_phone = forms.RegexField(regex=r'^\+?1?\d{9,15}$',     # 正则表达式方式一
    #                                 label='国际标准手机号')
                                                                    # 正则表达式方式二
    models_phone = forms.CharField(label='手机号', validators=[RegexValidator(r'(1[3|4|5|6|7|8|9])\d{9}$', '手机号格式错误'),])
    password = forms.CharField(label='密码',widget=forms.PasswordInput())        # password 展示时会根据 forms.PasswordInput() 插件进行展示
    # 重复密码
    confirm_password = forms.CharField(label='重复密码', widget=forms.PasswordInput())
    # 验证码
    code = forms.CharField(label='验证码')
    #  model 定义元数据
    class Meta:
        # 对应的Model类
        model = models.UserInfo
        # Model类中哪些字段可以展示,__all__ 表示所有
        fields = '__all__'


def register(request):
    form = RegisterModelForm()
    return render(request, 'register.html', {'form': form})
- 再次启动项目查看页面
1.3、ModelForm美化页面
1.3.1、bootstrap cdn引入
- bootstrap cdn :https://www.bootcdn.cn/twitter-bootstrap/
- https://cdn.bootcdn.net/ajax/libs/twitter-bootstrap/4.4.0/css/bootstrap.min.css
$ cat users_app/templates/register.html
<!DOCTYPE html>
<html lang="en">
<head>
    <meta charset="UTF-8">
    <title>Title</title>
    <link rel="stylesheet" href="https://cdn.bootcdn.net/ajax/libs/twitter-bootstrap/4.4.0/css/bootstrap.min.css">
    <style>
        .account{
            width: 600px;
            margin: 0 auto;
        }
    </style>

</head>
<body>

    <div class="account">
        <h1>注册</h1>
        {% for field in form %}
            <p> {{ field.label }} : {{ field }} </p>
        {% endfor %}
    </div>

</body>
</html>

1.3.2、引入 bootstrap 样式,ModelForm增加前端属性
- 引入 bootstrap 样式 :https://v3.bootcss.com/
- 表单 :https://v3.bootcss.com/css/#forms
- 样式调整前测试
$ cat users_app/templates/register.html
<!DOCTYPE html>
<html lang="en">
<head>
    <meta charset="UTF-8">
    <title>Title</title>
    <link rel="stylesheet" href="https://cdn.bootcdn.net/ajax/libs/twitter-bootstrap/4.4.0/css/bootstrap.min.css">
    <style>
        .account{
            width: 400px;
            margin: 0 auto;
        }
    </style>

</head>
<body>

    <div class="account">
        <h1>注册</h1>
        <form>
            {% for field in form %}
          <div class="form-group">
            <label for="{{ field.id_for_label }}">{{ field.label }}</label>
            <input type="email" class="form-control" id="exampleInputEmail1" placeholder="Email">
            {{ field }}
          </div>
            {% endfor %}
          <button type="submit" class="btn btn-default">注册</button>
        </form>
    </div>

</body>
</html>
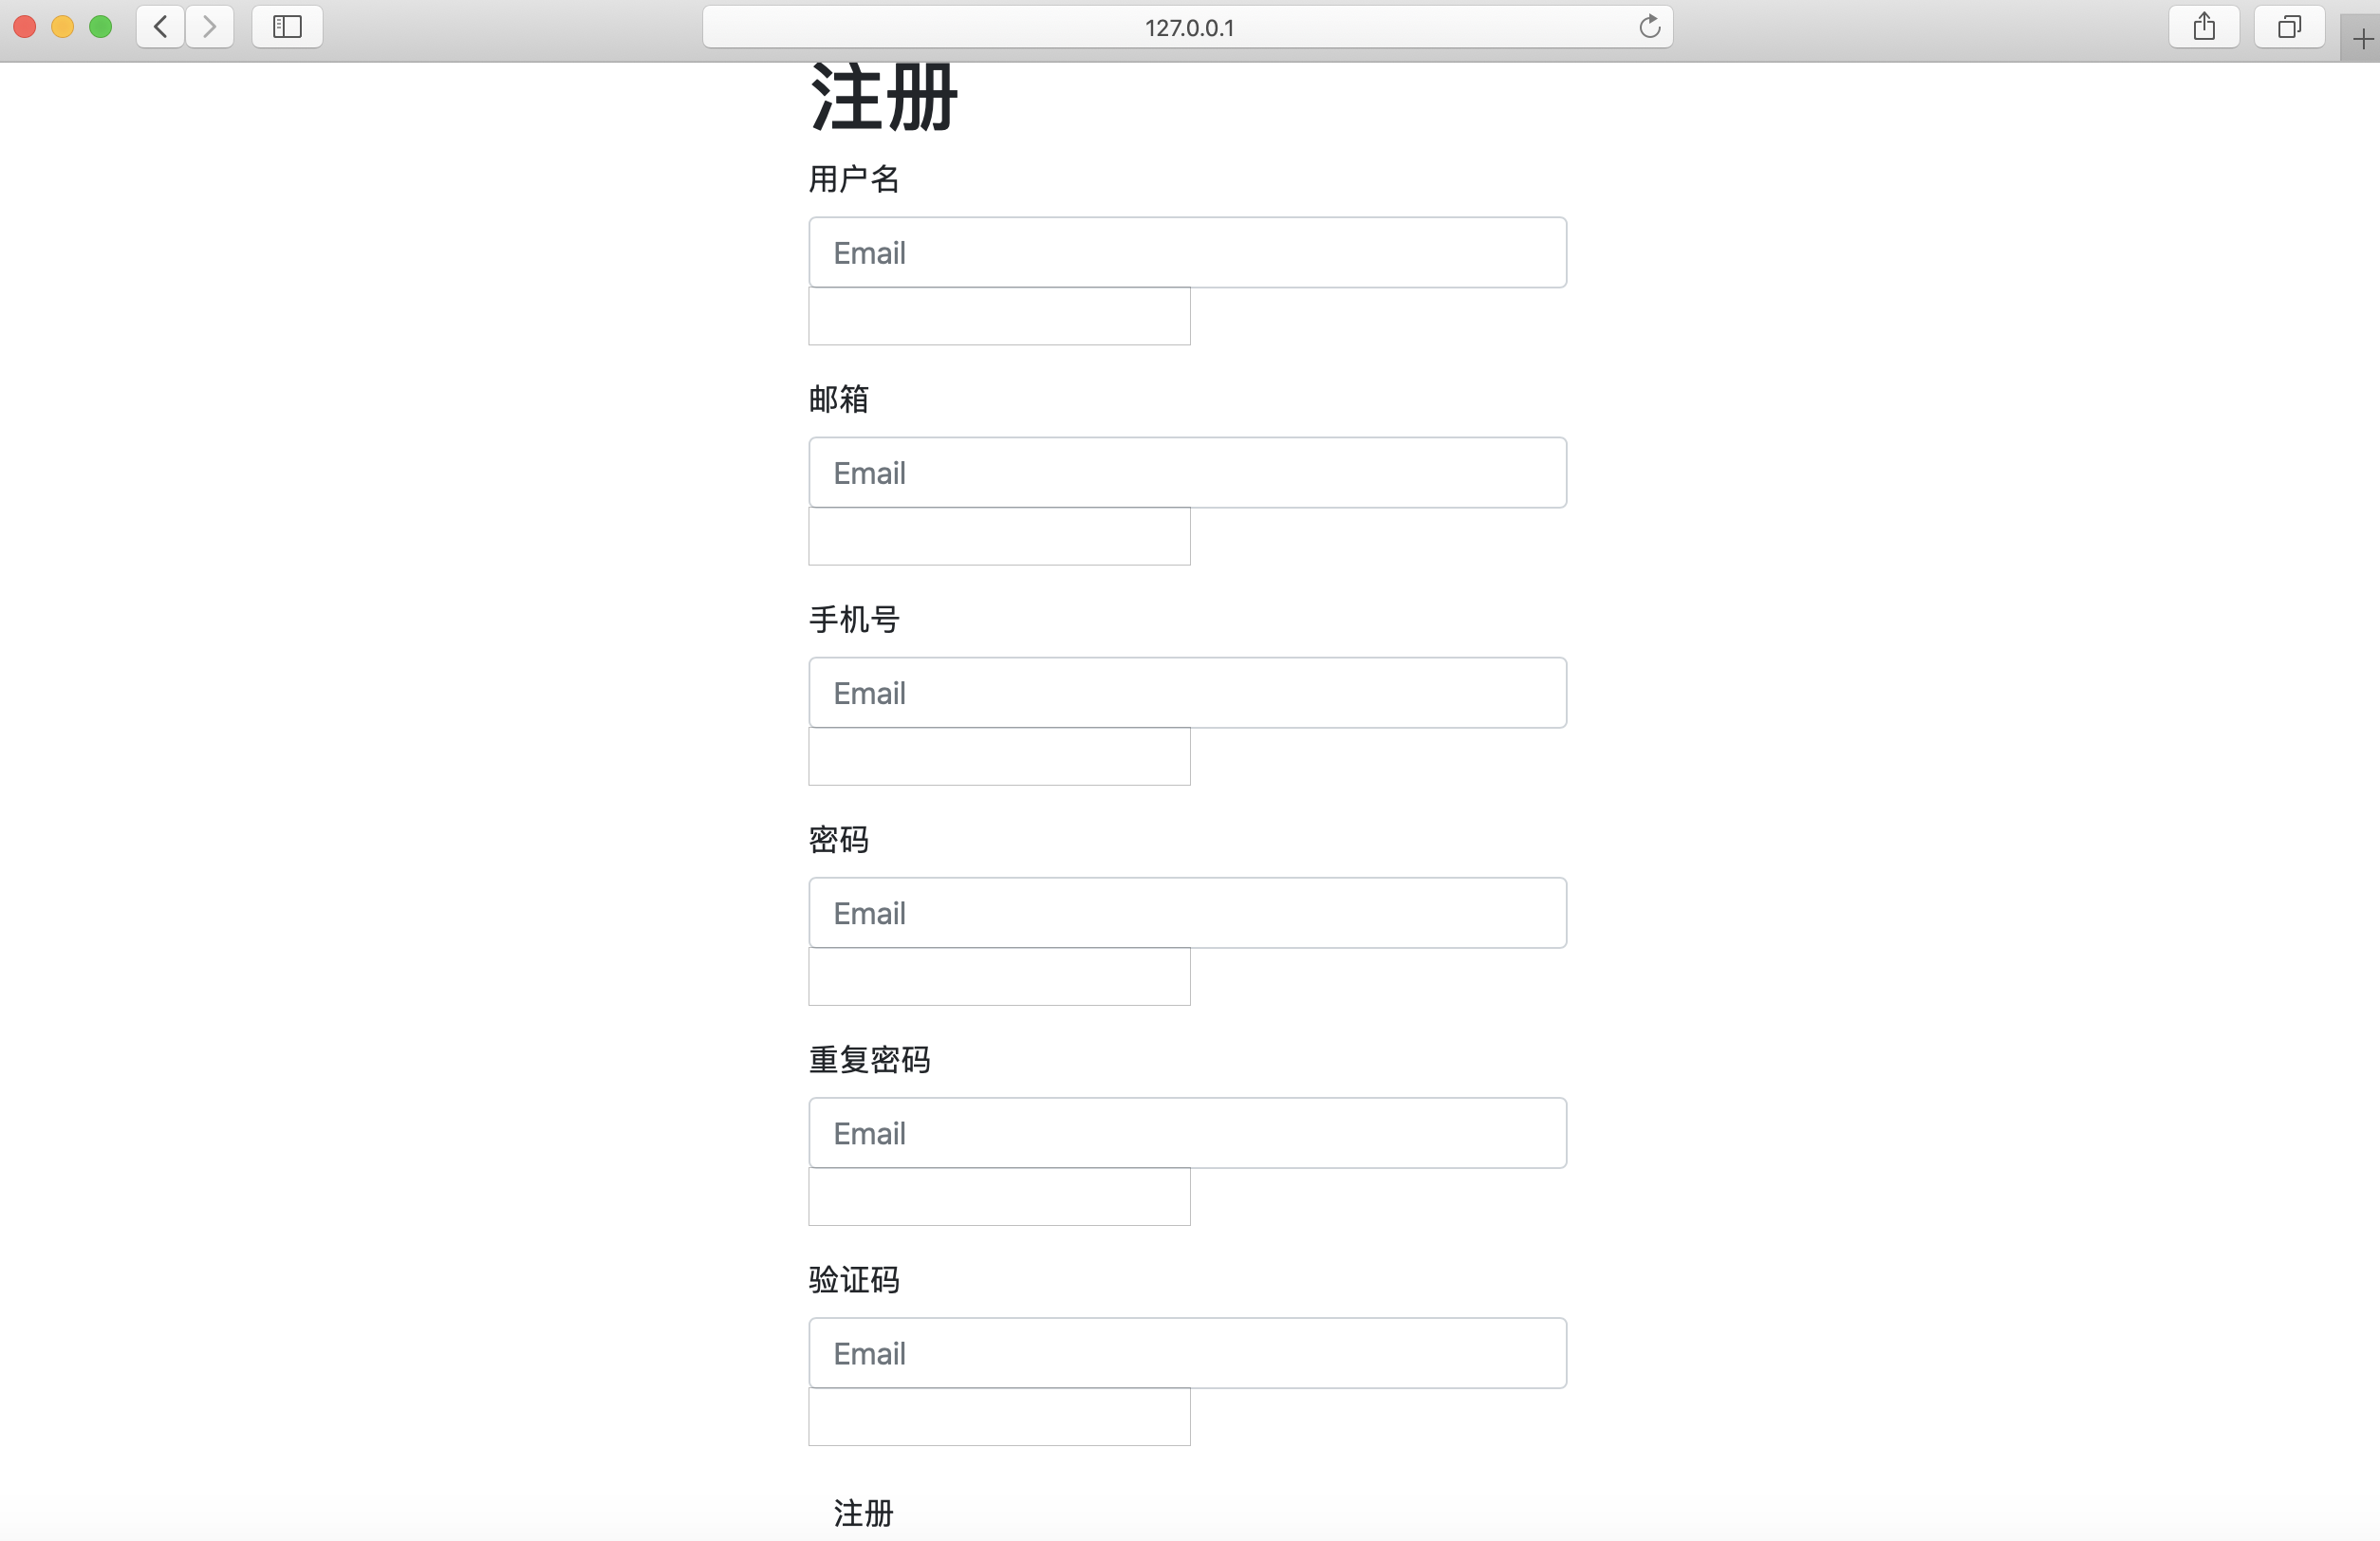
- 调整项说明 :
- 如果想要实现我们的 field 字段也可以展示成上图中Email字段样式,只需要在字段中增加
class="form-control"样式属性,所以需要后端ModelForm在生成标签的时候,将此class属性自动携带;
- 如果想要实现我们的 field 字段也可以展示成上图中Email字段样式,只需要在字段中增加
$ cat users_app/templates/register.html
...
...
<body>
    <div class="account">
        <h1>注册</h1>
        <form>
            {% for field in form %}
          <div class="form-group">
            <label for="{{ field.id_for_label }}">{{ field.label }}</label>
{#            <input type="email" class="form-control" id="exampleInputEmail1" placeholder="Email">#}
            {{ field }}
          </div>
            {% endfor %}
          <button type="submit" class="btn btn-default">注册</button>
        </form>
    </div>
</body>
...
...
(Bug_manager) daizhe@daizhedeMacBook-Pro Bug_manager % cat users_app/views.py
...
...
from django import forms
from users_app import models
from django.core.validators import RegexValidator
from django.core.exceptions import ValidationError
class RegisterModelForm(forms.ModelForm):

    # 重写models字段类型
    # models_phone = forms.RegexField(regex=r'^\+?1?\d{9,15}$',     # 正则表达式方式一
    #                                 label='国际标准手机号')
    # 密码
    #   attrs 表示在生成此标签时附加哪些属性 :class 表示生成输入框样式,palceholer 表示输入框提示信息
                                                                     # 正则表达式方式二
    models_phone = forms.CharField(label='手机号', validators=[RegexValidator(r'(1[3|4|5|6|7|8|9])\d{9}$', '手机号格式错误'),])
    password = forms.CharField(label='密码',widget=forms.PasswordInput(attrs={'class': 'form-control', 'placeholder': "请输入密码"}))        # password 展示时会根据 forms.PasswordInput() 插件进行展示
    # 重复密码
    confirm_password = forms.CharField(label='重复密码', widget=forms.PasswordInput(attrs={'class': 'form-control', 'placeholder': "请重复输入密码"}))
    # 验证码
    code = forms.CharField(label='验证码', widget=forms.TextInput(attrs={'class': 'form-control', 'placeholder': "请输入验证码"}))
    #  model 定义元数据
    class Meta:
        # 对应的Model类
        model = models.UserInfo
        # Model类中哪些字段可以展示,__all__ 表示所有
        fields = '__all__'


def register(request):
    form = RegisterModelForm()
    return render(request, 'register.html', {'form': form})
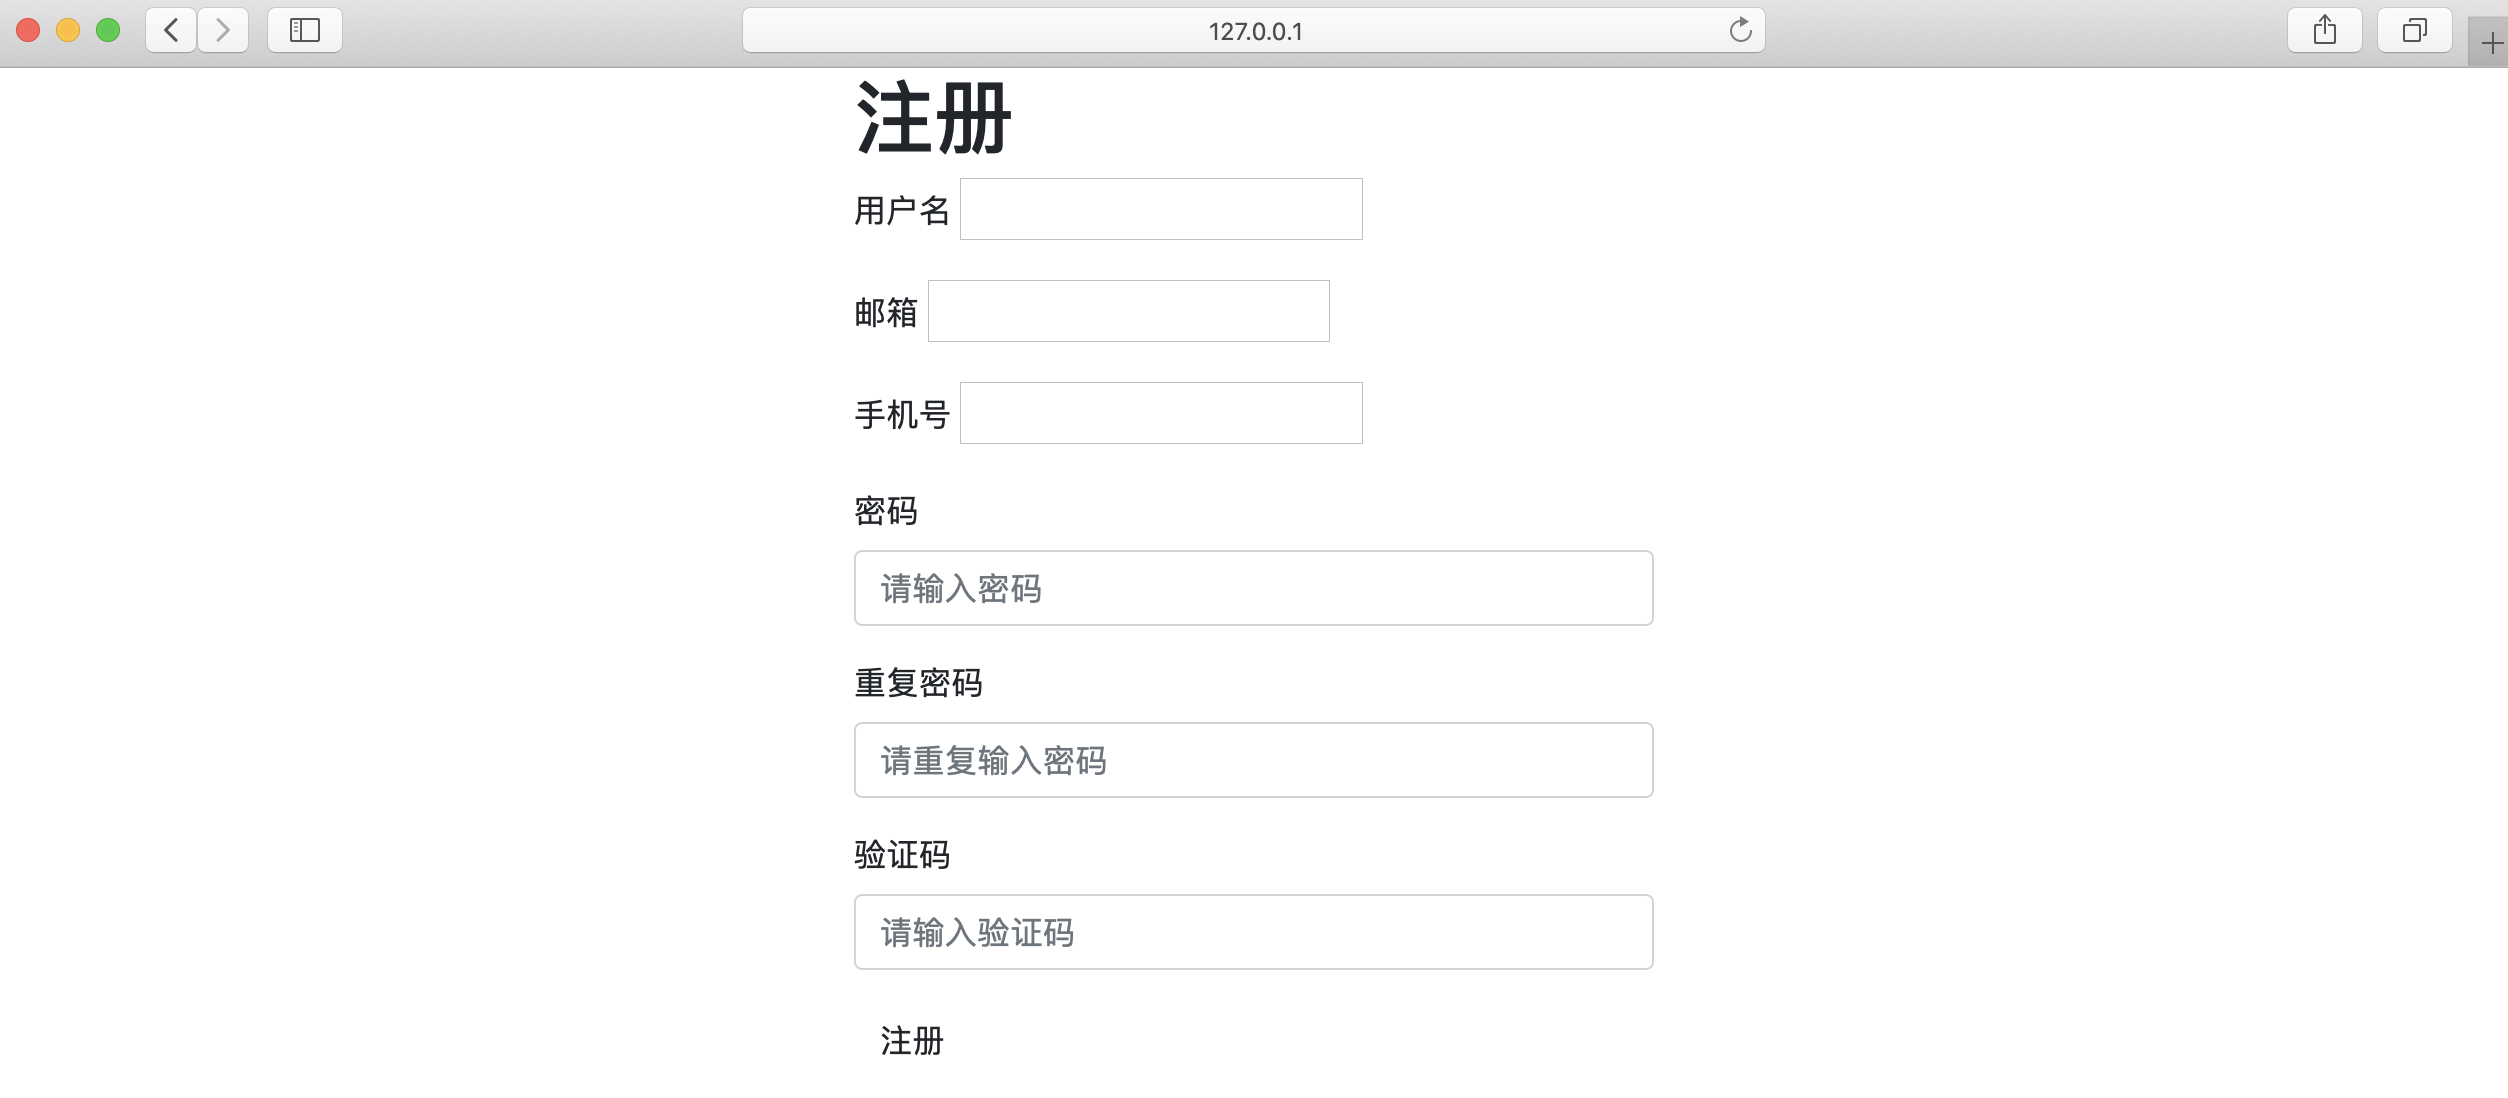
- 上面是通过ModelForm对字段增加额外的属性,实现了前端的展示效果;
- 但是发现每个字段都需要增加额外的属性,固然很麻烦,所以可以在
ModelForm重写__init__初始化方法增加属性;
$ cat users_app/templates/register.html
...
...
<body>
    <div class="account">
        <h1>注册</h1>
        <form>
            {% for field in form %}
          <div class="form-group">
            <label for="{{ field.id_for_label }}">{{ field.label }}</label>
{#            <input type="email" class="form-control" id="exampleInputEmail1" placeholder="Email">#}
            {{ field }}
          </div>
            {% endfor %}
          <button type="submit" class="btn btn-default">注册</button>
        </form>
    </div>
</body>
...
...
(Bug_manager) daizhe@daizhedeMacBook-Pro Bug_manager % cat users_app/views.py
...
...
from django import forms
from users_app import models
from django.core.validators import RegexValidator
from django.core.exceptions import ValidationError
class RegisterModelForm(forms.ModelForm):
    models_phone = forms.CharField(label='手机号', validators=[RegexValidator(r'(1[3|4|5|6|7|8|9])\d{9}$', '手机号格式错误'),])
    password = forms.CharField(label='密码',widget=forms.PasswordInput())
    confirm_password = forms.CharField(label='重复密码', widget=forms.PasswordInput())
    code = forms.CharField(label='验证码', widget=forms.TextInput())

    #  model 定义元数据
    class Meta:
        # 对应的Model类
        model = models.UserInfo
        # Model类中哪些字段可以展示,__all__ 表示所有
        fields = '__all__'

    def __init__(self, *args, **kwargs):
        """
        重写RegisterModelForm 的 初始化方法
            name  表示字段名称
            field 表示forms.CharField对象
                code = forms.CharField(label='验证码', widget=forms.TextInput(attrs={'class': 'form-control', 'placeholder': "请输入验证码"}))
        """
        super(RegisterModelForm, self).__init__(*args, **kwargs)
        for name, field in self.fields.items():
            field.widget.attrs['class'] = 'form-control'
            field.widget.attrs['placeholder'] = "请输入{}".format(field.label)

def register(request):
    form = RegisterModelForm()
    return render(request, 'register.html', {'form': form})
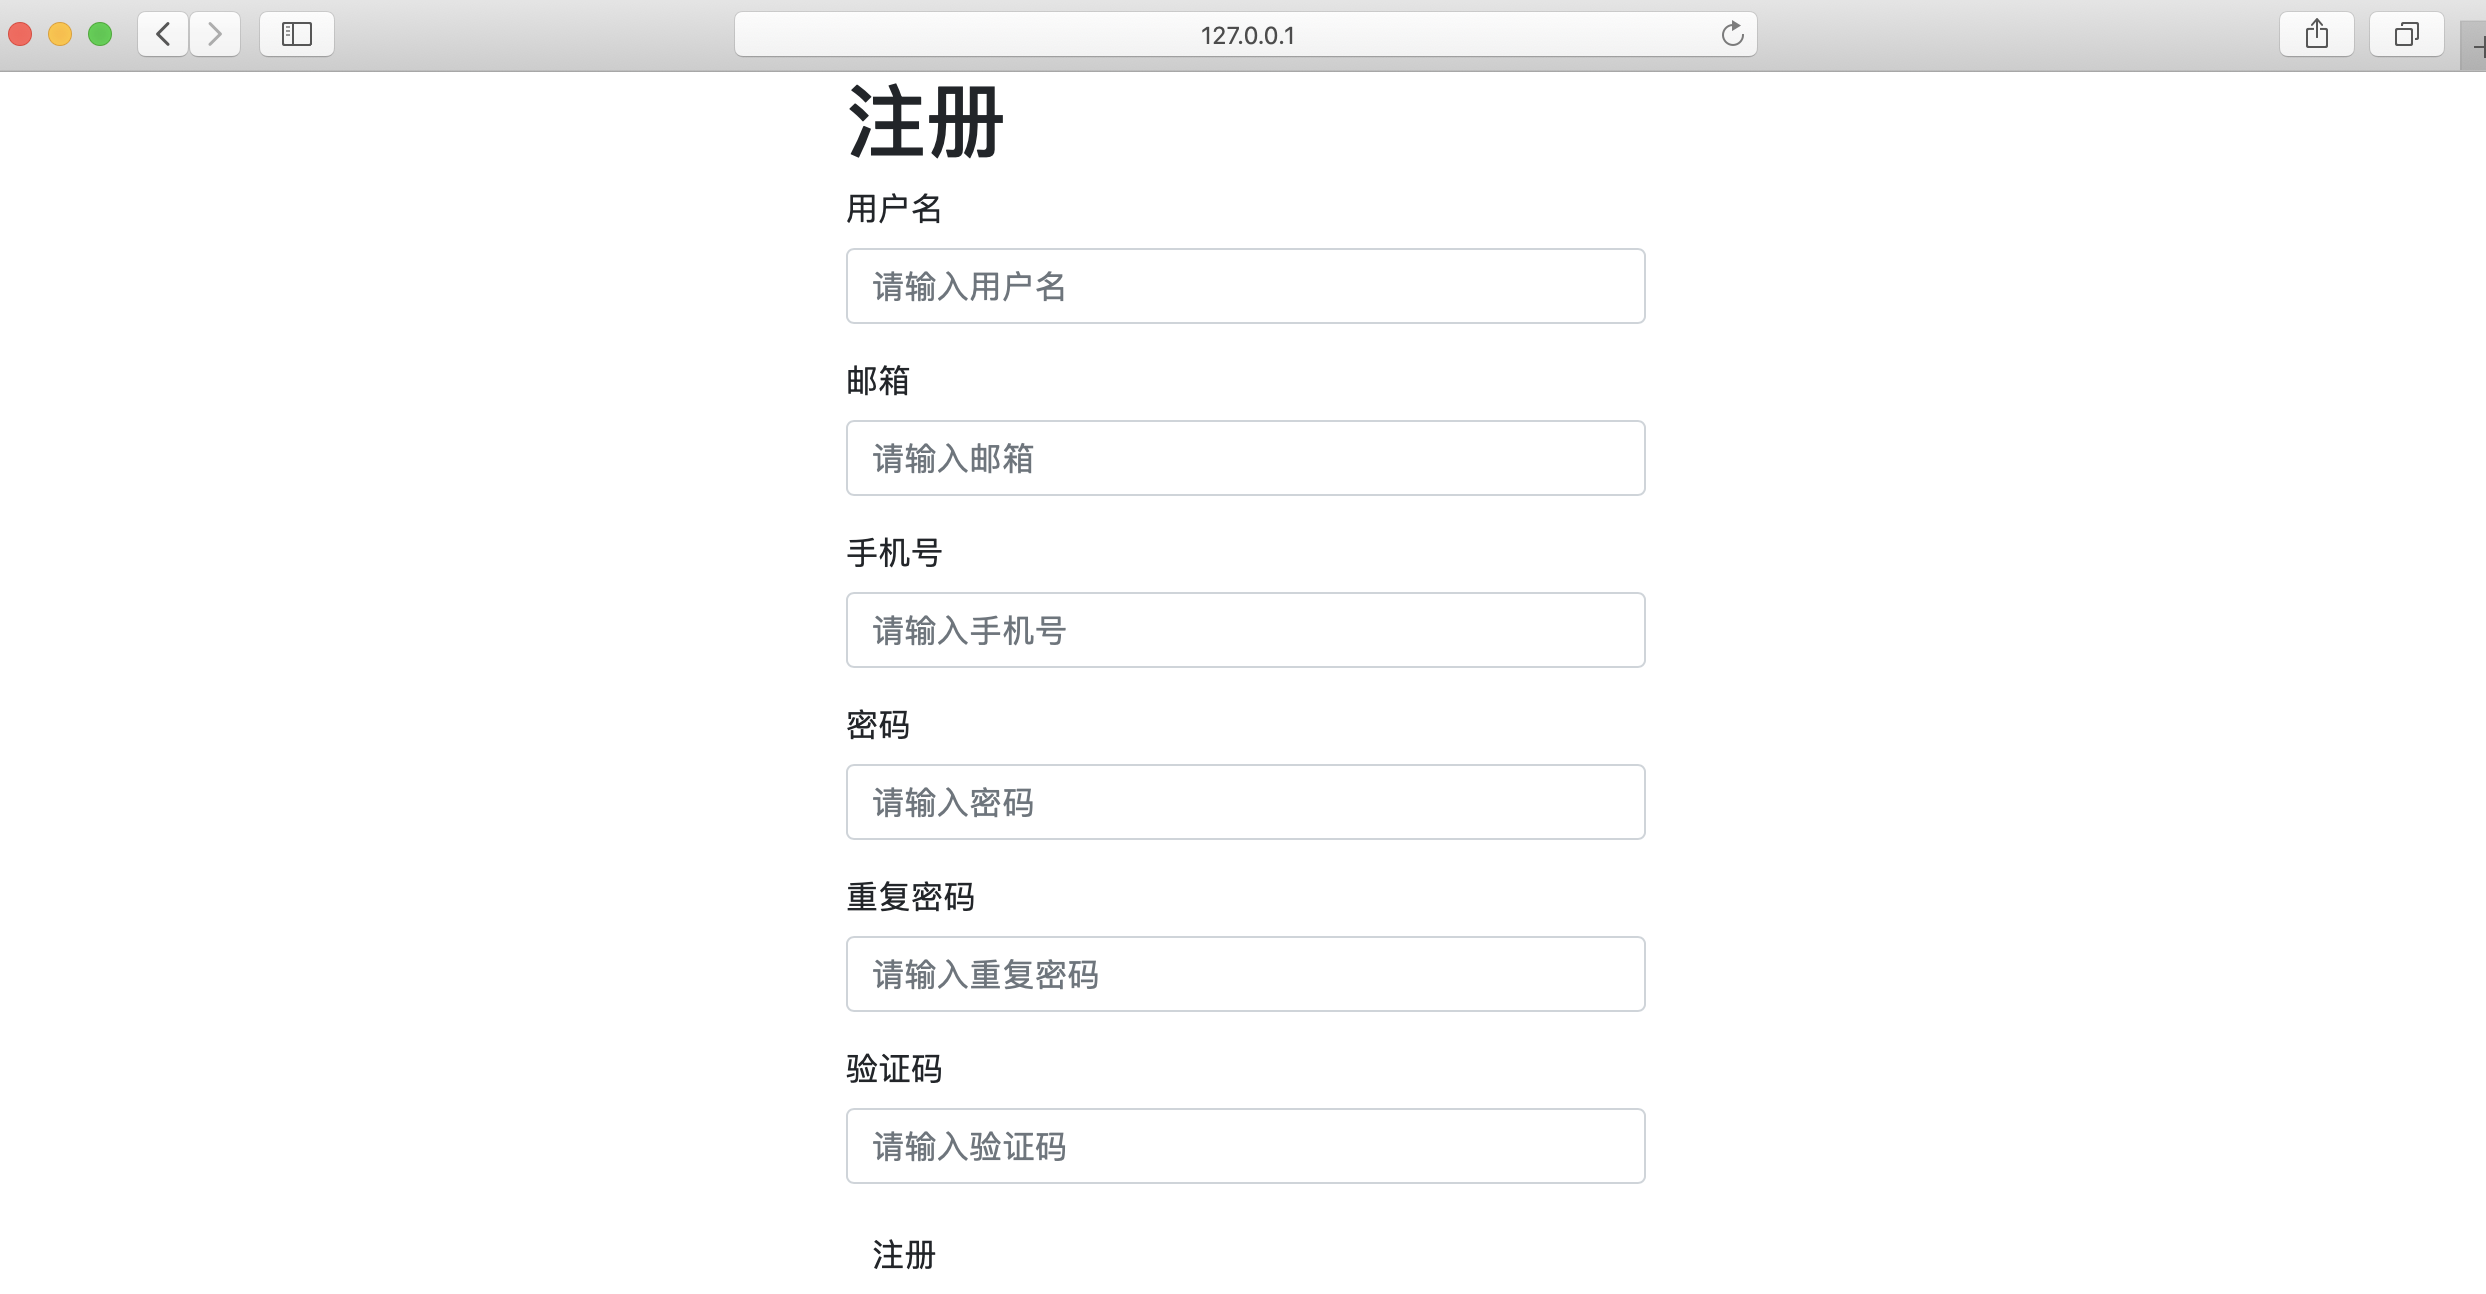
1.4、页面美化和调整
- 美化验证码按钮
$ cat users_app/templates/register.html

<!DOCTYPE html>
<html lang="en">
<head>
    <meta charset="UTF-8">
    <title>Title</title>
    <link rel="stylesheet" href="https://cdn.bootcss.com/twitter-bootstrap/3.4.1/css/bootstrap.min.css">
    <style>
        .account {
            width: 400px;
            margin: 0 auto;
        }
    </style>
</head>
<body>
<div class="account">
    <h1 style="text-align: center;">注册</h1>
    <form>
        {% for field in form %}
            {% if field.name == 'code' %}
                <div class="form-group">
                    <label for="{{ field.id_for_label }}">{{ field.label }}</label>
                    <div class="clearfix">
                        <div class="col-md-6" style="padding-left: 0;">{{ field }}</div>
                        <div class="col-md-6"><input type="button" class="btn btn-default" value="点击获取验证码"></div>
                    </div>

                </div>
            {% else %}
                <div class="form-group">
                    <label for="{{ field.id_for_label }}">{{ field.label }}</label>
                    {{ field }}
                </div>
            {% endif %}
        {% endfor %}

        <button type="submit" class="btn btn-primary">注 册</button>
    </form>
</div>
</body>
</html>
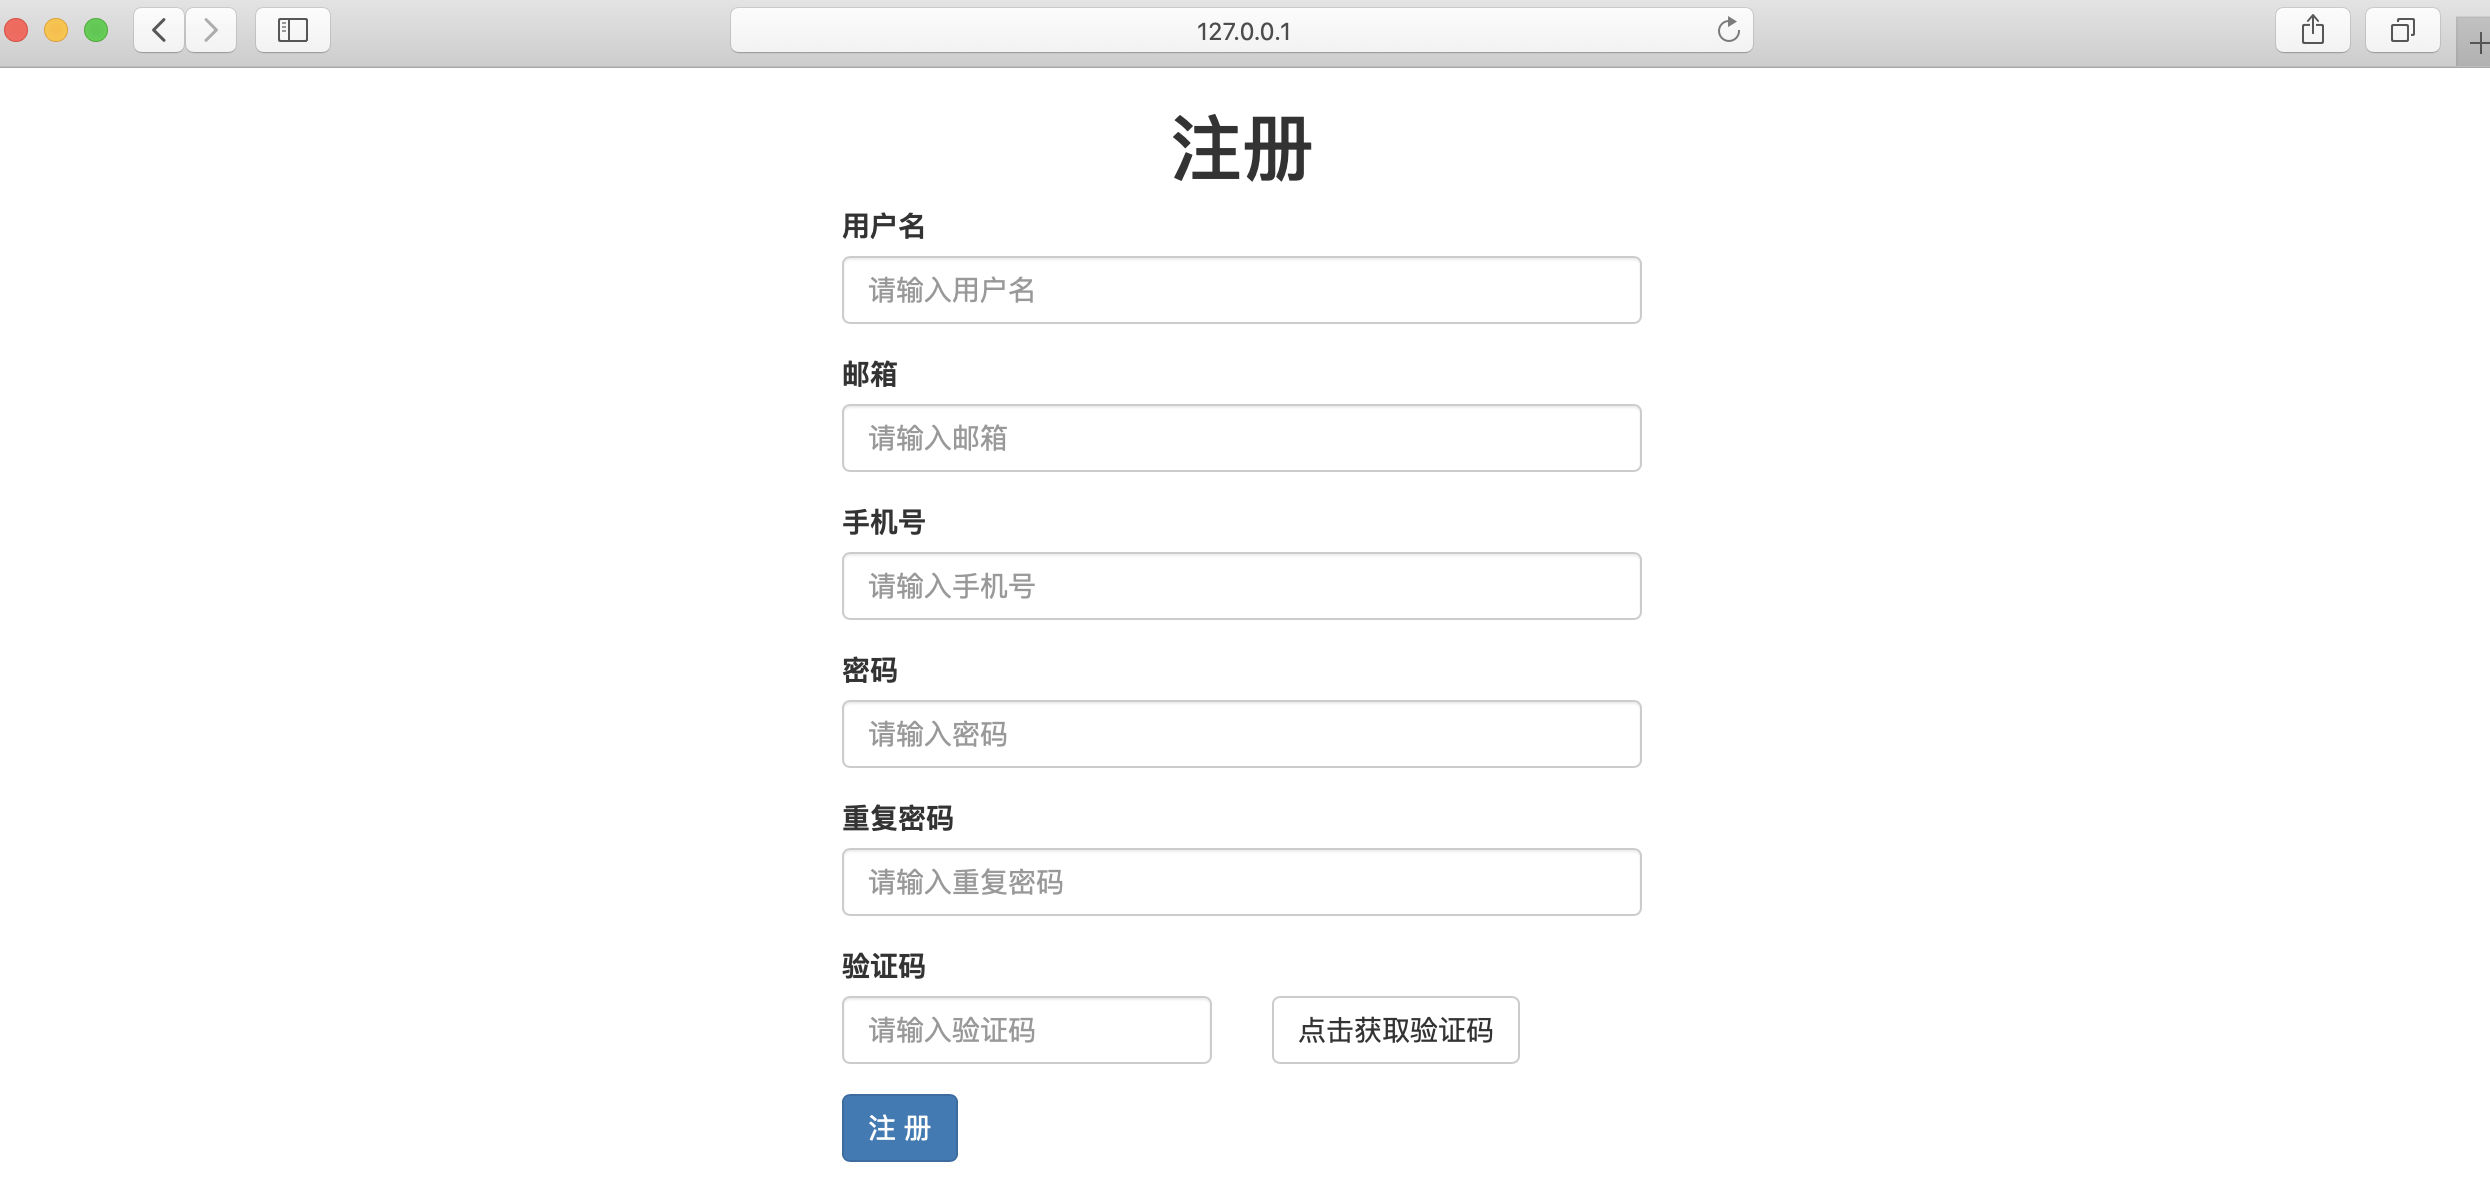
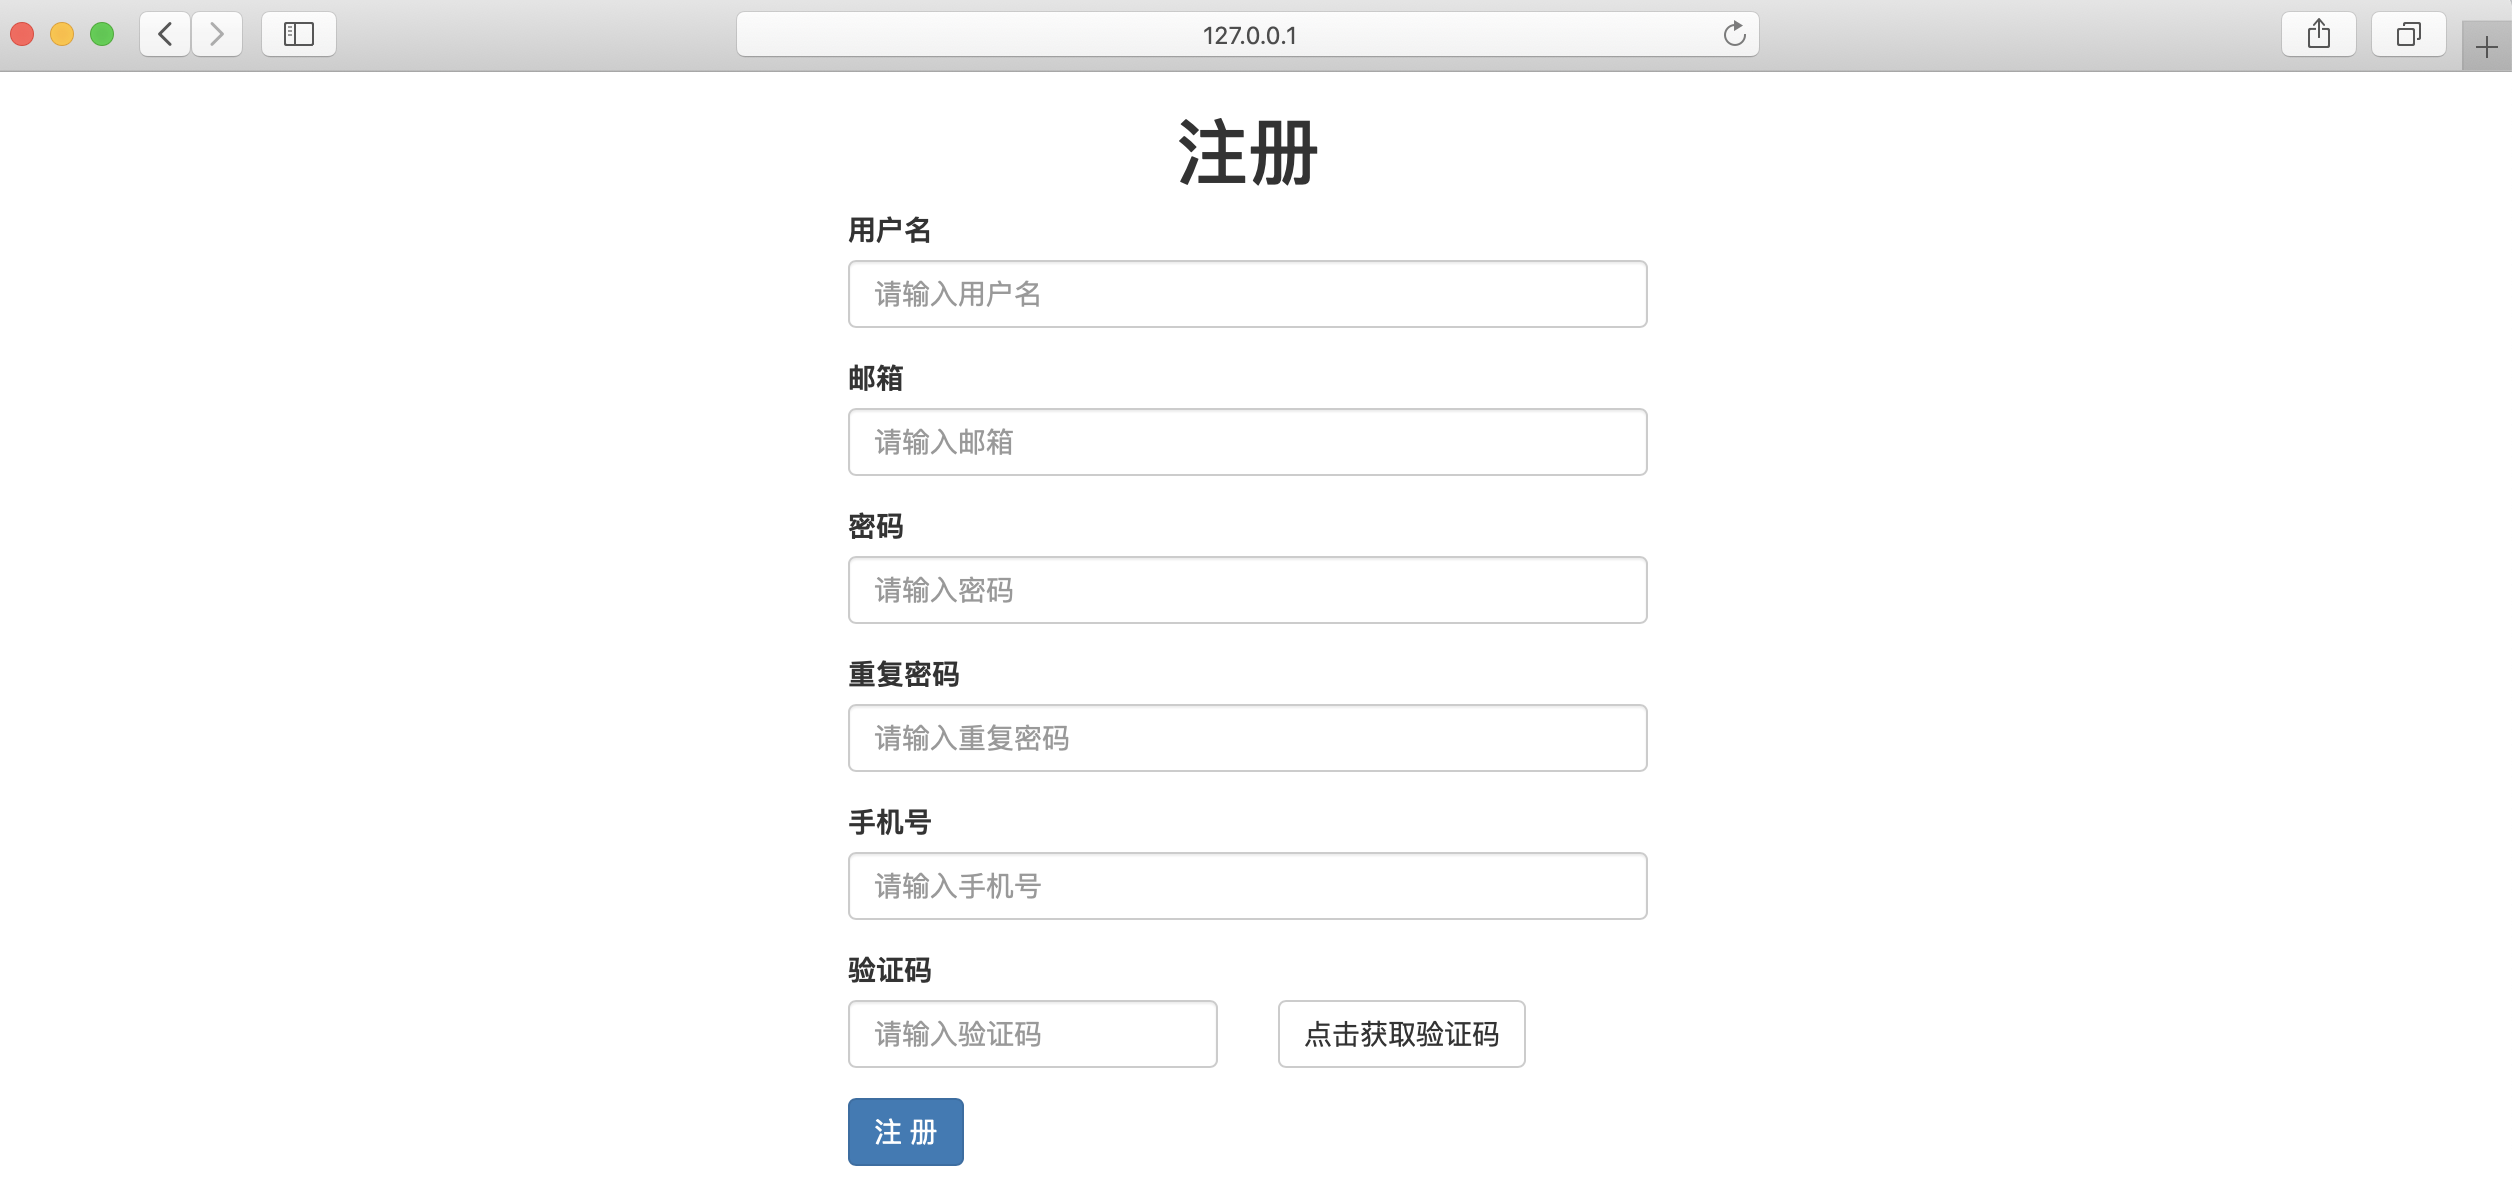
- 调整页面展示顺序,默认的展示效果是按照 ModelForm 中展示的,展示顺序为 :models中的字段,然后再展示 ModelForm中新增的字段;
(Bug_manager) daizhe@daizhedeMacBook-Pro Bug_manager % cat users_app/views.py
...
...
from django import forms
from users_app import models
from django.core.validators import RegexValidator
from django.core.exceptions import ValidationError
class RegisterModelForm(forms.ModelForm):
    models_phone = forms.CharField(label='手机号', validators=[RegexValidator(r'(1[3|4|5|6|7|8|9])\d{9}$', '手机号格式错误'),])
    password = forms.CharField(label='密码',widget=forms.PasswordInput())
    confirm_password = forms.CharField(label='重复密码', widget=forms.PasswordInput())
    code = forms.CharField(label='验证码', widget=forms.TextInput())

    #  model 定义元数据
    class Meta:
        # 对应的Model类
        model = models.UserInfo
        # Model类中哪些字段可以展示,__all__ 表示所有
        # fields = '__all__' 也表示默认的展示顺序,可以手动指定展示顺序
        fields = ['username', 'email', 'password', 'confirm_password', 'models_phone', 'code']

    def __init__(self, *args, **kwargs):
        """
        重写RegisterModelForm 的 初始化方法
            name  表示字段名称
            field 表示forms.CharField对象
                code = forms.CharField(label='验证码', widget=forms.TextInput(attrs={'class': 'form-control', 'placeholder': "请输入验证码"}))
        """
        super(RegisterModelForm, self).__init__(*args, **kwargs)
        for name, field in self.fields.items():
            field.widget.attrs['class'] = 'form-control'
            field.widget.attrs['placeholder'] = "请输入{}".format(field.label)


def register(request):
    form = RegisterModelForm()
    return render(request, 'register.html', {'form': form})
二、知识点补充
2.1、Django Form所有内置字段
Field
    required=True,               是否允许为空
    widget=None,                 HTML插件
    label=None,                  用于生成Label标签或显示内容
    initial=None,                初始值
    help_text='',                帮助信息(在标签旁边显示)
    error_messages=None,         错误信息 {'required': '不能为空', 'invalid': '格式错误'}
    validators=[],               自定义验证规则
    localize=False,              是否支持本地化
    disabled=False,              是否可以编辑
    label_suffix=None            Label内容后缀


CharField(Field)
    max_length=None,             最大长度
    min_length=None,             最小长度
    strip=True                   是否移除用户输入空白

IntegerField(Field)
    max_value=None,              最大值
    min_value=None,              最小值

FloatField(IntegerField)
    ...

DecimalField(IntegerField)
    max_value=None,              最大值
    min_value=None,              最小值
    max_digits=None,             总长度
    decimal_places=None,         小数位长度

BaseTemporalField(Field)
    input_formats=None          时间格式化

DateField(BaseTemporalField)    格式:2015-09-01
TimeField(BaseTemporalField)    格式:11:12
DateTimeField(BaseTemporalField)格式:2015-09-01 11:12

DurationField(Field)            时间间隔:%d %H:%M:%S.%f
    ...

RegexField(CharField)
    regex,                      自定制正则表达式
    max_length=None,            最大长度
    min_length=None,            最小长度
    error_message=None,         忽略,错误信息使用 error_messages={'invalid': '...'}

EmailField(CharField)
    ...

FileField(Field)
    allow_empty_file=False     是否允许空文件

ImageField(FileField)
    ...
    注:需要PIL模块,pip3 install Pillow
    以上两个字典使用时,需要注意两点:
        - form表单中 enctype="multipart/form-data"
        - view函数中 obj = MyForm(request.POST, request.FILES)

URLField(Field)
    ...


BooleanField(Field)
    ...

NullBooleanField(BooleanField)
    ...

ChoiceField(Field)
    ...
    choices=(),                选项,如:choices = ((0,'上海'),(1,'北京'),)
    required=True,             是否必填
    widget=None,               插件,默认select插件
    label=None,                Label内容
    initial=None,              初始值
    help_text='',              帮助提示


ModelChoiceField(ChoiceField)
    ...                        django.forms.models.ModelChoiceField
    queryset,                  # 查询数据库中的数据
    empty_label="---------",   # 默认空显示内容
    to_field_name=None,        # HTML中value的值对应的字段
    limit_choices_to=None      # ModelForm中对queryset二次筛选

ModelMultipleChoiceField(ModelChoiceField)
    ...                        django.forms.models.ModelMultipleChoiceField


TypedChoiceField(ChoiceField)
    coerce = lambda val: val   对选中的值进行一次转换
    empty_value= ''            空值的默认值

MultipleChoiceField(ChoiceField)
    ...

TypedMultipleChoiceField(MultipleChoiceField)
    coerce = lambda val: val   对选中的每一个值进行一次转换
    empty_value= ''            空值的默认值

ComboField(Field)
    fields=()                  使用多个验证,如下:即验证最大长度20,又验证邮箱格式
                               fields.ComboField(fields=[fields.CharField(max_length=20), fields.EmailField(),])

MultiValueField(Field)
    PS: 抽象类,子类中可以实现聚合多个字典去匹配一个值,要配合MultiWidget使用

SplitDateTimeField(MultiValueField)
    input_date_formats=None,   格式列表:['%Y--%m--%d', '%m%d/%Y', '%m/%d/%y']
    input_time_formats=None    格式列表:['%H:%M:%S', '%H:%M:%S.%f', '%H:%M']

FilePathField(ChoiceField)     文件选项,目录下文件显示在页面中
    path,                      文件夹路径
    match=None,                正则匹配
    recursive=False,           递归下面的文件夹
    allow_files=True,          允许文件
    allow_folders=False,       允许文件夹
    required=True,
    widget=None,
    label=None,
    initial=None,
    help_text=''

GenericIPAddressField
    protocol='both',           both,ipv4,ipv6支持的IP格式
    unpack_ipv4=False          解析ipv4地址,如果是::ffff:192.0.2.1时候,可解析为192.0.2.1, PS:protocol必须为both才能启用

SlugField(CharField)           数字,字母,下划线,减号(连字符)
    ...

UUIDField(CharField)           uuid类型
2.2、Django model中的class Meta详解
- 通过一个内嵌类 "class Meta" 给你的 model 定义元数据, 类似下面这样:
class Foo(models.Model):
    bar = models.CharField(maxlength=30)

    class Meta:
        # ...
- Model 元数据就是 "不是一个字段的任何数据" -- 比如排序选项, admin 选项等等;
- 下面是所有可能用到的 Meta 选项. 没有一个选项是必需的. 是否添加 class Meta 到你的 model 完全是可选的;
app_label
- app_label这个选项只在一种情况下使用,就是你的模型类不在默认的应用程序包下的models.py文件中,这时候你需要指定你这个模型类是那个应用程序的。比如你在其他地方写了一个模型类,而这个模型类是属于myapp的,那么你这是需要指定为:
app_label='myapp'
db_table
- db_table是用于指定自定义数据库表名的。Django有一套默认的按照一定规则生成数据模型对应的数据库表名,如果你想使用自定义的表名,就通过这个属性指定,比如:
table_name='my_owner_table'
- 若不提供该参数, Django 会使用 app_label + '_' + module_name 作为表的名字.
- 若你的表的名字是一个 SQL 保留字, 或包含 Python 变量名不允许的字符--特别是连字符 --没关系. Django 会自动在幕后替你将列名字和表名字用引号引起来.
db_tablespace
- 有些数据库有数据库表空间,比如Oracle。你可以通过db_tablespace来指定这个模型对应的数据库表放在哪个数据库表空间。
get_latest_by
- 由于Django的管理方法中有个lastest()方法,就是得到最近一行记录。如果你的数据模型中有 DateField 或 DateTimeField 类型的字段,你可以通过这个选项来指定lastest()是按照哪个字段进行选取的。
- 一个 DateField 或 DateTimeField 字段的名字. 若提供该选项, 该模块将拥有一个 get_latest() 函数以得到 "最新的" 对象(依据那个字段):
get_latest_by = "order_date"
managed
- 由于Django会自动根据模型类生成映射的数据库表,如果你不希望Django这么做,可以把managed的值设置为False。
- 默认值为True,这个选项为True时Django可以对数据库表进行 migrate或migrations、删除等操作。在这个时间Django将管理数据库中表的生命周期
- 如果为False的时候,不会对数据库表进行创建、删除等操作。可以用于现有表、数据库视图等,其他操作是一样的。
order_with_respect_to
- 这个选项一般用于多对多的关系中,它指向一个关联对象。就是说关联对象找到这个对象后它是经过排序的。指定这个属性后你会得到一个get_XXX_order()和set_XXX_order()的方法,通过它们你可以设置或者回去排序的对象。
- 举例来说, 如果一个 PizzaToppping 关联到一个 Pizza 对象, 这样做:
order_with_respect_to = 'pizza'
- ...就允许 toppings 依照相关的 pizza 来排序.
ordering
- 这个字段是告诉Django模型对象返回的记录结果集是按照哪个字段排序的。比如下面的代码:
ordering=['order_date']
# 按订单升序排列
ordering=['-order_date']
# 按订单降序排列,-表示降序
ordering=['?order_date']
# 随机排序,?表示随机
ordering = ['-pub_date', 'author']
# 对 pub_date 降序,然后对 author 升序
- 需要注意的是:不论你使用了多少个字段排序, admin 只使用第一个字段;
permissions
- permissions主要是为了在Django Admin管理模块下使用的,如果你设置了这个属性可以让指定的方法权限描述更清晰可读。
- 要创建一个对象所需要的额外的权限. 如果一个对象有 admin 设置, 则每个对象的添加,删除和改变权限会人(依据该选项)自动创建.下面这个例子指定了一个附加权限: can_deliver_pizzas:
permissions = (("can_deliver_pizzas", "Can deliver pizzas"),)
- 这是一个2-元素 tuple 的tuple或列表, 其中两2-元素 tuple 的格式为:(permission_code, human_readable_permission_name).
unique_together
- unique_together这个选项用于:当你需要通过两个字段保持唯一性时使用。这会在 Django admin 层和数据库层同时做出限制(也就是相关的 UNIQUE 语句会被包括在 CREATE TABLE 语句中)。比如:一个Person的FirstName和LastName两者的组合必须是唯一的,那么需要这样设置:
unique_together = (("first_name", "last_name"),)
verbose_name
- verbose_name的意思很简单,就是给你的模型类起一个更可读的名字:
verbose_name = "pizza"
- 若未提供该选项, Django 则会用一个类名字的 munged 版本来代替: CamelCase becomes camel case.
verbose_name_plural
- 这个选项是指定,模型的复数形式是什么,比如:
verbose_name_plural = "stories"
- 若未提供该选项, Django 会使用 verbose_name + "s".
向往的地方很远,喜欢的东西很贵,这就是我努力的目标。


 浙公网安备 33010602011771号