Mac-item2 配置lrzsz功能
一、Mac下iTerm2配置lrzsz功能
-
1.1、安装iTerm2
- iTerm2是Mac OS下的一款终端利器,相对于系统自带的终端软件具有很多更好的功能和扩展。官方地址为https://www.iterm2.com
- 安装iTerm2主要有下面两种方法:
- 从官网下载安装包进行安装
- 下载的是压缩文件,解压后是执行程序文件,你可以直接双击,或者直接将它拖到 Applications 目录下。
- 使用homebrew进行安装
- homebrew是mac下的一个包管理器,虽然苹果官方没有相关说明,很多的软件包可以利用homebrew轻松的在命令行进行安装,homebrew的安装可参考官方网站或某博客,安装后最好将软件源替换为国内源,例如阿里云或者清华大学源
- 从官网下载安装包进行安装
-
2、配置iterm2-send-zmodem.sh和iterm2-recv-zmodem.sh脚本文件
- 脚本见笔记:mac之lrzsz脚本 chmod +x iterm2-recv-zmodem.sh chmod +x iterm2-send-zmodem.sh
-
3、安装lrzsz
- 通过homebrew安装,执行brew install lrzsz安装即可
-
4、配置iterm2
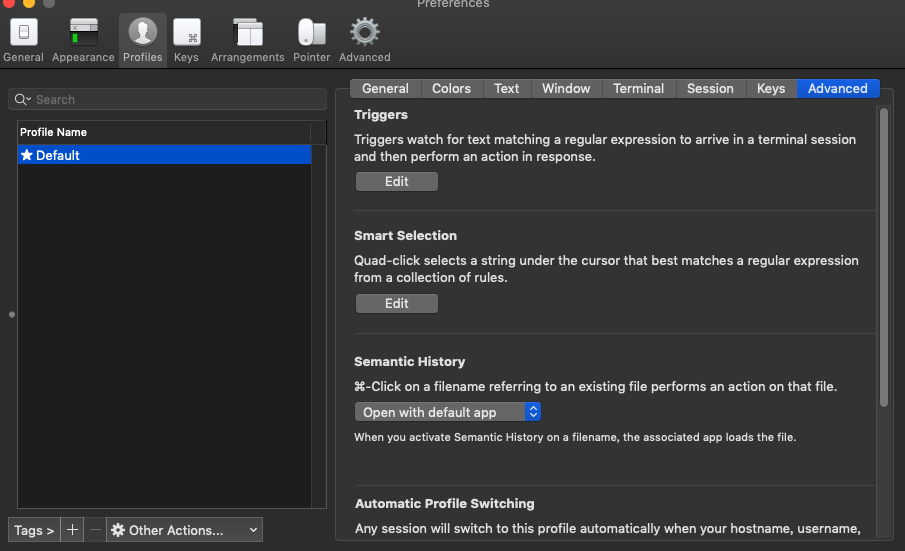
- 此步骤是关键步骤,打开iTerm2终端,依次点击"Preference"——>"Profiles"——>"Default"——>"Advanced"——>"Edit"
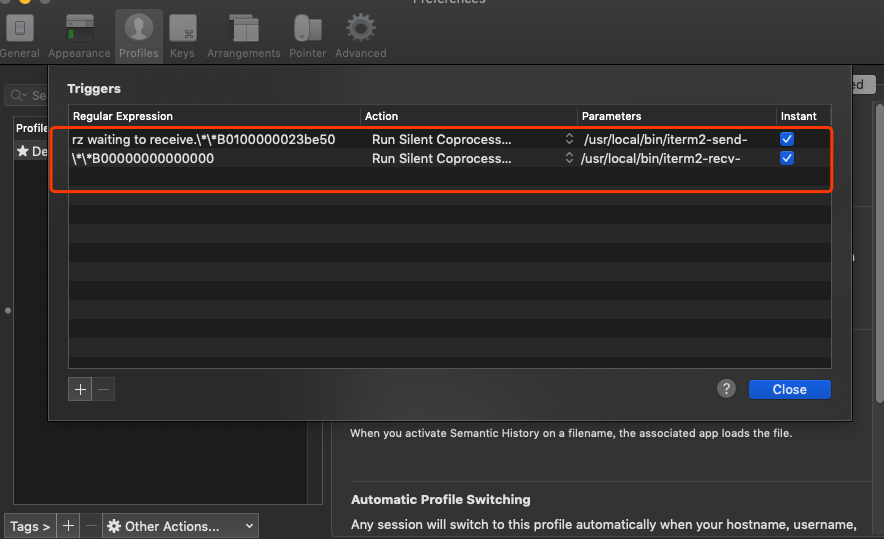
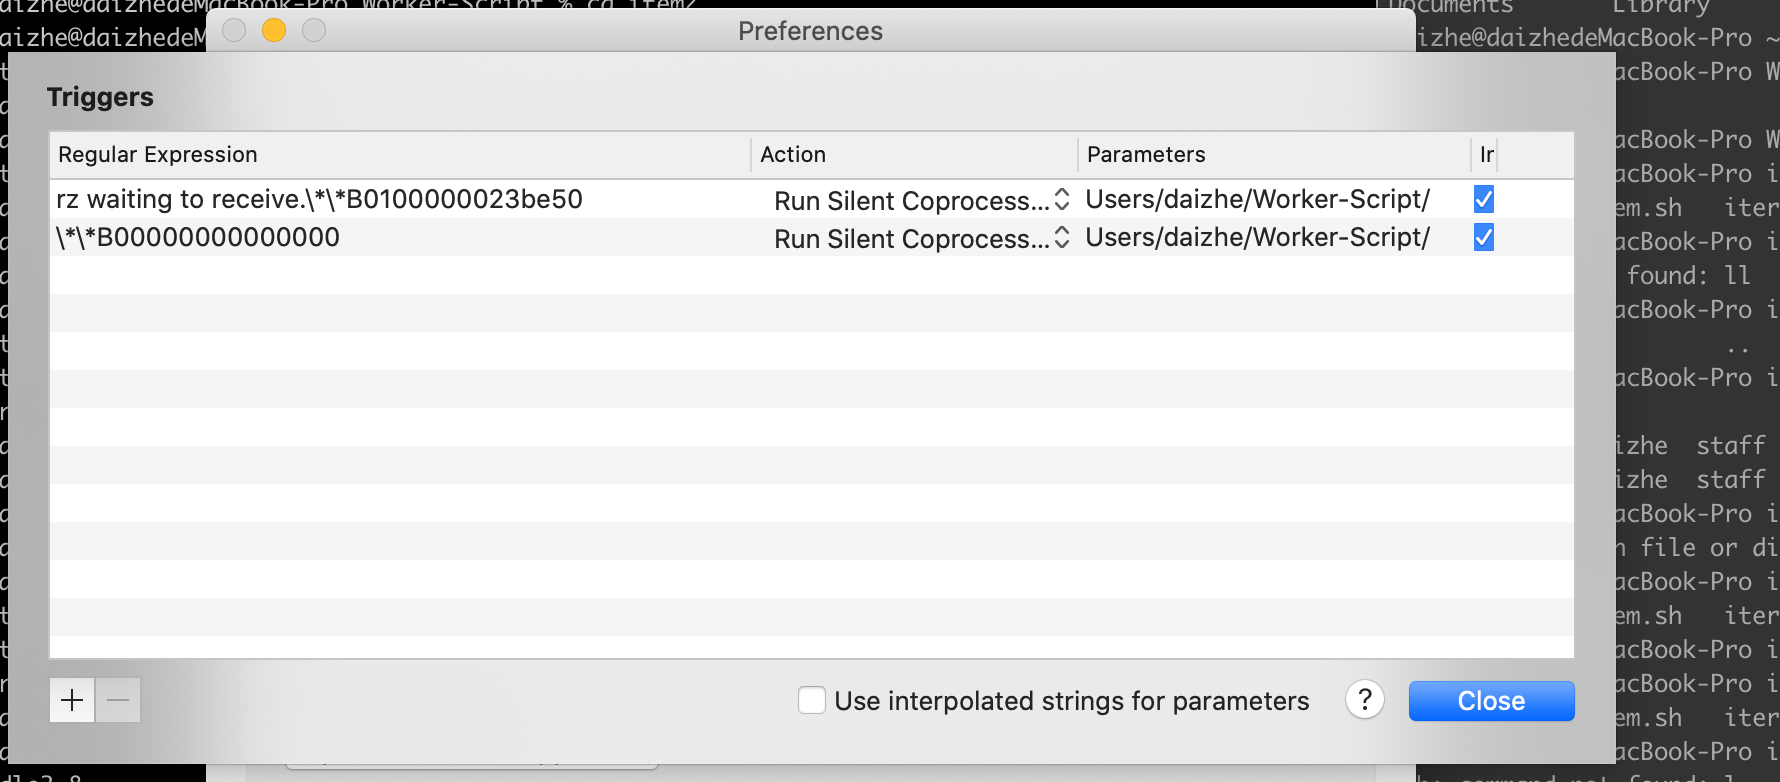
rz waiting to receive.\*\*B0100000023be50   /Users/daizhe/Worker-Script/item/iterm2-send-zmodem.sh
\*\*B00000000000000                         /Users/daizhe/Worker-Script/item/iterm2-recv-zmodem.sh
% cat /usr/local/bin/iterm2-send-zmodem.sh
#!/bin/bash
# Author: Matt Mastracci (matthew@mastracci.com)
# AppleScript from http://stackoverflow.com/questions/4309087/cancel-button-on-osascript-in-a-bash-script
# licensed under cc-wiki with attribution required
# Remainder of script public domain

osascript -e 'tell application "iTerm2" to version' > /dev/null 2>&1 && NAME=iTerm2 || NAME=iTerm
if [[ $NAME = "iTerm" ]]; then
    FILE=$(osascript -e 'tell application "iTerm" to activate' -e 'tell application "iTerm" to set thefile to choose file with prompt "Choose a file to send"' -e "do shell script (\"echo \"&(quoted form of POSIX path of thefile as Unicode text)&\"\")")
else
    FILE=$(osascript -e 'tell application "iTerm2" to activate' -e 'tell application "iTerm2" to set thefile to choose file with prompt "Choose a file to send"' -e "do shell script (\"echo \"&(quoted form of POSIX path of thefile as Unicode text)&\"\")")
fi
if [[ $FILE = "" ]]; then
    echo Cancelled.
    # Send ZModem cancel
    echo -e \\x18\\x18\\x18\\x18\\x18
    sleep 1
    echo
    echo \# Cancelled transfer
else
    /usr/local/bin/sz "$FILE" --escape --binary --bufsize 4096
    sleep 1
    echo
    echo \# Received "$FILE"
fi
% cat /usr/local/bin/iterm2-recv-zmodem.sh
#!/bin/bash
# Author: Matt Mastracci (matthew@mastracci.com)
# AppleScript from http://stackoverflow.com/questions/4309087/cancel-button-on-osascript-in-a-bash-script
# licensed under cc-wiki with attribution required
# Remainder of script public domain

osascript -e 'tell application "iTerm2" to version' > /dev/null 2>&1 && NAME=iTerm2 || NAME=iTerm
if [[ $NAME = "iTerm" ]]; then
    FILE=$(osascript -e 'tell application "iTerm" to activate' -e 'tell application "iTerm" to set thefile to choose folder with prompt "Choose a folder to place received files in"' -e "do shell script (\"echo \"&(quoted form of POSIX path of thefile as Unicode text)&\"\")")
else
    FILE=$(osascript -e 'tell application "iTerm2" to activate' -e 'tell application "iTerm2" to set thefile to choose folder with prompt "Choose a folder to place received files in"' -e "do shell script (\"echo \"&(quoted form of POSIX path of thefile as Unicode text)&\"\")")
fi

if [[ $FILE = "" ]]; then
    echo Cancelled.
    # Send ZModem cancel
    echo -e \\x18\\x18\\x18\\x18\\x18
    sleep 1
    echo
    echo \# Cancelled transfer
else
    cd "$FILE"
    /usr/local/bin/rz --rename --escape --binary --bufsize 4096
    sleep 1
    echo
    echo
    echo \# Sent \-\> $FILE
fi
-
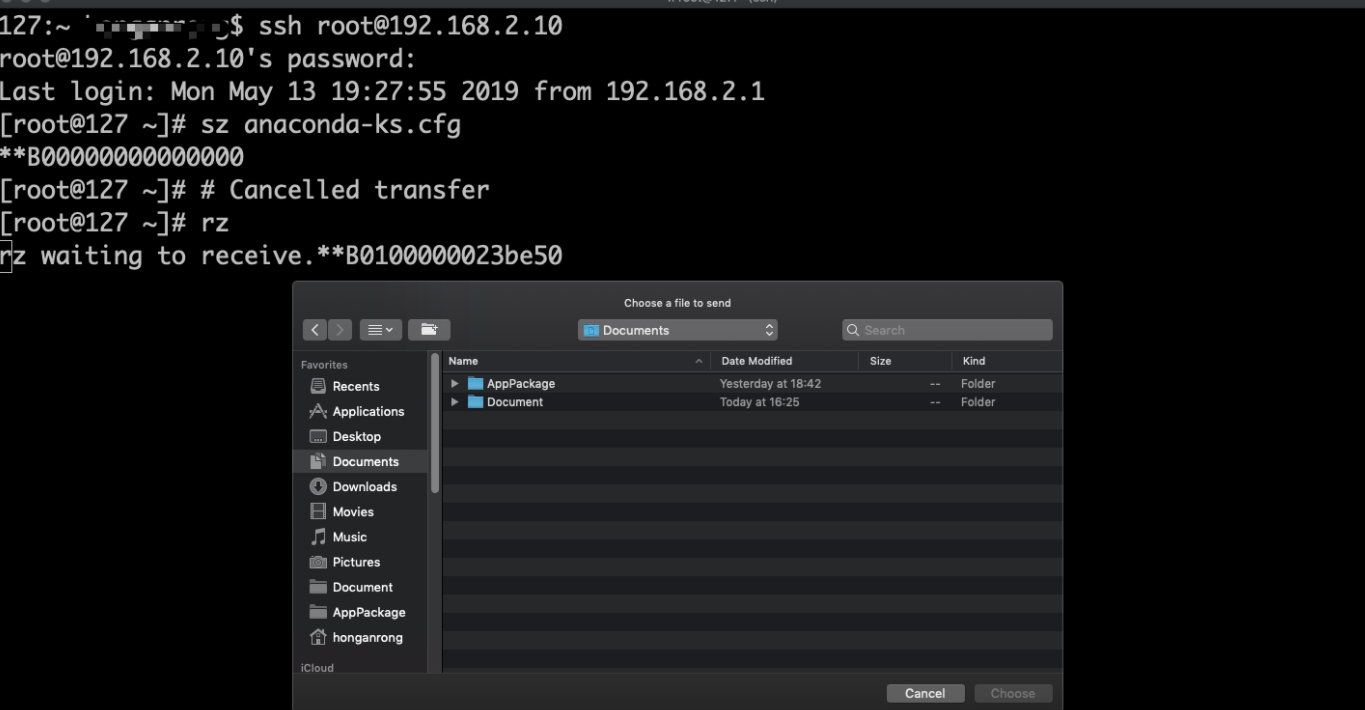
5、文件传输测试
- 打开终端,通过终端登录到服务器,再分别执行rz和sz命令,会自动弹出一个界面选择要上传文件所在的位置或选择下载文件的保存位置,大功告成
-
sz下载文件
-
6、rz命令和sz命令参数
sz命令
用途说明:sz命令是利用ZModem协议来从Linux服务器传送文件到本地,一次可以传送一个或多个文件。相对应的从本地上传文件到Linux服务器,可以使用rz命令。
常用参数:
-a 以文本方式传输(ascii)。 -b 以二进制方式传输(binary)。 -e 对控制字符转义(escape),这可以保证文件传输正确。 如果能够确定所传输的文件是文本格式的,使用 sz -a files 如果是二进制文件,使用 sz -be files
rz命令
-b 以二进制方式,默认为文本方式。(Binary (tell it like it is) file transfer override.) -e 对所有控制字符转义。(Force sender to escape all control characters; normally XON, XOFF, DLE, CR-@-CR, and Ctrl-X are escaped.)
如果要保证上传的文件内容在服务器端保存之后与原始文件一致,最好同时设置这两个标志,如下所示方式使用:
rz -be
此命令执行时,会弹出文件选择对话框,选择好需要上传的文件之后,点确定,就可以开始上传的过程了。上传的速度取决于当时网络的状况。
如果执行完毕显示“0错误”,文件上传就成功了,其他显示则表示文件上传出现问题了。
向往的地方很远,喜欢的东西很贵,这就是我努力的目标。
