【nginx】 入门学习
Nginx学习
简介
本来按照计划是学习集群的,不过看了下集群方案多以分库分表,多主多从等体现,应该先学习下nginx跨域相关知识。
由于一台服务器能承受的并发鸭梨有限,所以按需增加了数台服务器,此时应该设置一台服务器作为代理服务器,负责转发和处理请求,把请求分散到各个服务器上。
Nginx是一个高性能的HTTP和反向代理web服务器,由C语言编写,据说支持并发连接数高达50000个。
反向代理和正向代理
正向与反向的区别在于 代理的对象是谁,正向代理是给客户端代理,帮客户端做事,比如你使用VPN时,VPN会通过代理模式帮你请求访问某个服务器节点资源。
反向代理的代理对象是服务器,客户端不知道具体是对应那台服务器,就好像我登录b站,看到的只是bilibili.com,而实际上我的请求是被反向代理,给了某台服务器来处理。
负载均衡
负载均衡,load Balance。是平衡,分摊负载压力从而实现平衡的一种概念。
在这里解释为软件负载均衡方案,通常是按多个服务器上通过安装附加软件来实现负载均衡效果,nginx就是其中一种方案。
Nginx提供的负载均衡策略有两种:内置策略和扩展策略。
内置策略:
- 轮询 :简单的对每个服务器进行轮流分配请求
- 加权轮询 :给每个服务器设置一个权重,每次接收到请求都会通过权重分配,权重大的要处理的请求数就多,这种分配宏观上是比较均衡的。
- ip hash :把ip 地址映射为hash值,这样,同一个客户端的请求会被发送到同一个服务器,可以解决session不共享问题,只要用户的IP不发生改变,当前用户的会话就能够一直保持
动静分离
一些请求是不需要后台处理的,这类静态资源,比如html文件就不需要去重复加载,一些请求需要后台处理,要动态接口加载,所以静态和动态资源分离开,对静态资源进行本地缓存操作,这样可以提高资源响应的速度。
配置nginx
官网地址:
https://nginx.org/en/download.html
我的版本1.18.0
./configure
# 报错:./configure: error: the HTTP rewrite module requires the PCRE library.
# 安装缺少的包
yum -y install openssl openssl-devel
# 加参数执行命令
./configure --prefix=/usr/local/nginx
make
make install

[root@iZbp1hwh629hd4xz80i1z0Z nginx-1.18.0]# whereis nginx
nginx: /usr/local/nginx
# nginx默认安装路径/usr/local/nginx

[root@iZbp1hwh629hd4xz80i1z0Z nginx]# cd /usr/local/nginx/
[root@iZbp1hwh629hd4xz80i1z0Z nginx]# ll
total 16
drwxr-xr-x 2 root root 4096 Jul 11 17:54 conf
drwxr-xr-x 2 root root 4096 Jul 11 17:54 html
drwxr-xr-x 2 root root 4096 Jul 11 17:54 logs
drwxr-xr-x 2 root root 4096 Jul 11 17:54 sbin
[root@iZbp1hwh629hd4xz80i1z0Z nginx]# cd sbin
[root@iZbp1hwh629hd4xz80i1z0Z sbin]# ./nginx
[root@iZbp1hwh629hd4xz80i1z0Z sbin]#
默认监听端口一般是80,可以去浏览器验证ip + port ,显示 【Welcome to nginx!】为正常。
nginx常用指令
# 验证配置文件是否正常
./nginx -t
# 重新加载配置文件
./nginx -s reload

# 发版前端有时需要重启nginx
# 停止(注意所在路径)
./nginx -s stop
# 启动
./nginx
nginx简单使用
目前来说,nginx本身也是在一台服务器里的,我只有两台服务器,所以,这次nginx就暂时用windows本地来安装了,也就是说windows请求localhost出现welcom字样即可,此处带不带80都可以,因为默认80端口,然后代理目标服务器为 43.138.100.229
120.26.57.239
本地配置请求 对应变量为 test.project.uuz
- 本地配置windows的nginx过程略,解压缩后即可使用
- linux环境nginx配置:
linux环境配置:
安装tomcat:
tar -zxvf apache-tomcat-9.0.64.tar.gz
安装查看jvm环境
https://www.oracle.com/java/technologies/downloads/#java8
java -version
确定tomcat正常启动:
./startup.sh
ps -ef | grep tomcat
如果有修改配置文件的注意重启tomcat:
#/apache-tomcat/bin/shutdown.sh

#/apache-tomcat/bin/startup.sh
# 当前路径则用./startup.sh
上传jar包
运行jar包
nohup java -Xms128M -Xmx128M -jar /zoe/jar/fox-test.jar --server.port=8087 > /zoe/jar/logs/fox-test.log 2>&1 &
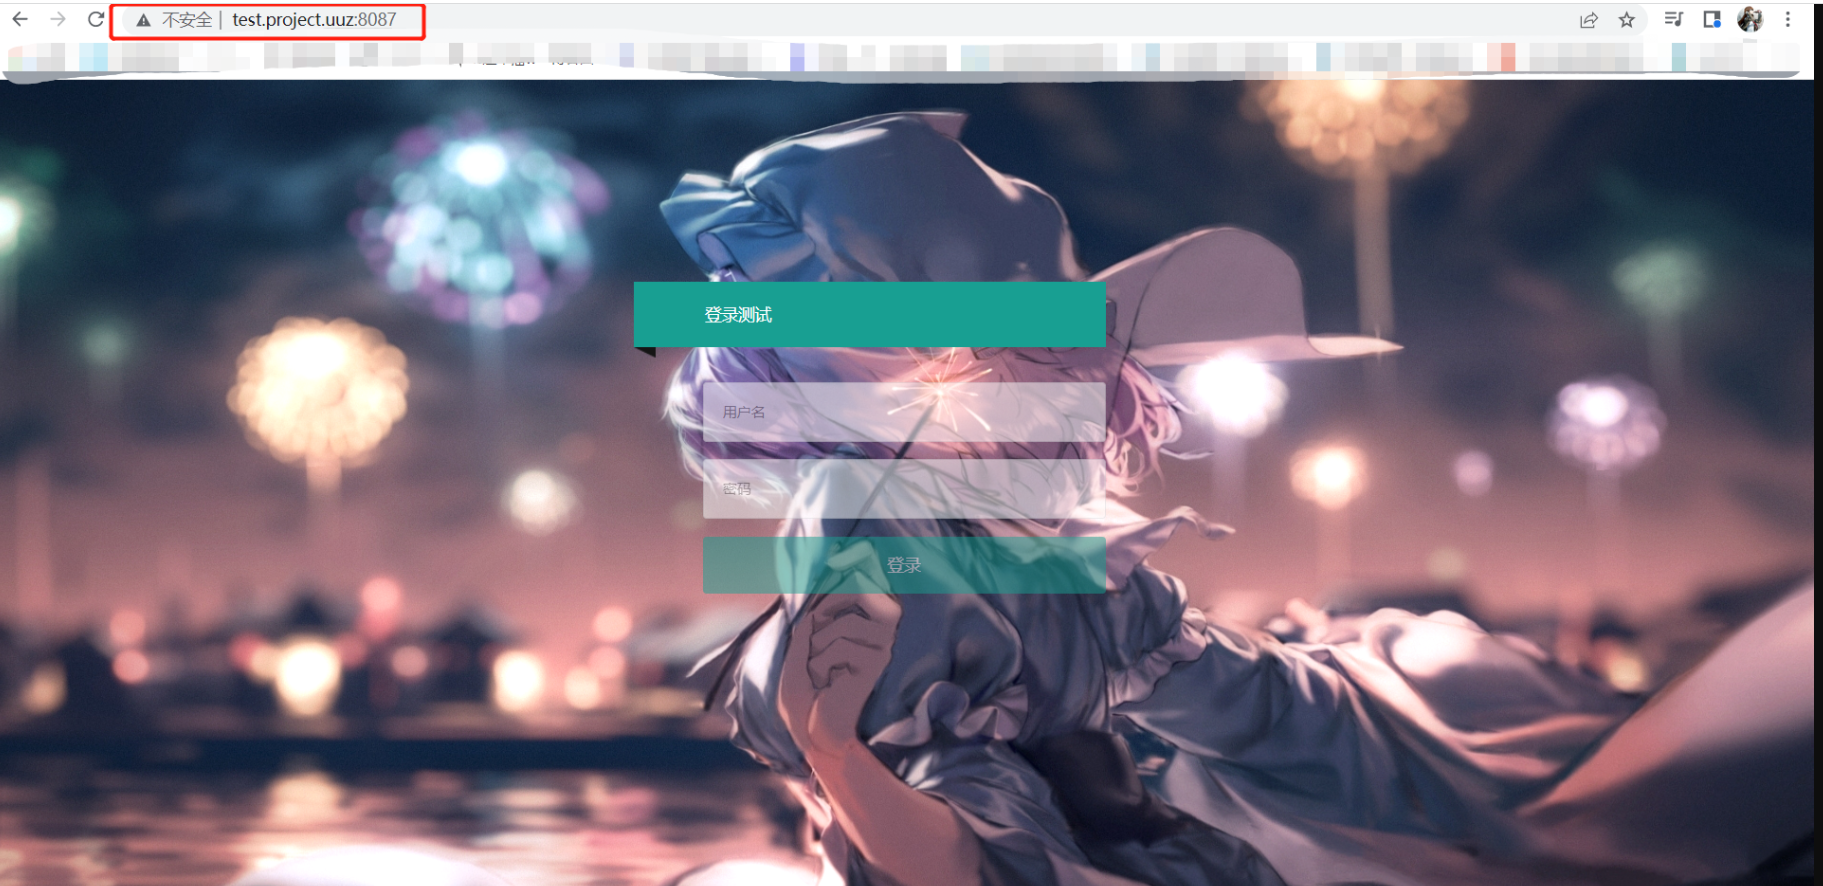
可以通过浏览器 ip+端口访问测试页面:

配置hosts文件后显示如下:
另外一个服务器同样配置:

本地可以配置hosts文件模仿域名:
test.project.uuz
emm,做好准备后,第二步是配置nginx转发,让请求可以比较均衡的分配到每个服务器
找到usr/local/nginx/conf下的nginx.conf文件,编辑:
# 全局配置区域
#user  nobody;
worker_processes  1;

#error_log  logs/error.log;
#error_log  logs/error.log  notice;
#error_log  logs/error.log  info;

#pid        logs/nginx.pid;

# 事件,比如最大连接数等配置
events {
    worker_connections  1024;
}

# 关于http的配置,可以有多个server配置,
http {
    include       mime.types;
    default_type  application/octet-stream;

    #log_format  main  '$remote_addr - $remote_user [$time_local] "$request" '
    #                  '$status $body_bytes_sent "$http_referer" '
    #                  '"$http_user_agent" "$http_x_forwarded_for"';

    #access_log  logs/access.log  main;

    sendfile        on;
    #tcp_nopush     on;

    #keepalive_timeout  0;
    keepalive_timeout  65;

    #gzip  on;

	# 此处对nginx80进行配置,80对应http,443对应https
	# location可以配置多个,对应不同层级的请求,比如location/a  和location/b ,对应可以配置不同的转发服务器
	# location中进行代理的配置,权重为1,轮询
	# upstream 配置负载均衡,uuz对应根目录请求路径,名字自定义或者对应
	upstream test.project.uuz {
		server 43.138.100.229:8087 weight=1;
		server 120.26.57.239:8087 weight=1;
}
	# 监听 80端口,表示80对应的请求在这里被代理,配置location:要代理的服务地址//test.project.uuz:8087/
    server {
        listen       80;
        server_name  localhost;

        #charset koi8-r;

        #access_log  logs/host.access.log  main;

        location / {
            root   html;
            index  index.html index.htm;
			proxy_pass http://test.project.uuz/
        }

        #error_page  404              /404.html;

        # redirect server error pages to the static page /50x.html
        #
        error_page   500 502 503 504  /50x.html;
        location = /50x.html {
            root   html;
        }

        # proxy the PHP scripts to Apache listening on 127.0.0.1:80
        #
        #location ~ \.php$ {
        #    proxy_pass   http://127.0.0.1;
        #}

        # pass the PHP scripts to FastCGI server listening on 127.0.0.1:9000
        #
        #location ~ \.php$ {
        #    root           html;
        #    fastcgi_pass   127.0.0.1:9000;
        #    fastcgi_index  index.php;
        #    fastcgi_param  SCRIPT_FILENAME  /scripts$fastcgi_script_name;
        #    include        fastcgi_params;
        #}

        # deny access to .htaccess files, if Apache's document root
        # concurs with nginx's one
        #
        #location ~ /\.ht {
        #    deny  all;
        #}
    }


    # another virtual host using mix of IP-, name-, and port-based configuration
    #
    #server {
    #    listen       8000;
    #    listen       somename:8080;
    #    server_name  somename  alias  another.alias;

    #    location / {
    #        root   html;
    #        index  index.html index.htm;
    #    }
    #}


    # HTTPS server
    #
    #server {
    #    listen       443 ssl;
    #    server_name  localhost;

    #    ssl_certificate      cert.pem;
    #    ssl_certificate_key  cert.key;

    #    ssl_session_cache    shared:SSL:1m;
    #    ssl_session_timeout  5m;

    #    ssl_ciphers  HIGH:!aNULL:!MD5;
    #    ssl_prefer_server_ciphers  on;

    #    location / {
    #        root   html;
    #        index  index.html index.htm;
    #    }
    #}

}
配置完成后,重新加载配置文件:
# 重新加载配置文件
./nginx -s reload
此时,我们在windows浏览器 请求localhost,应该就可以看到对应的测试页面了

至于轮询策略的验证,查看logs下的日志记录即可(两个都是weight =1 ,对应每个服务器分配一个请求)。
要点
- server的server_name:nginx本身作为服务器转发担当,也是要配置对应的ip的,我这里用的是windows本地,所以默认就是localhost,端口就是80,实际开发中应该是填写对应的域名
- server中的location:location可以配置多个,对应不同层级的请求,比如location/a 和location/b ,对应可以配置不同的转发服务
- upstream :可用于配置负载均衡,uuz对应根目录请求路径,名字自定义,但要与proxy_pass中的路径对应:server <服务信息> [权重信息];
- linux的host:/etc/host 文件

 浙公网安备 33010602011771号