SpringSecurity使用数据库认证
介绍
在Spring Security中如果想要使用数据进行认证操作,有很多种操作方式,这里我们介绍使用UserDetails、
UserDetailsService来完成操作。
- UserDetails
public interface UserDetails extends Serializable {
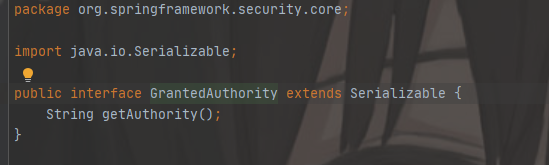
Collection<? extends GrantedAuthority> getAuthorities();
String getPassword();
String getUsername();
boolean isAccountNonExpired();
boolean isAccountNonLocked();
boolean isCredentialsNonExpired();
boolean isEnabled();
}
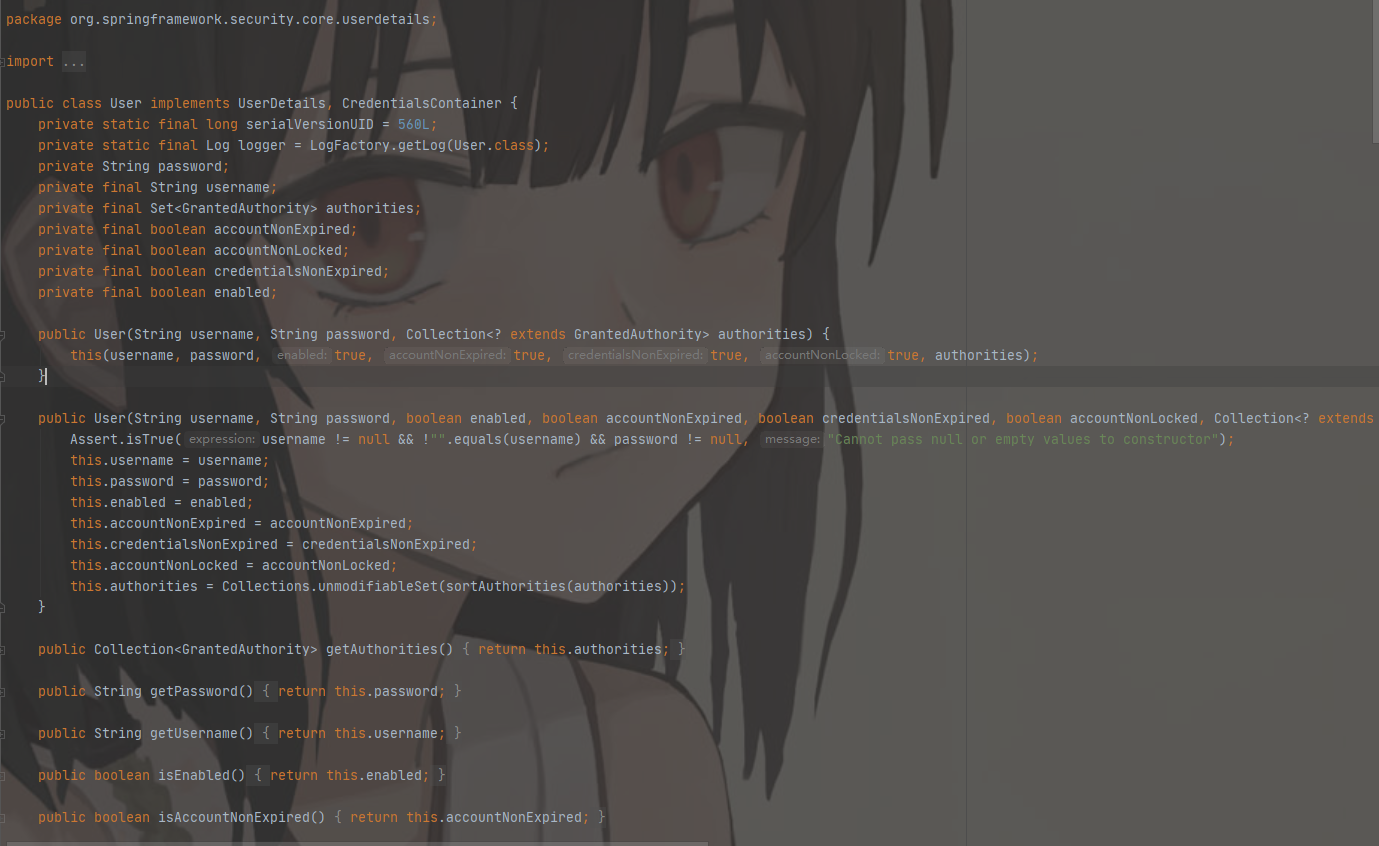
UserDetails是一个接口,我们可以认为UserDetails作用是于封装当前进行认证的用户信息,但由于其是一个
接口,所以我们可以对其进行实现,也可以使用Spring Security提供的一个UserDetails的实现类User来完成
操作
以下是User类的部分代码
public class User implements UserDetails, CredentialsContainer {
    private String password;
    private final String username;
    private final Set<GrantedAuthority> authorities;
    private final boolean accountNonExpired; //帐户是否过期
    private final boolean accountNonLocked; //帐户是否锁定
    private final boolean credentialsNonExpired; //认证是否过期
    private final boolean enabled; //帐户是否可用
}
- UserDetailsServices
public interface UserDetailsService {
  UserDetails loadUserByUsername(String username) throws UsernameNotFoundException;
}
当我们使用SpringSecurity时,不再需要写自己controller,controller由SpringSecurity框架提供我们
只需要实现UserDetails与UserDetailsService两个接口即可
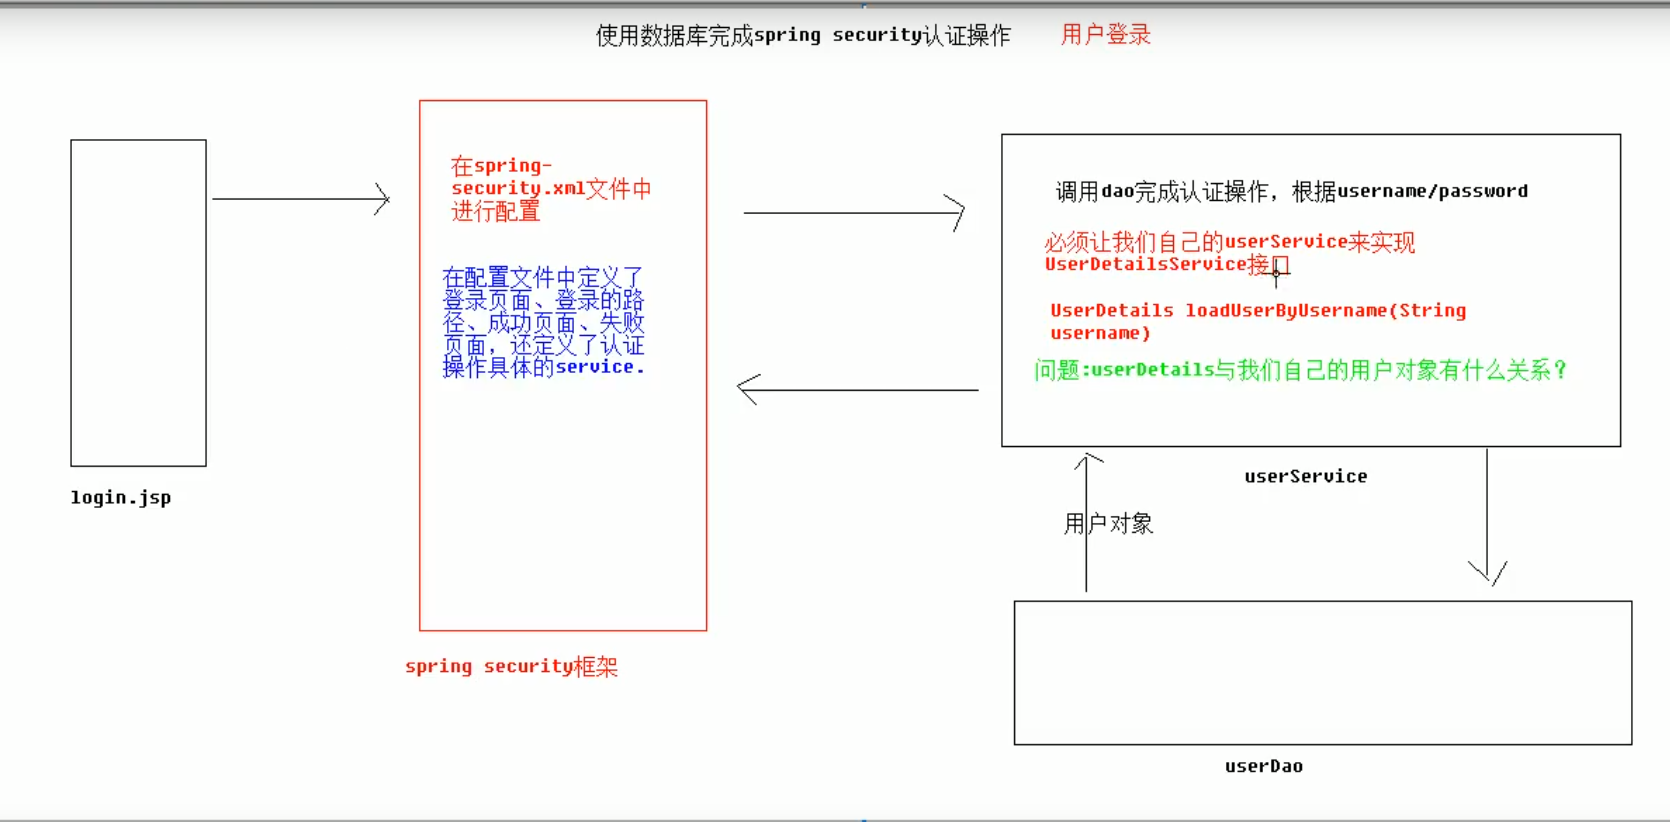
注:由于配置了密码加密,所以我们数据库的密码也要以相应的加密方式存储在其中,不然会出现密码正确无法登录的情况
配置与使用
web.xml配置SpringSecurity过滤器
<!--设置配置文件的路径-->
  <context-param>
    <param-name>contextConfigLocation</param-name>
    <param-value>classpath:applicationContext.xml,classpath:spring-security.xml</param-value>
  </context-param>


    <listener>
      <listener-class>org.springframework.web.context.ContextLoaderListener</listener-class>
    </listener>
    <filter>
      <filter-name>springSecurityFilterChain</filter-name>
      <filter-class>org.springframework.web.filter.DelegatingFilterProxy</filter-class>
    </filter>
    <filter-mapping>
      <filter-name>springSecurityFilterChain</filter-name>
      <url-pattern>/*</url-pattern>
    </filter-mapping>
    <welcome-file-list>
      <welcome-file>index.html</welcome-file>
      <welcome-file>index.htm</welcome-file>
      <welcome-file>index.jsp</welcome-file>
      <welcome-file>default.html</welcome-file>
      <welcome-file>default.htm</welcome-file>
      <welcome-file>default.jsp</welcome-file>
    </welcome-file-list>
classpath:spring-security.xml
<?xml version="1.0" encoding="UTF-8"?>
<beans xmlns="http://www.springframework.org/schema/beans"
	xmlns:security="http://www.springframework.org/schema/security"
	xmlns:xsi="http://www.w3.org/2001/XMLSchema-instance"
	xsi:schemaLocation="http://www.springframework.org/schema/beans
    http://www.springframework.org/schema/beans/spring-beans.xsd
    http://www.springframework.org/schema/security
    http://www.springframework.org/schema/security/spring-security.xsd">

    <!-- 配置不拦截的资源 -->
    <security:http pattern="/login.jsp" security="none"/>
    <security:http pattern="/failer.jsp" security="none"/>
    <security:http pattern="/css/**" security="none"/>
    <security:http pattern="/img/**" security="none"/>
    <security:http pattern="/plugins/**" security="none"/>

    <!--
    	配置具体的规则
    	auto-config="true"	不用自己编写登录的页面,框架提供默认登录页面
    	use-expressions="false"	是否使用SPEL表达式(没学习过)
    -->
    <security:http auto-config="true" use-expressions="false">
    	<!-- 配置具体的拦截的规则 pattern="请求路径的规则" access="访问系统的人,必须有ROLE_USER的角色" -->
    	<security:intercept-url pattern="/**" access="ROLE_USER,ROLE_ADMIN"/>

    	<!-- 定义跳转的具体的页面 -->
    	<security:form-login
    		login-page="/login.jsp"
    		login-processing-url="/login.do"
    		default-target-url="/index.jsp"
    		authentication-failure-url="/failer.jsp"
    	/>

    	<!-- 关闭跨域请求 -->
    	<security:csrf disabled="true"/>

    	<!-- 退出 -->
    	<security:logout invalidate-session="true" logout-url="/logout.do" logout-success-url="/login.jsp" />

    </security:http>

    <!-- 切换成数据库中的用户名和密码 -->
    <security:authentication-manager>
    	<security:authentication-provider user-service-ref="userService">
    		<!-- 配置加密的方式 -->
    		<security:password-encoder ref="passwordEncoder"/>
    	</security:authentication-provider>
    </security:authentication-manager>

    <!-- 配置加密类 -->
    <bean id="passwordEncoder" class="org.springframework.security.crypto.bcrypt.BCryptPasswordEncoder"/>

    <!-- 提供了入门的方式,在内存中存入用户名和密码
    <security:authentication-manager>
    	<security:authentication-provider>
    		<security:user-service>
    			<security:user name="admin" password="{noop}admin" authorities="ROLE_USER"/>
    		</security:user-service>
    	</security:authentication-provider>
    </security:authentication-manager>
    -->

 </beans>
UserDetailsService实现类编写
SpringSecurity已实现UserDetails接口,我们可以直接使用,UserInfo则为自定义的User类
没有符合配置文件要求的权限,我们也无法成功完成登录,故我们需要使用到权限类,SpringSecurity也为我们封装完毕
- UserService
package com.czy.ssm.service;

import org.springframework.security.core.userdetails.UserDetailsService;

public interface UserService extends UserDetailsService {
}
- UserService实现类
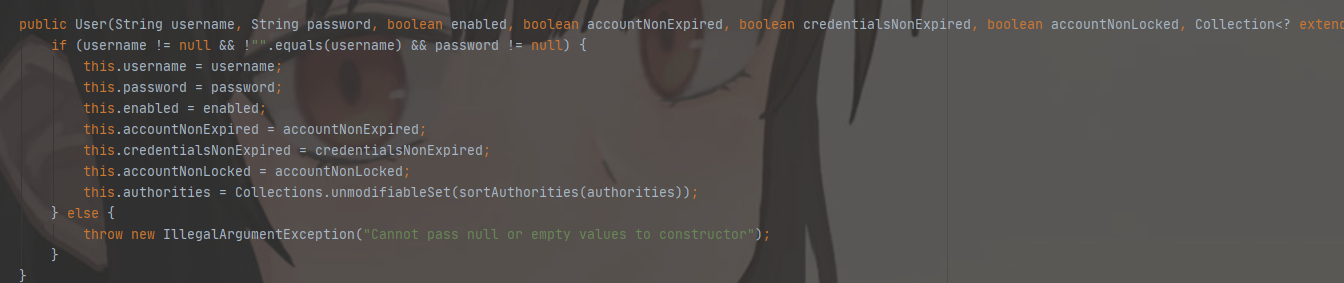
User对象使用如下构造函数:
package com.czy.ssm.service.impl;

import com.czy.ssm.dao.UserDao;
import com.czy.ssm.domain.Role;
import com.czy.ssm.domain.UserInfo;
import com.czy.ssm.service.UserService;
import org.springframework.beans.factory.annotation.Autowired;
import org.springframework.security.core.GrantedAuthority;
import org.springframework.security.core.authority.SimpleGrantedAuthority;
import org.springframework.security.core.userdetails.User;
import org.springframework.security.core.userdetails.UserDetails;
import org.springframework.security.core.userdetails.UsernameNotFoundException;
import org.springframework.stereotype.Service;

import java.util.ArrayList;
import java.util.List;

@Service("userService")
public class UserServiceImpl implements UserService {

    @Autowired
    private UserDao dao;

    @Override
    public UserDetails loadUserByUsername(String username) throws UsernameNotFoundException {
        UserInfo userInfo = dao.findByUsername(username);
        //处理自己的user对象,将其封装成UserDetails:UserInfo
        //User user = new User(userInfo.getUsername(), "{noop}"+userInfo.getPassword(), getAuthority(userInfo));
        User user = new User(userInfo.getUsername(), "{noop}"+userInfo.getPassword(), userInfo.getStatus() == 1, true, true, true,getAuthority(userInfo));
        return user;
    }

    //作用返回一个list集合,集合中装入的角色的权限
    public List<SimpleGrantedAuthority> getAuthority(UserInfo userInfo){
        List<SimpleGrantedAuthority> list = new ArrayList<SimpleGrantedAuthority>();
        for(Role role: userInfo.getRoles()){
            list.add(new SimpleGrantedAuthority("ROLE_"+role.getRoleName()));
        }
        return list;
    }
}

 浙公网安备 33010602011771号