cmake+vcpkg 实在是泰裤辣
使用导出方式
使用vcpkg
项目集成vcpkg
vcpkg执行
D:\Downloads\tset> vcpkg integrate install
Applied user-wide integration for this vcpkg root.
CMake projects should use: "-DCMAKE_TOOLCHAIN_FILE=C:/dev/vcpkg/scripts/buildsystems/vcpkg.cmake"

All MSBuild C++ projects can now #include any installed libraries. Linking will be handled automatically. Installing new libraries will make them instantly available.
然后我们只要把-DCMAKE_TOOLCHAIN_FILE这句代码加入到cmake构建语句中,即可完成集成vcpkg,如下所示
cmake -S . -B build -DCMAKE_TOOLCHAIN_FILE=C:/dev/vcpkg/scripts/buildsystems/vcpkg.cmake
最好每次执行cmake构建语句时将原来生成的build文件夹删掉,避免因使用原来的缓存文件而没有刷新环境变量导致找不到库
导入目标库
在vcpkg 安装,在最后会给出cmake的用法,如下所示
D:\Downloads\tset>vcpkg install fmt:x86-windows fmt:x64-windows
Computing installation plan...
The following packages are already installed:
    fmt[core]:x64-windows -> 10.0.0
    fmt[core]:x86-windows -> 10.0.0
fmt:x64-windows is already installed
fmt:x86-windows is already installed
Restored 0 package(s) from C:\Users\czl\AppData\Local\vcpkg\archives in 100 us. Use --debug to see more details.
Total install time: 1.14 ms
The package fmt provides CMake targets:

    find_package(fmt CONFIG REQUIRED)
    target_link_libraries(main PRIVATE fmt::fmt)

    # Or use the header-only version
    find_package(fmt CONFIG REQUIRED)
    target_link_libraries(main PRIVATE fmt::fmt-header-only)
我们把find_package、target_link_libraries加入CMakeLists.txt就行了,到这里就可以编译了,只是依赖了本地的vcpkg而已
导出目标库
之前那样会依赖本地的vcpkg,我们可以将我们想要的库都导出来,放到我们的项目目录中,这样就不会依赖本地环境
vcpkg导出命令
vcpkg export fmt:x86-windows fmt:x64-windows jsoncpp:x86-windows jsoncpp:x64-windows --raw --output-dir . --output vcpkg
vcpkg export是导出命令fmt:x86-windows fmt:x64-windows jsoncpp:x86-windows jsoncpp:x64-windows表示32位和64位都要打包,且同时可以导出多个库--raw以原始方式导出,写死的没什么好说的--output-dir <path>要导出在哪个目录--output vcpkg这个是要生成的包名 我这里用vcpkg
包里生成vcpkg.exe可以删掉
修改-DCMAKE_TOOLCHAIN_FILE
下面是导出语句的命令行输出
D:\Downloads\tset>vcpkg export fmt:x86-windows fmt:x64-windows jsoncpp:x86-windows jsoncpp:x64-windows  --raw --output-dir .  --output vcpkg
The following packages are already built and will be exported:
    fmt:x86-windows
    fmt:x64-windows
    jsoncpp:x86-windows
    jsoncpp:x64-windows
  * vcpkg-cmake:x64-windows
  * vcpkg-cmake-config:x64-windows
Additional packages (*) need to be exported to complete this operation.
Exporting vcpkg-cmake:x64-windows...
Exporting vcpkg-cmake-config:x64-windows...
Exporting fmt:x86-windows...
Exporting fmt:x64-windows...
Exporting jsoncpp:x86-windows...
Exporting jsoncpp:x64-windows...
Files exported at: D:\Downloads\tset\.\vcpkg
To use exported libraries in CMake projects, add -DCMAKE_TOOLCHAIN_FILE=D:/Downloads/tset/./vcpkg/scripts/buildsystems/vcpkg.cmake to your CMake command line.
接下来包生成的包复制到项目目录中,并将cmake构建语句中的-DCMAKE_TOOLCHAIN_FILE的值修改为<包所在目录>/<包名>/scripts/buildsystems/vcpkg.cmake即可
例子
下面通过一个使用了fmt、jsoncpp的项目,来演示如何在cmake中使用vcpkg
项目结构
│  CMakeLists.txt
│  compile.bat
│  main.cpp
│
└─sdk
    └─win
        └─vcpkg
源代码
main.cpp
#include <iostream>
#include <fmt/core.h>
#include <json/json.h>

int main() {
    int num = 42;
    std::string text = "Hello, fmt!";

    // 使用 fmt 库进行格式化输出
    std::string formatted = fmt::format("Number: {}, Text: {}", num, text);

    std::cout << formatted << std::endl;

        // 创建 JSON 对象
    Json::Value root;
    root["name"] = "John";
    root["age"] = 30;
    root["city"] = "New York";

    // 将 JSON 对象转换为 JSON 字符串
    Json::StreamWriterBuilder writer;
    std::string json_str = Json::writeString(writer, root);

    std::cout << "JSON String: " << json_str << std::endl;
    return 0;
}
vcpkg安装需要的库
vcpkg install fmt:x86-windows fmt:x64-windows jsoncpp:x86-windows jsoncpp:x64-windows
vcpkg导出需要的库
vcpkg export fmt:x86-windows fmt:x64-windows jsoncpp:x86-windows jsoncpp:x64-windows --raw --output-dir . --output vcpkg
删掉包里vcpkg.exe,将导出的包复制到项目目录的sdk/win中
构建项目
CMakeLists.txt
# 指定编译的最小版本
cmake_minimum_required(VERSION 3.0.0)

# 指定解决方案的名字 和版本
project(test VERSION 0.1.0)

# 添加可执行项目
add_executable(test main.cpp)


# 链接第三方库

find_package(jsoncpp CONFIG REQUIRED)
find_package(fmt CONFIG REQUIRED)

target_link_libraries(test PRIVATE JsonCpp::JsonCpp fmt::fmt)
编译脚本
compile.bat
SET WORKSPACE=%~dp0

SET BUILD_DIR=%WORKSPACE%\build

cmake -S %WORKSPACE% -B %BUILD_DIR% -DCMAKE_TOOLCHAIN_FILE=%WORKSPACE%sdk/win/vcpkg/scripts/buildsystems/vcpkg.cmake
cmake --build %BUILD_DIR%
到这里就结束了,vcpkg是跨平台的,macos的用法应该是一样的
这是这个例子的仓库地址,感兴趣的朋友可以尝试一下
使用vcpkg.json
安装特定依赖项的库
"dependencies": [{ "name": "ffmpeg", "features": ["ffmpeg"] }]
上面的字段表示安装ffmpeg库,并顺便构建ffmpeg可执行文件
为不同特性指定平台
{
  "dependencies": [
    {
      "name": "ffmpeg",
      "features": [
        "x264",
        {
          "name":"nvcodec",
          "platform": "windows"
        }

      ]
    }
  ]
}
如上所示,mac平台ffmpeg是没有nvcodec这个依赖项的,所以使用platform指定只在windows平台生效
安装特定版本的库
第一种方式
{
  "overrides": [
    {
      "name": "ffmpeg",
      "version": "5.1.2"
    }
  ],

"dependencies": [{ "name": "ffmpeg", "features": ["ffmpeg"] }]
,
  "builtin-baseline": "5fa0f075ea51f305b627ecd5e050a363707353ff"
}
overrides 规定了库的版本(这个库的所有版本可以在vcpkg的versions文件夹找到),然后执行命令行
vcpkg x-update-baseline
就可以更新builtin-baseline的值,这样就可以安装特定版本的库了
第二种方式
上面使用基线的方式只能针对一个库的版本进行调整
vcpkg.json
{
"dependencies": [{ "name": "ffmpeg", "features": ["ffmpeg"] }]
}
vcpkg-configuration.json
{
  "default-registry": {
    "kind": "git",
    "baseline": "8e7f6491ae3cae2f26eacadda80a45e548b2d9e8",
    "repository": "https://github.com/Microsoft/vcpkg"
  },"registries": [
    {
      "kind": "git",
      "baseline": "cbf4a6641528cee6f172328984576f51698de726",
      "repository": "https://github.com/Microsoft/vcpkg",
      "packages": [
        "boost*",
        "boost-*"
      ]
    },
        {
      "kind": "git",
      "baseline": "402bfa3a80dff46bdc812a9efddcfe3d63512e52",
      "repository": "https://github.com/Microsoft/vcpkg",
      "packages": [
       "ffmpeg*"
      ]
    }
  ]
}
default-registry 使用的是默认基线,registries 针对不同库使用不同的基线
基线的commit如何获取呢
git log "--format=%H %cd %s" --date=short --left-only -- versions/f-/ffmpeg.json
使用上面的语句可以查询对于库的提交信息

使用前面的commit就行了
安装特定平台的库
cmake -B build -S . -DVCPKG_TARGET_TRIPLET=x64-osx-dynamic -DCMAKE_TOOLCHAIN_FILE=/Users/admin/Applications/vcpkg/scripts/buildsystems/vcpkg.cmake
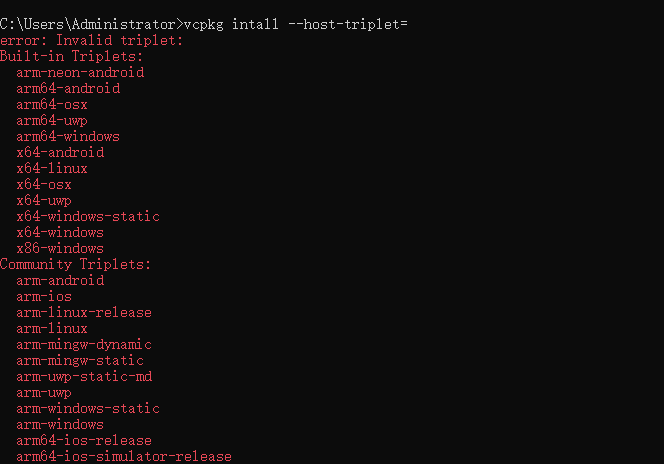
VCPKG_TARGET_TRIPLET传递值就可以安装特定平台,或者是static库或动态库,它的值可以使用vcpkg intall --host-triplet=查询

例子
下面通过一个使用了ffmpeg的项目,来演示如何在cmake中使用vcpkg,这个例子是在macos上的
项目结构
├── CMakeLists.txt
├── compile.sh
├── main.cpp
└── vcpkg.json
使用vcpkg.json配置所需要的库
vcpkg.json
{
  "overrides": [
    {
      "name": "ffmpeg",
      "version": "5.1.2"
    }
  ],

"dependencies": [{ "name": "ffmpeg", "features": ["ffmpeg"] }]
,
  "builtin-baseline": "5fa0f075ea51f305b627ecd5e050a363707353ff"
}
执行vcpkg x-update-baseline更新基线
构建项目
CMakeLists.txt
cmake_minimum_required(VERSION 3.18)

project(versionstest CXX)

add_executable(main main.cpp)

find_package(FFMPEG REQUIRED)
target_include_directories(main PRIVATE ${FFMPEG_INCLUDE_DIRS})
target_link_directories(main PRIVATE ${FFMPEG_LIBRARY_DIRS})
target_link_libraries(main PRIVATE ${FFMPEG_LIBRARIES})
编译脚本
compile.sh
VCPKG_PATH=$(which vcpkg)
echo $VCPKG_PATH$
cmake -B build -S . -DVCPKG_TARGET_TRIPLET=x64-osx-dynamic -DCMAKE_TOOLCHAIN_FILE=$VCPKG_PATH/../scripts/buildsystems/vcpkg.cmake
cmake --build build
在项目根目录(vcpkg.json所在目录)执行compile.sh即可
到这里就结束了,vcpkg是跨平台的,windows的用法应该是一样的


 浙公网安备 33010602011771号