从零开始写Makefile(0)
前言
之前写过一篇Linux0.11内核的Makefile的解析(Linux0.11之初识Makefile/build.c),通过分析Linus大神Makefile,总结了Makefile的构成以及部分规则,但如果只是看过几遍,了解一些语法,到真正要写的时候,我相信大部分人还是会无从下手。所以本系列文章的目的就是带大家从零开始一步一步写出一个高逼格的Makefile,相信写完之后,大家对Makefile是如何控制编译(这里的编译指的是宏观上源代码形成可执行文件的过程,包含gcc编译器的编译过程,后文请根据语境判断)会有一个更深的理解。
GCC工具链
既然是从零开始,我们打算从GCC和命令行开始讲起,看看可执行文件是如何产生的,了解这个过程是对编写Makefile有很大帮助的。
GCC(GNU Compiler Collection)工具链包括3个部分:
- gcc-core:即编译器gcc,用于把源代码(C、C++、Java等)转换成汇编代码。
- Binutils:一系列工具,包括链接器ld、汇编器as等,用于把汇编代码转换成可执行文件,还有一些辅助功能。
- glibc:C语言标准函数库。
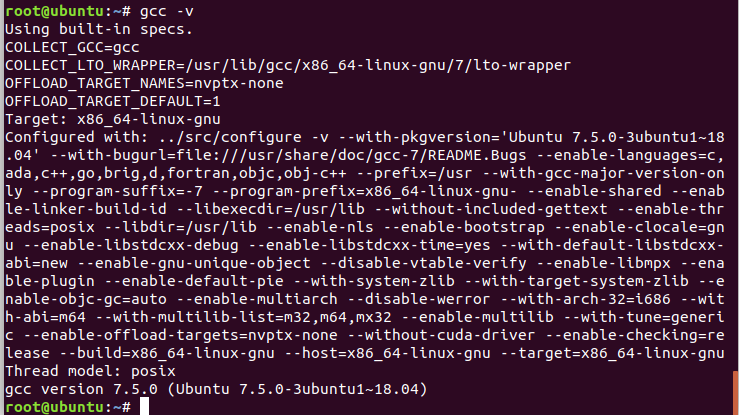
本系列文章中使用的环境为Ubuntu-18.04.2,已默认安装GCC编译器GCC 7.5.0,可通过如下命令查看:
gcc -v

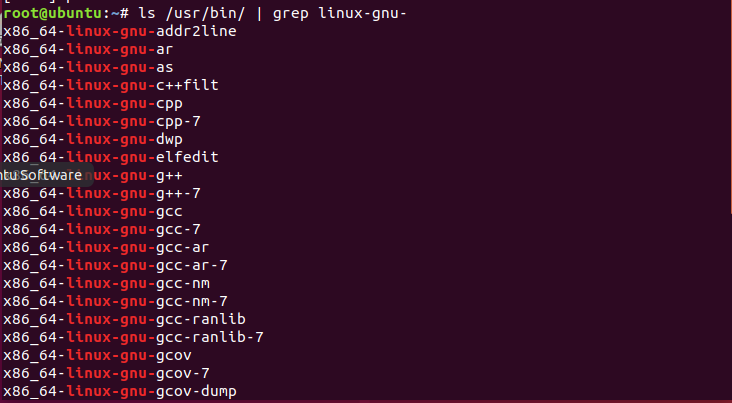
查看Binutils工具集:
ls /usr/bin/ | grep linux-gnu-

查看glibc库版本:
/lib/x86_64-linux-gnu/libc.so.6

一个编译实验
简单了解了GCC工具链后,我们开始我们的实验,首先随便创建一个目录用来存放我们的文件:
mkdir /home/HelloMakefile
进入上面的目录后,写一个简单的.C,推荐使用vim文本编辑器。
vim hello.c
#include <stdio.h>
void main(){
	printf("hello Makefile!\n");
}
用gcc命令将hello.c编译成可执行文件hello
gcc hello.c -o hello
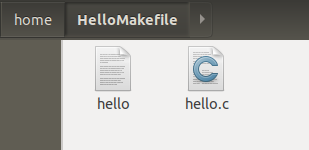
如果成功,不会有提示,我们在目录中可以查看到生成的文件。

接下来我们在目录中执行hello
./hello
#or 在任意目录 ./home/HelloMakefile/hello

编译过程简介
GCC的命令的语法格式为:
gcc [参数1] A文件 [参数2] B文件
常用参数和示例如下(参数1、2的位置在使用中可慢慢熟悉,不做说明):
-
-o(小写字母o):指定生成的可执行文件的名字(默认输出文件为a.out)。
#把.c源文件直接编译成可执行文件(.c -> 可执行文件) gcc hello.c -o hello -
-E:预处理。
#把.c预处理(.c -> .i) gcc –E hello.c –o hello.i -
-S:编译。
#把.i编译(.i -> .s) gcc –S hello.i –o hello.s -
-c:汇编。
#把.s汇编(.s -> .o)
gcc –c hello.s –o hello.o
实际上直接编译可执行文件的命令可等效为上述全部命令的和,即
gcc hello.c -o hello
# ↑↑↑↑↑↑↑  直接编译成可执行文件
# ↓↓↓↓↓↓↓  等效命令
gcc –E hello.c –o hello.i #预处理
gcc –S hello.i –o hello.s #编译
gcc –c hello.s –o hello.o #汇编
gcc hello.o –o hello      #链接
从上述命令可以看出,编译.c源文件的过程分为以下4步:
- 预处理(Preprocessing)。将
include、define合并为C代码,生成.i文件。 - 编译(Compilation)。通过编译器
gcc把C代码(.i)转化为汇编代码(.s)。 - 汇编(Assemble)。通过汇编器
as把汇编代码(.s)转化为机器代码(.o)。 - 链接(Linking)。通过链接器
ld把机器代码(.o)链接为可执行文件。

预处理过程
看一下预处理阶段做了哪些事情,这里我们修改hello.c,加入一个define。
#include <stdio.h>

#define TEST 0

void main(){
	printf("hello Makefile!\n");
	printf("%d\n", TEST);
}
执行命令:
gcc –E hello.c –o hello.i
打开生成的hello.i,我们看到文件中是一些注释、typedef、extern,这是把.c中包含的头文件的内容汇总了,还可以看到使用宏定义的地方,被替换成了宏定义的内容。
......

# 1 "/usr/lib/gcc/x86_64-linux-gnu/7/include/stddef.h" 1 3 4
# 216 "/usr/lib/gcc/x86_64-linux-gnu/7/include/stddef.h" 3 4

# 216 "/usr/lib/gcc/x86_64-linux-gnu/7/include/stddef.h" 3 4
typedef long unsigned int size_t;
# 34 "/usr/include/stdio.h" 2 3 4

# 1 "/usr/include/x86_64-linux-gnu/bits/types.h" 1 3 4
# 27 "/usr/include/x86_64-linux-gnu/bits/types.h" 3 4
# 1 "/usr/include/x86_64-linux-gnu/bits/wordsize.h" 1 3 4
# 28 "/usr/include/x86_64-linux-gnu/bits/types.h" 2 3 4


typedef unsigned char __u_char;
typedef unsigned short int __u_short;
typedef unsigned int __u_int;
typedef unsigned long int __u_long;

......

# 1 "/usr/include/x86_64-linux-gnu/bits/types/__mbstate_t.h" 1 3 4
# 13 "/usr/include/x86_64-linux-gnu/bits/types/__mbstate_t.h" 3 4
typedef struct
{
  int __count;
  union
  {
    unsigned int __wch;
    char __wchb[4];
  } __value;
} __mbstate_t;
# 22 "/usr/include/x86_64-linux-gnu/bits/_G_config.h" 2 3 4

......


enum __codecvt_result
{
  __codecvt_ok,
  __codecvt_partial,
  __codecvt_error,
  __codecvt_noconv
};

.......

extern struct _IO_FILE_plus _IO_2_1_stdin_;
extern struct _IO_FILE_plus _IO_2_1_stdout_;
extern struct _IO_FILE_plus _IO_2_1_stderr_;
# 337 "/usr/include/x86_64-linux-gnu/bits/libio.h" 3 4

......

# 868 "/usr/include/stdio.h" 3 4

# 2 "hello.c" 2

# 5 "hello.c"
void main(){
 printf("hello Makefile!\n");
 printf("%d\n", 0);
}
编译过程
编译过程的目的是生成汇编代码,但编译器gcc只会检查每一个文件的语法,并不做文件之间的关联检查,所以即使你调用了一个无中生有的函数,也不会报错。我们修改hello.c:
#include <stdio.h>

#define TEST 0

void main(){
	printf("hello Makefile!\n");
	printf("%d\n", TEST);
	helloEveryone();
}
然后执行下面命令(可二选一,我们用第一种):
# 先预处理,后编译
gcc -E hello.c -o hello.i
gcc -S hello.i -o hello.s

# 直接编译
gcc -S hello.c -o hello.s
可以看到预处理是不报任何错误的,而编译报了一个warning。

(悬崖边立着一块警示牌写着warning,然后程序员跳了下去......)

查看hello.s的内容,生成的是面向x86的汇编代码,并且的确调用了helloEveryone():
	.file	"hello.c"
	.text
	.section	.rodata
.LC0:
	.string	"hello Makefile!"
.LC1:
	.string	"%d\n"
	.text
	.globl	main
	.type	main, @function
main:
.LFB0:
	.cfi_startproc
	pushq	%rbp
	.cfi_def_cfa_offset 16
	.cfi_offset 6, -16
	movq	%rsp, %rbp
	.cfi_def_cfa_register 6
	leaq	.LC0(%rip), %rdi
	call	puts@PLT
	movl	$0, %esi
	leaq	.LC1(%rip), %rdi
	movl	$0, %eax
	call	printf@PLT
	movl	$0, %eax
	call	helloEveryone@PLT
	nop
	popq	%rbp
	.cfi_def_cfa 7, 8
	ret
	.cfi_endproc
.LFE0:
	.size	main, .-main
	.ident	"GCC: (Ubuntu 7.5.0-3ubuntu1~18.04) 7.5.0"
	.section	.note.GNU-stack,"",@progbits
汇编过程
汇编过程将生成机器代码,但不进行连接。执行命令(我们用第一种):
# 先预处理,后编译,最后汇编
gcc -E hello.c -o hello.i
gcc -S hello.i -o hello.s
gcc -c hello.s -o hello.o

# 直接汇编
gcc -c hello.c -o hello.o
如果我们使用上一小节的源文件进行汇编,会看到依然没有报错。通过readelf工具可以查看生成的hello.o:
root@ubuntu:/home/HelloMakefile# readelf -a hello.o
ELF Header:
  Magic:   7f 45 4c 46 02 01 01 00 00 00 00 00 00 00 00 00
  Class:                             ELF64
  Data:                              2's complement, little endian
  Version:                           1 (current)
  OS/ABI:                            UNIX - System V
  ABI Version:                       0
  Type:                              REL (Relocatable file)
  Machine:                           Advanced Micro Devices X86-64
  Version:                           0x1
  Entry point address:               0x0
  Start of program headers:          0 (bytes into file)
  Start of section headers:          888 (bytes into file)
  Flags:                             0x0
  Size of this header:               64 (bytes)
  Size of program headers:           0 (bytes)
  Number of program headers:         0
  Size of section headers:           64 (bytes)
  Number of section headers:         13
  Section header string table index: 12

Section Headers:
  [Nr] Name              Type             Address           Offset
       Size              EntSize          Flags  Link  Info  Align
  [ 0]                   NULL             0000000000000000  00000000
       0000000000000000  0000000000000000           0     0     0
  [ 1] .text             PROGBITS         0000000000000000  00000040
       0000000000000033  0000000000000000  AX       0     0     1
  [ 2] .rela.text        RELA             0000000000000000  00000280
       0000000000000078  0000000000000018   I      10     1     8
  [ 3] .data             PROGBITS         0000000000000000  00000073
       0000000000000000  0000000000000000  WA       0     0     1
  [ 4] .bss              NOBITS           0000000000000000  00000073
       0000000000000000  0000000000000000  WA       0     0     1
  [ 5] .rodata           PROGBITS         0000000000000000  00000073
       0000000000000014  0000000000000000   A       0     0     1
  [ 6] .comment          PROGBITS         0000000000000000  00000087
       000000000000002a  0000000000000001  MS       0     0     1
  [ 7] .note.GNU-stack   PROGBITS         0000000000000000  000000b1
       0000000000000000  0000000000000000           0     0     1
  [ 8] .eh_frame         PROGBITS         0000000000000000  000000b8
       0000000000000038  0000000000000000   A       0     0     8
  [ 9] .rela.eh_frame    RELA             0000000000000000  000002f8
       0000000000000018  0000000000000018   I      10     8     8
  [10] .symtab           SYMTAB           0000000000000000  000000f0
       0000000000000150  0000000000000018          11     9     8
  [11] .strtab           STRTAB           0000000000000000  00000240
       000000000000003e  0000000000000000           0     0     1
  [12] .shstrtab         STRTAB           0000000000000000  00000310
       0000000000000061  0000000000000000           0     0     1
Key to Flags:
  W (write), A (alloc), X (execute), M (merge), S (strings), I (info),
  L (link order), O (extra OS processing required), G (group), T (TLS),
  C (compressed), x (unknown), o (OS specific), E (exclude),
  l (large), p (processor specific)

There are no section groups in this file.

There are no program headers in this file.

There is no dynamic section in this file.

Relocation section '.rela.text' at offset 0x280 contains 5 entries:
  Offset          Info           Type           Sym. Value    Sym. Name + Addend
000000000007  000500000002 R_X86_64_PC32     0000000000000000 .rodata - 4
00000000000c  000b00000004 R_X86_64_PLT32    0000000000000000 puts - 4
000000000018  000500000002 R_X86_64_PC32     0000000000000000 .rodata + c
000000000022  000c00000004 R_X86_64_PLT32    0000000000000000 printf - 4
00000000002c  000d00000004 R_X86_64_PLT32    0000000000000000 helloEveryone - 4

Relocation section '.rela.eh_frame' at offset 0x2f8 contains 1 entry:
  Offset          Info           Type           Sym. Value    Sym. Name + Addend
000000000020  000200000002 R_X86_64_PC32     0000000000000000 .text + 0

The decoding of unwind sections for machine type Advanced Micro Devices X86-64 is not currently supported.

Symbol table '.symtab' contains 14 entries:
   Num:    Value          Size Type    Bind   Vis      Ndx Name
     0: 0000000000000000     0 NOTYPE  LOCAL  DEFAULT  UND
     1: 0000000000000000     0 FILE    LOCAL  DEFAULT  ABS hello.c
     2: 0000000000000000     0 SECTION LOCAL  DEFAULT    1
     3: 0000000000000000     0 SECTION LOCAL  DEFAULT    3
     4: 0000000000000000     0 SECTION LOCAL  DEFAULT    4
     5: 0000000000000000     0 SECTION LOCAL  DEFAULT    5
     6: 0000000000000000     0 SECTION LOCAL  DEFAULT    7
     7: 0000000000000000     0 SECTION LOCAL  DEFAULT    8
     8: 0000000000000000     0 SECTION LOCAL  DEFAULT    6
     9: 0000000000000000    51 FUNC    GLOBAL DEFAULT    1 main
    10: 0000000000000000     0 NOTYPE  GLOBAL DEFAULT  UND _GLOBAL_OFFSET_TABLE_
    11: 0000000000000000     0 NOTYPE  GLOBAL DEFAULT  UND puts
    12: 0000000000000000     0 NOTYPE  GLOBAL DEFAULT  UND printf
    13: 0000000000000000     0 NOTYPE  GLOBAL DEFAULT  UND helloEveryone

No version information found in this file.
链接过程
链接过程的目的是将机器代码链接成可执行文件。
# 先预处理,后编译,最后汇编
gcc -E hello.c -o hello.i
gcc -S hello.i -o hello.s
gcc -c hello.s -o hello.o
gcc hello.o -o hello

# 直接生成可执行文件
gcc hello.c -o hello.o
如果用上一小节的hello.c,会报helloEveryone无法找到的错误。

由前面的实验可以知道,一直到链接之前的过程,对于每一个源文件来说,都是独立的,编译器只去检查文件的语法,而到了链接阶段,链接器需要找到每一个元素的位置,建立映射,如果找不到某个函数,就会报错。
链接的形式分为两种:
- 动态链接,可执行程序运行时去加载引用的库,例如
printf的.so。 - 静态链接,编译阶段把所用到的库合成到可执行性程序中。
我们将hello.c改正确,并在编译时加入--static进行静态编译:
gcc hello.c -o hello_static --static
可以看到静态可执行文件比动态可执行文件大很多。

用工具ldd查看可执行文件的依赖库:

显示动态编译后的hello运行需要加载一些库,其中lib.so.6就是包含printf的.so,而静态编译后的hello_s不是一个动态可执行文件。
小结
本篇文章介绍了GCC工具链及可执行文件形成的过程,并且通过一个编译实验产生了一个可执行文件。有了这一篇的基础,我们就可以慢慢从零开始写Makefile了!


