Lab VPC配置实例
vPC介绍:
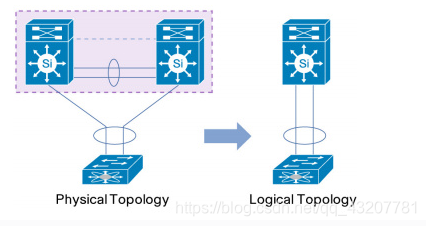
vPC(Virtual Port-Channel)是Cisco Nexus系列交换机中的一个特性。它支持一个跨机箱的二层Port-Channel。对于第三方设备来说(交换机或服务器)物理上是连接到了两台交换机,但逻辑上是一台交换机。

vPC的优势:
1.消除STP阻塞端口;
2.使用所有可用的链路带宽;
3.允许服务器双主上连;
4.当链路或设备失效后提供了快速的收敛;
5.为服务器提供了双active的网关;
VPC术语
vPC Peer:启用vPC的交换机被称为vPC的 Peer。
vPC domain:两台启用vPC的交换机所有的逻辑域
vPC Peer Keepalive Link:Peer Keepalive link是一个三层链路,用于在Peer-link失效后检测vPC Peer是否存活。
vPC Peer Link:用于传输vPC控制层面的流量 ,包括同步mac地址表、vpc成员信息、IGMP信息。
Orphan Port:孤立端口,没有加入vpc的端口。
vPC Member Port:加入vpc的端口,是一个Port-Channel接口。
VPC防环
vPC执行一个数据层面的防环来代替控制层面的STP。vPC peer-link被使用在两台vPC设备之间同步mac地址、vPC成员状态信息和IGMP。从vPC member port进来的流量,穿越vpc peer-link之后,不会再被允许从任何vPC Member port发出,但可以从其实接口(L3 Port或孤立端口转发)。vPC基于这样的机制来进行防环。

VPC
vPC 成员端口失效
如果一个vPC member port失效,和普通的Port-channel机制一样,另一个端口会继续转发数据。
vPC Peer Link失效
当Peer link失效以后,vpc设备会通过peer keepalive link来检测Primary交换机是否存活,如果Secondary交换机能够继续收到Primary交换机发过来的信息,表示Primary交换机未宕机,则Secondary Peer会shutdown所有vpc member port,Primary交换机继续转发流量。
vPC Primary Switch 失效
如果Primary交换机失效,Secondary交换机会变成Primary,继续转发流量。vPC role不支持抢占,Priority越小越优先。
vPC Peer keepalive link和 Peer link同时失效
当Peer keepalive linke和Peer Link同时失效以后,Secondary交换机也会运行在Priamry模式下,两台交换机都会转发流量。
vPC Peer keepalive失效
只有Peer keepalive link失效并不会影响vpc的工作。
vPC和FHRP
如果两台交换机是汇聚或核心交换机的话,一定会使用FHRP(First Hot Redundant Protocol)来保障三层的冗余。当启用了vPC之后,在两台vPC交换机上开启HSRP或VRRP,这时HSRP/VRRP是控制层面一个是Active,一个是Standby,由Active的交换机来响应ARP的请求;在数据转发层面,两台交换机都是Active,都在转发数据。
When running HSRP/VRRP in active-active mode (data plane standpoint), aggressive timers can be
relaxed: use the default HSRP/VRRP timers.
● Define the SVI associated with FHRP/VRRP as passive routing interface in order to avoid forming routing adjacency over vPC peer-link.
● Define vPC primary peer device as the active HSRP/VRRP instance and vPC secondary peer device as
standby HSRP/VRRP (from control plane standpoint) for ease of operations.
● Disable ip redirect on the interface VLAN where HSRP/VRRP is configured (command is no ip redirect).
This is a general best practice related to HSRP/VRRP
vPC Configuration:
Step1:Enable the vPC feature.
N5k-1(config)# feature vpc
N5k-1(config)# feature lacp
Step2:Create a VLAN.
N5k-1(config)#vlan 101
Step3:Create the vPC domain
N5k-1(config)# vpc domain 1
Step4:Configure the vPC role priority (optional).
N5k-1(config-vpc-domain)# role priority 1000
Step5:Configure the peer keepalive link. The management interface IP address for Cisco Nexus 5000 Series Switch 2 is 192.168.1.1
N5k-1(config-vpc-domain)# peer-keepalive destination 192.168.1.2 source 192.168.1.1 vrf PKL
Step 6. Configure the vPC peer link. Note that, as for a regular interswitch trunk, trunking must be turned on for the VLANs to which the vPC member port belongs.
N5k-1(config-vpc-domain)# int ethernet 1/17-18
N5k-1(config-if-range)# channel-group 1 mode active
N5k-1(config-if-range)# int po1
N5k-1(config-if)# vpc peer-link
N5k-1(config-if)# switchport mode trunk
N5k-1(config-if)# switchport trunk allowed vlan 1,101

