JQuery
JQuery
1. Jquery其实就是一个类库,集成了DOM/BOM/JavaScript的类库
http://jquery.cuishifeng.cn/ 这个网站里有所有的jQuery的方法
2. 查找元素
jQuery里有:选择器、筛选器
关于JQuery的版本
关于jQuery的版本:(现在一共有三大版本)
1系列版本
2系列版本
3系列版本
三者的区别是:1系列兼容ie的各个版本、2系列以及3系列只能支持ie8以上的浏览器
所以选择1系列,现在最新的是1.12.4版本
jQuery的导入方式
<script src="jquery-1.12.4.js"></script>
调用的时候有两种方式:
$或者jquery
下面是一个基本的例子
<head>
    <meta charset="UTF-8">
    <title>Title</title>
    <script src="jquery-1.12.4.js"></script>
</head>
<body>
    <div id="i1">test</div>
    <script src="jquery-1.12.4.js"></script>
    <script>
        console.log($("#i1"))
        console.log(jQuery("#i1"))
    </script>
</body>
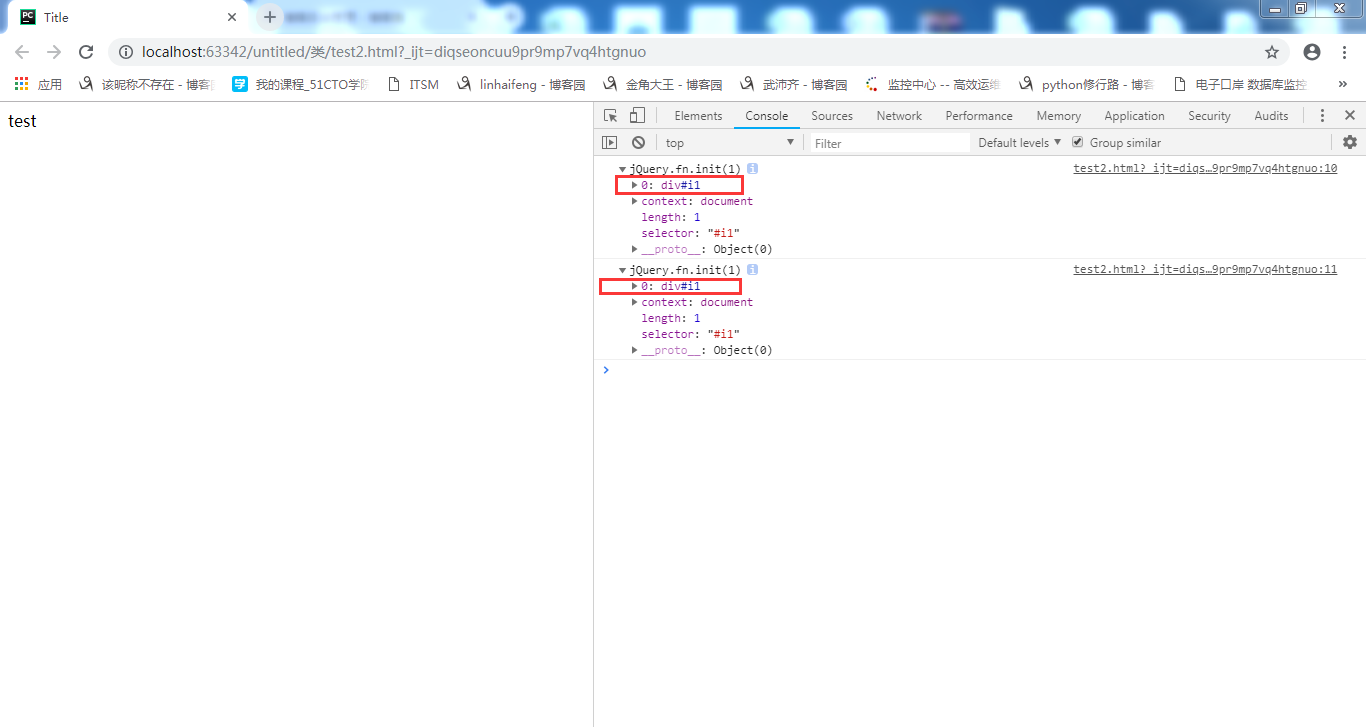
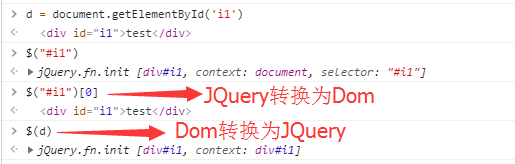
jQuery和Dom获取标签的区别即转换
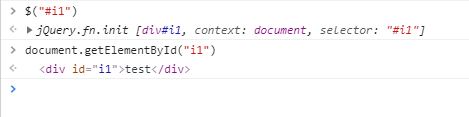
还是利用上面的例子,我们可以理解为jQuery获取的是一个jQuery对象,而dom获取的直接是内容,两者之间可以相互转换
转换方法:
jQuery转换为Dom:jQuery对象[0]就可以转换为Dom内容
Dom转换为jQuery对象:$(Dom内容)
转换例子:
选择器
基本
选择器直接找到某个或者某类标签
1. id 通过id查找标签
<div id="i1"></div>
$("#id")
2. class通过class查找标签
<div class="c1"></div>
$(".c1")
3. 通过标签名直接查找
<div class="c1">
    <a>zzz</a>
    <a>xxx</a>
</div>
<div class="c2">
    <a>aaa</a>
</div>
找到所有的a标签
$("a")
4. 组合查找
<div class="c1">
    <a>zzz</a>
    <a>xxx</a>
</div>
<div class="c2">
    <a>aaa</a>
    <div>bbb</div>
</div>
找到所有的a标签以及class=c1以及class=c2的标签
$("a,.c1,.c2")
层级
1、$(".c1 a") 中间用一个空格隔开,表示子子孙孙的找
如下例所示:
<head>
    <meta charset="UTF-8">
    <title>Title</title>
    <script src="jquery-1.12.4.js"></script>
</head>
<body>
    <div class = 'c1'>
        <div>
            <a>bbbb</a>
        </div>
       <a>zzz</a>
       <a>zzz</a>
    </div>
</body>
查找class = 'c1'中的所有的a标签
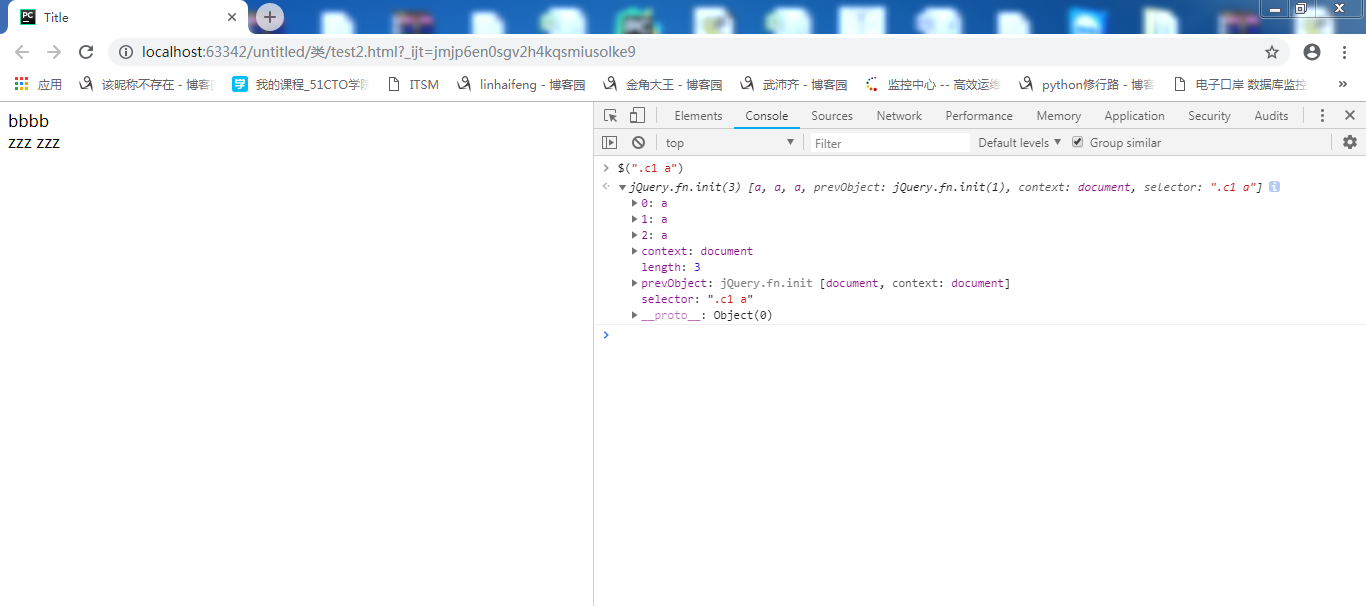
如上所示,找到了c1所在div中的所有的a标签
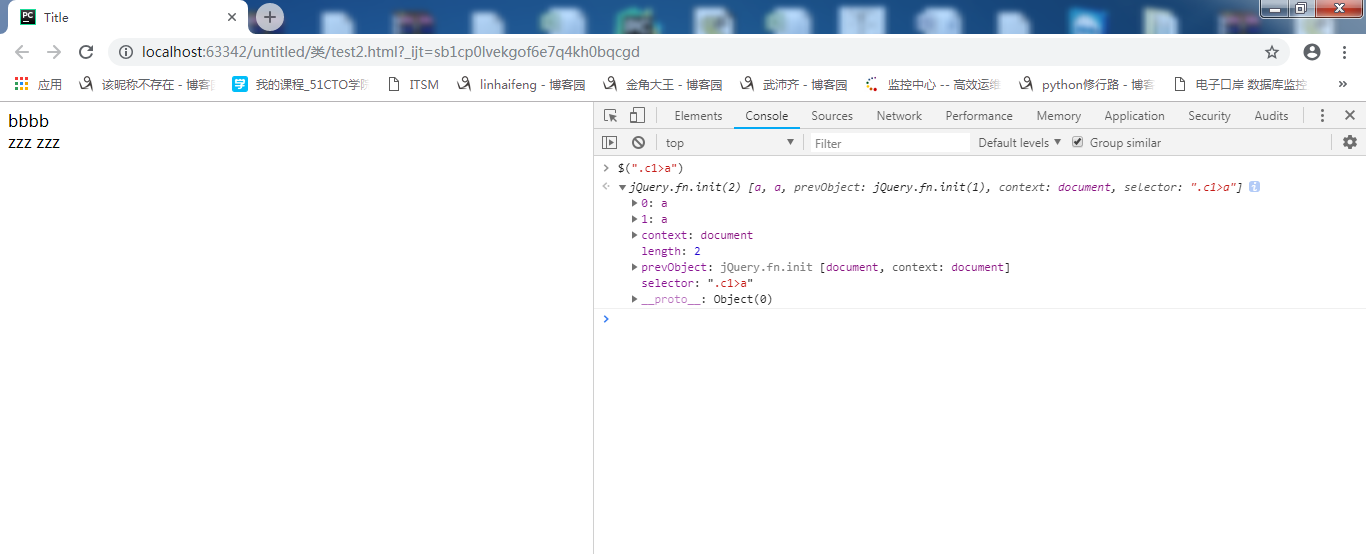
2. $(".c1>a")查找儿子标签
基本筛选器
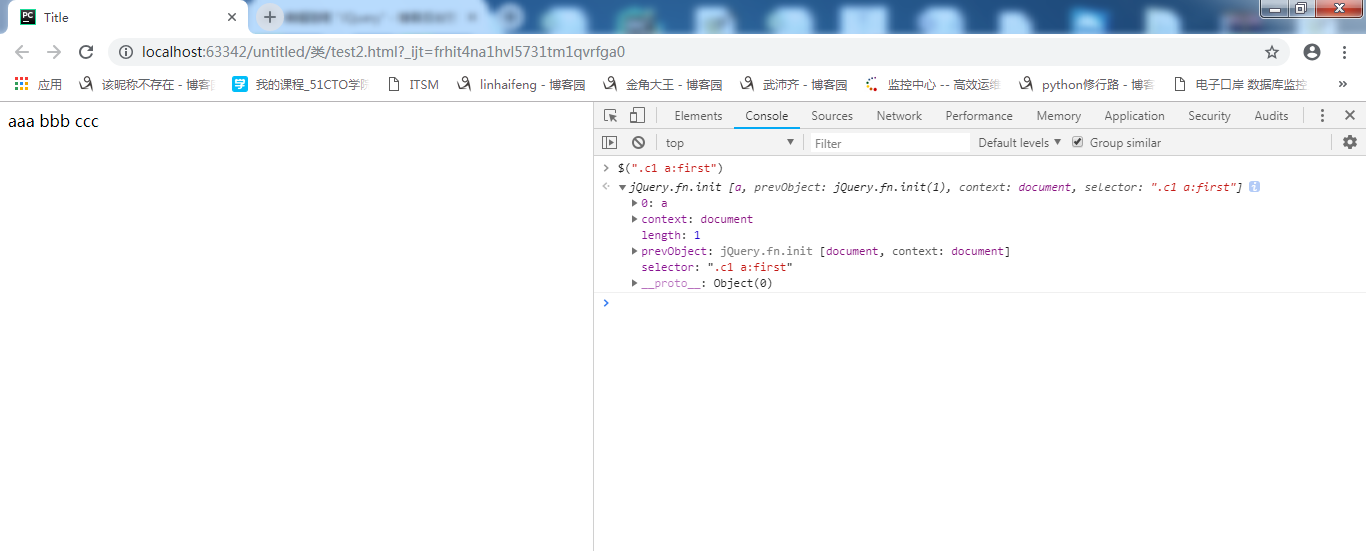
查找多个标签中的第一个,通过:first
<head>
    <meta charset="UTF-8">
    <title>Title</title>
    <script src="jquery-1.12.4.js"></script>
</head>
<body>
    <div class="c1">
        <a>aaa</a>
        <a>bbb</a>
        <a>ccc</a>
    </div>
</body>
查找c1下面的第一个a标签
通过的这里存在:last查找最后一个:even奇数位,:odd偶数位
:eq(index),index从0开始
:gt(index)
属性
通过属性查找标签
<head>
    <meta charset="UTF-8">
    <title>Title</title>
    <script src="jquery-1.12.4.js"></script>
</head>
<body>
    <div class = 'c1'>
       <a name = 'zs'>zzz</a>
       <a name = 'ls'>bbb</a>
       <a name = 'ww'>qqq</a>
    </div>
</body>
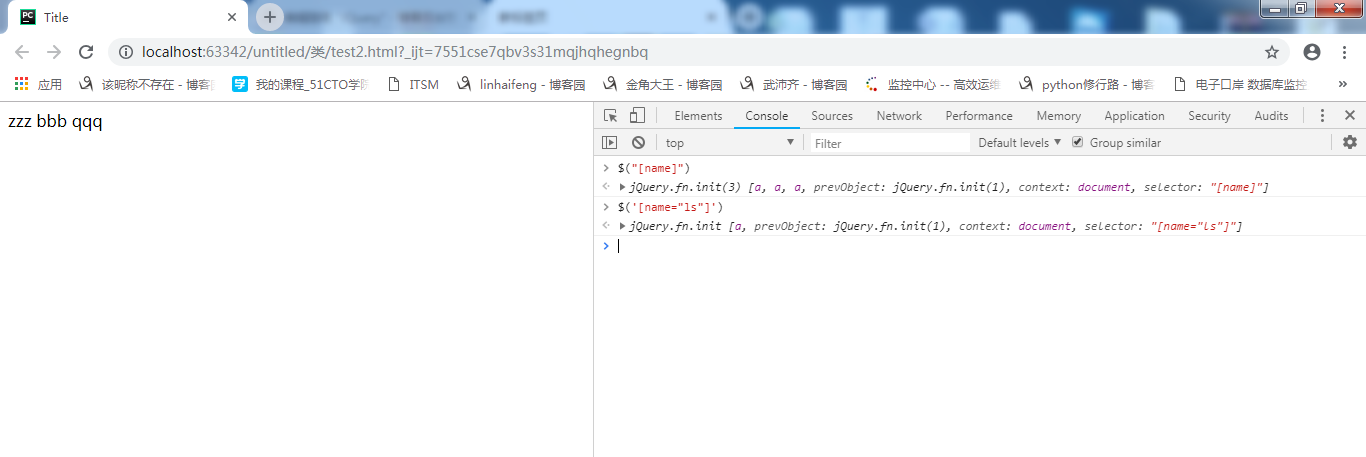
这里需要记住:
$('[name]') 查找具有name属性的标签
$('[name="ls"]') 查找具有name属性并且值为ls的标签
表单对象属性
$(':enabled')
:disabled
:checked
:selected
实现多选、反选及取消例子
<!DOCTYPE html>
<html lang="en">
<head>
    <meta charset="UTF-8">
    <title>Title</title>
</head>
<body>
    <input type="button" value="全选" onclick="checkALL()">
    <input type="button" value="取消" onclick="cancleALL()">
    <input type="button" value="反选" onclick="reverseALL()">
    <table id ="tb1" border="1">
        <thead>
        <tr>
            <th>选项</th>
            <th>IP</th>
            <th>PORT</th>
        </tr>
        </thead>

        <tbody>
        <tr>
            <td><input type="checkbox"></td>
            <td>1.1.1.1</td>
            <td>80</td>
        </tr>
        <tr>
            <td><input type="checkbox"></td>
            <td>1.1.1.1</td>
            <td>80</td>
        </tr>
        <tr>
            <td><input type="checkbox"></td>
            <td>1.1.1.1</td>
            <td>80</td>
        </tr>
        <tr>
            <td><input type="checkbox"></td>
            <td>1.1.1.1</td>
            <td>80</td>
        </tr>
        </tbody>
    </table>

    <script src="jquery-1.12.4.js"></script>
    <script>
        function checkALL() {
            $("#tb1 :checkbox").prop("checked",true)
        }
        function cancleALL() {
            $("#tb1 :checkbox").prop("checked",false)
        }
        function reverseALL() {
            $("#tb1 :checkbox").each(function () {

//                反选这里有三种方式,第一种方式:
//                if(this.checked){
//                    this.checked=false
//                }
//                else{
//                    this.checked = true
//                }
//               第二种方式:
//                if($(this).prop("checked")){
//                    $(this).prop("checked",false)
//                }
//                else{
//                    $(this).prop("checked",true)
//                }
//                第三种方式:通过三元运算方式
                v = $(this).prop("checked")?false:true;
                $(this).prop("checked",v)
            })
        }
    </script>
</body>
</html>
这里的反选一共用了三种方法。
这里有几个只是需要知道:
$("#tb1 :checkbox").prop("checked") //获取值
$("#tb1 :checkbox").prop("checked",true) //设置值
JQuery方法内置循环:$("#tb :checkbox").xxx
v = $(this).prop("checked")?false:true;
并且要切记一个问题$("#tb1 :checkbox") #tb1和:checkbox之间要有空格
后台左侧菜单例子
实现代码如下
<!DOCTYPE html>
<html lang="en">
<head>
    <meta charset="UTF-8">
    <title>Title</title>
    <style>
        .header{
            background-color: black;
            color: wheat;
        }
        .content{
            min-height: 50px;
        }
        .hide{
            display: none;
        }
    </style>
</head>
<body>
    <div style="height:400px;width: 200px;border: 1px solid #dddddd">
        <div class="item">
            <div class="header">标题一</div>
            <div id="i1" class="content hide">内容</div>
        </div>
        <div class="item">
            <div class="header">标题二</div>
            <div class="content hide">内容</div>
        </div>

        <div class="item">
            <div class="header">标题三</div>
            <div class="content hide">内容</div>
        </div>
    </div>
    <script src="jquery-1.12.4.js"></script>
    <script>
        $(".header").click(function () {
//            $(this).next().removeClass('hide')
//            $(this).parent().siblings().find('.content').addClass('hide')
            $(this).next().removeClass('hide').parent().siblings().find('.content').addClass('hide')
        })
    </script>
</body>
</html>
这里有几个知识需要注意:
$(this).next().removeClass('hide').parent().siblings().find('.content').addClass('hide')这种编程方式叫做链式编程
还有就是jQuery的绑定事件的方式:
$(".header").click通过这种方式就可以给所有的class=header的标签绑定click事件
筛选器中的几个用法:
$(this).next() 下一个
$(this).prev() 上一个
$(this).parent() 父
$(this).children() 孩子
$('#i1').siblings() 兄弟
$('#i1').find('#i1') 子子孙孙中查找
jQuery添加和移除样式方法:
$('#i1').addClass(..)
$('#i1').removeClass(..)
筛选
$('#i1').next()
$('#i1').nextAll()
$('#i1').nextUntil('#ii1')
$('#i1').prev()
$('#i1').prevAll()
$('#i1').prevUntil('#ii1')
$('#i1').parent()
$('#i1').parents()
$("#i1").parentsUntil()
$('#i1').children()
$('#i1').siblings()
$('#i1').find()
关于文本操作
$(..).text() //获取文本内容
$(..).text(“<a>1</a>”) // 设置文本内容
$(..).html()
$(..).html("<a>1</a>")
对于input系列以及textarea 以及select获取和设置是通过val
$(..).val()
$(..).val(..)
样式操作
removeClass //删除样式
addClass //添加样式
toggleClass
这里通过toggleClass可以实现一个开灯关灯的效果
代码例子如下:
<!DOCTYPE html>
<html lang="en">
<head>
    <meta charset="UTF-8">
    <title>Title</title>
    <style>
        .hide{
            display: none;
        }

    </style>
</head>
<body>
    <input id = "i1" type="button" value="开/关">
    <div class="c1 hide">aaa</div>
    <script src="jquery-1.12.4.js"></script>
    <script>
        $("#i1").click(function () {
//            if($(".c1").hasClass('hide')){
//                $(".c1").removeClass('hide')
//            }else{
//                $(".c1").addClass('hide')
//            }
              $(".c1").toggleClass('hide');
        })

    </script>
</body>
</html>
实现效果如下
默认情况下:

当点击 开/关图标时:

代码中注释的部分:
//            if($(".c1").hasClass('hide')){
//                $(".c1").removeClass('hide')
//            }else{
//                $(".c1").addClass('hide')
//            }
实现的效果和下面代码是一样的:
$(".c1").toggleClass('hide');
属性操作
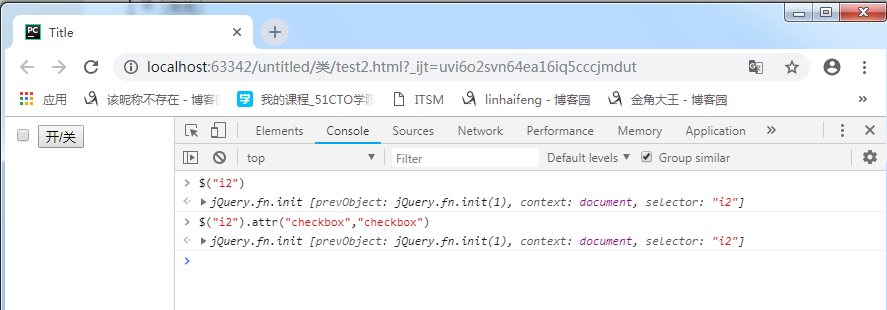
$(..).attr() 专门用于做自定义属性操作,可以获取属性值,设置属值
$(..).removeAttr 可以删除属性
例子如下:
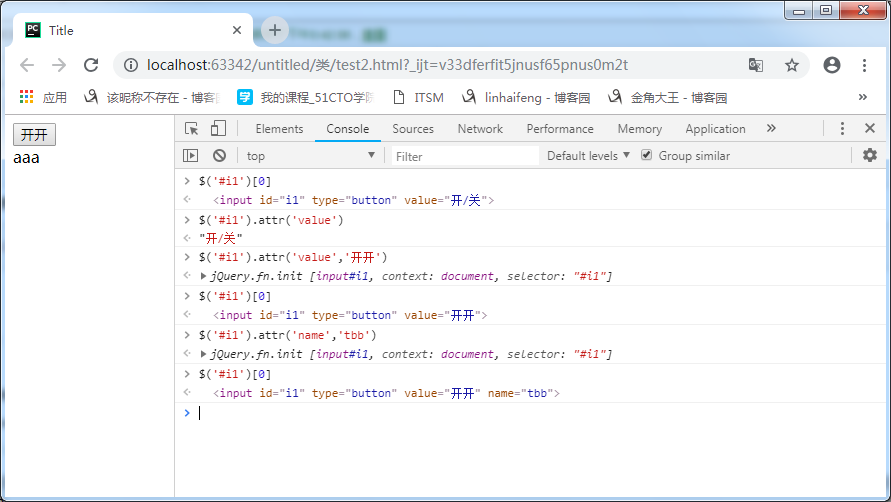
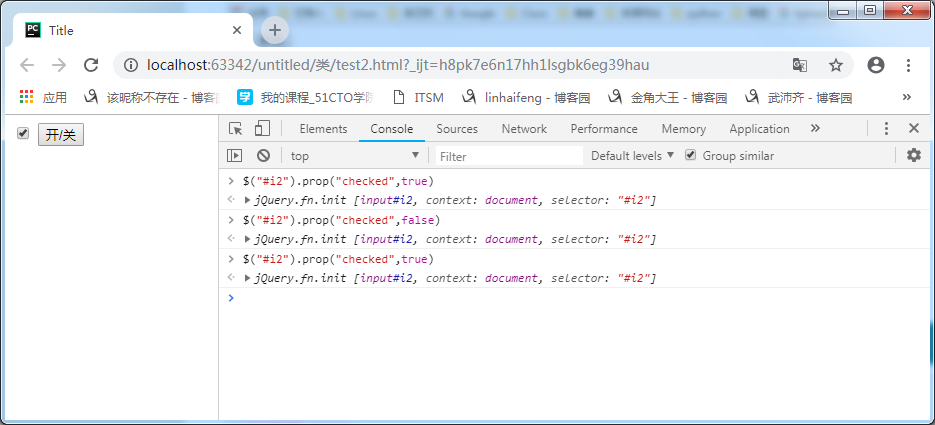
$(..).prop 专门用于checkbox,radio做操作
在3版本以下的jQuery中存在一个问题,效果如下:
当设置为选中后再取消:
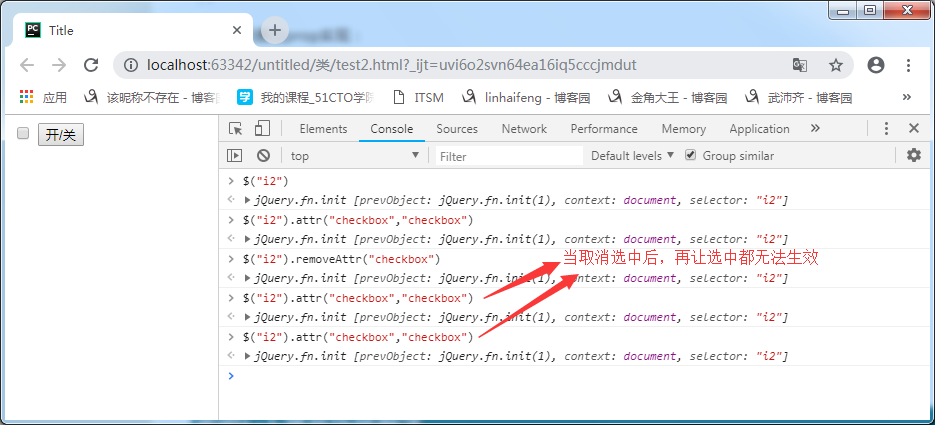
所以这里通过prop实现:
模块对话框升级版例子
<!DOCTYPE html>
<html lang="en">
<head>
    <meta charset="UTF-8">
    <title>Title</title>
    <style>
        .hide{
            display: none;
        }
        .modal{
            position: fixed;
            top: 50%;
            left: 50%;
            width: 500px;
            height: 400px;
            margin-left: -250px;
            margin-top: -250px;
            background-color: #eeeeee;
            z-index: 10;
        }
        .shadow{
            position: fixed;
            top: 0;
            left: 0;
            right: 0;
            bottom: 0;
            opacity: 0.6;
            background-color: black;
            z-index: 9;
        }
    </style>
</head>
<body>
    <a onclick="addElement();">添加</a>

    <table border="1" id="tb">
        <tr>
            <td target="hostname">1.1.1.11</td>
            <td target="port">80</td>
            <td target="ip">1.1.1.11</td>
            <td>
                <a class="edit">编辑</a> | <a class="del">删除</a>
            </td>
        </tr>
        <tr>
            <td target="hostname">1.1.1.12</td>
            <td target="port">80</td>
            <td target="ip">1.1.1.12</td>
            <td>
                <a class="edit">编辑</a> | <a class="del">删除</a>
            </td>
        </tr>
        <tr>
            <td target="hostname">1.1.1.13</td>
            <td target="port">80</td>
            <td target="ip">1.1.1.13</td>
            <td>
                <a class="edit">编辑</a> | <a class="del">删除</a>
            </td>
        </tr>
        <tr>
            <td target="hostname">1.1.1.14</td>
            <td target="port">80</td>
            <td target="ip">1.1.1.14</td>
            <td>
                <a class="edit">编辑</a> | <a class="del">删除</a>
            </td>

        </tr>
    </table>

    <div class="modal hide">
        <div>
            <input name="hostname" type="text"  />
            <input name="port" type="text" />
            <input name="ip" type="text" />
        </div>

        <div>
            <input type="button" value="取消" onclick="cancleModal();" />
            <input type="button" value="确定" onclick="confirmModal();" />
        </div>
    </div>

    <div class="shadow hide"></div>
    <script src="jquery-1.12.4.js"></script>
    <script>
        function addElement() {
            $(".modal,.shadow").removeClass('hide')
        }
        function cancleModal() {
            $(".modal,.shadow").addClass('hide');
            $(".modal input[type='text']").val("");
        }
        $(".edit").click(function () {
            $(".modal,.shadow").removeClass('hide')
            var tds = $(this).parent().prevAll();
            tds.each(function () {
                var n = $(this).attr('target');
                var text = $(this).text();
                $(".modal input[name="+n+"]").val(text)

            })

        })
        $(".del").click(function () {
            $(this).parent().parent().remove();
        })
//        function confirmModal() {
//            var tr = document.createElement('tr');
//            var td1 = document.createElement('td');
//            td1.innerHTML="192.168.1.1";
//            var td2 = document.createElement('td');
//            td2.innerHTML="8080";
//            $(tr).append(td1);
//            $(tr).append(td2);
//            $("#tb").append(tr);
//            $(".modal,.shadow").addClass('hide');
//        }
    </script>
</body>
</html>
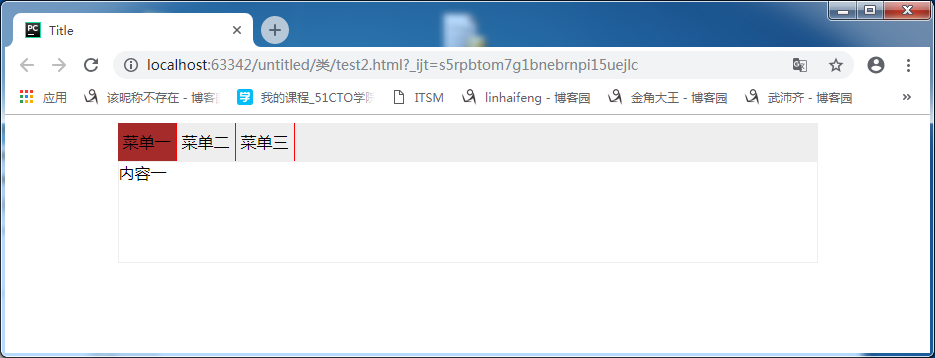
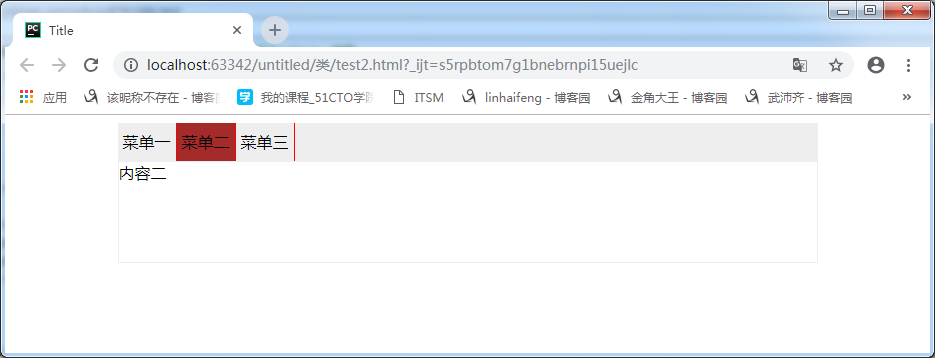
实现Tab菜单功能例子
<!DOCTYPE html>
<html lang="en">
<head>
    <meta charset="UTF-8">
    <title>Title</title>
    <style>
        .hide{
            display: none;
        }
        .menu{
            height: 38px;
            background-color: #eeeeee;
            line-height: 38px;
        }
        .active{
            background-color: brown;
        }
        .menu .menu-item{
            float: left;
            border-right: 1px solid red;
            padding: 0 5px;
            cursor: pointer;
        }
        .content{
            min-height: 100px;
            border: 1px solid #eeeeee;
        }
    </style>
</head>
<body>

    <div style="width: 700px;margin:0 auto">

        <div class="menu">
            <div  class="menu-item active" a="1">菜单一</div>
            <div  class="menu-item" a="2">菜单二</div>
            <div  class="menu-item" a="3">菜单三</div>
        </div>
        <div class="content">
            <div b="1">内容一</div>
            <div class="hide"  b="2">内容二</div>
            <div class="hide" b="3">内容三</div>
        </div>

    </div>
    <script src="jquery-1.12.4.js"></script>
    <script>
        $('.menu-item').click(function () {
            $(this).addClass("active").siblings().removeClass("active")
            var v =$(this).attr('a')
            $('.content').children("[b='"+v+"']").removeClass('hide').siblings().addClass('hide')
        })
    </script>
</body>
</html>
实现效果如下:
上面是通过外加属性实现的,还可以通过索引实现,这样就不用额外添加属性
可以将下面两行代码进行替换:
            var v =$(this).attr('a')
            $('.content').children("[b='"+v+"']").removeClass('hide').siblings().addClass('hide')
替换为:
$('.content').children().eq($(this).index()).removeClass('hide').siblings().addClass('hide')
同样可以实现上述的效果。
文档处理
$("#u1").append(temp) 这个是在当前标签子标签里的后面追加
$("#u1").prepend(temp) 这个是在当前标签子标签里的前面追加
$("#u1").after(temp) 这个是作为当前标签的兄弟标签的后面添加
$("#u1").before(temp) 这个是作为当前标签的兄弟标签的前面添加
$('#u1 li').eq(index).remove() 这个是删除
$('#u1 li').eq(index).empty() 这个是将标签的值清空
var v = $("#u1 li").eq(index).clone(); 这个是克隆内容
代码例子如下:
<!DOCTYPE html>
<html lang="en">
<head>
    <meta charset="UTF-8">
    <title>Title</title>
</head>
<body>
    <input id ="a1" type="text">
    <input id ="t1" type="button" value="添加">
    <input id ="t2" type="button" value="删除">
    <input id ="t3" type="button" value="复制">
    <u1 id ="u1">
        <li>1</li>
        <li>2</li>
    </u1>
    <script src="jquery-1.12.4.js"></script>
    <script>
        $("#t1").click(function () {
            var v = $("#a1").val();
            console.log(v)
            var temp = "<li>"+v+"</li>";
//            $("#u1").append(temp)
            $("#u1").prepend(temp)
//            $("#u1").after(temp)
//            $("#u1").before(temp)
        })
        $("#t2").click(function () {
            var index = $("#a1").val();
//            $('#u1 li').eq(index).remove()
            $('#u1 li').eq(index).empty()
        })
        $("#t3").click(function () {
            var index = $("#a1").val();
            var v = $("#u1 li").eq(index).clone();
            $("#u1").append(v);
        })
    </script>
</body>
</html>
CSS处理
$("t1").css('样式名称','样式值')
下面一个例子实现类似抽屉网的点赞功能
代码如下:
<!DOCTYPE html>
<html lang="en">
<head>
    <meta charset="UTF-8">
    <title>Title</title>
    <style>
        .container{
            padding: 50px;
            border: 1px solid #dddddd;
        }
        .item{
            position: relative;
            width: 30px;
        }
    </style>
</head>
<body>
    <div class="container">
        <div class="item">
            <span>赞</span>
        </div>
    </div>
    <div class="container">
        <div class="item">
            <span>赞</span>
        </div>
    </div>
    <div class="container">
        <div class="item">
            <span>赞</span>
        </div>
    </div>
    <div class="container">
        <div class="item">
            <span>赞</span>
        </div>
    </div>

    <script src="jquery-1.12.4.js"></script>
    <script>
        $(".item").click(function () {
            //绑定click事件,并调用AddFavor函数
            AddFavor(this);
        })
        function AddFavor(self) {
            //设置初始的字体大小,位置及透明度
            var fontSize = 15;
            var top = 0;
            var right = 0;
            var opacity = 1;
            //创建一个span标签,并为其设置初始的css样式
            var tag = document.createElement("span");
            $(tag).text("+1");
            $(tag).css("color","green");
            $(tag).css("position",'absolute');
            $(tag).css("fontSize",fontSize+"px");
            $(tag).css("right",right);
            $(tag).css("top",top);
            $(tag).css("opacity",opacity)
            $(self).append(tag);

            //设置定时器,自动更改样式
            var obj = setInterval(function () {
                fontSize = fontSize+10;
                top = top-10;
                right = right - 10;
                opacity = opacity - 0.1;

                //将更改后的样式设置到标签上
                $(tag).css("fontSize",fontSize+"px");
                $(tag).css('right',right+"px");
                $(tag).css('top',top);
                $(tag).css('opacity',opacity);
                //当标签的透明度小于0的时候将标签以及定时器删除
                if(opacity<0){
                    clearInterval(obj)
                    $(tag).remove();
                }

            },40)

        }
    </script>
</body>
</html>
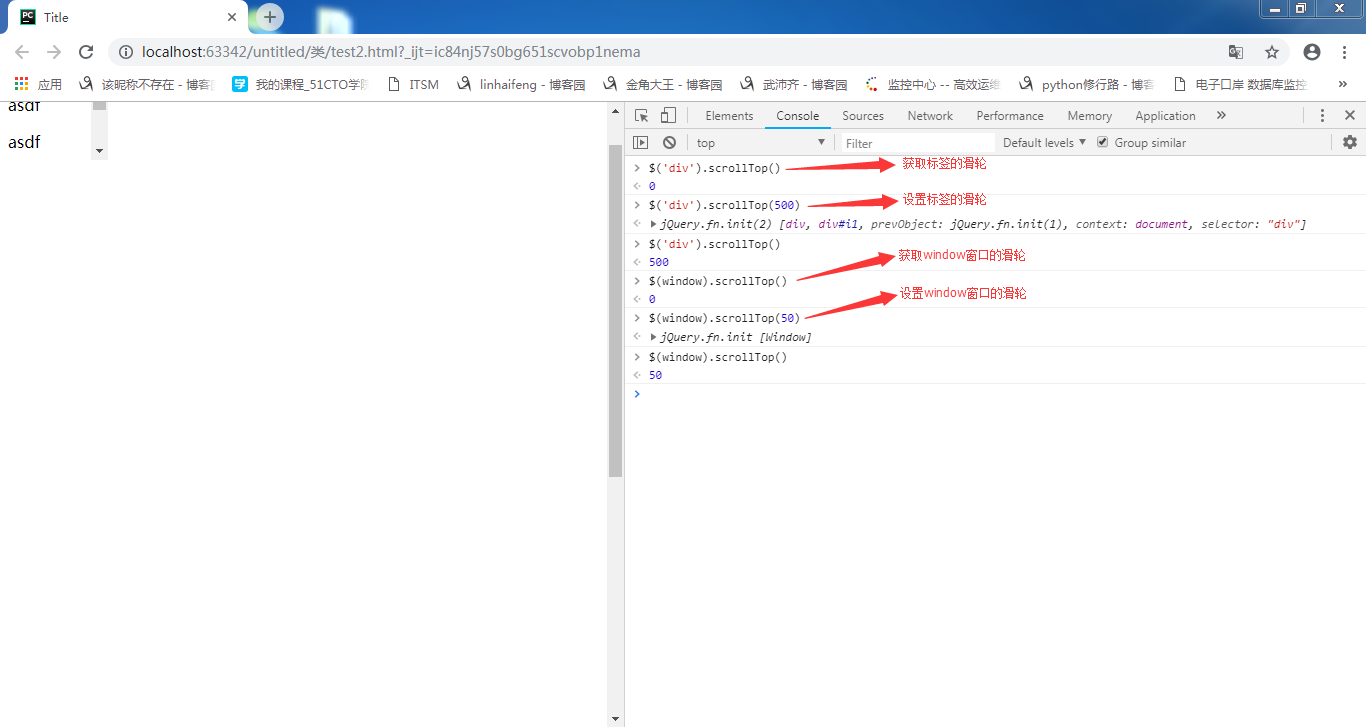
位置
$(window).scrollTop() 获取 注意切记这里是window而不是windows,并且这里不需要引号
$(window).scrollTop(0) 设置
上面两个表示的是windows窗体的
scrollLeft() 和scrollTop一样
代码如下:
<!DOCTYPE html>
<html lang="en">
<head>
    <meta charset="UTF-8">
    <title>Title</title>
</head>
<body>
     <!--<div id="i1"></div>-->
     <div style="height: 100px;width:100px;overflow: auto">
            <p>asdf</p><p>asdf</p><p>asdf</p><p>asdf</p><p>asdf</p><p>asdf</p><p>asdf</p>
            <p>asdf</p><p>asdf</p><p>asdf</p><p>asdf</p><p>asdf</p><p>asdf</p><p>asdf</p>
            <p>asdf</p><p>asdf</p><p>asdf</p><p>asdf</p><p>asdf</p><p>asdf</p><p>asdf</p>
            <p>asdf</p><p>asdf</p><p>asdf</p><p>asdf</p><p>asdf</p><p>asdf</p><p>asdf</p>
            <p>asdf</p><p>asdf</p><p>asdf</p><p>asdf</p><p>asdf</p><p>asdf</p><p>asdf</p>
            <p>asdf</p><p>asdf</p><p>asdf</p><p>asdf</p><p>asdf</p><p>asdf</p><p>asdf</p>
        </div>
     <div id="i1" style="height: 1000px"></div>
    <script src="jquery-1.12.4.js"></script>

</body>
</html>
效果如下:

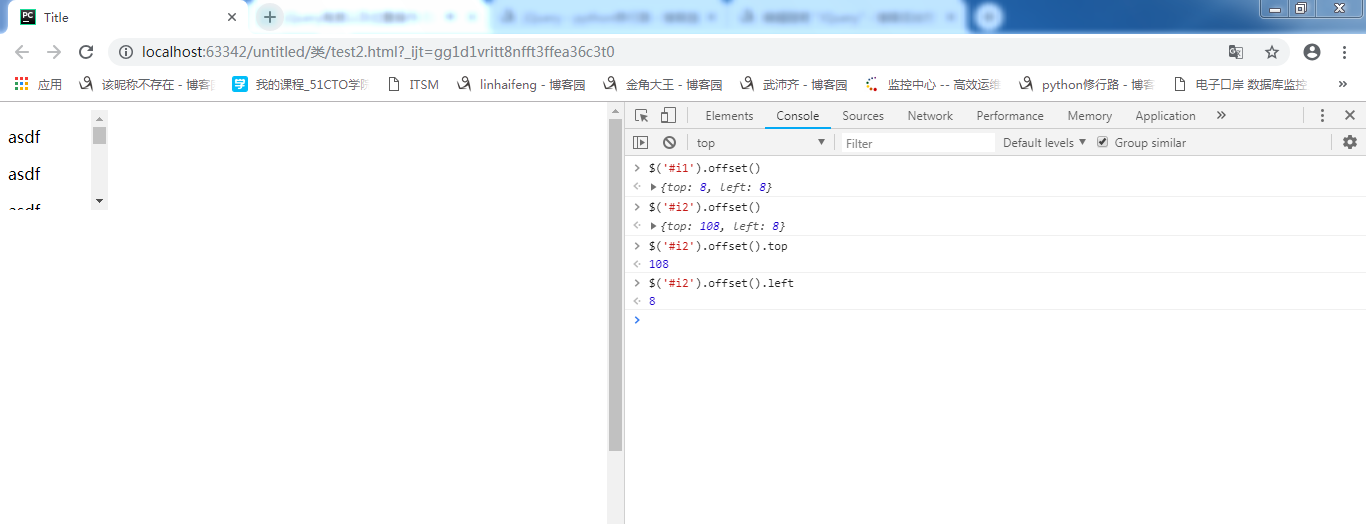
offset 获取指定标签在html中的坐标
$("#i1").offset().left 获取指定的坐标
$("#i1").offset().top 获取指定的坐标
代码例子如下:
<!DOCTYPE html>
<html lang="en">
<head>
    <meta charset="UTF-8">
    <title>Title</title>
</head>
<body>
     <div id="i1"></div>
     <div style="height: 100px;width:100px;overflow: auto">
            <p>asdf</p><p>asdf</p><p>asdf</p><p>asdf</p><p>asdf</p><p>asdf</p><p>asdf</p>
            <p>asdf</p><p>asdf</p><p>asdf</p><p>asdf</p><p>asdf</p><p>asdf</p><p>asdf</p>
            <p>asdf</p><p>asdf</p><p>asdf</p><p>asdf</p><p>asdf</p><p>asdf</p><p>asdf</p>
            <p>asdf</p><p>asdf</p><p>asdf</p><p>asdf</p><p>asdf</p><p>asdf</p><p>asdf</p>
            <p>asdf</p><p>asdf</p><p>asdf</p><p>asdf</p><p>asdf</p><p>asdf</p><p>asdf</p>
            <p>asdf</p><p>asdf</p><p>asdf</p><p>asdf</p><p>asdf</p><p>asdf</p><p>asdf</p>
        </div>
     <div id="i2"></div>
     <div style="height: 1000px"></div>
    <script src="jquery-1.12.4.js"></script>

</body>
</html>
position() //指定标签相对父标签(relative)标签的坐标,如下:
<div style="relative">
    <div>
        <div id="i1" style="position: absolute;"></div>
    </div>
</div>
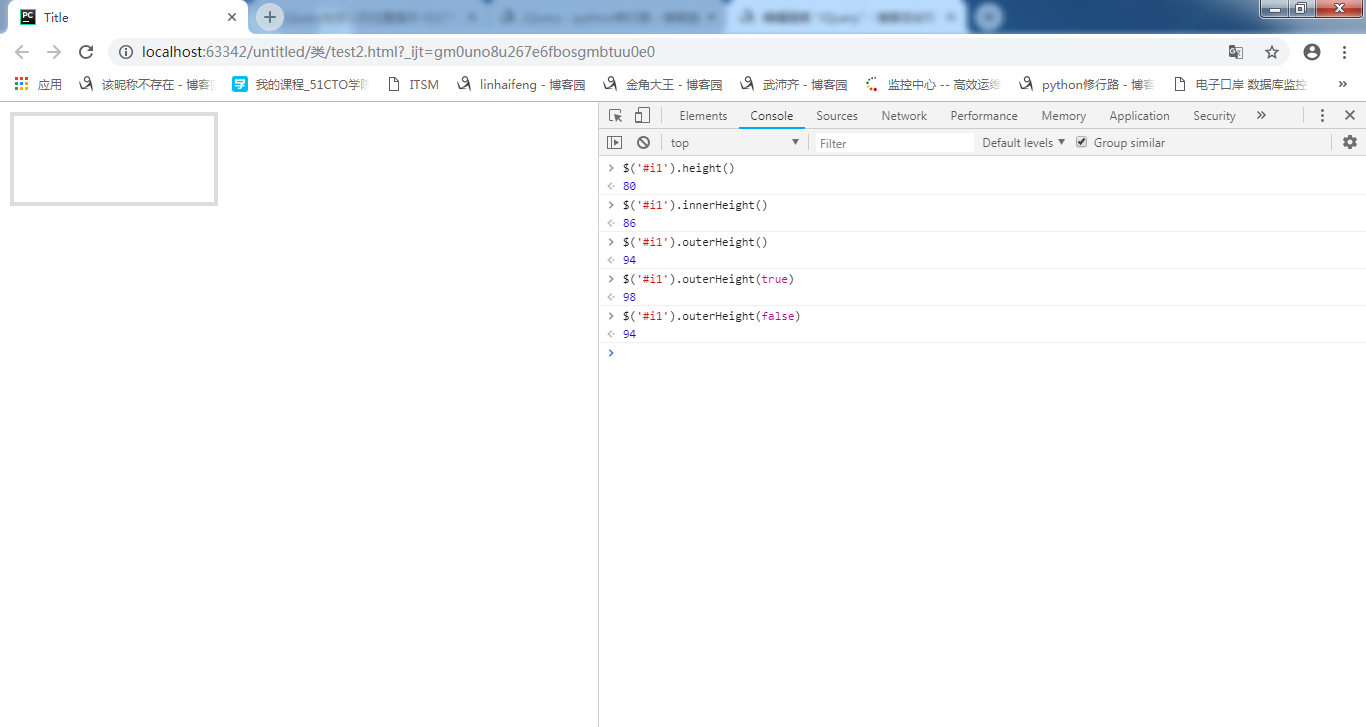
这里有几个高度需要注意:
.height()获取当前标签的高度
.innerHeight()获取自身高度+padding
.outerHeight() :
参数:false-->获取自身高度+padding+border;
参数:true--->获取自身高度+padding+border+margin;
默认是false即获取自身高度+padding+border
通过如下例子演示:
<!DOCTYPE html>
<html lang="en">
<head>
    <meta charset="UTF-8">
    <title>Title</title>
</head>
<body>
    <div style="position:relative;">
        <div>
            <div id = "i1" style="position: absolute;height: 80px;width: 200px;padding:3px 0;margin:2px;border: 4px solid #dddddd"></div>
        </div>
    </div>
    <script src="jquery-1.12.4.js"></script>
</body>
</html>
JQuery绑定事件方式
第一种是:
$('.c1').click()等等还有很多
第二种是:(可以绑定同时可以解除绑定)
$('.c1').bind("click",function(){})
$('.c1').unbind('click',function(){})
第三种是:(可以绑定同时可以解除绑定)
$('.c1').delegate('a','click',function(){}) //.c1下的所有a标签绑定一个click事件
$('.c1').undelegate('a','click',function(){})
第四种是:(可以绑定同时可以解除绑定)
$('.c1').on('click',function(){})
$('.c1').off('click',function(){})
以上绑定方式中特殊的是delegate绑定方式:
通过下面例子理解:
<!DOCTYPE html>
<html lang="en">
<head>
    <meta charset="UTF-8">
    <title>Title</title>
</head>
<body>
    <input id ="a1" type="text">
    <input id ="t1" type="button" value="添加">
    <ul id ="u1">
        <li>1</li>
        <li>2</li>
    </ul>
    <script src="jquery-1.12.4.js"></script>
    <script>

        $("#t1").click(function () {
            var v = $("#a1").val();
            var temp = "<li>"+v+"</li>";
            $("#u1").append(temp);
        });
        $('ul li').click(function () {
            var v = $(this).text();
            alert(v)
        })
    </script>

</body>
</html>
上面代码中给li绑定click是通过第一种方式绑定的,通过.click()、bind()、以及on三种方式绑定的时候后续增加的li标签点击的时候是不会有弹框的,只有将li的click绑定方式用delegate方式绑定就可以实现后续添加的li仍然可以绑定click事件:
        $('ul').delegate('li','click',function () {
            var v = $(this).text();
            alert(v);
        })
这种方式在其他语言中加做委托,只有当点击的时候才会绑定时间并执行
默认先不绑定
关于自身跳转和人为绑定跳转
<body>
    <a onclick="ClickOn()" href="http://www.baidu.com">百度1</a>
    <script>
        function ClickOn() {
            alert(123);
        }
    </script>
</body>
这样运行的时候,默认先弹框,然后才会跳转到百度,也就是先执行我们后天绑定的事件,然后执行标签本身具有的事件,即后天绑定的事件的优先级高于本身具有的事件
如果不想要执行标签本身具有的属性,需要在绑定的事件最后加上:
return false
<body>
    <a onclick="return ClickOn()" href="http://www.baidu.com">百度1</a>
    <script>
        function ClickOn() {
            alert(123);
            return false
        }
    </script>
</body>
上述是以Dom方式实现,同样通过jQuery也是相同的:
<body>
    <a id="i1" href="http://www.baidu.com">百度1</a>
    <script src="jquery-1.12.4.js"></script>
    <script>
        $('#i1').click(function () {
            alert(456);
            return false
        })
    </script>
</body>
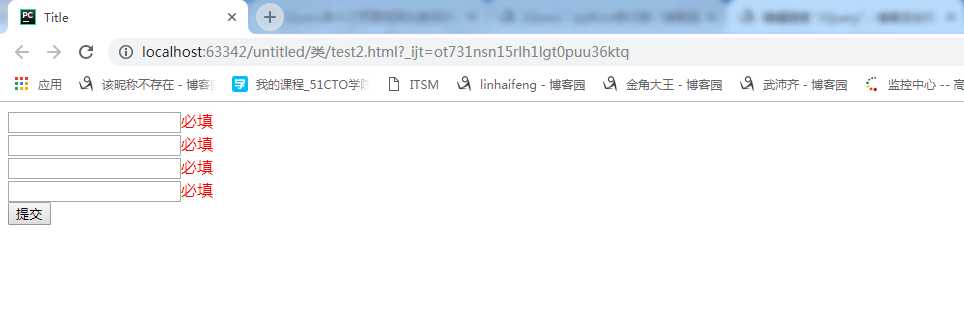
表单提交例子
代码如下:
<!DOCTYPE html>
<html lang="en">
<head>
    <meta charset="UTF-8">
    <title>Title</title>
    <style>
        .error{
            color: red;
        }
    </style>
</head>
<body>
    <form id = "f1" action="ss4.html" method="POST">
        <div><input name="n1" type="text" /></div>
        <div><input name="n2" type="password" /></div>
        <div><input name="n3" type="text" /></div>
        <div><input name="n4" type="text" /></div>

        <input type="submit" value="提交"/>
    </form>
    <script src="jquery-1.12.4.js"></script>
    <script>
        $(":submit").click(function () {
            $('.error').remove();
            var flag=true;
            $('#f1').find("input[type='text'],input[type='password']").each(function () {
                var v = $(this).val();
                if (v.length<=0){
                    //当输入框没有输入内容的时候
                    flag = false;
                    var tag = document.createElement("span");
                    tag.className='error';
                    tag.innerHTML="必填";
                    $(this).after(tag);
                    //这里的return false只能终止当前循环,并不能阻止事件的提交
                    //return false;
                }
            });
            return flag;
        })
    </script>
</body>
</html>
实现效果如下:
默认什么都不输入直接提交,提示必填
当填写一个之后点击提交,第一个的就会不再提示必填
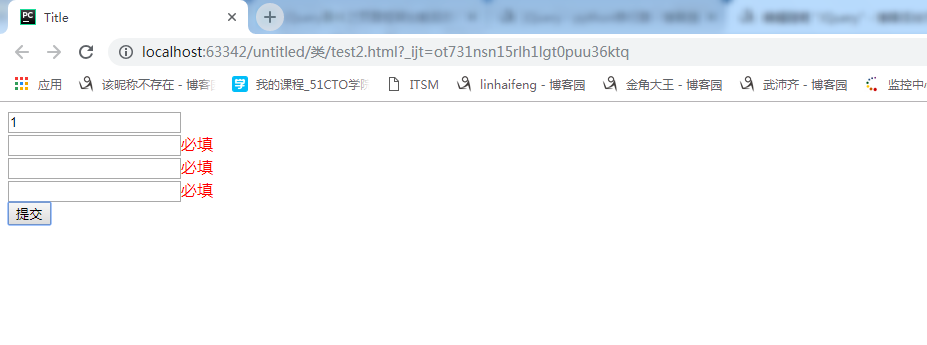
只有当全部填写内容之后才会提交
当页面框架加载完毕之后自动执行
$(function(){})
一般默认把绑定事件或默认要执行的操作都放到这个里面,如下:
<!DOCTYPE html>
<html lang="en">
<head>
    <meta charset="UTF-8">
    <title>Title</title>
    <style>
        .error{
            color: red;
        }
    </style>
</head>
<body>
    <form id = "f1" action="ss4.html" method="POST">
        <div><input name="n1" type="text" /></div>
        <div><input name="n2" type="password" /></div>
        <div><input name="n3" type="text" /></div>
        <div><input name="n4" type="text" /></div>

        <input type="submit" value="提交"/>
    </form>
    <script src="jquery-1.12.4.js"></script>
    <script>
        //当页面框架加载完毕后,自动执行
        $(function () {
            //当页面所有元素完全加载完毕后,执行
            $(":submit").click(function () {
                $('.error').remove();
                var flag=true;
                $('#f1').find("input[type='text'],input[type='password']").each(function () {
                    var v = $(this).val();
                    if (v.length<=0){
                        //当输入框没有输入内容的时候
                        flag = false;
                        var tag = document.createElement("span");
                        tag.className='error';
                        tag.innerHTML="必填";
                        $(this).after(tag);
                        //这里的return false只能终止当前循环,并不能阻止事件的提交
                        //return false;
                    }
                });
                return flag;
            })
        })

    </script>
</body>
</html>
JQuery扩展
有两种方式:
-.extend调用的时候.extend调用的时候.方法
<body>
    <script src="jquery-1.12.4.js"></script>
    <script>
        //JQuery扩展方式一
        $.extend({
            'zhangsan':function () {
                return 'sb';
            }
        });
        //调用扩展的方法
        var v = $.zhangsan();
        alert(v)
    </script>
</body>
-.fn.extend调用的时候.fn.extend调用的时候(..).方法
<body>
    <script src="jquery-1.12.4.js"></script>
    <script>
        //JQuery扩展方式二
        $.fn.extend({
            'lisi':function () {
                return 'db';
            }
        });
        //调用扩展的方法
        var v = $('#i1').lisi();
        alert(v)
    </script>
</body>
注意:需要将扩展放到自执行函数里,以避免全局变量冲突的问题
(function(arg){
    var status = 1
    arg.fn.extend({
        'lisi':function () {
            return status;
        }
    });
})(jQuery)

 浙公网安备 33010602011771号