在windows上安装和使用ns-3.38
绪论:
已知:
- ns3只能在linux环境中使用;
- ns3需要相对封闭的环境;
- windows是常用系统;
- windows上使用linux的常见方案是vm虚拟机和wsl子系统;
- vm虚拟机开销大,wsl开销小;
- vm虚拟机有完整的系统图形化界面,wsl只有命令行界面;
- wsl最新版可以在windows上使用软件的图形化界面;
- ns3.36后的版本在Clion上可以点击运行直接build和run;
可得:
使用ns3的一种方法是在windows系统上安装wsl子系统,在wsl上配置ns3和安装Clion,在windows上打开wsl中的Clion,以此打开wsl中的ns3项目。
本文解决的问题:
- 在已经装了Ubuntu的wsl的windows系统中如何再安装同版本的Ubuntu的wsl;
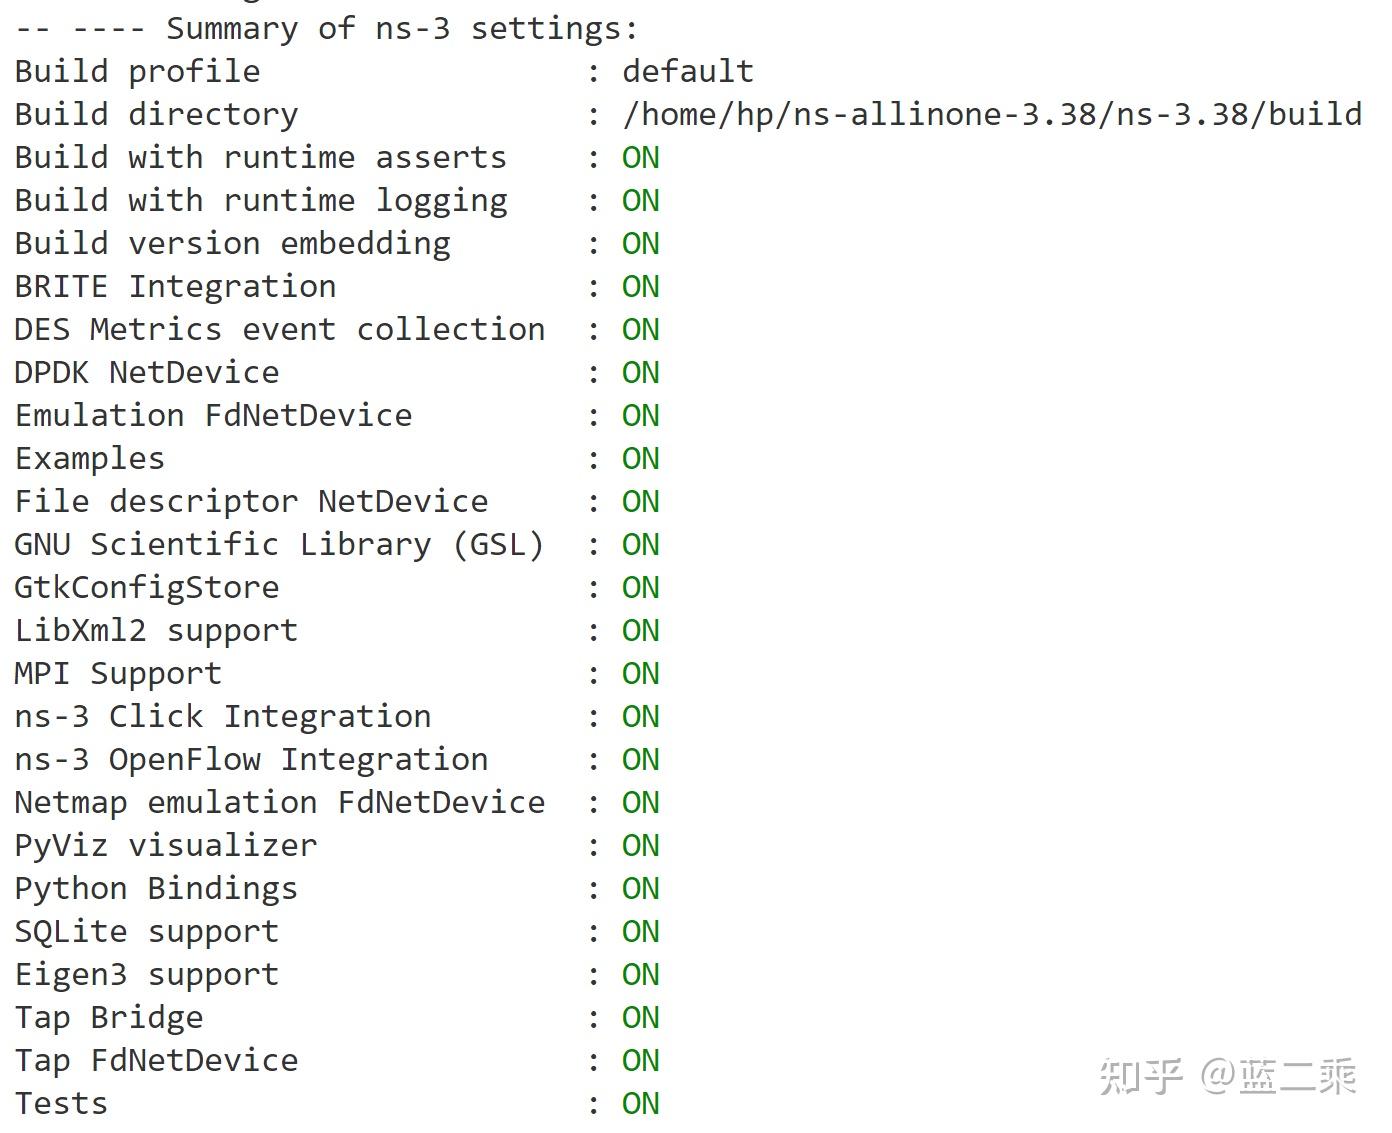
- ns3.38安装(点亮所有设置的安装方法);
- Clion配置;
教程:
1. 安装多个同版本的ubuntu-wsl:
可能有同学已经正在使用wsl,但想有个新的隔离环境安装NS3,也想使用同版本的Ubuntu,但官方并不支持(Ubuntu可以和Ubuntu22.04并存,但可能),所以需要其他方法。
总的方法是利用导入wsl时重新定义名字实现的。而获取的方法有两种:
第一种是利用LxRunOffline安装官网下载的.tar.gz包实现的。具体方法可以查看:
这个也是我写的。
第二种是找现成的,从新的wsl系统导出的.tar文件,这里可以提供Ubuntu和Ubuntu22.04的tar文件,这些都是从新系统里导出的,用户名是hp,密码是123:
https://pan.baidu.com/s/1Wsz_zAEJYLDhsgOrz3EMrQ?pwd=xaiz
然后用下面的命令导入wsl,这里的
wsl --import <Distribution Name> <InstallLocation> <FileName>
此时每次登录的是root用户,可以切换到普通用户登录:
先设置root的密码:
passwd root
打开/etc/wsl.conf:
vim /etc/wsl.conf
复制粘贴:
[user]
default = hp
关闭wsl,然后再windows终端里彻底关闭wsl:
wsl --shutdown
再次登录就是用普通用户登录了。
然后是给apt换源:
sudo vim /etc/apt/sources.list
然后手打:
:1,$d
清空文件
把以下代码复制进文件中:
# 默认注释了源码镜像以提高 apt update 速度,如有需要可自行取消注释
deb https://mirrors.tuna.tsinghua.edu.cn/ubuntu/ jammy main restricted universe multiverse
# deb-src https://mirrors.tuna.tsinghua.edu.cn/ubuntu/ jammy main restricted universe multiverse
deb https://mirrors.tuna.tsinghua.edu.cn/ubuntu/ jammy-updates main restricted universe multiverse
# deb-src https://mirrors.tuna.tsinghua.edu.cn/ubuntu/ jammy-updates main restricted universe multiverse
deb https://mirrors.tuna.tsinghua.edu.cn/ubuntu/ jammy-backports main restricted universe multiverse
# deb-src https://mirrors.tuna.tsinghua.edu.cn/ubuntu/ jammy-backports main restricted universe multiverse

# deb https://mirrors.tuna.tsinghua.edu.cn/ubuntu/ jammy-security main restricted universe multiverse
# # deb-src https://mirrors.tuna.tsinghua.edu.cn/ubuntu/ jammy-security main restricted universe multiverse

deb http://security.ubuntu.com/ubuntu/ jammy-security main restricted universe multiverse
# deb-src http://security.ubuntu.com/ubuntu/ jammy-security main restricted universe multiverse

# 预发布软件源,不建议启用
# deb https://mirrors.tuna.tsinghua.edu.cn/ubuntu/ jammy-proposed main restricted universe multiverse
# # deb-src https://mirrors.tuna.tsinghua.edu.cn/ubuntu/ jammy-proposed main restricted universe multiverse
退出后更新源和软件:
sudo apt update
sudo apt upgrade
2. ns3.38安装:
下载ns3.38的压缩包并解压:
wget https://www.nsnam.org/release/ns-allinone-3.38.tar.bz2
sudo apt install bzip2
tar xjf ns-allinone-3.38.tar.bz2
下载依赖:
#!/bin/sh

# 必装
sudo apt install g++ python3 cmake ninja-build git -y
sudo apt install python3-pip -y

# 推荐
sudo apt install ccache -y
sudo apt install clang-format clang-tidy -y
sudo apt install gdb valgrind -y
python3 -m pip install --user cppyy
sudo apt install mercurial -y
sudo apt install cmake-format -y

# 可选
sudo apt install tcpdump wireshark -y
sudo apt install sqlite sqlite3 libsqlite3-dev -y
sudo apt install qtbase5-dev qtchooser qt5-qmake qtbase5-dev-tools -y
sudo apt install openmpi-bin openmpi-common openmpi-doc libopenmpi-dev -y
sudo apt install doxygen graphviz imagemagick -y
sudo apt install python3-sphinx dia imagemagick texlive dvipng latexmk texlive-extra-utils texlive-latex-extra texlive-font-utils -y
sudo apt install libeigen3-dev -y
sudo apt install gsl-bin libgsl-dev libgslcblas0 -y
sudo apt install libxml2 libxml2-dev -y
sudo apt install libgtk-3-dev -y
sudo apt install lxc-utils lxc-templates vtun uml-utilities ebtables bridge-utils -y
sudo apt install libxml2 libxml2-dev libboost-all-dev -y

sudo apt install gir1.2-goocanvas-2.0 python3-gi python3-gi-cairo python3-pygraphviz gir1.2-gtk-3.0 ipython3 -y
复制这段代码保存到本地的.sh文件中,并执行该sh文件。
然后cd到ns3.38的文件夹下,build项目:
./ns3 configure --enable-examples --enable-tests
./ns3 build
等待编译结束。
编译好后可以测试项目,看有没有问题:
./test.py
后面的是一些可装可不装的模块:
1)PyViz visualizer:
./ns3 configure --enable-python-bindings -- -DNS3_BINDINGS_INSTALL_DIR="/home/hp/.local/lib/python3.10/site-packages"
2)“Build version embedding”和“DES Metrics event collection”
./ns3 configure --enable-des-metrics --enable-build-version
3)ns-3 Click Integration
cd到ns-3.38的上一级文件夹下
git clone https://github.com/kohler/click
cd click/
./configure --disable-linuxmodule --enable-nsclick --enable-wifi
make
cd到ns-3.38:
./ns3 configure --with-click=/home/hp/ns-allinone-3.38/click
4)BRITE Integration
cd到ns-3.38的上一级文件夹下
hg clone http://code.nsnam.org/BRITE
cd BRITE
make
cd到ns-3.38:
./ns3 configure --with-brite=/home/hp/ns-allinone-3.38/BRITE
5)ns-3 OpenFlow Integration
cd到ns-3.38的上一级文件夹下
hg clone http://code.nsnam.org/openflow
cd openflow
./waf configure
./waf build
cd到ns-3.38:
./ns3 configure --with-openflow=/home/hp/ns-allinone-3.38/openflow
6)MPI Support
./ns3 configure --enable-mpi
7)DPDK NetDevice
sudo apt-get install dpdk dpdk-dev libdpdk-dev
./ns3 configure --enable-dpdk
8)Netmap emulation FdNetDevice
下载前置:
sudo apt-get install libelf-dev build-essential pkg-config
sudo apt-get install bison build-essential flex libssl-dev libelf-dev bc
sudo apt-get install dwarves
先查看当前系统的内核版本号:
uname -r
在github上找对应的源码:
Releases · microsoft/WSL2-Linux-Kernel (github.com)
在随便哪个文件夹下下载源码的压缩包:
wget https://github.com/microsoft/WSL2-Linux-Kernel/archive/refs/tags/linux-msft-wsl-5.15.90.1.tar.gz
解压:
tar -zxvf linux-msft-wsl-5.15.90.1.tar.gz
然后:
cd WSL2-Linux-Kernel-linux-msft-wsl-5.15.90.1
zcat /proc/config.gz > .config
make -j $(nproc)
sudo make -j $(nproc) modules_install
cd到ns-3.38的上一级文件夹下
git clone https://github.com/luigirizzo/netmap.git
cd netmap
./configure
su root
make && make install
cd到ns-3.38文件夹下:
清理缓存:
./ns3 clean
把之前的配置重新配置一遍
./ns3 configure --with-brite=/home/hp/ns-allinone-3.38/BRITE --with-click=/home/hp/ns-allinone-3.38/click --with-openflow=/home/hp/ns-allinone-3.38/openflow

./ns3 configure --enable-python-bindings -- -DNS3_BINDINGS_INSTALL_DIR="/home/hp/.local/lib/python3.10/site-packages"

./ns3 configure --enable-tests --enable-mpi --enable-dpdk --enable-examples --enable-build-version --enable-des-metrics
至此,恭喜你,你成功点亮了ns3的所有设置:

3. Clion配置:
下载Clion:
https://www.jetbrains.com/clion/download/#section=linux
解压压缩包:
tar -xzf CLion-2023.1.3.tar.gz
然后在bin文件夹下执行CLion.sh文件,开始安装。
安装好后打开Clion,你就可以在windows中看到Clion的图形化界面了:
sudo Clion
之后还可以在windows中直接打开在wsl中的Clion:

在clion需要登录才能使用,但wsl里没有浏览器,所以在点击登录后需要点击有问题,然后会给你一个网址,在windows中进入网址并登录,它会给你一段key,复制到Clion就行。
先打开项目文件夹“ns-3.38”。
然后会跳出提示框让你配置工具链,只需要改变其中的Cmake,改成usr里的cmake文件:

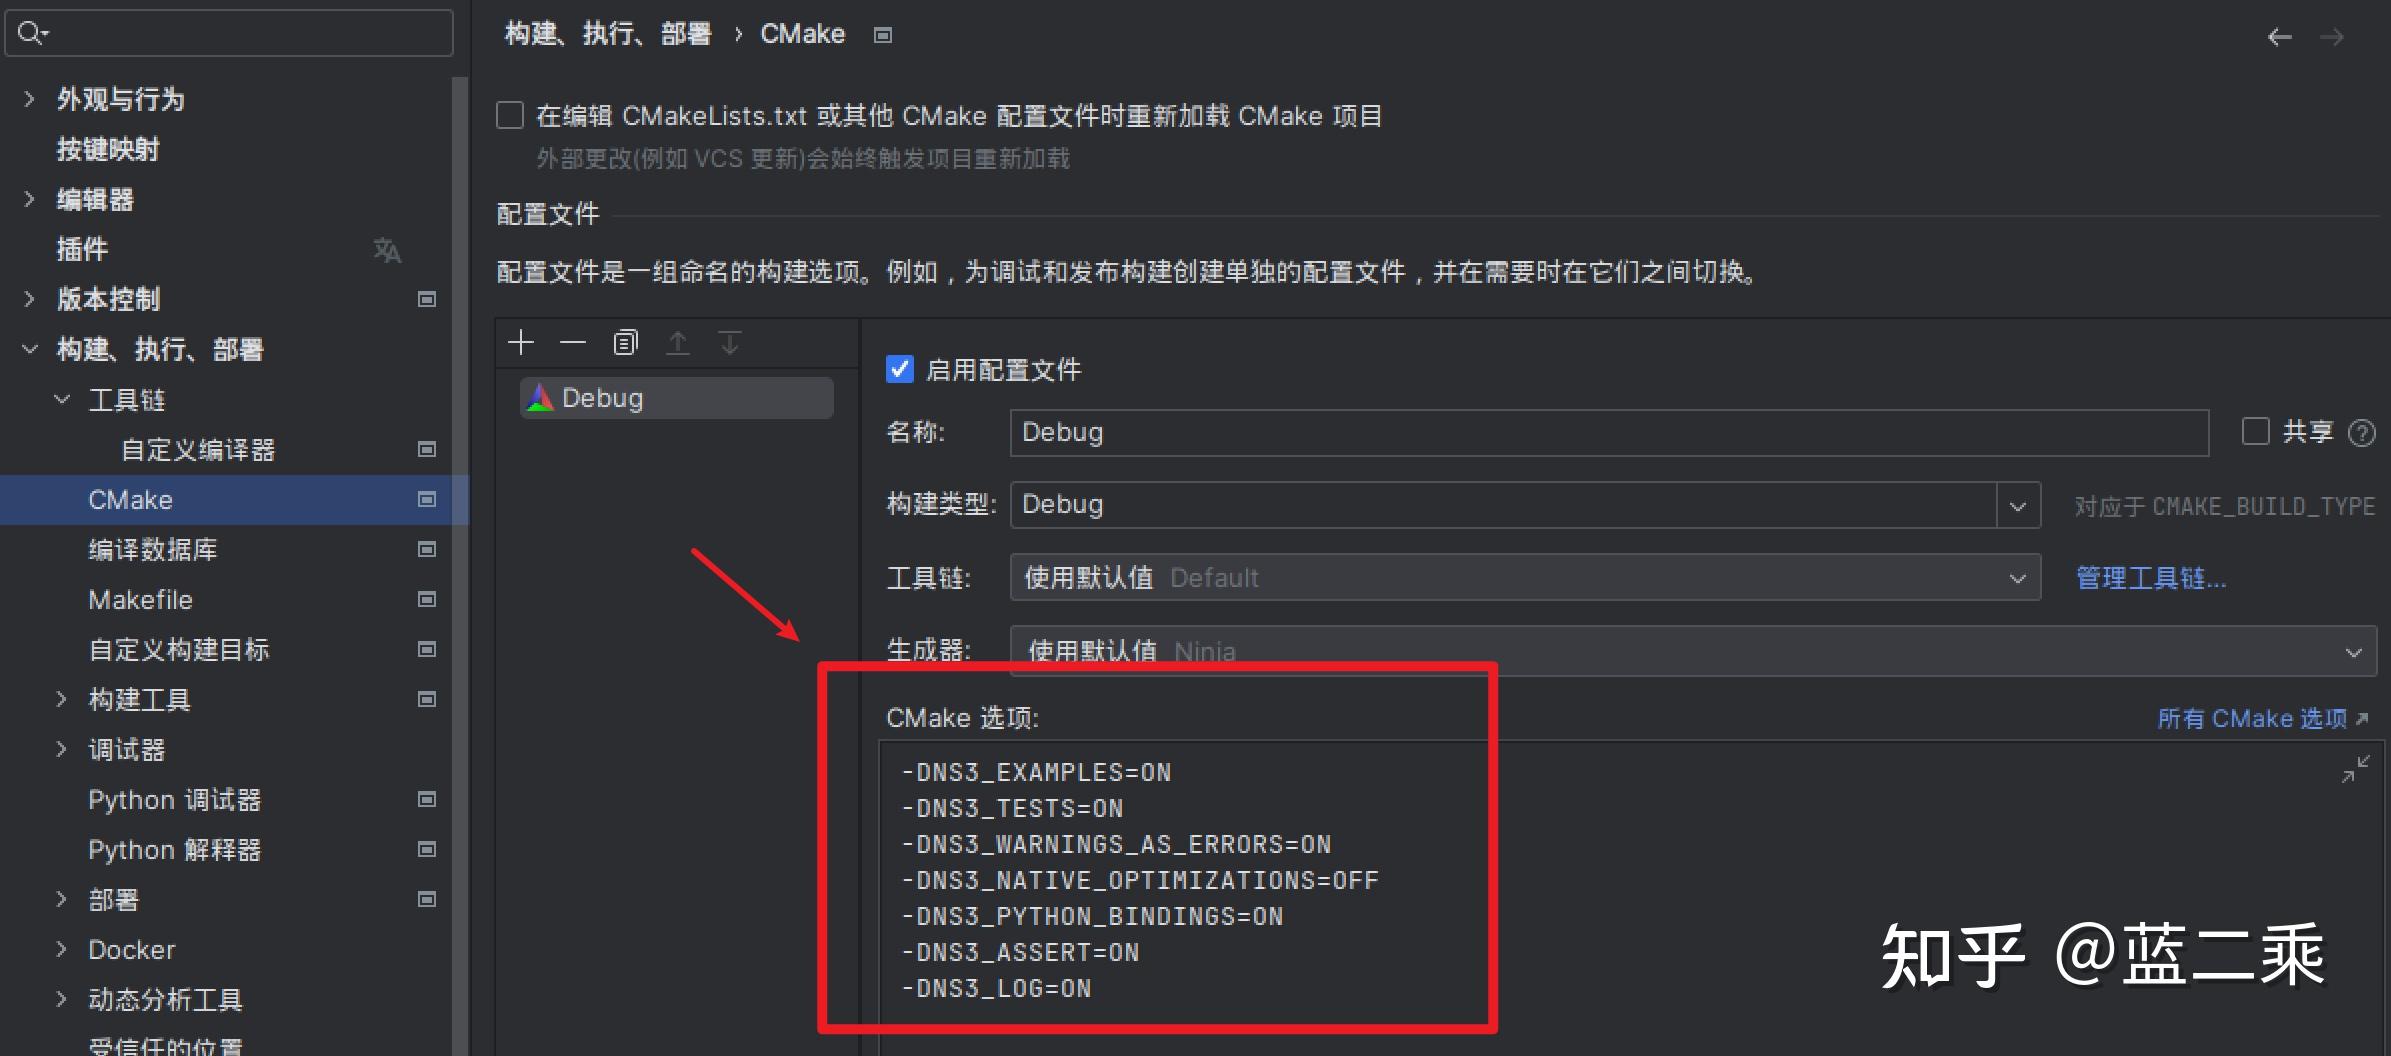
然后配置cmake:

-DNS3_EXAMPLES=ON
-DNS3_TESTS=ON
-DNS3_WARNINGS_AS_ERRORS=ON
-DNS3_NATIVE_OPTIMIZATIONS=OFF
-DNS3_PYTHON_BINDINGS=ON
-DNS3_ASSERT=ON
-DNS3_LOG=ON
然后等右下角全部转好后就配置好了。
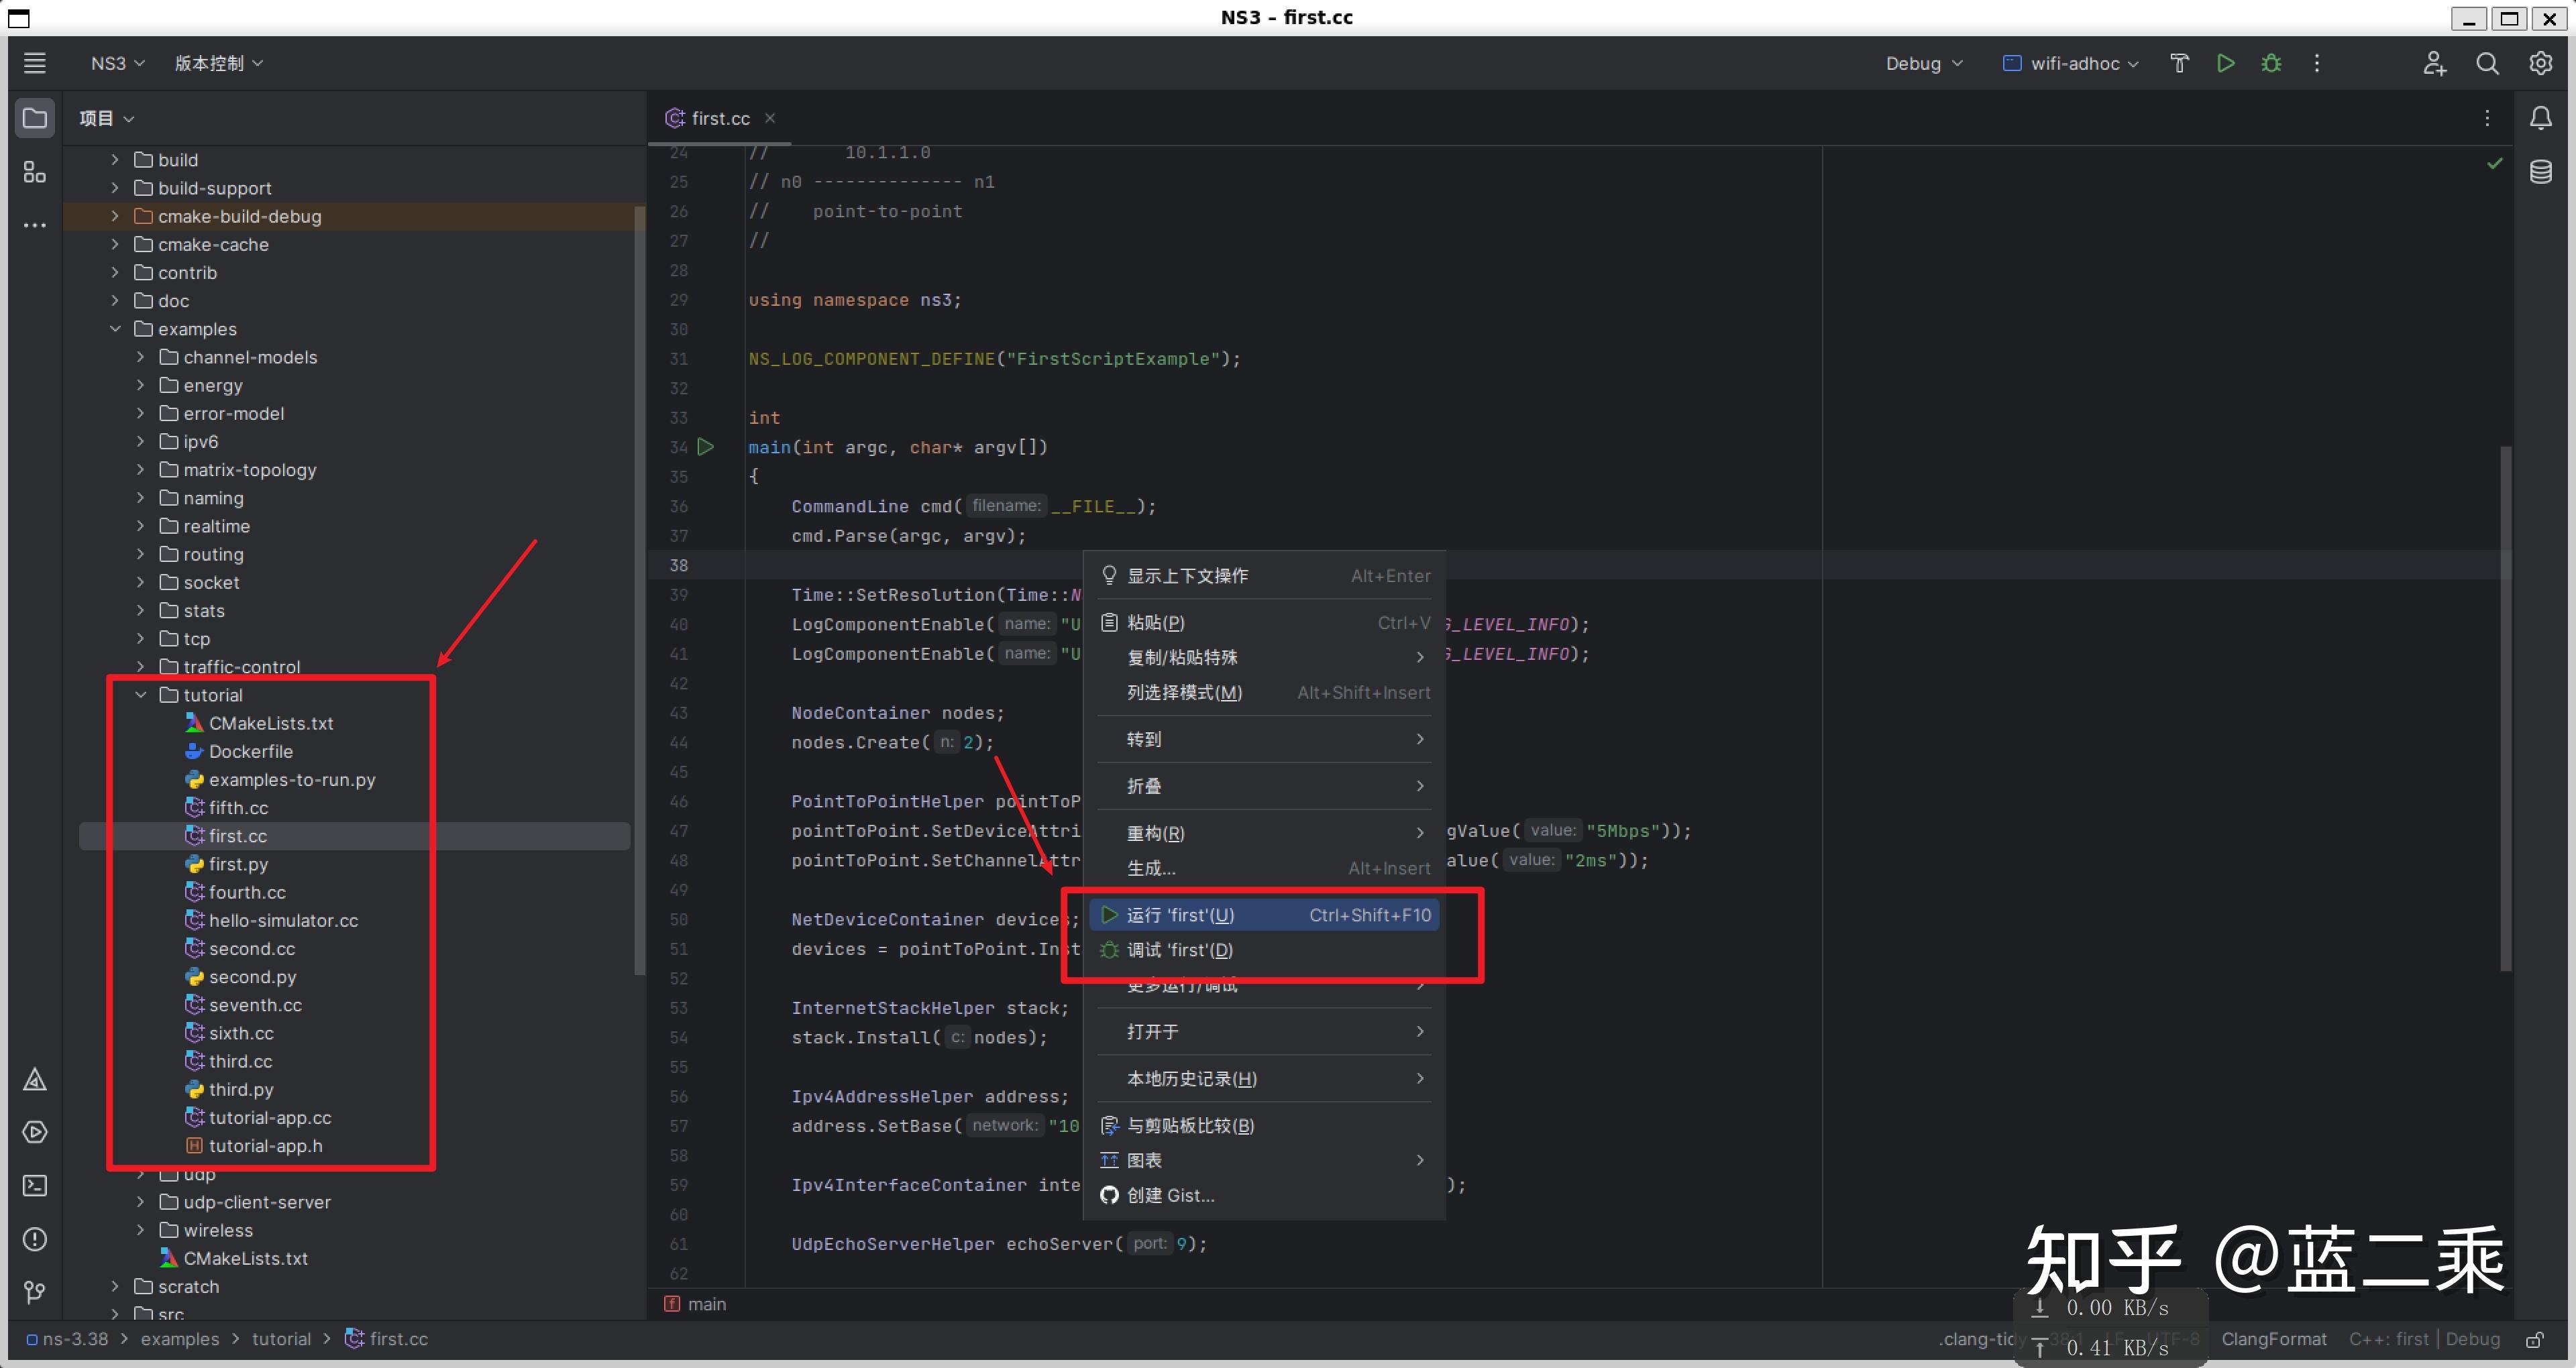
打开/ns-3.38/examples/tutorial/http://first.cc文件用Clion编译ns3文件:

就可以直接在运行栏看到运行结果了:

若想测试自己的文件,可以直接在scratch文件夹内新建.cc文件直接运行,中途可能会让你把文件的信息写入Cmake文件,点写入就行,Clion会帮你写入的。
(你也可以用Gateway连接wsl来运行ns3,配置方法和Clion差不多)


