002_Nginx 配置文件
一、 Nginx 配置文件
1. 虚拟主机配置
#### 启用虚拟主机配置
vim /opt/nginx/conf/nginx.conf
删除主配置文件 "server 主机配置内容“,替换成
include vhost/*.conf;
#### 创建虚拟主机配置存放目录
mkdir /opt/nginx/conf/vhost
#### 创建虚拟主机配置
cd !$;  vim default.conf
#### 虚拟主机配置内容
server
{
   listen 80;      # 监听的端口
   server_name localhost;    # 监听的域名
   index index.html index.htm index.php;
   root /opt/www/html;  # 网页路径
}
2.Nginx 用户认证
2.1. 安装http
yum install -y httpd(用来创建用户、密码)
2.2. 创建用户、密码
htpasswd -c /opt/nginx/conf/htpasswd admin (运行htpasswd创建用户名、密码时,不能在用户名、密码存放的目录下运行该命令;这里不能在conf目录下运行htpasswd)
2.3. 虚拟主机中的配置
location /        # 作用整个网站:“/”,作用某个目录: “/admin/”,作用某个url:"~ admin.php" ~匹配
    {
     auth_basic            "Auth";
     auth_basic_user_file   /opt/nginx/conf/htpasswd;  # 定义用户认证的用户名、密码路径;
    }
2.4. 检查Nginx配置&重新加载Nginx配置
/opt/nginx/sbin/nginx -t 检查Nginx配置;
/opt/nginx/sbin/nginx -s reload 重新加载Nginx;
若之前运行过上述命令,则可按Ctrl+R建,直接输入 -t && -s reload
2.5. 验证
curl -x127.0.0.1:80 test.com -I 正常会出现401报错信息,需要指定用户名、密码;
curl -uadmin:admin -x127.0.0.1:80 test.com -I 正常会出现200 的代码,这个说明用户认证已经生效了;
3.Nginx 域名重定向
虚拟主机配置文件,如:test.com.conf
server
{
  listen 80;
  server_name test.com test1.com test2.com;        # 指定域名,这里可以指定多个域名
  index index.html index.htm index.php;
  root /data/wwwroot/test.com;
  if ($host != 'test.com' )      # if 在这里是用来重定向的,这里是将所有的域名都重定向到 test.com
    {
      rewrite  ^/(.*)$  http://test.com/$1  permanent; # “rewrite” 跳转,“ ^/(.*)$ ” 以“/”开头任意结尾;permanent  301跳转、redirect 302 跳转;
    }
}
4. Nginx访问日志
4.1. 主配置文件nginx.conf中搜索log_format,这个是定义log样式的;默认日志样式如下:
log_format combined_realip '$remote_addr $http_x_forwarded_for [$time_local]'
    ' $host "$request_uri" $status'
    ' "$http_referer" "$http_user_agent"';
4.2. 日志参数说明:
combined_realip日志格式名称,可以自定义;$remote_addr客户端IP(公网IP);$http_x_forwarded_for代理服务器的IP;$time_local服务器本地时间;$host访问主机名(域名);$request_uri访问的url地址;$status状态码 (如:404、301、302、200等);$http_referer$http_user_agent
4.3. 虚拟主机日志配置
除了在主配置文件nginx.conf里定义日志格式外,还需要在虚拟主机配置文件中增加:access_log /tmp/1.log combined_realip; ;
这里的combined_realip就是在nginx.conf中定义的日志格式名字;
4.4. 检查配置,重新加载Nginx配置
-t && -s reload
curl -x127.0.0.1:80 test.com -I
cat /tmp/1.log
5. Nginx日志切割
5.1. 自定义shell 脚本,用于日志切割;
vim /usr/local/sbin/nginx_log_rotate.sh//写入如下内容
#! /bin/bash
## 假设nginx的日志存放路径为/data/logs/
d=`date -d "-1 day" +%Y%m%d`
logdir="/data/logs"
nginx_pid="/usr/local/nginx/logs/nginx.pid"
cd $logdir
for log in `ls *.log`
do
    mv $log $log-$d
done
/bin/kill -HUP `cat $nginx_pid`
5.2. 任务计划 (crontab -e)
添加定时任务
0 0 * * * /bin/bash /usr/local/sbin/nginx_log_rotate.sh
6. 静态文件不记录日志和过期时间
具体配置如下:
location ~ .*\.(gif|jpg|jpeg|png|bmp|swf)$
    {
          expires      7d;    # 缓存过期时间
          access_log off;   # 关闭日志记录
    }
location ~ .*\.(js|css)$
    {
          expires      12h;
          access_log off;
    }
7. Nginx防盗链
配置如下,可以和上面的配置结合起来
location ~* ^.+\.(gif|jpg|png|swf|flv|rar|zip|doc|pdf|gz|bz2|jpeg|bmp|xls)$
{
    expires 7d;  # 缓存过期时间
    valid_referers none blocked server_names  *.test.com ;
    if ($invalid_referer) {
        return 403;
    }
    access_log off;  # 关闭日志记录
}
8. Nginx 访问控制
8.1. 需求:访问/admin/目录的请求,只允许某几个IP访问,配置如下:
location /admin/
{
    allow 192.168.133.1;
    allow 127.0.0.1;
    deny all;
}
- 创建目录
mkdir /data/wwwroot/test.com/admin/ - 创建网页
echo “test,test”>/data/wwwroot/test.com/admin/1.html - 检查&加载配置
-t && -s reload - 测试访问:
curl -x127.0.0.1:80 test.com/admin/1.html -I
curl -x192.168.133.130:80 test.com/admin/1.html -I
8.2. 可以匹配正则
location ~ .*(abc|image)/.*\.php$
{
       deny all;
}
8.3. 根据user_agent限制
if ($http_user_agent ~ 'Spider/3.0|YoudaoBot|Tomato')
{
      return 403;  # “deny all”和“return 403”效果一样
}
9. Nginx 解析PHP配置
配置如下:
location ~ \.php$
    {
        include fastcgi_params;
        fastcgi_pass unix:/tmp/php-fcgi.sock;
        # fastcgi_pass 127.0.0.1:9000;
        fastcgi_index index.php;
        fastcgi_param SCRIPT_FILENAME /opt/www/html$fastcgi_script_name;
    }
fastcgi_pass 用来指定php-fpm监听的“地址:端口”或者socket
10. Nginx 代理
10.1. Nginx 代理示意图:

10.2. Nginx 代理配置:
cd /usr/local/nginx/conf/vhost
vim proxy.conf //加入如下配置
server
{
    listen 80;      # 监听端口
    server_name ask.apelearn.com;    # 访问域名

    location /
    {
        proxy_pass      http://121.201.9.155/;     # 代理的网站IP地址
        proxy_set_header Host   $host;             # 代理的网站域名,Host == server_name
        proxy_set_header X-Real-IP      $remote_addr;
        proxy_set_header X-Forwarded-For $proxy_add_x_forwarded_for;
    }
}
11. Nginx 负载均衡
负载均衡配置:
vim /usr/local/nginx/conf/vhost/load.conf // 写入如下内容
upstream qq_com    #  “upstream”来指定多个“web server”
{
    ip_hash;   # 作用:确保同个客户端访问在同一个IP
    server 61.135.157.156:80;
    server 125.39.240.113:80;
}
server
{
    listen 80;
    server_name www.qq.com;
    location /
    {
        proxy_pass      http://qq_com;
        proxy_set_header Host   $host;
        proxy_set_header X-Real-IP      $remote_addr;
        proxy_set_header X-Forwarded-For $proxy_add_x_forwarded_for;
    }
}
Nginx 不支持代理 https ;但可以在Nginx代理上设置https 监听
12. Nginx配置SSL(https 访问)
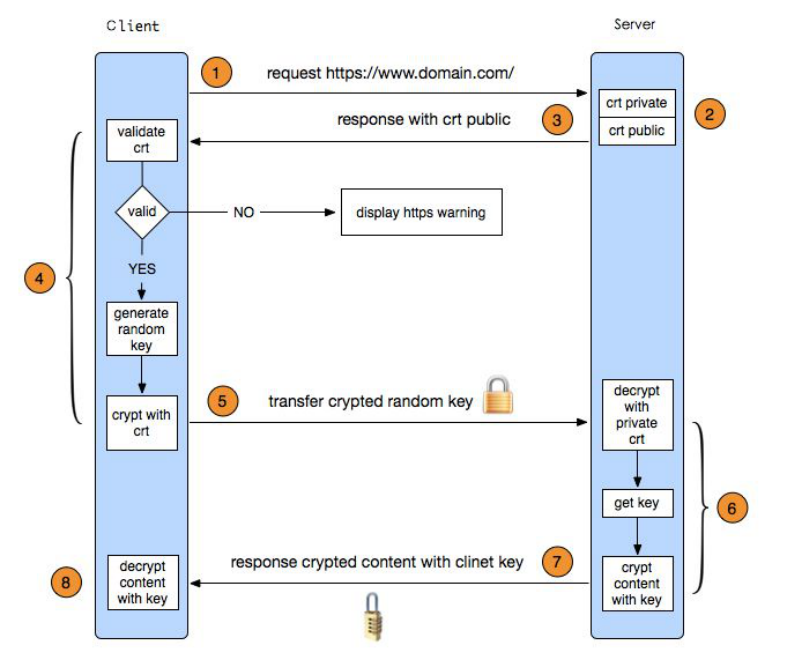
12.1. SSL工作流程
- 浏览器发送一个https的请求给服务器;
- 服务器要有一套数字证书,可以自己制作(后面的操作会具体介绍),也可以向组织申请,区别就是自己颁发的证书需要客户端验证通过,才可以继续访问,而使用受信任的公司申请的证书,则不会弹出>提示页面,这套证书其实就是一对公钥和私钥;
- 服务器会把公钥传输给客户端;
- 客户端(浏览器)收到公钥后,会验证其是否合法有效,无效会有警告提醒,有效则会生成一串随机数,并用收到的公钥加密;
- 客户端把加密后的随机字符串传输给服务器;
- 服务器收到加密随机字符串后,先用私钥解密(公钥加密,私钥解密),获取到这一串随机数后,再用这串随机字符串加密传输的数据(该加密为对称加密,所谓对称加密,就是将数据和私钥也就是这个随机字符串>通过某种算法混合在一起,这样除非知道私钥,否则无法获取数据内容);
- 服务器把加密后的数据传输给客户端;
- 客户端收到数据后,再用自己的私钥也就是那个随机字符串解密;
12.2 SSL 工作示意图
12.3. 生成SSL密钥对
- 进入“conf”目录
cd /usr/local/nginx/conf - 创建私钥
openssl genrsa -des3 -out tmp.key 2048//key文件为私钥 - 转换key,取消密码
openssl rsa -in tmp.key -out admin.key//转换key,取消密码
rm -f tmp.key - 生成证书请求文件
openssl req -new -key admin.key -out admin.csr//生成证书请求文件,需要拿这个文件和私钥一起生产公钥文件 - 生成公钥文件
openssl x509 -req -days 365 -in admin.csr -signkey admin.key -out admin.crt// 这里的admin.crt为公钥
12.4. Nginx配置 SSL
- 编辑配置:
vim /usr/local/nginx/conf/vhost/ssl.conf//加入如下内容
server
{
    listen 443;
    server_name admin.com;
    index index.html index.php;
    root /data/wwwroot/admin.com;
    ssl on;
    ssl_certificate admin.crt;
    ssl_certificate_key admin.key;
    ssl_protocols TLSv1 TLSv1.1 TLSv1.2;
}
- 检查&加载配置
-t && -s reload//若报错unknown directive “ssl”,需要重新编译nginx,加上--with-http_ssl_module - 创建目录、网页:
mkdir /data/wwwroot/aming.com
echo “ssl test page.”>/data/wwwroot/admin.com/index.html - Windows测试网页:
编辑hosts,增加 127.0.0.1 admin.com
浏览器访问:https://admin.com/
二、 Nginx 配置 root 目录、虚拟目录 alias
Nginx是通过 alias 设置虚拟目录,在Nginx的配置中,alias目录和root目录是有区别的。
-
alias 指定的目录是准确的,即 location 匹配访问的 path 目录下的文件直接是在alias目录下查找的;
-
root 指定的目录是 location 匹配访问的 path 目录的上一级目录,这个path目录一定要是真实存在root指定目录下的;
-
使用 alias 标签的目录块中不能使用 rewrite 的 break(具体原因不明);另外,alias指定的目录后面必须要加上
/符号; -
alias 虚拟目录配置中
-
location 匹配的 path 目录后面不带“/”,
那么访问的 url 地址中这个 path 目录后面加不加“/”不影响访问,访问时它会自动加上“/”; -
location 匹配的 path 目录后面加上“/”,
那么访问的url地址中这个path目录必须要加上“/”,访问时它不会自动加上“/”。如果不加上/,访问就会失败!
-
-
root 目录配置中,location 匹配的 path 目录后面带不带“/”,都不会影响访问。
举例说明: 比如Nginx配置的域名是www.abcd.com
1. 示例一
1.1 alias 虚拟目录配置
alias 虚拟目录配置下,访问http://www.abcd.com/huan/a.html实际指定的是/home/www/huan/a.html;
location /huan/ {
      alias /home/www/huan/;
}
注意:alias指定的目录后面必须要加上"/",即/home/www/huan/不能改成/home/www/huan;
1.2 root 目录配置
如下:这样 nginx 就会去 /home/www/huan下寻找http://www.abcd.com/huan的访问资源,两者配置后的访问效果是一样的;
location /huan/ {
       root /home/www/;
}
2. 示例二
上面的例子中alias设置的目录名和 location 匹配访问的 path 目录名一致,这样可以直接改成 root 目录配置;那要是不一致呢?
2.1 alias 虚拟目录配置:
location /web/ {
      alias /home/www/html/;
}
访问http://www.abcd.com/web的时候就会去/home/www/html/下寻找访问资源;这样的话,还不能直接改成root目录配置。
2.2 root 目录配置
如果非要改成root目录配置,就只能在/home/www下将html->web(做软连接,即快捷方式),如下:
location /web/ {
     root /home/www/;
}
ln -s /home/www/web /home/www/html //即保持/home/www/web和/home/www/html内容一直
-
所以,一般情况下,在nginx配置中的良好习惯是:
- 在location /中配置root目录;
- 在location /path中配置alias虚拟目录。
例 1:
server {
          listen 80;
          server_name www.abcd.com;
          index index.html index.php index.htm;
          access_log /usr/local/nginx/logs/image.log;

    location / {
        root /var/www/html;
        }

   location /haha {            # 匹配的path目录haha不需要真实存在alias指定的目录中
       alias /var/www/html/ops/;    # 后面的"/"符号一定要带上
       rewrite ^/opp/hen.php(.*)$ /opp/hen.php?s=$1 last;
    # rewrite ^/opp/(.*)$ /opp/hen.php?s=$1 last;
       }

   location /wang {           # 匹配的path目录wang一定要真实存在root指定的目录中(就/var/www/html下一定要有wang目录存在)
      root /var/www/html;
     }

 }
例 2:
[root@web01 vhosts]# cat www.cde.com.conf
server {
      listen      80;
      server_name www.cde.com;

      access_log  /data/nginx/logs/www.cde.com-access.log main;
      error_log  /data/nginx/logs/www.cde.com-error.log;

 location / {
      root /data/web/cde;
      index index.php index.html index.htm;
      }

  location /document/ {
      alias /data/web/document/;
}

  }
[root@web01 vhosts]# ll /data/web/
total 4
drwxrwxr-x 2 app app   33 Nov 22 10:22 document
drwxrwxr-x 4 app app  173 Sep 23 15:00 cde
如上配置后,则:
访问http://www.cde.com/admin 就会找到/data/web/cde/admin目录
访问http://www.cde.com/document 就会找到/data/web/document 目录 (里面是一些静态资源)

 浙公网安备 33010602011771号