
elasticSerach 知识学习
一 介绍:
ElasticSearch是一个基于Lucene的搜索服务器。它提供了一个分布式多用户能力的全文搜索引擎,基于RESTful web接口。Elasticsearch是用Java语言开发的,并作为Apache许可条款下的开放源码发布,是一种流行的企业级搜索引擎。ElasticSearch用于云计算中,能够达到实时搜索,稳定,可靠,快速,安装使用方便。官方客户端在Java、.NET(C#)、PHP、Python、Apache Groovy、Ruby和许多其他语言中都是可用的。根据DB-Engines的排名显示,Elasticsearch是最受欢迎的企业搜索引擎,其次是Apache Solr,也是基于Lucene。
ElasticSearch 是一个分布式、高扩展、高实时的搜索与数据分析引擎。它能很方便的使大量数据具有搜索、分析和探索的能力。充分利用ElasticSearch的水平伸缩性,能使数据在生产环境变得更有价值。
ElasticSearch 的实现原理主要分为以下几个步骤,首先用户将数据提交到Elastic Search 数据库中,再通过分词控制器去将对应的语句分词,将其权重和分词结果一并存入数据,当用户搜索数据时候,再根据权重将结果排名,打分,再将返回结果呈现给用户。
总结:
1、elasticsearch是一个基于Lucene的高扩展的分布式搜索服务器,支持开箱即用。
2、elasticsearch隐藏了Lucene的复杂性,对外提供Restful 接口来操作索引、搜索。
突出优点:
1. 扩展性好,可部署上百台服务器集群,处理PB级数据。
2.近实时的去索引数据、搜索数据。
es和solr选择哪个?
1.如果你公司现在用的solr可以满足需求就不要换了。
2.如果你公司准备进行全文检索项目的开发,建议优先考虑elasticsearch,因为像Github这样大规模的搜索都在用
二 elasticsearch概念介绍
1 cluster:
代表一个集群,集群中有多个节点,其中有一个为主节点,这个主节点是可以通过选举产生的,主从节点是对于集群内部来说的。es的一个概念就是去中心化,字面上理解就是无中心节点,这是对于集群外部来说的,因为从外部来看es集群,在逻辑上是个整体,你与任何一个节点的通信和与整个es集群通信是等价的。
映射是用于定义ES对索引中字段的存储类型、分词方式和是否存储等信息,就像数据库中的 schema ,描述了文档可能具有的字段或属性、每个字段的数据类型。只不过关系型数据库建表时必须指定字段类型,而ES对于字段类型可以不指定然后动态对字段类型猜测,也可以在创建索引时具体指定字段的类型。
对字段类型根据数据格式自动识别的映射称之为动态映射(Dynamic mapping),我们创建索引时具体定义字段类型的映射称之为静态映射或显示映射(Explicit mapping)在索引中每个文档都包括了一个或多个field,创建映射就是向索引库中创建field的过程,下边是document和field
与关系数据库的概念的类比:
文档(Document)----------------Row记录
字段(Field)-------------------Columns 列
注意:6.0之前的版本有type(类型)概念,type相当于关系数据库的表,ES官方将在ES9.0版本中彻底删除type。
上边讲的创建索引库相当于关系数据库中的数据库还是表?
1、如果相当于数据库就表示一个索引库可以创建很多不同类型的文档,这在ES中也是允许的。
2、如果相当于表就表示一个索引库只能存储相同类型的文档,ES官方建议 在一个索引库中只存储相同类型的文档
安装配置:
1、新版本要求至少jdk1.8以上。
2、支持tar、zip、rpm等多种安装方式。
在windows下开发建议使用ZIP安装方式。
3、支持docker方式安装
详细参见:https://www.elastic.co/guide/en/elasticsearch/reference/current/install-elasticsearch.html
下载 ES: Elasticsearch 6.2.1
https://www.elastic.co/downloads/past-releases
解压 elasticsearch-6.2.1.zip
解压之后截图:
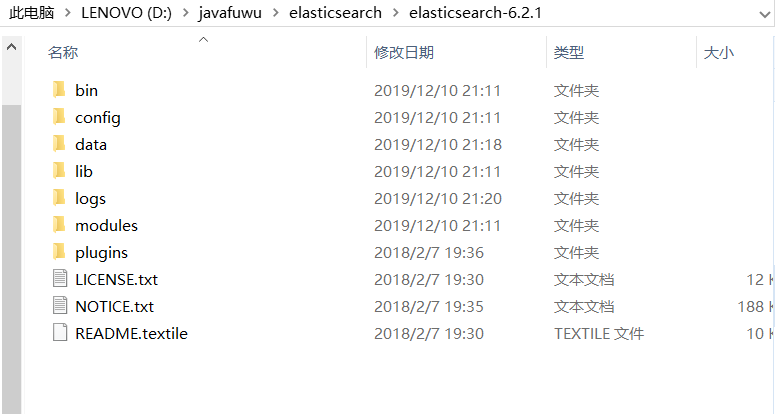
bin:脚本目录,包括:启动、停止等可执行脚本
config:配置文件目录
data:索引目录,存放索引文件的地方
logs:日志目录
modules:模块目录,包括了es的功能模块
plugins :插件目录,es支持插件机制
配置文件详解:
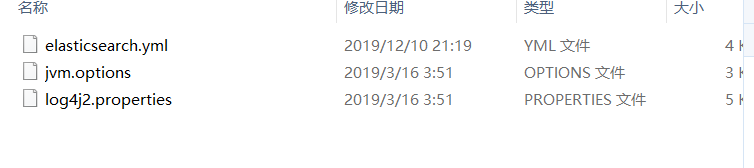
elasticsearch.yml : 用于配置Elasticsearch运行参数
jvm.options : 用于配置Elasticsearch JVM设置
log4j2.properties: 用于配置Elasticsearch日志
elasticsearch.yml 配置: 我的配置:
# ======================== Elasticsearch Configuration =========================
#
# NOTE: Elasticsearch comes with reasonable defaults for most settings.
#       Before you set out to tweak and tune the configuration, make sure you
#       understand what are you trying to accomplish and the consequences.
#
# The primary way of configuring a node is via this file. This template lists
# the most important settings you may want to configure for a production cluster.
#
# Please consult the documentation for further information on configuration options:
# https://www.elastic.co/guide/en/elasticsearch/reference/index.html
#
# ---------------------------------- Cluster -----------------------------------
#
# Use a descriptive name for your cluster:
#
#cluster.name: my-application
#
# ------------------------------------ Node ------------------------------------
#
# Use a descriptive name for the node:
#
#node.name: node-1
#
# Add custom attributes to the node:
#
#node.attr.rack: r1
#
# ----------------------------------- Paths ------------------------------------
#
# Path to directory where to store the data (separate multiple locations by comma):
#
#path.data: /path/to/data
#
# Path to log files:
#
#path.logs: /path/to/logs
#
# ----------------------------------- Memory -----------------------------------
#
# Lock the memory on startup:
#
#bootstrap.memory_lock: true
#
# Make sure that the heap size is set to about half the memory available
# on the system and that the owner of the process is allowed to use this
# limit.
#
# Elasticsearch performs poorly when the system is swapping the memory.
#
# ---------------------------------- Network -----------------------------------
#
# Set the bind address to a specific IP (IPv4 or IPv6):
#
#network.host: 192.168.0.1
#
# Set a custom port for HTTP:
#
#http.port: 9200
#
# For more information, consult the network module documentation.
#
# --------------------------------- Discovery ----------------------------------
#
# Pass an initial list of hosts to perform discovery when new node is started:
# The default list of hosts is ["127.0.0.1", "[::1]"]
#
#discovery.zen.ping.unicast.hosts: ["host1", "host2"]
#
# Prevent the "split brain" by configuring the majority of nodes (total number of master-eligible nodes / 2 + 1):
#
#discovery.zen.minimum_master_nodes:
#
# For more information, consult the zen discovery module documentation.
#
# ---------------------------------- Gateway -----------------------------------
#
# Block initial recovery after a full cluster restart until N nodes are started:
#
#gateway.recover_after_nodes: 3
#
# For more information, consult the gateway module documentation.
#
# ---------------------------------- Various -----------------------------------
#
# Require explicit names when deleting indices:
#
#action.destructive_requires_name: true

cluster.name: cxy
node.name: cxy_node_1
network.host: 0.0.0.0
http.port: 9200
transport.tcp.port: 9300
node.master: true
node.data: true
discovery.zen.ping.unicast.hosts: ["0.0.0.0:9300", "0.0.0.0:9301"]
discovery.zen.minimum_master_nodes: 1
node.ingest: true
bootstrap.memory_lock: false
node.max_local_storage_nodes: 2

path.data: D:\javafuwu\elasticsearch\elasticsearch-6.2.1\data
path.logs: D:\javafuwu\elasticsearch\elasticsearch-6.2.1\logs

http.cors.enabled: true
http.cors.allow-origin: /.*/
jvm配置:
## JVM configuration

################################################################
## IMPORTANT: JVM heap size
################################################################
##
## You should always set the min and max JVM heap
## size to the same value. For example, to set
## the heap to 4 GB, set:
##
## -Xms4g
## -Xmx4g
##
## See https://www.elastic.co/guide/en/elasticsearch/reference/current/heap-size.html
## for more information
##
################################################################

# Xms represents the initial size of total heap space
# Xmx represents the maximum size of total heap space

-Xms1g
-Xmx1g

################################################################
## Expert settings
################################################################
##
## All settings below this section are considered
## expert settings. Don't tamper with them unless
## you understand what you are doing
##
################################################################

## GC configuration
-XX:+UseConcMarkSweepGC
-XX:CMSInitiatingOccupancyFraction=75
-XX:+UseCMSInitiatingOccupancyOnly

## optimizations

# pre-touch memory pages used by the JVM during initialization
-XX:+AlwaysPreTouch

## basic

# explicitly set the stack size
-Xss1m

# set to headless, just in case
-Djava.awt.headless=true

# ensure UTF-8 encoding by default (e.g. filenames)
-Dfile.encoding=UTF-8

# use our provided JNA always versus the system one
-Djna.nosys=true

# turn off a JDK optimization that throws away stack traces for common
# exceptions because stack traces are important for debugging
-XX:-OmitStackTraceInFastThrow

# flags to configure Netty
-Dio.netty.noUnsafe=true
-Dio.netty.noKeySetOptimization=true
-Dio.netty.recycler.maxCapacityPerThread=0

# log4j 2
-Dlog4j.shutdownHookEnabled=false
-Dlog4j2.disable.jmx=true

-Djava.io.tmpdir=${ES_TMPDIR}

## heap dumps

# generate a heap dump when an allocation from the Java heap fails
# heap dumps are created in the working directory of the JVM
-XX:+HeapDumpOnOutOfMemoryError

# specify an alternative path for heap dumps
# ensure the directory exists and has sufficient space
#-XX:HeapDumpPath=/heap/dump/path

## JDK 8 GC logging

8:-XX:+PrintGCDetails
8:-XX:+PrintGCDateStamps
8:-XX:+PrintTenuringDistribution
8:-XX:+PrintGCApplicationStoppedTime
8:-Xloggc:logs/gc.log
8:-XX:+UseGCLogFileRotation
8:-XX:NumberOfGCLogFiles=32
8:-XX:GCLogFileSize=64m

# JDK 9+ GC logging
9-:-Xlog:gc*,gc+age=trace,safepoint:file=logs/gc.log:utctime,pid,tags:filecount=32,filesize=64m
# due to internationalization enhancements in JDK 9 Elasticsearch need to set the provider to COMPAT otherwise
# time/date parsing will break in an incompatible way for some date patterns and locals
9-:-Djava.locale.providers=COMPAT
日志配置:
status = error

# log action execution errors for easier debugging
logger.action.name = org.elasticsearch.action
logger.action.level = debug

appender.console.type = Console
appender.console.name = console
appender.console.layout.type = PatternLayout
appender.console.layout.pattern = [%d{ISO8601}][%-5p][%-25c{1.}] %marker%m%n

appender.rolling.type = RollingFile
appender.rolling.name = rolling
appender.rolling.fileName = ${sys:es.logs.base_path}${sys:file.separator}${sys:es.logs.cluster_name}.log
appender.rolling.layout.type = PatternLayout
appender.rolling.layout.pattern = [%d{ISO8601}][%-5p][%-25c{1.}] %marker%.-10000m%n
appender.rolling.filePattern = ${sys:es.logs.base_path}${sys:file.separator}${sys:es.logs.cluster_name}-%d{yyyy-MM-dd}-%i.log.gz
appender.rolling.policies.type = Policies
appender.rolling.policies.time.type = TimeBasedTriggeringPolicy
appender.rolling.policies.time.interval = 1
appender.rolling.policies.time.modulate = true
appender.rolling.policies.size.type = SizeBasedTriggeringPolicy
appender.rolling.policies.size.size = 128MB
appender.rolling.strategy.type = DefaultRolloverStrategy
appender.rolling.strategy.fileIndex = nomax
appender.rolling.strategy.action.type = Delete
appender.rolling.strategy.action.basepath = ${sys:es.logs.base_path}
appender.rolling.strategy.action.condition.type = IfFileName
appender.rolling.strategy.action.condition.glob = ${sys:es.logs.cluster_name}-*
appender.rolling.strategy.action.condition.nested_condition.type = IfAccumulatedFileSize
appender.rolling.strategy.action.condition.nested_condition.exceeds = 2GB

rootLogger.level = info
rootLogger.appenderRef.console.ref = console
rootLogger.appenderRef.rolling.ref = rolling

appender.deprecation_rolling.type = RollingFile
appender.deprecation_rolling.name = deprecation_rolling
appender.deprecation_rolling.fileName = ${sys:es.logs.base_path}${sys:file.separator}${sys:es.logs.cluster_name}_deprecation.log
appender.deprecation_rolling.layout.type = PatternLayout
appender.deprecation_rolling.layout.pattern = [%d{ISO8601}][%-5p][%-25c{1.}] %marker%.-10000m%n
appender.deprecation_rolling.filePattern = ${sys:es.logs.base_path}${sys:file.separator}${sys:es.logs.cluster_name}_deprecation-%i.log.gz
appender.deprecation_rolling.policies.type = Policies
appender.deprecation_rolling.policies.size.type = SizeBasedTriggeringPolicy
appender.deprecation_rolling.policies.size.size = 1GB
appender.deprecation_rolling.strategy.type = DefaultRolloverStrategy
appender.deprecation_rolling.strategy.max = 4

logger.deprecation.name = org.elasticsearch.deprecation
logger.deprecation.level = warn
logger.deprecation.appenderRef.deprecation_rolling.ref = deprecation_rolling
logger.deprecation.additivity = false

appender.index_search_slowlog_rolling.type = RollingFile
appender.index_search_slowlog_rolling.name = index_search_slowlog_rolling
appender.index_search_slowlog_rolling.fileName = ${sys:es.logs.base_path}${sys:file.separator}${sys:es.logs.cluster_name}_index_search_slowlog.log
appender.index_search_slowlog_rolling.layout.type = PatternLayout
appender.index_search_slowlog_rolling.layout.pattern = [%d{ISO8601}][%-5p][%-25c] %marker%.-10000m%n
appender.index_search_slowlog_rolling.filePattern = ${sys:es.logs.base_path}${sys:file.separator}${sys:es.logs.cluster_name}_index_search_slowlog-%d{yyyy-MM-dd}.log
appender.index_search_slowlog_rolling.policies.type = Policies
appender.index_search_slowlog_rolling.policies.time.type = TimeBasedTriggeringPolicy
appender.index_search_slowlog_rolling.policies.time.interval = 1
appender.index_search_slowlog_rolling.policies.time.modulate = true

logger.index_search_slowlog_rolling.name = index.search.slowlog
logger.index_search_slowlog_rolling.level = trace
logger.index_search_slowlog_rolling.appenderRef.index_search_slowlog_rolling.ref = index_search_slowlog_rolling
logger.index_search_slowlog_rolling.additivity = false

appender.index_indexing_slowlog_rolling.type = RollingFile
appender.index_indexing_slowlog_rolling.name = index_indexing_slowlog_rolling
appender.index_indexing_slowlog_rolling.fileName = ${sys:es.logs.base_path}${sys:file.separator}${sys:es.logs.cluster_name}_index_indexing_slowlog.log
appender.index_indexing_slowlog_rolling.layout.type = PatternLayout
appender.index_indexing_slowlog_rolling.layout.pattern = [%d{ISO8601}][%-5p][%-25c] %marker%.-10000m%n
appender.index_indexing_slowlog_rolling.filePattern = ${sys:es.logs.base_path}${sys:file.separator}${sys:es.logs.cluster_name}_index_indexing_slowlog-%d{yyyy-MM-dd}.log
appender.index_indexing_slowlog_rolling.policies.type = Policies
appender.index_indexing_slowlog_rolling.policies.time.type = TimeBasedTriggeringPolicy
appender.index_indexing_slowlog_rolling.policies.time.interval = 1
appender.index_indexing_slowlog_rolling.policies.time.modulate = true

logger.index_indexing_slowlog.name = index.indexing.slowlog.index
logger.index_indexing_slowlog.level = trace
logger.index_indexing_slowlog.appenderRef.index_indexing_slowlog_rolling.ref = index_indexing_slowlog_rolling
logger.index_indexing_slowlog.additivity = false
注意在生产上配置不可以配置debug级别,
然后启动:
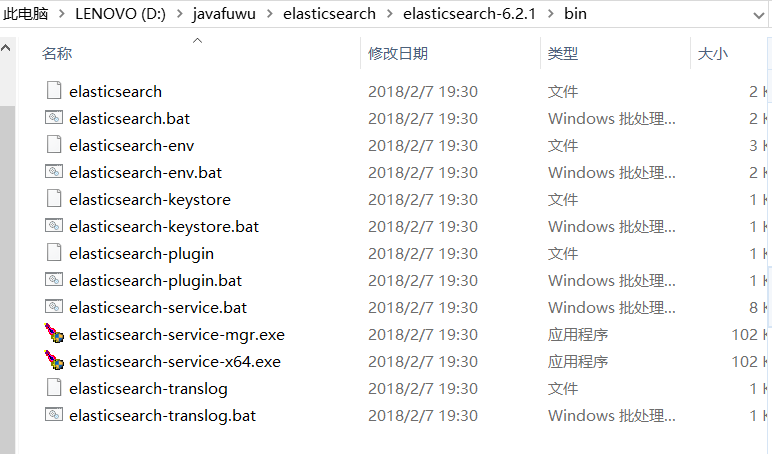
点击elasticsearch.bat就可以启动了:
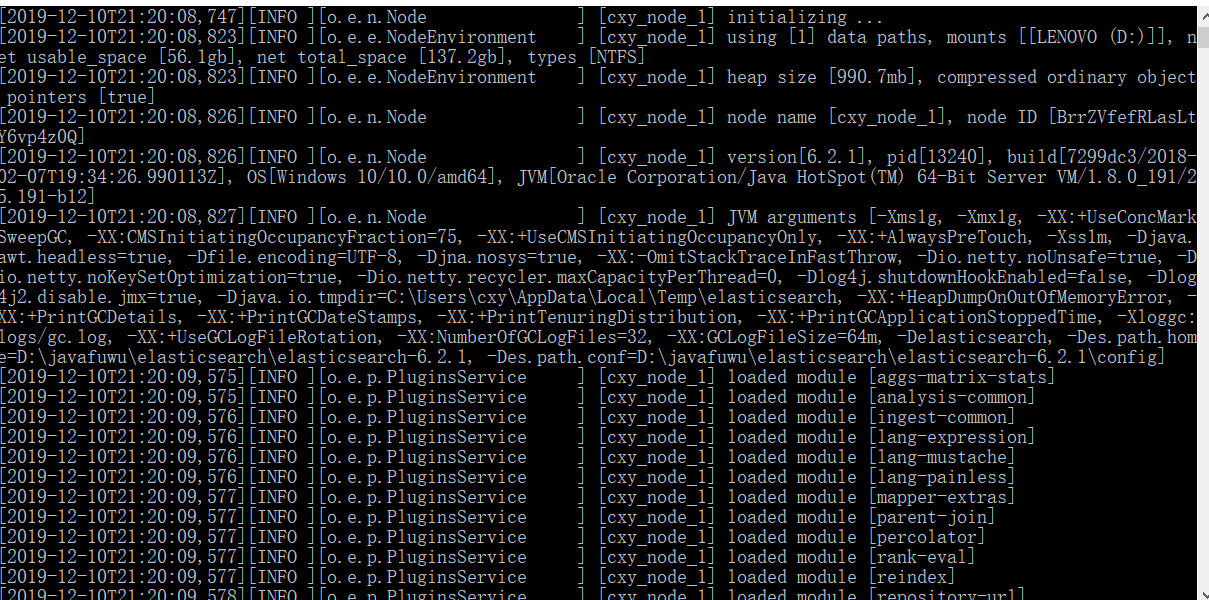
然后在浏览器上输入:
localhost:9200就可以看到相关信息
{
  "name" : "cxy_node_1",
  "cluster_name" : "cxy",
  "cluster_uuid" : "P38fyKScTreA8ptsvHe0PQ",
  "version" : {
    "number" : "6.2.1",
    "build_hash" : "7299dc3",
    "build_date" : "2018-02-07T19:34:26.990113Z",
    "build_snapshot" : false,
    "lucene_version" : "7.2.1",
    "minimum_wire_compatibility_version" : "5.6.0",
    "minimum_index_compatibility_version" : "5.0.0"
  },
  "tagline" : "You Know, for Search"
}
有些地方大家是不是很熟悉,就是在配置文件中配置的集群名称
四 插件安装:
head插件是ES的一个可视化管理插件,用来监视ES的状态,并通过head客户端和ES服务进行交互,比如创建映
射、创建索引等,head的项目地址在https://github.com/mobz/elasticsearch-head 。
从ES6.0开始,head插件支持使得node.js运行。
1、安装node.js
2、下载head并运行
git clone git://github.com/mobz/elasticsearch-head.git
cd elasticsearch-head
npm install
npm run start open
HTTP://本地主机:9100 /
3、运行

可以看到相关结果:
五:创建索引和映射:
使用postman工具:
put http://localhost:9200/chenxuyou 此处chenxuyou 是索引库的名称
body里面丢进参数:参数和副本
{
"settings":{
"index":{
"number_of_shards":1,
"number_of_replicas":0
    }
    }
}
然后返回结果
{
    "acknowledged": true,
    "shards_acknowledged": true,
    "index": "chenxuyou"
}
创建映射:
http://localhost:9200/chenxuyou1/doc/_mapping

{
"properties":{
    "name":{
        "type":"text"
    },
    "description":{
        "type":"text"
    },
    "address":{
        "type":"keyword"
    }
}


}

结果:
{
"acknowledged": true
}
然后将方法写get 就可以获取到刚才创建的信息
http://localhost:9200/chenxuyou1/doc/_mapping get方法
结果:
{
    "chenxuyou1": {
        "mappings": {
            "doc": {
                "properties": {
                    "address": {
                        "type": "keyword"
                    },
                    "description": {
                        "type": "text"
                    },
                    "name": {
                        "type": "text"
                    }
                }
            }
        }
    }
}
就可以将所有信息进行查询:
在这里创建更快
创建文档:
http://localhost:9200/chenxuyou2/doc/4028e58161bcf7f40161bcf8b77c0000


{
"name":"Bootstrap开发框架",
"description":"Bootstrap是由Twitter推出的一个前台页面开发框架,在行业之中使用较为广泛。此开发框架包含了大量的CSS、JS程序代码,可以帮助开发者(尤其是不擅长页面开程序人员)轻松的实现一个不受浏览器限制的精美界面效果。",
"address":"201001"


}

{
    "_index": "chenxuyou2",
    "_type": "doc",
    "_id": "4028e58161bcf7f40161bcf8b77c0000",
    "_version": 1,
    "result": "created",
    "_shards": {
        "total": 1,
        "successful": 1,
        "failed": 0
    },
    "_seq_no": 0,
    "_primary_term": 1
}
查询文档:
http://localhost:9200/chenxuyou2/doc/4028e58161bcf7f40161bcf8b77c0000


get请求


结果:
{
    "_index": "chenxuyou2",
    "_type": "doc",
    "_id": "4028e58161bcf7f40161bcf8b77c0000",
    "_version": 1,
    "found": true,
    "_source": {
        "name": "Bootstrap开发框架",
        "description": "Bootstrap是由Twitter推出的一个前台页面开发框架,在行业之中使用较为广泛。此开发框架包含了大量的CSS、JS程序代码,可以帮助开发者(尤其是不擅长页面开程序人员)轻松的实现一个不受浏览器限制的精美界面效果。",
        "address": "201001"
    }
}
查询所有文档:
http://localhost:9200/chenxuyou2/doc/_search

get


{
    "took": 27,
    "timed_out": false,
    "_shards": {
        "total": 1,
        "successful": 1,
        "skipped": 0,
        "failed": 0
    },
    "hits": {
        "total": 1,
        "max_score": 1,
        "hits": [
            {
                "_index": "chenxuyou2",
                "_type": "doc",
                "_id": "4028e58161bcf7f40161bcf8b77c0000",
                "_score": 1,
                "_source": {
                    "name": "Bootstrap开发框架",
                    "description": "Bootstrap是由Twitter推出的一个前台页面开发框架,在行业之中使用较为广泛。此开发框架包含了大量的CSS、JS程序代码,可以帮助开发者(尤其是不擅长页面开程序人员)轻松的实现一个不受浏览器限制的精美界面效果。",
                    "address": "201001"
                }
            }
        ]
    }
}
查询带关键字:
http://localhost:9200/chenxuyou2/doc/_search?q=name:bootstrap

get

结果:

{
    "took": 2,
    "timed_out": false,
    "_shards": {
        "total": 1,
        "successful": 1,
        "skipped": 0,
        "failed": 0
    },
    "hits": {
        "total": 1,
        "max_score": 0.2876821,
        "hits": [
            {
                "_index": "chenxuyou2",
                "_type": "doc",
                "_id": "4028e58161bcf7f40161bcf8b77c0000",
                "_score": 0.2876821,
                "_source": {
                    "name": "Bootstrap开发框架",
                    "description": "Bootstrap是由Twitter推出的一个前台页面开发框架,在行业之中使用较为广泛。此开发框架包含了大量的CSS、JS程序代码,可以帮助开发者(尤其是不擅长页面开程序人员)轻松的实现一个不受浏览器限制的精美界面效果。",
                    "address": "201001"
                }
            }
        ]
    }
}
 http://localhost:9200/chenxuyou2/doc/_search?q=address:201001

get

结果:
{
    "took": 2,
    "timed_out": false,
    "_shards": {
        "total": 1,
        "successful": 1,
        "skipped": 0,
        "failed": 0
    },
    "hits": {
        "total": 1,
        "max_score": 0.2876821,
        "hits": [
            {
                "_index": "chenxuyou2",
                "_type": "doc",
                "_id": "4028e58161bcf7f40161bcf8b77c0000",
                "_score": 0.2876821,
                "_source": {
                    "name": "Bootstrap开发框架",
                    "description": "Bootstrap是由Twitter推出的一个前台页面开发框架,在行业之中使用较为广泛。此开发框架包含了大量的CSS、JS程序代码,可以帮助开发者(尤其是不擅长页面开程序人员)轻松的实现一个不受浏览器限制的精美界面效果。",
                    "address": "201001"
                }
            }
        ]
    }
查询不存在:
 http://localhost:9200/chenxuyou2/doc/_search?q=address:20100


get


{
    "took": 1,
    "timed_out": false,
    "_shards": {
        "total": 1,
        "successful": 1,
        "skipped": 0,
        "failed": 0
    },
    "hits": {
        "total": 0,
        "max_score": null,
        "hits": []
    }
}
查询结果内容的意思:
took:本次操作花费的时间,单位为毫秒。
timed_out:请求是否超时
_shards:说明本次操作共搜索了哪些分片
hits:搜索命中的记录
hits.total :符合条件的文档总数
hits.hits :匹配度较高的前N个文档
hits.max_score:文档匹配得分,这里为最高分
_score:每个文档都有一个匹配度得分,按照降序排列。
_source:显示了文档的原始内容。
六 ik分词器的使用:
首先为什么要使用ik分词器呢:
测试分词:
localhost:9200/_analyze

post

body内容:
{"text":"测试分词器,后边是测试内容"


}

结果:
{
    "tokens": [
        {
            "token": "测",
            "start_offset": 0,
            "end_offset": 1,
            "type": "<IDEOGRAPHIC>",
            "position": 0
        },
        {
            "token": "试",
            "start_offset": 1,
            "end_offset": 2,
            "type": "<IDEOGRAPHIC>",
            "position": 1
        },
        {
            "token": "分",
            "start_offset": 2,
            "end_offset": 3,
            "type": "<IDEOGRAPHIC>",
            "position": 2
        },
        {
            "token": "词",
            "start_offset": 3,
            "end_offset": 4,
            "type": "<IDEOGRAPHIC>",
            "position": 3
        },
        {
            "token": "器",
            "start_offset": 4,
            "end_offset": 5,
            "type": "<IDEOGRAPHIC>",
            "position": 4
        },
        {
            "token": "后",
            "start_offset": 6,
            "end_offset": 7,
            "type": "<IDEOGRAPHIC>",
            "position": 5
        },
        {
            "token": "边",
            "start_offset": 7,
            "end_offset": 8,
            "type": "<IDEOGRAPHIC>",
            "position": 6
        },
        {
            "token": "是",
            "start_offset": 8,
            "end_offset": 9,
            "type": "<IDEOGRAPHIC>",
            "position": 7
        },
        {
            "token": "测",
            "start_offset": 9,
            "end_offset": 10,
            "type": "<IDEOGRAPHIC>",
            "position": 8
        },
        {
            "token": "试",
            "start_offset": 10,
            "end_offset": 11,
            "type": "<IDEOGRAPHIC>",
            "position": 9
        },
        {
            "token": "内",
            "start_offset": 11,
            "end_offset": 12,
            "type": "<IDEOGRAPHIC>",
            "position": 10
        },
        {
            "token": "容",
            "start_offset": 12,
            "end_offset": 13,
            "type": "<IDEOGRAPHIC>",
            "position": 11
        }
    ]
}
可以看到对中文的支持非常差,所以需要中文分词器来进行分词
使用IK分词器可以实现对中文分词的效果。 下载IK分词器:(Github地址:https://github.com/medcl/elasticsearch-analysis-ik)
首先解压ik分词器:
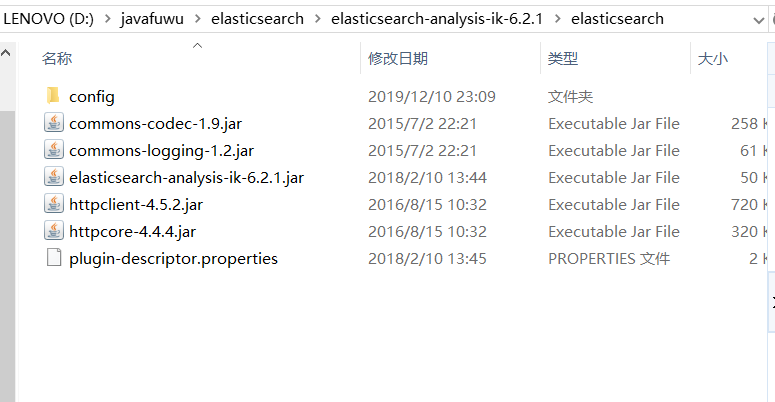
将这个目录拷贝到es的plgin目录下:
ik分词器的测试:
localhost:9200/_analyze

{"text":"测试分词器,后边是测试内容",
"analyzer":"ik_max_word"


}

结果:
{
    "tokens": [
        {
            "token": "测试",
            "start_offset": 0,
            "end_offset": 2,
            "type": "CN_WORD",
            "position": 0
        },
        {
            "token": "分词器",
            "start_offset": 2,
            "end_offset": 5,
            "type": "CN_WORD",
            "position": 1
        },
        {
            "token": "分词",
            "start_offset": 2,
            "end_offset": 4,
            "type": "CN_WORD",
            "position": 2
        },
        {
            "token": "器",
            "start_offset": 4,
            "end_offset": 5,
            "type": "CN_CHAR",
            "position": 3
        },
        {
            "token": "后边",
            "start_offset": 6,
            "end_offset": 8,
            "type": "CN_WORD",
            "position": 4
        },
        {
            "token": "是",
            "start_offset": 8,
            "end_offset": 9,
            "type": "CN_CHAR",
            "position": 5
        },
        {
            "token": "测试",
            "start_offset": 9,
            "end_offset": 11,
            "type": "CN_WORD",
            "position": 6
        },
        {
            "token": "内容",
            "start_offset": 11,
            "end_offset": 13,
            "type": "CN_WORD",
            "position": 7
        }
    ]
}
localhost:9200/_analyze

{"text":"测试分词器,后边是测试内容",
"analyzer":"ik_smart"


}

结果:
{
    "tokens": [
        {
            "token": "测试",
            "start_offset": 0,
            "end_offset": 2,
            "type": "CN_WORD",
            "position": 0
        },
        {
            "token": "分词器",
            "start_offset": 2,
            "end_offset": 5,
            "type": "CN_WORD",
            "position": 1
        },
        {
            "token": "后边",
            "start_offset": 6,
            "end_offset": 8,
            "type": "CN_WORD",
            "position": 2
        },
        {
            "token": "是",
            "start_offset": 8,
            "end_offset": 9,
            "type": "CN_CHAR",
            "position": 3
        },
        {
            "token": "测试",
            "start_offset": 9,
            "end_offset": 11,
            "type": "CN_WORD",
            "position": 4
        },
        {
            "token": "内容",
            "start_offset": 11,
            "end_offset": 13,
            "type": "CN_WORD",
            "position": 5
        }
    ]
}
上面是两种测试:
ik分词器有两种分词模式:ik_max_word和ik_smart模式。
1、ik_max_word 会将文本做最细粒度的拆分,比如会将“中华人民共和国人民大会堂”拆分为“中华人民共和国、中华人民、中华、 华人、人民共和国、人民、共和国、大会堂、大会、会堂等词语。
2、ik_smart 会做最粗粒度的拆分,比如会将“中华人民共和国人民大会堂”拆分为中华人民共和国、人民大会堂。
自定义ik分词器词库:
原因:由于ik分词器只会将常用词库进行分词,那么有些词是不可以分的
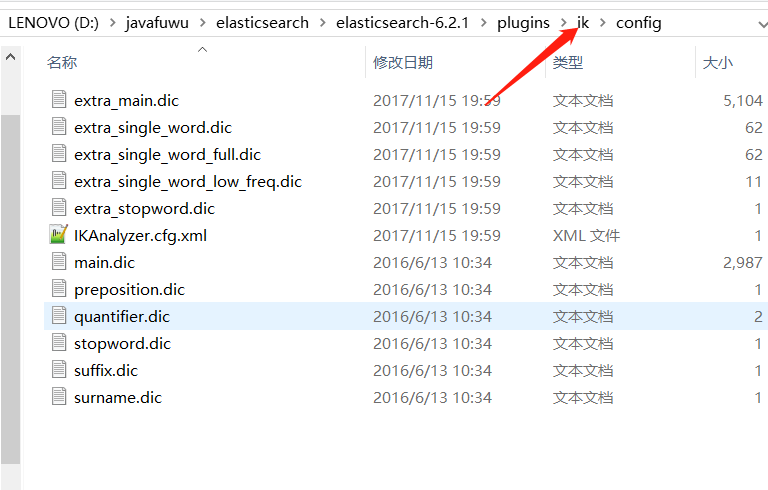
再新建文件:
my.dic
内容:
陈秀峰
风清扬

再配置:
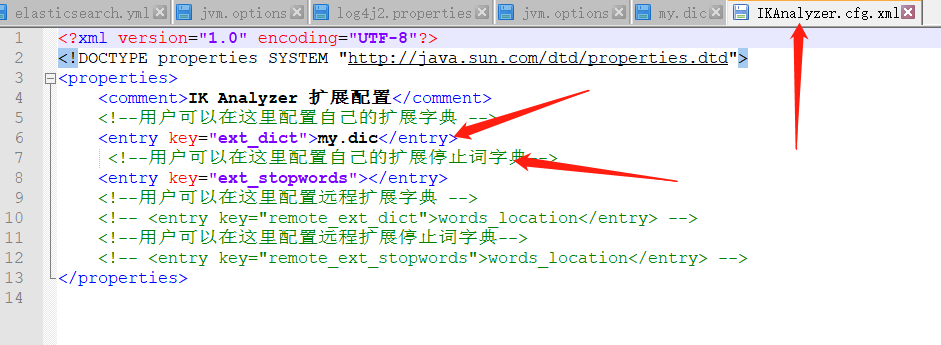
再看分词:
localhost:9200/_analyze

post

{"text":"陈秀峰",
"analyzer":"ik_smart"


}

结果:
{
    "tokens": [
        {
            "token": "陈秀峰",
            "start_offset": 0,
            "end_offset": 3,
            "type": "CN_WORD",
            "position": 0
        }
    ]
}
可以看出已经分词
再测试下:
localhost:9200/_analyze

{"text":"中华人民共和国人民大会堂",
"analyzer":"ik_smart"


}

{
    "tokens": [
        {
            "token": "中华人民共和国人民大会堂",
            "start_offset": 0,
            "end_offset": 12,
            "type": "CN_WORD",
            "position": 0
        }
    ]
}
到此可以看出已经生效
六 映射维护
1 text
1)analyzer
通过analyzer属性指定分词器。
下边指定name的字段类型为text,使用ik分词器的ik_max_word分词模式。
"name": {
                  "type": "text",
                  "analyzer":"ik_max_word"
   }
上边指定了analyzer是指在索引和搜索都使用ik_max_word,如果单独想定义搜索时使用的分词器则可以通过search_analyzer属性。
对于ik分词器建议是索引时使用ik_max_word将搜索内容进行细粒度分词,搜索时使用ik_smart提高搜索精确性。
索引的时候采用最细粒度的分词 ik_max_word,搜索的时候采用粗粒度的分词ik_smart,在搜索的时候采用粗粒度的分词就方便更精确的匹配
例如:我搜索,陈秀峰 三个字,那么采用最粗粒度的分词,去搜索陈秀峰,那么可以精确匹配到这个,如果采用最细粒度的分词,那么就会搜索到,陈, 秀,峰这些,导致搜索的精确性
"name": {
                  "type": "text",
                  "analyzer":"ik_max_word",
                  "search_analyzer":"ik_smart"
   }
2)index
通过index属性指定是否索引。
默认为index=true,即要进行索引,只有进行索引才可以从索引库搜索到。
但是也有一些内容不需要索引,比如:商品图片地址只被用来展示图片,不进行搜索图片,此时可以将index设为false。
删除索引,重新创建映射,将pic的index设置为false,尝试根据pic去搜索,结果搜索不到数据
"name": {
  "type": "text",
              "index":false
           }
看如下,如果将index设置为flase,将不会进行分词,那么这个字段查询只会根据原型来查询
http://localhost:9200/chenxuyou/doc/_mapping

post

内容:
{
    "properties": {
        "name": {
            "type": "text",
            "analyzer": "ik_max_word",
            "search_analyzer": "ik_smart"
        },
        "description": {
            "type": "text",
            "analyzer": "ik_max_word",
            "search_analyzer": "ik_smart"
        },
        "addr": {
            "type": "text",
            "index": false
        },
        "nickname": {
            "type": "text"
        }
    }
}

结果:
{
    "acknowledged": true
}
插入数据:
http://localhost:9200/chenxuyou/doc/4028e58161bcf7f40161bcf8b77c0000
post

{
"name":"es学习",
"description":"ES是一个基于RESTful web接口并且构建在Apache Lucene之上的开源分布式搜索引擎。",
"addr":"ES还是一个分布式文档数据库",
"nickname":"aaaaaaaaaaaaaaa"


}

{
    "_index": "chenxuyou",
    "_type": "doc",
    "_id": "4028e58161bcf7f40161bcf8b77c0000",
    "_version": 1,
    "result": "created",
    "_shards": {
        "total": 2,
        "successful": 1,
        "failed": 0
    },
    "_seq_no": 0,
    "_primary_term": 1
}
可以看到成功了
那么我们来进行搜索下,由于addr的index设置为false了,所以无法分词
http://localhost:9200/chenxuyou/_search?q=name:学习

{
    "took": 106,
    "timed_out": false,
    "_shards": {
        "total": 1,
        "successful": 1,
        "skipped": 0,
        "failed": 0
    },
    "hits": {
        "total": 1,
        "max_score": 0.2876821,
        "hits": [
            {
                "_index": "chenxuyou",
                "_type": "doc",
                "_id": "4028e58161bcf7f40161bcf8b77c0000",
                "_score": 0.2876821,
                "_source": {
                    "name": "es学习",
                    "description": "ES是一个基于RESTful web接口并且构建在Apache Lucene之上的开源分布式搜索引擎。",
                    "addr": "ES还是一个分布式文档数据库",
                    "nickname": "aaaaaaaaaaaaaaa"
                }
            }
        ]
    }
}
http://localhost:9200/chenxuyou/_search?q=description:构建

{
    "took": 4,
    "timed_out": false,
    "_shards": {
        "total": 1,
        "successful": 1,
        "skipped": 0,
        "failed": 0
    },
    "hits": {
        "total": 1,
        "max_score": 0.2876821,
        "hits": [
            {
                "_index": "chenxuyou",
                "_type": "doc",
                "_id": "4028e58161bcf7f40161bcf8b77c0000",
                "_score": 0.2876821,
                "_source": {
                    "name": "es学习",
                    "description": "ES是一个基于RESTful web接口并且构建在Apache Lucene之上的开源分布式搜索引擎。",
                    "addr": "ES还是一个分布式文档数据库",
                    "nickname": "aaaaaaaaaaaaaaa"
                }
            }
        ]
    }
}
http://localhost:9200/chenxuyou/_search?q=addr:ES

{
    "took": 6,
    "timed_out": false,
    "_shards": {
        "total": 1,
        "successful": 1,
        "skipped": 0,
        "failed": 0
    },
    "hits": {
        "total": 0,
        "max_score": null,
        "hits": []
    }
}
由此可知,所有的都支持分词,凡是index指定为falase的就不支持分词查询
keyword关键字字段
上边介绍的 text文本字段在映射时要设置分词器,keyword字段为关键字字段,通常搜索keyword是按照整体搜
索,所以创建keyword字段的索引时是不进行分词的,比如:邮政编码、手机号码、身份证等。keyword字段通常
用于过虑、排序、聚合等。
http://localhost:9200/chenxuyou2/doc/_mapping

post


{
    "properties": {
        "name": {
            "type": "text",
            "analyzer": "ik_max_word",
            "search_analyzer": "ik_smart"
        },
        "description": {
            "type": "text",
            "analyzer": "ik_max_word",
            "search_analyzer": "ik_smart"
        },
        "addr": {
            "type": "text",
            "index": false
        },
        "nickname": {
            "type": "keyword"
        }
    }
}

结果:
{
    "acknowledged": true
}
插入数据:
http://localhost:9200/chenxuyou2/doc/4028e58161bcf7f40161bcf8b77c000

post

{
"name":"es学习",
"description":"ES是一个基于RESTful web接口并且构建在Apache Lucene之上的开源分布式搜索引擎。",
"addr":"ES还是一个分布式文档数据库",
"nickname":"123456"


}
结果:
{
    "_index": "chenxuyou2",
    "_type": "doc",
    "_id": "4028e58161bcf7f40161bcf8b77c000",
    "_version": 1,
    "result": "created",
    "_shards": {
        "total": 2,
        "successful": 1,
        "failed": 0
    },
    "_seq_no": 0,
    "_primary_term": 1
}
操作:
http://localhost:9200/chenxuyou2/_search?q=nickname:12345

{
    "took": 2,
    "timed_out": false,
    "_shards": {
        "total": 1,
        "successful": 1,
        "skipped": 0,
        "failed": 0
    },
    "hits": {
        "total": 0,
        "max_score": null,
        "hits": []
    }
}

http://localhost:9200/chenx2/_search?q=nickname:123456

{
    "took": 2,
    "timed_out": false,
    "_shards": {
        "total": 1,
        "successful": 1,
        "skipped": 0,
        "failed": 0
    },
    "hits": {
        "total": 1,
        "max_score": 0.2876821,
        "hits": [
            {
                "_index": "chenxuyou2",
                "_type": "doc",
                "_id": "4028e58161bcf7f40161bcf8b77c000",
                "_score": 0.2876821,
                "_source": {
                    "name": "es学习",
                    "description": "ES是一个基于RESTful web接口并且构建在Apache Lucene之上的开源分布式搜索引擎。",
                    "addr": "ES还是一个分布式文档数据库",
                    "nickname": "123456"
                }
            }
        ]
    }
}
date日期类型
日期类型不用设置分词器。
通常日期类型的字段用于排序。
1)format
通过format设置日期格式
例子:
下边的设置允许date字段存储年月日时分秒、年月日及毫秒三种格式。
{
"properties": {
        "timestamp": {
          "type":   "date",
          "format": "yyyy‐MM‐dd HH:mm:ss||yyyy‐MM‐dd"
        }
      }
}
数字类型:
1、尽量选择范围小的类型,提高搜索效率
2、对于浮点数尽量用比例因子,比如一个价格字段,单位为元,我们将比例因子设置为100这在ES中会按 分 存
储,映射如下:
 "price": {
  "type": "scaled_float",
        "scaling_factor": 100
  },
由于比例因子为100,如果我们输入的价格是23.45则ES中会将23.45乘以100存储在ES中。
如果输入的价格是23.456,ES会将23.456乘以100再取一个接近原始值的数,得出2346。
使用比例因子的好处是整型比浮点型更易压缩,节省磁盘空间。

 浙公网安备 33010602011771号