springboot 知识点
---恢复内容开始---
1springBoot项目引入方式,
1,继承自父 project (需要没有付项目才能用,一般我们的项目都会有 父 项目 所以 这种方式不推荐 ,记住有这种方式 就可以了)
        <parent>
		<groupId>org.springframework.boot</groupId>
		<artifactId>spring-boot-starter-parent</artifactId>
		<version>1.5.8.RELEASE</version>
	</parent>
2,写dependencyManagement ,推荐 使用这种方式,没有什么限制,dependencyManagement 包着 的依赖不会直接使用,只有在外面 的 dependencies 上面写了才会生效,并且这时候可以不写 版本
       <dependencyManagement>
		<dependencies>
			<dependency>
				<groupId>org.springframework.boot</groupId>
				<artifactId>spring-boot-dependencies</artifactId>
				<version>1.5.8.RELEASE</version>
				<type>pom</type>
				<scope>import</scope>
			</dependency>
		</dependencies>
	</dependencyManagement>
2 springBoot 的启动
第一种方式:SpringApplication application = new SpringApplication();
Set<Object> set = new HashSet<>();
set.add(Main.class );
application.setSources(set);
ConfigurableApplicationContext context = application.run(args);
第二种方式: ConfigurableApplicationContext context = SpringApplication.run(Main.class, args);
备注:上面代码需要引入 springweb
	<dependencies>
		<dependency>
			<groupId>org.springframework.boot</groupId>
			<artifactId>spring-boot-starter-web</artifactId>
		</dependency>
	</dependencies>
3 springBoot 的启动 会把 Sources 当做 配置类,相当有了 @SpringBootConfiguration 注解,所以可以不写@SpringBootConfiguration
4 springBoot 的默认配置文件是 application.properties
4 springBoot 获取 配置文件的三种方式
1,通过context 回去环境对象
context.getEnvironment().getProperty("local.properties")
2,注入环境对象
@Autowired
private Environment environment;
3,使用 @Value("${local.ip}") 在属性上面注入
备注: value的值 格式 ${key}
5 springBoot propertise 的 配置 支持 内部引用 (可以直接在value 中通过表达式接近应用key 对应的 value )
local.ip=127.0.0.1
local.port=8080
local.ipAndPort=${local.ip}:${local.port}
6 配置文件去默认值(如果key 不存在,且不设置默认值或报错) 但是通过 getEnvironment().getProperty("local.def","000000") 这种方式获取不会报错,只会返回null
${key:默认值} (在没有这个key 的时候生效)
例子:@Value("${local.df:99}") (local.df不存在)
7 修改配置文件的位置
默认配置文件才classpath: 根目录 或者 classpath:config/ 目录
8 修改配置文件名
1 修改main 方法启动参数 --spring.config.name=配置文件名(不要拓展名)
2 修改任意 的 路径和文件名 --spring.config.location=classpath:conf/app.properties
3 可以是 file:协议的地址 --spring.config.location=file:D:\eclipsej2ee\springBoot\src\main\resources\conf\app.properties
4 可以有多个 配置文件(逗号隔开) -spring.config.location=file:path,classpath:path2,,classpath:path2
5 可以通过 @PropertySource("classpath:conf/app.properties") 注解方式指定 配置文件 的路径
注:@PropertySources 可以写多个 @PropertySource
注2:可以直接写多个 @PropertySource
6 使用 @ConfigurationProperties(prefix="local") 直接指定 配置文件
注:若果 key 没有 前缀,那么不配置前缀就可以
9,springBoot 的 配置文件可以使yml
10 ,注入集合或者数组 (亲测,必要指定泛型类型),不能是set
key[0]=value0
key[1]=value1
key[2]=value2
11 通过编程方式动态指定 配置文件,需要实现 EnvironmentPostProcessor 接口 并且 在 META-INF/spring.factories 中注册
spring.factories --> org.springframework.boot.env.EnvironmentPostProcessor=com.zyk.springBoot.main.MyEnvironmentPostProcessor
代码实现 environment.getPropertySources().addLast(propertySource); propertySource好像就是以前spring 的placeHoder
spring的 profile
12 指定profile
默认会加载application.properties 设置类 app.setAdditionalProfiles("test"); 会额外加载 application-test.properties,如果 test环境配置和 默认环境配置有key重复,那么 用额外的,如果是数组,不会合并,而是只用额外环境
备注:setAdditionalProfiles 设置额外配置文件 (可以添加多个额外配置)
备注2:--spring.profiles.active=test 也可以设置环境(额外激活)
备注3:--spring.profiles=test 仅仅激活test,不激活默认的环境
13 @Profile 修饰的 Bean 只有在指定环境面 才会生效 (可以指定在类型前面)
spring的 Condition
14 Condition 接口配合 @Conditional 注解使用,修饰@Bean 只有条件成立才,spring才会 调用@Bean 的的方法,
自定义Condition 例子:
@Bean
@Conditional(MyCondition1.class)
public String gbk(){
return "GBK";
}
@Bean
@Conditional(MyCondition2.class)
public String utf(){
return "utf-8";
}
只有MyCondition2.class 接口函数的 方法放回true 的时候才会产生
spring 提供大量默认的Condition注解
备注1:@Conditional 成立需要全部条件 true
备注2:@Conditional 有大量 类似 @ConditionalOn* 的注解,只有单满足 的时候才转配 @Bean
@ConditionalOnBean
@ConditionalOnClass
@ConditionalOnJava
@ConditionalOnExpression
@ConditionalOnNotWebApplication
@ConditionalOnSingleCandidate
spring @Enable*注解
1,@EnableAsync 注解开启后 使用 异步运行后, @Async 修饰的方法 会异步执行(不是代理对象,估计spring是直接改了 这个方法的二进制码 )
15 @Import 导入一个需要spring管理的 类 (可以是配置类或者是普通bean)
注:@Import 可以指向 ImportSelector 接口的实现类,在接口函数中指定 导入的类(接口与方法返回值是 类名全称字符数组)
注2: 可以写 ImportBeanDefinitionRegistrar 的 实现类 用来注册bean
16 spring注解的特点,任意一个自定义注解写入spring 配置类里面,那么这个自定义注解的全部父注解(spring认识的)都会生效 (N层都生效)
17 @EnableAutoConfiguration 的作用 (classpath 下面的 META-INF 里面 spring 工厂文件里面的接口对应的 值都加入到 spring 管理)
1,可以在 META-INF 中写上 org.springframework.boot.autoconfigure.EnableAutoConfiguration=com.zyk.springBoot.Parent
这样 spring会把 Parent 加入spring管理(如果 Parent 是 类加入管理,如果 Parent 是配置 同样),并且上面这种写法的申明的配置 可以被另一的jar(别的项目模块)包使用
注2: 这个注解可以通过 spring.boot.enableautoconfiguration=ture/false 启用或者关闭(可以卸载 application.properties 配置文件 或者 args )
18 springBoot 的事件监听 需要继承 ApplicationEvent ,实现 MyApplicationListener ,需要先注册监听器,然后发布事件
例子:
SpringApplication app = new SpringApplication(Main.class);
app.addListeners(new MyApplicationListener());
ConfigurableApplicationContext context = app.run(args);
启用这个监听器需要启用才能接受事件,启动的方式可以通过
1 任意方式吧监听器加入 spring 容器中 (当做普通bean 加入就可以)
2 在 SpringApplication app = new SpringApplication(Main.class); app.addListeners(new MyApplicationListener());
3 在 配置文件 application.properties 中写入 context.listener.classes=com.zyk.springBoot.event.MyApplicationListener (这种方法和 DelegatingApplicationListener 有关)
4 可以 不实现 ApplicationListener 直接在一个方法中写上注解 @EventListener (参数决定可以接受什么类型的 事件 ,参数类型任意,Object 可以接受任何类型 ) (和 EventListenerMethodProcessor 这个 处理进程类有关 )
@EventListener
public void listener1( MyApplicationEvent event){
System.out.println( " 直接接收: " + event.getSource() );
}
5 在工厂配置文件里面 去 org.springframework.boot.SpringApplicationRunListener=。。。。。
19 springBoot 的拓展分析
是一种方式: 实现 接口 ApplicationContextInitializer ,然后在 加入到容器 springApplication.addInitializers( new MyApplicationContextInitializer()); 这个接口函数中有 springcontext 可以在容器启动的 过程中做一些事情
备注1: 不能直接加入到spring容器(应为这个很早,不想 事件监听器)
备注2: 这时候容器管理的类好没有加载完毕,不能取到spring管理的类(只有最初始的6个类)
第二种方式 配置文件配置 context.initializer.classes=com.zyk.springBoot.event.MyApplicationContextInitializer
第三种: 写在工厂配置文件里面 去 org.springframework.context.ApplicationContextInitializer=。。。。。
20 CommandLineRunner在容器成功启动的最后一步回掉 (比ApplicationContextInitializer 靠后 ),这时候容器已经启动
1备注直接加入容器就生效
2@Order(100) 修改顺序 (数字大的后执行)
21 ApplicationRunner 类似( ApplicationRunner 的 参数 是 ApplicationArguments 的封装) ,CommandLineRunner 取得main的args 的原值
22 关闭 springBoot 的 banner app.setBannerMode(Banner.Mode.OFF);
23 @SpringBootApplication 默认扫描的是当前包,和子包 可以通过 scanBasePackages指定扫描包
24 自定义 banner 写一个banner.txt 位于classpath 就会制动 使用这个文件里面的 banner
25 可以通过 在配置文件里面写入 banner.location 指定banner 位置 banner.cherset 指定编码
26 spring 支出 图片的banner 只要命名为 banner.图片格式就可以
27 banner.img.location 指定位置
springBoot 的运行流程分析
没做记录
springBoot web方面
28 @RestController 和@Controller 类似,区别在于相当于在每个 方法都写上 @ResponseBody (springWeb 带有的 不是 springBoot独有) (4.0以后)
29 提供了大量的 @GetMapping 之类的注解用来代替 @RequestMapping 每次需要指定 method (4.3 以后)
30 springBoot 指定前缀和后缀 (springboot 默认不支持jsp ,需要映入 tomcat-embed-jasper 才能支持)
spring.mvc.view.prefix=/WEB_INF/jsp
spring.mvc.view.suffix=.jsp
31 指定端口 server.port=8080
32 对于参数的传递到 页面视图传统方式是通过 在reques 里面设置属性,现在可以通过 Model 或者 ModelAndView
33 springBoot 使用 freemarker (测试没有成功,)
34 访问静态资源 和 ResourceProperties 有关,里面定义了 那些目录可以直接访问
spring.resources.staticLocations=.... 可以修改
35 在 SpringBootApplication 上使用@ServletComponentScan 注解后,Servlet、Filter、Listener 可以直接通过 @WebServlet、@WebFilter、@WebListener 注解自动注册,无需其他代码。这种仅支持servlet3.0以后
或者 通过 ServletRegistrationBean (这种可以支持servlet2.5以前)
@Bean
public ServletRegistrationBean servletRegistrationBean() {
return new ServletRegistrationBean(new MyServlet(), "/xs/*");
}
备注 :还有FilterRegistrationBean ServletListenerRegistrationBean
36 使用 jetty 启动 ,需要排除 tomcat 然后 加入 (不排除好像也可以)
<dependency>
<groupId>org.springframework.boot</groupId>
<artifactId>spring-boot-starter-jetty</artifactId>
</dependency>
spring-boot-autoconfigure/1.5.8.RELEASE/spring-boot-autoconfigure-1.5.8.RELEASE-sources.jar 里面有很多的配置可以参考
37 springBoot 里面使用拦截器 (HandlerInterceptor,WebMvcConfigurerAdapter)
步骤如下:
1 写一个 类实现 HandlerInterceptor
2 写一个class 集成 WebMvcConfigurerAdapter
3 在 WebMvcConfigurerAdapter 的 方法中加入 添加 拦截器
38 自定义异常处理
1 方式1 (springBoot 才有)
实现 ErrorPageRegistrar(需要加入到spring管理) (ErrorPage 对象可以对应 不同状态码,不同异常跳转到不同地址(这个地址可以是页面或者action) )
在 ErrorPageRegistrar 里面添加 ErrorPage 对应的异常和异常处理地址的关系
方式 2 使用 SimpleMappingExceptionResolver 类,并且加入到 spring管理
方式 3 使用 实现 HandlerExceptionResolver 接口 ,并且加入到spring管理
方式4 @ExceptionHandler 注解方式 ( 默认只能处理当前controller 里面你的异常,在类前面 加上 @ControllerAdvice可以处理全部异常,优先级低于类同控制类里面的定义的 )
39 @ControllerAdvice 的作用
把@ControllerAdvice注解内部使用@ExceptionHandler、@InitBinder、@ModelAttribute注解的方法,应用到所有的 @RequestMapping注解的方法。不过只有当使用@ExceptionHandler最有用,另外两个用处不大。
40 继承 EmbeddedServletContainerCustomizer 可以 对 servlet 容器的启动进行设置
方法2 直接在@Bean 上返回一个 EmbeddedServletContainerCustomizer 对象
41 实现 AbstractRoutingDataSource 可以 对spring 数据源进行切换 (spring 会去这里面取数据源 )
------------------------------------------- ---------------------------------------------spring boot2----------------------------------------------------------------------------------------------------
1 spring boot2 文档地址
https://docs.spring.io/spring-boot/docs/current/reference/html/
2 spring boot 热启动(实际上是自动重启) ,使用的 自动重启,jrebel 是热更新
<dependency>
<groupId>org.springframework.boot</groupId>
<artifactId>spring-boot-devtools</artifactId>
<optional>true</optional>
</dependency>
在eclipse 里面保存就重启,在IDEA 里面 Ctrl+F9(rebuild) 生效
3 yaml 对象和集合的写法
对象:
单行写法
key: {key1: value1,key3: value2,key3: value3}
多行写法
key:
key1: value1
key2: value2
key3: value3
数组:
单行写法
key: [value1,value2,value3]
多行写法
key:
- value1
- value2
- value3
4 yaml 的 单引号和 双 引号的区别
单引号字符串里面的转义字符不生效,双引号里面的转移字符生效
'张\n三' 原样输出
"张\n三" 输出换行
5 我们编写配置类对象以后,在配置文件里面需要语法提示的时候可以导入 configuration-processor
<dependency>
<groupId>org.springframework.boot</groupId>
<artifactId>spring-boot-configuration-processor</artifactId>
<version>2.7.3</version>
</dependency>
configuration-processor 运行无意义,应该在打包的时候排查掉
6 springboot 默认指定的spring mvc 静态资源目录是 static,public,resources,META-INF/resources
可以通过spring.mvc.static-path-pattern=/prefix/** 修改访问前缀
可以通过spring.web.resources.static-locations=classpath:/image/ 指定目录
7 webjar 静态资源封装的原理是jar包里面META-INF/resources 目录下面存放了需要的静态资源文件
查看有哪些webjars地址:https://www.webjars.org/
8 在静态资源里面支持 index.html的首页,和favicon.icon 图标,但是设置前缀后首页和图标的访问
favicon 需要配合:htm llink标签 <link rel="icon" href="favicon.ico">
9 自动配置类 WebMvcAutoConfiguration 关于静态资源 index,开始REST风格请求 的自动配置都在这里面
10
spring.mvc.hiddenmethod.filter.enable=true 开启post转 put,delete,前提是参数中有_method="put/delete"的参数
11 浏览器默认不支持delete和put 请求,spring OrderedHiddenHttpMethodFilter 使用 HttpMethodRequestWrapper 重新 getMethod 方法在 POST 请求上面包装一层
12 spring请求映射原理
HttpServlet的子类FrameworkServlet的doGet或者doPost方法-->this.processRequest--> this.doService(模板方法)-->
DispatcherServlet的doService实现方法(FrameworkServlet的子类)-->xxxxHandlerMapping-->this.doDispatch--this.getHandler(重5种handlerMappings种an优先级)获取HandlerExecutionChain
HandlerExecutionChain 就是应该执行的请求地址和资源的映射关系
和我们controller方法有关的 handler 名字是 RequestMappingHandlerMapping,里面存在请求URI和方法的对应关系
总结就是:doGet/doPost-->doService-——>doDispatch-->getHandler
13 获取参数的注解
@RequestBody json
@RequestParam 参数
@PathVariable restFul 请求路径参数
@RequestHeader 请求头
@CookieValue Cookie
@RequestAttribute 请求转发的时候httpRequest.setAttribute设置的参数信息
@MatrixVariable 获取矩阵变量的值
14 spring mvc 服务器重定向 返回 "forward:/actionUri" (不是返回json格式)
15 举证变量格式用分号分割,多个值用逗号分割,也可以用分号分割
传参数格式:queryUsers/{dept;id=1;state=1,2}
或者queryUsers/{dept;id=1;state=1;state=2}
上面的 state有多个值,是集合
矩阵变量是和pathvariable绑定在一起的,对于多个pathVariable 的时候需要指定 pathVariable的名字
queryUsers/{dept;id=1;state=1,2}/{dept2;id=1;state=1,2}
实现下面的方式获取
(@MatrixVariable(pathVar = "depet",value = "id") Integer id,@MatrixVariable(pathVar = "depet,value = "state") List<Integer> states)
默认矩阵变量格式被禁用
开启方式:重写 WebMvcConfig里面的的configurePathMatch方法,使 UrlPathHelper的 removeSemicolonContent = false。(然后让我们的 这个 WebMvcConfig 加入到 spring容器管理就行了 )
16 解析参数是通过HandlerMethodArgumentResolver的26 个子类来实现的
解析过程大概是 通过 HandlerMapping 得到解析 对应的方法,得到方法参数,遍历方法参数,去26个 ArgumentResolver 解析 找到可以解析这个参数的参数解析器,对应请求参数得到解析后的参数
解析的过程中会把那个方法参数用那个解析器的对应关系缓存起来,二次请求的时候直接 找到参数解析器,通过请求参数直接生产解析后的参数对象
17 Map 和 Model 里面的数据会在服 后端foward 到别的请求地址渲染阶段 被设置到 下一个请求的 Attribute 里面。
18 自定类型装换器,可以是通过实现 Converter 实现,
比如我们需要把 a-b-b-d 装换成 List 可以通过 自定义类型装换器来实现
拓展方式:重写 WebMvcConfig 的 addFormatters 方法(FormatterRegistry 集成了 ConverterRegistry) ,或者直接继承 Converter 然后加入到spring容器
请求到响应的过程中 有个很重要的用于数据装换的接口 叫做 HttpMessageConverter ,请求参数过来,通过 一群 HttpMessageConverter找到合适的把请求参数转换成请求对象,响应的时候通过 HttpMessageConverter把响应对象转换成对应的格式
19 spring mvc 返回的内容格式是通过 请求头里面 accept 指定格式和 服务器端可以返回的格式来确定的。请求头协商是响应格式协商的默认方式
20 可以通过请求参数 协商响应格式
配置:spring.mvc.contentnagotiation.favor_parameter=true 然后再请求参数中 带上参数 format=json/xml 来指定返回格式(@ResponseBody 不是返回json 而是返回一个响应体,否者应该叫做 @ResponseJSON )
备注:如果要支持json 和 xml 2种格式同时存在,并且通过 accept 或者 format 来指定,需要 导入 json 和 xml 两种关于格式装换的包
备注2:浏览器accept 中 默认支持多重格式xml优先,ajax 请求的 时候一般会显示的显示的指明请求格式的json
浏览器默认accept参数-->accept: text/html,application/xhtml+xml,application/xml;q=0.9,image/avif,image/webp,image/apng,*/*;q=0.8,application/signed-exchange;v=b3;q=0.9
响应-->content-type: text/html; charset=utf-8
ajax请求发送JSON请求-->accept: application/json, text/plain, */*
响应-->content-type: application/json; charset=utf-8
21 内容协商是通过 ContentNegotiationManager 来实现的,通过编写新的内容协商管理器,可以实现其他类型数据格式返回
22 自定义媒体类型, 拓展 HttpMessageConverter 可以实现对新的 accept 格式的适配,比如向支持 accept: text/x-safebody,我们返回加密的内容
拓展方式重写 WebMvcConfigurer 的 extendMessageConverters 方法
备注:Converter 是 具体的对象类型装换器,把A类型装换成B类型,HttpMessageConverter 是格式装换器,装换的是媒体格式,是对不同MediaType的适配
23 自定义媒体类型以后,默认只能支持accept 请求头指定 返回值类型,请求参数format只能支持 json 和 xml ,我们需要让它支持 我们的媒体格式
拓展方式:WebMvcConfigurer 接口的 configureContentNegotiation 方法 strategies 里面指定 内容协商的策略在里面加入支持 我们格式的 ParameterContentNegotiationStrategy (前提要开启参数格式的内容协议)
备注:ParameterContentNegotiationStrategy 通过构造方法闯入支持的媒体类型 public MappingMediaTypeFileExtensionResolver(@Nullable Map<String, MediaType> mediaTypes)
备注2:MediaType.parseMediaType("自定义格式"); 得到一个新的媒体类型,已有的媒体类型都是静态常量
备注3 :接口的 configureContentNegotiation 方法 strategies 需要把PathExtensionContentNegotiationStrategy也加进去,不让 请求头accept方式的 指定媒体类型会失效
24 spring boot 是不支持jsp 的 ,因为spring boot 不支持在压缩包中渲染
可以使用 freemarker ,groovy 和 thymeleaf
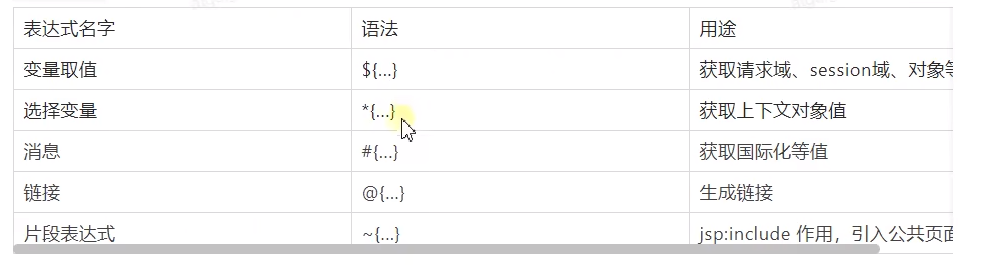
thymeleaf的模板语言取值语法
设置属性写法 th:attr="value=${valueKey}" 格式 ,多个值的时候 th:attr="value=${valueKey},value2=${valueKey2}"
或者简写 th:属性名字=${valueKey}
25 spring 拦截器 拓展
编写 HandlerInterceptor 重写 WebMvcConfigurer里面的 addInterceptors方法 ,添加 拦截器并且指定拦截器生效和不生效的 uri 规则
26 拦截器执行逻辑 是在 获取 能够处理当前请求的 HandlerMapping 以后获取到的,把能够处理请求的HandlerMapping 和 拦截器一起封装到 mappedHandler 里面,然后再合适的位置调用对应 拦截器周期函数
需要注意的是拦截器连的顺序: preHandle(执行前), 是顺序执行的, 这个时间点是方法执行,而 postHandle(执行后),afterCompletion(完成以后) 是倒序执行的,这也是符合责任链 模式里面的执行顺序的。
27 文件上传 写法 请求参数写法 @RequestPart("file1") MultipartFile file1,多个文件用MultipartFile数组就可以了
备注:如果是 from 表单,需要指定 enctype="multipart/form-data"
28 文件相关的 自动配置在 MultipartAutoConfiguration 里面 multipartProperties 里面有文件大小的限制
默认是每个文件1兆 ,一个请求最多10 兆 通过:spring.servlet.multipart.maxFileSize(单个文件的最大值) 和 spring.servlet.multipart.maxRequestSize(请求文件的最大值) 单位兆
29 文件上传 是通过 MultipartResolver 来完成的
	@Bean(name = DispatcherServlet.MULTIPART_RESOLVER_BEAN_NAME)
	@ConditionalOnMissingBean(MultipartResolver.class)
	public StandardServletMultipartResolver multipartResolver() {
		StandardServletMultipartResolver multipartResolver = new StandardServletMultipartResolver();
		multipartResolver.setResolveLazily(this.multipartProperties.isResolveLazily());
		return multipartResolver;
	}
30 自定义异常码对应的页面,可以把 自定义页面放到 resources/error/目录下 命名为 400.html 或者 4xx.html 格式 4xx 对应 4开头的所有异常码
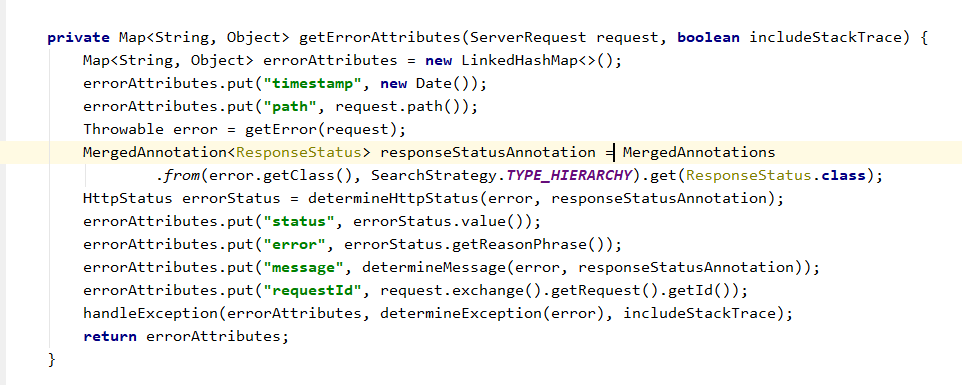
spring mvc 默认的异常处理,如果请求媒体类型xml优先返回一个异常页,如果是json媒体优先返回JSON格式的异常码
DefaultErrorAttributes 里面记录着可以包含的异常属性
31 实现 HandlerExceptionResolver 可以自己处理异常
32 自义定异常处理 的几种方法总结
1 自定义 异常页面
2 实现 HandlerExceptionResolver 接口
3 @ExceptionHandler 注解
33 spring MVC 中使用 Filter,Listener,Servlet
方法1
1 继承 Filter,Listener,ServletContextListener接口
2 写上@WebFilter/Listener/Servlet 注解
备注如果是 Servlet 需要指定扫描包 在启动类上开启 @ServletComponentScan
方法2 通过 xxxRegistrationBean 的注册类来注册 FilterRegistrationBean,ServletRegistrationBean,ServletListenerRegistrationBean来注册
34 Spring boot 使用的 容器切换,导入不同容器依赖就可以切换不同容器,在 ServletWebServerFactoryConfiguration 里面 配置的,检查存在对应的类就初始化容器
自动配置在: ServletWebServerFactoryAutoConfiguration
配置文件在:ServerProperties 里面可以改关于容器的一些参数
     @Configuration(proxyBeanMethods = false)
	@ConditionalOnClass({ Servlet.class, Tomcat.class, UpgradeProtocol.class })
	@ConditionalOnMissingBean(value = ServletWebServerFactory.class, search = SearchStrategy.CURRENT)
	static class EmbeddedTomcat {

		@Bean
		TomcatServletWebServerFactory tomcatServletWebServerFactory(
				ObjectProvider<TomcatConnectorCustomizer> connectorCustomizers,
				ObjectProvider<TomcatContextCustomizer> contextCustomizers,
				ObjectProvider<TomcatProtocolHandlerCustomizer<?>> protocolHandlerCustomizers) {
			TomcatServletWebServerFactory factory = new TomcatServletWebServerFactory();
			factory.getTomcatConnectorCustomizers()
					.addAll(connectorCustomizers.orderedStream().collect(Collectors.toList()));
			factory.getTomcatContextCustomizers()
					.addAll(contextCustomizers.orderedStream().collect(Collectors.toList()));
			factory.getTomcatProtocolHandlerCustomizers()
					.addAll(protocolHandlerCustomizers.orderedStream().collect(Collectors.toList()));
			return factory;
		}

	}
默认使用的 Jetty,tomcat,Undertow 默认是 tomcat,导入别的容器的start时候需要排除默认的认证tomcat
35 spring actuator 里面带有监控指标信息
实现AbstractHeathIndicator可以自定义heath 信息
实现InfoContributer可以实现自定义info信息
自定义 metrics 可以通过 拿到 MeterRegistry 来注册
自定义 Endpoint 可以通过 @Endpoint 注解(类上)和 @ReadOperation @WriterOperation 来去顶顶读写方法
36 spring boot admin 监控指标可视化工具 分成 2 部分 ,server 和 client server 独立启动运行,并且图形化的展示指标,client 注册上来 后回访client信息。
37 spring starter 存在的意义是自动配置,自己编写一个 starer 的 过程
1 编写自己的服务类
2 编写自动配置类
3 早 mete-infi/spring.factories 里面标注这个自动配置类生效(类似 SPI 的 写法)
导入一个jar 一样可以导入服务类,在什么情况下我们需要starter呢?
1 如果是静态方法,那么直接使用jar包合适,但是如果需要加入到spring容器管理的服务那么starer 更加合适。如果直接导包,需要手动加入spring容器管理
2 starter 的外置参数比代码设置参数更加方便,尤其是参数复杂的时候。
3 自动配置类的条件加载方便拓展,可以很方便拓展
能耍的时候就一定要耍,不能耍的时候一定要学。
--天道酬勤,贵在坚持posted on 2018-07-10 20:28 zhangyukun 阅读(315) 评论(0) 收藏 举报


 浙公网安备 33010602011771号