fastdfs 安装和使用
fastdfs 全套依赖阿里云盘地址: 「fastdfsv5.08安装全套依赖」https://www.aliyundrive.com/s/hDpZdKVFBuk 点击链接保存,或者复制本段内容,打开「阿里云盘」APP ,无需下载极速在线查看,视频原画倍速播放。
一、 fastdfs tracker ,storrage 安装
1 安装gcc
	yum install -y gcc gcc-c++

2 安装libevent
	yum -y install libevent

3 安装其他依赖
	yum -y install zlib zlib-devel pcre pcre-devel gcc gcc-c++ openssl openssl-devel libevent libevent-devel perl unzip net-tools wget

3 安装 libfastcommon
	备注:libfastcommon有很多版本,实测github的 libfastcommonmaster 可以用


	下载地址:https://codeload.github.com/xintyan/libfastcommon-master/zip/refs/heads/master

	解压对应的zip包: unzip libfastcommon-master-master.zip

	进入目录: cd libfastcommon-master-master

	然后修改 make.sh 数据权限:chmod 777	make.sh

	编译 ./make.sh

	安装 ./make.sh install

4 安装 fastdfs
	下载地址:https://udomain.dl.sourceforge.net/project/fastdfs/FastDFS%20Server%20Source%20Code/FastDFS%20Server%20with%20PHP%20Extension%20Source%20Code%20V5.08/FastDFS_v5.08.tar.gz

	解压缩: tar -zxvf FastDFS_v5.08.tar.gz

	进入解压完成的目录:cd FastDFS/

	编译 ./make.sh

	安装 ./make.sh install

	如果安装成功,/etc/init.d/目录下会有两个f服务启动文件:ls /etc/init.d/ | grep fdfs
			fdfs_storaged
			fdfs_trackerd

	在/etc/fdfs/ 下面有默认配置文件三个配置文件的例子,我们去掉sample后缀后修改对应参数就能启动了。
		client.conf.sample
		storage.conf.sample
		tracker.conf.sample

5 启动 tracker

	复制配置文件: cp /etc/fdfs/tracker.conf.sample /etc/fdfs/tracker.conf

	修改配置文件:vi /etc/fdfs/tracker.conf

				base_path:监听狗存储数据日志的路径,也可以不改,建议修改 fdfs 默认tracker 和  strorger 存储地址一样
				bind_addr:允许范围的地址,默认都允许
				port:端口默认22122


	(开发测试机才建议这么干)可能需要关闭防火墙:systemctl stop firewalld ,觉得每次关闭麻烦的直接禁用防火墙 开机启动 systemctl disable firewalld


	启动 tracker 服务:systemctl start fdfs_trackerd
	查看 tracker 服务状态: systemctl status fdfs_trackerd

	有需要可以设置成开机启动:chkconfig fdfs_trackerd on
	如果想关闭: chkconfig fdfs_trackerd off

6 启动strorage
	复制配置文件:cp /etc/fdfs/storage.conf.sample /etc/fdfs/storage.conf

	编辑配置文件:
			base_path:storage存储数据日志的路径
			store_path0:这个是存上传文件的路劲
			tracker_server:tracker的地址端口


	如果修改了新的文件目录需要手动新建: mkdir -p /你指定的路径


	启动 tracker 服务:systemctl start fdfs_storaged

	检查服务是否启动成功:ps -ef |grep fdfs
		root       1493      1  0 06:33 ?        00:00:04 /usr/bin/fdfs_trackerd /etc/fdfs/tracker.conf
		root       1529      1  0 06:35 ?        00:00:06 /usr/bin/fdfs_storaged /etc/fdfs/storage.conf
二、 linux 客户端使用
安装fdfs以后,在 /etc/fdfs/ 下有三个例子配置文件,其中一个是客户端的配置文件
-rw-r--r--. 1 root root  1459 Mar 17 06:20 client.conf
-rw-r--r--. 1 root root  1461 Mar 17 03:30 client.conf.sample   这个就是client配置文件的例子
-rw-r--r--. 1 root root   858 Mar 17 05:51 http.conf
-rw-r--r--. 1 root root 31172 Mar 17 05:51 mime.types
-rw-r--r--. 1 root root  3690 Mar 17 05:50 mod_fastdfs.conf
-rw-r--r--. 1 root root  7932 Mar 17 04:27 storage.conf
-rw-r--r--. 1 root root  7927 Mar 17 03:30 storage.conf.sample
-rw-r--r--. 1 root root  7201 Mar 17 03:35 tracker.conf
-rw-r--r--. 1 root root  7200 Mar 17 03:30 tracker.conf.sample
复制这个配置文件: cp client.conf.sample client.conf
然后修改:tracker_server=10.10.10.11:22122 和 base_path=/home/fastdfs/client(client存放日志的位置) 到指定位置
查看有那么fdfs相关的程序命令: ls -l /usr/bin/ |grep fdfs
-rwxr-xr-x. 1 root root    315288 Mar 17 03:30 fdfs_appender_test
-rwxr-xr-x. 1 root root    315064 Mar 17 03:30 fdfs_appender_test1
-rwxr-xr-x. 1 root root    301920 Mar 17 03:30 fdfs_append_file
-rwxr-xr-x. 1 root root    301584 Mar 17 03:30 fdfs_crc32
-rwxr-xr-x. 1 root root    301984 Mar 17 03:30 fdfs_delete_file
-rwxr-xr-x. 1 root root    302712 Mar 17 03:30 fdfs_download_file
-rwxr-xr-x. 1 root root    302304 Mar 17 03:30 fdfs_file_info
-rwxr-xr-x. 1 root root    316112 Mar 17 03:30 fdfs_monitor
-rwxr-xr-x. 1 root root   1101712 Mar 17 03:30 fdfs_storaged
-rwxr-xr-x. 1 root root    325192 Mar 17 03:30 fdfs_test
-rwxr-xr-x. 1 root root    320312 Mar 17 03:30 fdfs_test1
-rwxr-xr-x. 1 root root    447752 Mar 17 03:30 fdfs_trackerd
-rwxr-xr-x. 1 root root    302912 Mar 17 03:30 fdfs_upload_appender
-rwxr-xr-x. 1 root root    303928 Mar 17 03:30 fdfs_upload_file
上传文件: fdfs_test 配置文件路径 upload 需要上传的文件路径 ,返回 上传后的文件地址
下载:fdfs_test 配置文件路径 download 组名 文件地址 【新文件名字】 (组名就是上传文件返回的第一段)
删除: fdfs_test 配置文件路径 delete 组名 文件地址
三、 Java api 的使用
创建 fdfs_client.conf 文件:
connect_timeout = 2
network_timeout = 30
charset = UTF-8
http.tracker_http_port = 8080
http.anti_steal_token = no
http.secret_key = FastDFS1234567890
tracker_server = 10.10.10.11:22122
导入maven 依赖: commons-io 是方便文件处理,不是必须
          <dependency>
		    <groupId>net.oschina.zcx7878</groupId>
		    <artifactId>fastdfs-client-java</artifactId>
		    <version>1.27.0.0</version>
		</dependency>

		<!-- commons-io -->
		<dependency>
		    <groupId>commons-io</groupId>
		    <artifactId>commons-io</artifactId>
		    <version>2.4</version>
		</dependency>
上传和下载的例子:
import java.io.File;
import java.io.IOException;

import org.apache.commons.io.FileUtils;
import org.csource.common.MyException;
import org.csource.common.NameValuePair;
import org.csource.fastdfs.ClientGlobal;
import org.csource.fastdfs.StorageClient1;
import org.csource.fastdfs.StorageServer;
import org.csource.fastdfs.TrackerClient;
import org.csource.fastdfs.TrackerServer;

public class Main {

	public static void main(String[] args) throws IOException, MyException {
		 String conf_filename = new Main().getClass().getClassLoader().getResource("fdfs_client.conf").getPath().replaceAll("%20"," ");
         ClientGlobal.init(conf_filename);


         //建立连接
         TrackerClient tracker = new TrackerClient();
         TrackerServer trackerServer = tracker.getConnection();
         StorageServer storageServer = tracker.getStoreStorage(trackerServer);
         StorageClient1 client = new StorageClient1(trackerServer, storageServer);


         byte[] fileData =  FileUtils.readFileToByteArray(new File( "C:\\Users\\ZHANGYUKUN\\Desktop\\QQ截图20220317164211.png" ));

         //上传文件
         //设置元信息
         NameValuePair[] metaList = new NameValuePair[3];
         metaList[0] = new NameValuePair("fileName", "");
         metaList[1] = new NameValuePair("fileExtName", "");
         metaList[2] = new NameValuePair("fileLength", String.valueOf( fileData.length ));

         String fileId = client.upload_file1(fileData, "png", metaList);
         System.out.println( fileId );


         //下载文件
         byte[] file =  client.download_file1(fileId);
         FileUtils.writeByteArrayToFile(new File("C:\\\\Users\\\\ZHANGYUKUN\\\\Desktop\\\\2.png"), file);

	}

}
四、 fastdfs nginx 直联
7 nginx 直连 fastDFS 设置

	1. 解压fastdfs nginx 插件: fastdfs-nginx-module_v1.16.tar.gz


	2. 修改配置文件把config里面所有的/usr/local替换成/usr(我也不知道为什么这样搞)
			cd fastdfs-nginx-module/src
			vi config


	3. 安装Nginx的依赖库: yum -y install gcc pcre pcre-devel zlib zlib-devel openssl openssl-devel


	4. 下载nginx解压,并且引用fastdfs插件,然后编译安装
		下载地址: http://nginx.org/download/nginx-1.20.2.tar.gz

		解压:tar -zxvf nginx-1.20.2.tar.gz

		进入解压的nginx目录:cd  nginx-1.20.2

		设置nginx配置文件包含fastdfs 插件:./configure --prefix=/opt/nginx --sbin-path=/usr/bin/nginx --add-module=你的插件所以路径/fastdfs-nginx-module/src

		编译安装nginx:make && make install
			备注:安装的nginx 的默认位置是  /opt/nginx ,这里面与 配置和日志文件,如果 nginx 启动课访问不到 log 下面的日志里面有范围异常信息

		修改nginx配置文件:vi  /opt/nginx/conf/nginx.conf   修改图中

		    server {
				listen       80;
				server_name  image.smarthome.com;

				#指定格式的路径,交给FastDFS模块处理
				location ~/group([0-9])/ {
					ngx_fastdfs_module;
				}

				location / {
					root   html;
					index  index.html index.htm;
				}

				error_page   500 502 503 504  /50x.html;
				location = /50x.html {
					root   html;
				}
			}


     fastdfs nginx插件 默认使用的配置文件路径是/etc/fdfs/mod_fastdfs.conf,我们把插件config目录下得插件配置文件复制过去(插件解压后根目录INSTALL文件里面说的)
     5.复制插件配置文件到:
		cp mod_fastdfs.conf /etc/fdfs/
	6. 编辑插件配置文件指向tracker: vi /etc/fdfs/mod_fastdfs.conf
			tracker_server=tracker_serverIP:端口
			url_have_group_name=true
			store_path0=文件存储位置
	5,进入Fast DFS的conf目录,复制 FastDFS 的部分配置文件到/etc/fdfs 目录:

		cd FastDFS/conf/
		cp http.conf mime.types /etc/fdfs/
	8.启动nginx :nginx


	9.浏览器访问:ip/group1/M00/00/00/CgoKCmIxpXOAN46wAAAAOtIRWms521.txt 就可以看到对应文件了
五、fdfs 原理
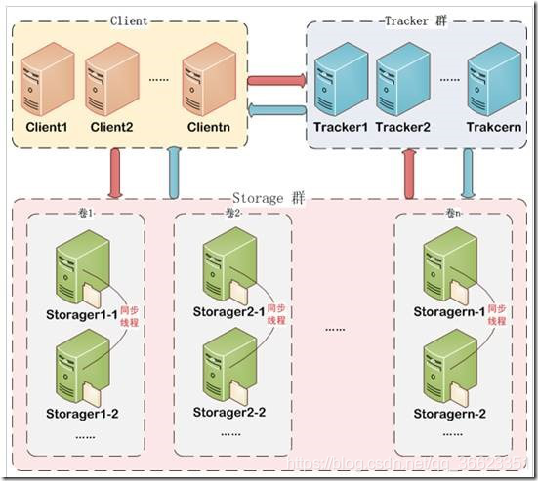
六 fastdfs 集群搭建
1 单个个tracker 多个 storage
我们只要修改多个 storage 里面的group_name=不同的组名,然后连接同一个tracker,这样就可以了。(默认是按照磁盘容量切换 storage ,可以在 tracker 配置文件里面指定负载均衡策略)。
group_name=group2
2 多个tracker,多个storage
1 保持storage 有不同的组名。
group_name=group2
2 分别吧他们都注册到 tracker 上。
tracker_server=192.168.1.200:22122
tracker_server=192.168.1.201:22122
3 是可以使用 fdfs_monitor /etc/fdfs/storage.conf 查看连接情况
[2022-03-18 13:00:52] DEBUG - base_path=/home/fdfs/storage, connect_timeout=30, network_timeout=60, tracker_server_count=2, anti_steal_token=0, anti_steal_secret_key length=0, use_connection_pool=0, g_connection_pool_max_idle_time=3600s, use_storage_id=0, storage server id count: 0

server_count=2, server_index=1

tracker server is 192.168.1.201:22122

group count: 2

Group 1:
group name = group1
disk total space = 48096 MB
disk free space = 48021 MB
trunk free space = 0 MB
storage server count = 1
active server count = 1
storage server port = 23000
storage HTTP port = 8888
store path count = 1
subdir count per path = 256
current write server index = 0
current trunk file id = 0

        Storage 1:
                id = 192.168.1.200
                ip_addr = 192.168.1.200 (192.168.1.200)  ACTIVE
                http domain =
                version = 5.08
                join time = 2022-03-18 10:49:47
                up time = 2022-03-18 10:56:13
                total storage = 48096 MB
                free storage = 48021 MB
                upload priority = 10
                store_path_count = 1
                subdir_count_per_path = 256
                storage_port = 23000
                storage_http_port = 8888
                current_write_path = 0
                source storage id =
                if_trunk_server = 0
                connection.alloc_count = 256
                connection.current_count = 0
                connection.max_count = 1
                total_upload_count = 9
                success_upload_count = 9
                total_append_count = 0
                success_append_count = 0
                total_modify_count = 0
                success_modify_count = 0
                total_truncate_count = 0
                success_truncate_count = 0
                total_set_meta_count = 9
                success_set_meta_count = 9
                total_delete_count = 0
                success_delete_count = 0
                total_download_count = 215
                success_download_count = 215
                total_get_meta_count = 0
                success_get_meta_count = 0
                total_create_link_count = 0
                success_create_link_count = 0
                total_delete_link_count = 0
                success_delete_link_count = 0
                total_upload_bytes = 7674912
                success_upload_bytes = 7674912
                total_append_bytes = 0
                success_append_bytes = 0
                total_modify_bytes = 0
                success_modify_bytes = 0
                stotal_download_bytes = 228356660
                success_download_bytes = 228356660
                total_sync_in_bytes = 0
                success_sync_in_bytes = 0
                total_sync_out_bytes = 0
                success_sync_out_bytes = 0
                total_file_open_count = 224
                success_file_open_count = 224
                total_file_read_count = 1075
                success_file_read_count = 1075
                total_file_write_count = 37
                success_file_write_count = 37
                last_heart_beat_time = 2022-03-18 13:00:50
                last_source_update = 2022-03-18 12:38:17
                last_sync_update = 1969-12-31 19:00:00
                last_synced_timestamp = 1969-12-31 19:00:00

Group 2:
group name = group2
disk total space = 48096 MB
disk free space = 48023 MB
trunk free space = 0 MB
storage server count = 1
active server count = 1
storage server port = 23000
storage HTTP port = 8888
store path count = 1
subdir count per path = 256
current write server index = 0
current trunk file id = 0

        Storage 1:
                id = 192.168.1.201
                ip_addr = 192.168.1.201 (192.168.1.201)  ACTIVE
                http domain =
                version = 5.08
                join time = 2022-03-18 10:52:13
                up time = 2022-03-18 10:58:11
                total storage = 48096 MB
                free storage = 48023 MB
                upload priority = 10
                store_path_count = 1
                subdir_count_per_path = 256
                storage_port = 23000
                storage_http_port = 8888
                current_write_path = 0
                source storage id =
                if_trunk_server = 0
                connection.alloc_count = 256
                connection.current_count = 0
                connection.max_count = 1
                total_upload_count = 6
                success_upload_count = 6
                total_append_count = 0
                success_append_count = 0
                total_modify_count = 0
                success_modify_count = 0
                total_truncate_count = 0
                success_truncate_count = 0
                total_set_meta_count = 6
                success_set_meta_count = 6
                total_delete_count = 0
                success_delete_count = 0
                total_download_count = 0
                success_download_count = 0
                total_get_meta_count = 0
                success_get_meta_count = 0
                total_create_link_count = 0
                success_create_link_count = 0
                total_delete_link_count = 0
                success_delete_link_count = 0
                total_upload_bytes = 5430642
                success_upload_bytes = 5430642
                total_append_bytes = 0
                success_append_bytes = 0
                total_modify_bytes = 0
                success_modify_bytes = 0
                stotal_download_bytes = 0
                success_download_bytes = 0
                total_sync_in_bytes = 0
                success_sync_in_bytes = 0
                total_sync_out_bytes = 0
                success_sync_out_bytes = 0
                total_file_open_count = 6
                success_file_open_count = 6
                total_file_read_count = 0
                success_file_read_count = 0
                total_file_write_count = 26
                success_file_write_count = 26
                last_heart_beat_time = 2022-03-18 13:00:50
                last_source_update = 2022-03-18 12:39:02
                last_sync_update = 1969-12-31 19:00:00
                last_synced_timestamp = 1969-12-31 19:00:00
3 tracker相互是独立的,没有通讯,他们分别保持着storage的信息(地址,状态,等信息),然后通过groupName 来确定数据放在那个storage。如果storageName 不同,那么他们负载均衡的保存数据,如果groupName相同他们就是互为备份节点。
在storage 内部可以指定多个 store 路径(比如storage主机上有2 个硬盘,我们可以指定 store1=路径a ,store2=路径b ),实测效果是多个store轮流存储文件。有些文档写的是多个store之间是互为备份,这是错的。
store_path_count=n
store_path0=/home/fdfs/storage/store1
store_path1=/home/fdfs/storage/store2
.
.
.
store_path(n-1)=/home/fdfs/storage/store(n)
4 集群下得nginx 级联
编辑插件配置文件:vi /etc/fdfs/mod_fastdfs.conf
修改:store_path0=本地storage得存储地址
url_have_group_name = true
group_name=本地storage组名
tracker_server=192.168.1.200:22122
tracker_server=192.168.1.201:22122(如果有多个tracker得话写多行)
这样就可以在任意storage主机上直连任意一个组的文件了( ngxin fdfs插件会通过组名给我们找到后端非法到对应住的 storage )。
如果我们设置两个storage的 groupName=group2的stotrage,那么他们会互为备份,如果一个新的同名节点加入集群(或者暂时离线的节点后面又加入了进来),会复制 数据。
一个文件存储到group2以后两个storage都会有相同的数据
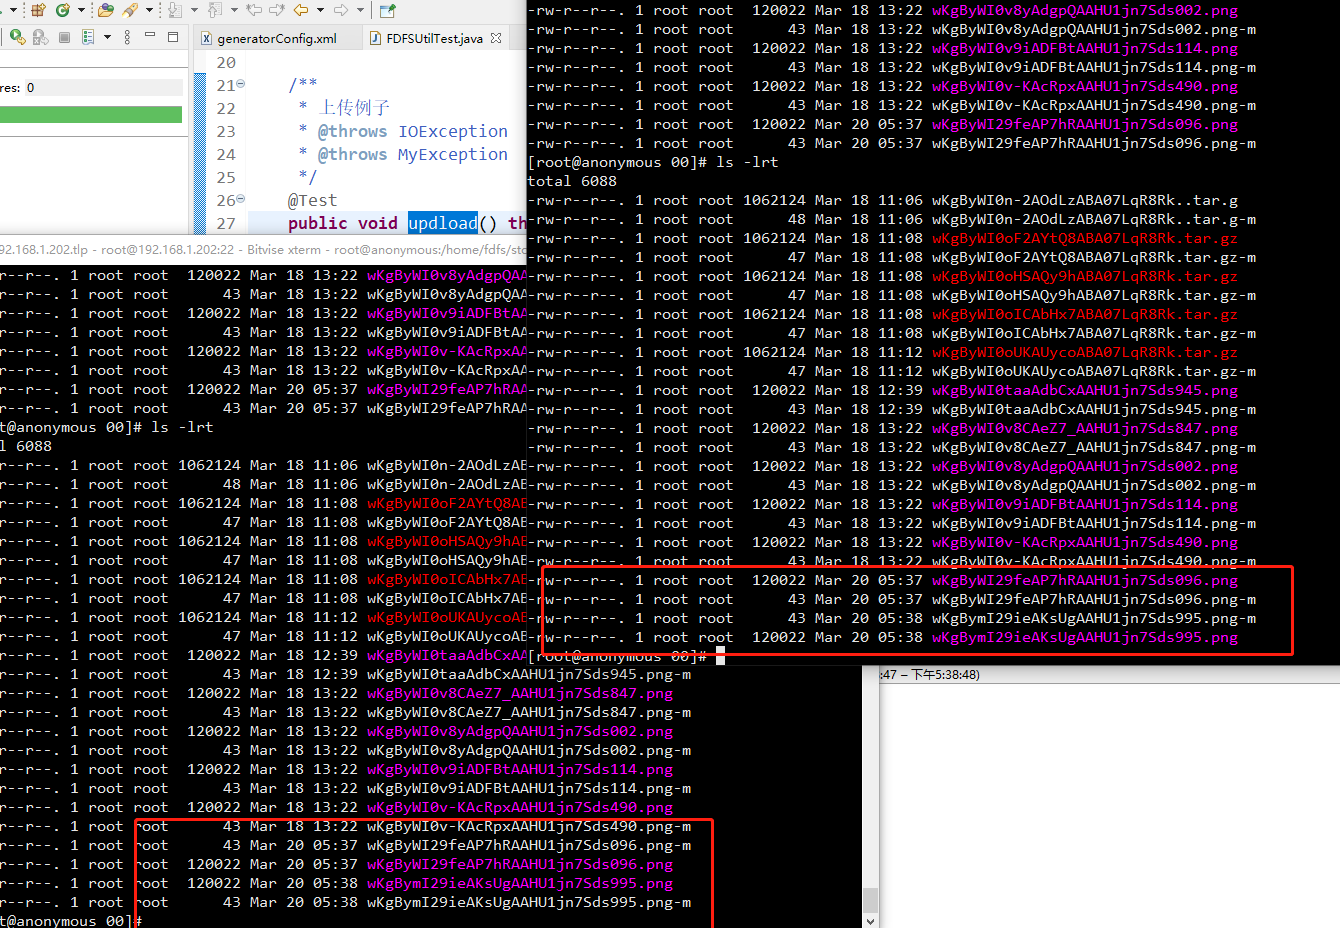
我们使用 fdfs_moniter /etc/fdfs/storage.conf 可以看到 group2 有2 个storage节点
[root@anonymous ~]# fdfs_monitor /etc/fdfs/storage.conf
[2022-03-20 05:47:38] DEBUG - base_path=/home/fdfs/storage, connect_timeout=30, network_timeout=60, tracker_server_count=2, anti_steal_token=0, anti_steal_secret_key length=0, use_connection_pool=0, g_connection_pool_max_idle_time=3600s, use_storage_id=0, storage server id count: 0

server_count=2, server_index=1

tracker server is 192.168.1.201:22122

group count: 2

Group 1:
group name = group1
disk total space = 96192 MB
disk free space = 95968 MB
trunk free space = 0 MB
storage server count = 1
active server count = 1
storage server port = 23000
storage HTTP port = 8888
store path count = 2
subdir count per path = 256
current write server index = 0
current trunk file id = 0

        Storage 1:    组1 的 storage(虽然这个 storage 有两个 store,但是这里不会表现出来 )
                id = 192.168.1.200
                ip_addr = 192.168.1.200 (192.168.1.200)  ACTIVE
                http domain =
                version = 5.08
                join time = 2022-03-18 10:49:47
                up time = 2022-03-20 05:28:46
                total storage = 96192 MB
                free storage = 95968 MB
                upload priority = 10
                store_path_count = 2
                subdir_count_per_path = 256
                storage_port = 23000
                storage_http_port = 8888
                current_write_path = 0
                source storage id =
                if_trunk_server = 0
                connection.alloc_count = 256
                connection.current_count = 0
                connection.max_count = 1
                total_upload_count = 24
                success_upload_count = 24
                total_append_count = 0
                success_append_count = 0
                total_modify_count = 0
                success_modify_count = 0
                total_truncate_count = 0
                success_truncate_count = 0
                total_set_meta_count = 24
                success_set_meta_count = 24
                total_delete_count = 0
                success_delete_count = 0
                total_download_count = 215
                success_download_count = 215
                total_get_meta_count = 0
                success_get_meta_count = 0
                total_create_link_count = 0
                success_create_link_count = 0
                total_delete_link_count = 0
                success_delete_link_count = 0
                total_upload_bytes = 9475242
                success_upload_bytes = 9475242
                total_append_bytes = 0
                success_append_bytes = 0
                total_modify_bytes = 0
                success_modify_bytes = 0
                stotal_download_bytes = 228356660
                success_download_bytes = 228356660
                total_sync_in_bytes = 0
                success_sync_in_bytes = 0
                total_sync_out_bytes = 0
                success_sync_out_bytes = 0
                total_file_open_count = 239
                success_file_open_count = 239
                total_file_read_count = 1075
                success_file_read_count = 1075
                total_file_write_count = 52
                success_file_write_count = 52
                last_heart_beat_time = 2022-03-20 05:47:17
                last_source_update = 2022-03-20 05:38:28
                last_sync_update = 1969-12-31 19:00:00
                last_synced_timestamp = 1969-12-31 19:00:00

Group 2:
group name = group2
disk total space = 48096 MB
disk free space = 48023 MB
trunk free space = 0 MB
storage server count = 2
active server count = 2
storage server port = 23000
storage HTTP port = 8888
store path count = 1
subdir count per path = 256
current write server index = 0
current trunk file id = 0

        Storage 1:   组2 的storage1
                id = 192.168.1.201
                ip_addr = 192.168.1.201 (192.168.1.201)  ACTIVE
                http domain =
                version = 5.08
                join time = 2022-03-18 10:52:13
                up time = 2022-03-20 05:28:51
                total storage = 48096 MB
                free storage = 48023 MB
                upload priority = 10
                store_path_count = 1
                subdir_count_per_path = 256
                storage_port = 23000
                storage_http_port = 8888
                current_write_path = 0
                source storage id =
                if_trunk_server = 0
                connection.alloc_count = 256
                connection.current_count = 1
                connection.max_count = 2
                total_upload_count = 11
                success_upload_count = 11
                total_append_count = 0
                success_append_count = 0
                total_modify_count = 0
                success_modify_count = 0
                total_truncate_count = 0
                success_truncate_count = 0
                total_set_meta_count = 11
                success_set_meta_count = 11
                total_delete_count = 0
                success_delete_count = 0
                total_download_count = 0
                success_download_count = 0
                total_get_meta_count = 0
                success_get_meta_count = 0
                total_create_link_count = 0
                success_create_link_count = 0
                total_delete_link_count = 0
                success_delete_link_count = 0
                total_upload_bytes = 6030752
                success_upload_bytes = 6030752
                total_append_bytes = 0
                success_append_bytes = 0
                total_modify_bytes = 0
                success_modify_bytes = 0
                stotal_download_bytes = 0
                success_download_bytes = 0
                total_sync_in_bytes = 1184009
                success_sync_in_bytes = 120065
                total_sync_out_bytes = 0
                success_sync_out_bytes = 0
                total_file_open_count = 13
                success_file_open_count = 13
                total_file_read_count = 0
                success_file_read_count = 0
                total_file_write_count = 33
                success_file_write_count = 33
                last_heart_beat_time = 2022-03-20 05:47:23
                last_source_update = 2022-03-20 05:37:58
                last_sync_update = 2022-03-20 05:38:56
                last_synced_timestamp = 2022-03-20 05:38:46 (0s delay)
        Storage 2:   组2的storage2
                id = 192.168.1.202
                ip_addr = 192.168.1.202 (192.168.1.202)  ACTIVE
                http domain =
                version = 5.08
                join time = 2022-03-18 10:52:13
                up time = 2022-03-20 05:32:36
                total storage = 48096 MB
                free storage = 48023 MB
                upload priority = 10
                store_path_count = 1
                subdir_count_per_path = 256
                storage_port = 23000
                storage_http_port = 8888
                current_write_path = 0
                source storage id =
                if_trunk_server = 0
                connection.alloc_count = 256
                connection.current_count = 1
                connection.max_count = 2
                total_upload_count = 11
                success_upload_count = 11
                total_append_count = 0
                success_append_count = 0
                total_modify_count = 0
                success_modify_count = 0
                total_truncate_count = 0
                success_truncate_count = 0
                total_set_meta_count = 11
                success_set_meta_count = 11
                total_delete_count = 0
                success_delete_count = 0
                total_download_count = 0
                success_download_count = 0
                total_get_meta_count = 0
                success_get_meta_count = 0
                total_create_link_count = 0
                success_create_link_count = 0
                total_delete_link_count = 0
                success_delete_link_count = 0
                total_upload_bytes = 6030752
                success_upload_bytes = 6030752
                total_append_bytes = 0
                success_append_bytes = 0
                total_modify_bytes = 0
                success_modify_bytes = 0
                stotal_download_bytes = 0
                success_download_bytes = 0
                total_sync_in_bytes = 1184009
                success_sync_in_bytes = 120065
                total_sync_out_bytes = 0
                success_sync_out_bytes = 0
                total_file_open_count = 13
                success_file_open_count = 13
                total_file_read_count = 0
                success_file_read_count = 0
                total_file_write_count = 33
                success_file_write_count = 33
                last_heart_beat_time = 2022-03-20 05:47:36
                last_source_update = 2022-03-20 05:38:46
                last_sync_update = 2022-03-20 05:38:01
                last_synced_timestamp = 2022-03-20 05:37:58 (0s delay)
[root@anonymous ~]#
能耍的时候就一定要耍,不能耍的时候一定要学。
--天道酬勤,贵在坚持posted on 2022-03-13 14:32 zhangyukun 阅读(717) 评论(0) 收藏 举报


 浙公网安备 33010602011771号