SpringBoot注解驱动
1. 系统版本
- JDK 1.8
- maven 3.6
- IDEA 2019.3
1.1 Maven配置
- 找到maven配置文件:
\environment\apache-maven-3.6.3\conf\setting.xml - 设置阿里云镜像和编译的jdk版本
<mirrors>
      <mirror>
        <id>nexus-aliyun</id>
        <mirrorOf>central</mirrorOf>
        <name>Nexus aliyun</name>
        <url>http://maven.aliyun.com/nexus/content/groups/public</url>
      </mirror>
  </mirrors>

<profiles>
       <profile>
            <id>jdk-1.8</id>
            <activation>
              <activeByDefault>true</activeByDefault>
              <jdk>1.8</jdk>
            </activation>
            <properties>
              <maven.compiler.source>1.8</maven.compiler.source>
              <maven.compiler.target>1.8</maven.compiler.target>
              <maven.compiler.compilerVersion>1.8</maven.compiler.compilerVersion>
            </properties>
       </profile>
</profiles>
2. 自动装配原理
springboot项目依赖
- 几乎声明了所有开发中常用的依赖的版本号,
自动版本仲裁机制。 - 即便不写依赖版本,也会从父项目中找到和当前springboot版本对应的依赖版本。
<parent>
  <groupId>org.springframework.boot</groupId>
  <artifactId>spring-boot-dependencies</artifactId>
  <version>2.3.4.RELEASE</version>
</parent>
2.1 web项目
- 想要开发一个web项目,只需要导入
spring-boot-starter-web启动器,springboot会自动将web开发相关的依赖全部导入。
<dependency>
  <groupId>org.springframework.boot</groupId>
  <artifactId>spring-boot-starter-web</artifactId>
</dependency>
点进去
spring-boot-starter-web这个启动器依赖,发现这个启动器内置tomcat,web,webmvc依赖。
- 所以我们不用配置tomcat,也不用引入
web,webmvc依赖。
<dependency>
  <groupId>org.springframework.boot</groupId>
  <artifactId>spring-boot-starter</artifactId>
  <version>2.3.4.RELEASE</version>
  <scope>compile</scope>
</dependency>
<dependency>
  <groupId>org.springframework.boot</groupId>
  <artifactId>spring-boot-starter-json</artifactId>
  <version>2.3.4.RELEASE</version>
  <scope>compile</scope>
</dependency>
<dependency>
  <groupId>org.springframework.boot</groupId>
  <artifactId>spring-boot-starter-tomcat</artifactId>
  <version>2.3.4.RELEASE</version>
  <scope>compile</scope>
</dependency>
<dependency>
  <groupId>org.springframework</groupId>
  <artifactId>spring-web</artifactId>
  <version>5.2.9.RELEASE</version>
  <scope>compile</scope>
</dependency>
<dependency>
  <groupId>org.springframework</groupId>
  <artifactId>spring-webmvc</artifactId>
  <version>5.2.9.RELEASE</version>
  <scope>compile</scope>
</dependency>
点进去
spring-boot-starter这个启动器依赖,发现这个启动器内置spring-core依赖。
<dependencies>
  <dependency>
    <groupId>org.springframework.boot</groupId>
    <artifactId>spring-boot</artifactId>
    <version>2.3.4.RELEASE</version>
    <scope>compile</scope>
  </dependency>
  //自动配置
  <dependency>
    <groupId>org.springframework.boot</groupId>
    <artifactId>spring-boot-autoconfigure</artifactId>
    <version>2.3.4.RELEASE</version>
    <scope>compile</scope>
  </dependency>
  <dependency>
    <groupId>org.springframework.boot</groupId>
    <artifactId>spring-boot-starter-logging</artifactId>
    <version>2.3.4.RELEASE</version>
    <scope>compile</scope>
  </dependency>
  //注解相关依赖
  <dependency>
    <groupId>jakarta.annotation</groupId>
    <artifactId>jakarta.annotation-api</artifactId>
    <version>1.3.5</version>
    <scope>compile</scope>
  </dependency>
  //spring核心依赖
  <dependency>
    <groupId>org.springframework</groupId>
    <artifactId>spring-core</artifactId>
    <version>5.2.9.RELEASE</version>
    <scope>compile</scope>
  </dependency>
  //解析yaml文件依赖
  <dependency>
    <groupId>org.yaml</groupId>
    <artifactId>snakeyaml</artifactId>
    <version>1.26</version>
    <scope>compile</scope>
  </dependency>
</dependencies>
点进去
spring-boot这个依赖。
<dependencies>
  <dependency>
    <groupId>org.springframework</groupId>
    <artifactId>spring-core</artifactId>
    <version>5.2.9.RELEASE</version>
    <scope>compile</scope>
  </dependency>
  <dependency>
    <groupId>org.springframework</groupId>
    <artifactId>spring-context</artifactId>
    <version>5.2.9.RELEASE</version>
    <scope>compile</scope>
  </dependency>
</dependencies>
2.2 自动配置
只是引入一个
spring-boot-starter-web启动器,springboot为我们做了那些事?
- 自动配好Tomcat
- 引入Tomcat依赖,配置Tomcat。
- 自动配好SpringMVC
- 引入SpringMVC全套组件,自动配好SpringMVC常用组件(功能)
- 自动配好Web常见功能,如:字符编码问题
- SpringBoot帮我们配置好了所有web开发的常见场景
- 各种配置拥有默认值
- 默认配置最终都是映射到某个类上,如:MultipartProperties。
- 配置文件(application.yml)的值最终会绑定每个类上,这个类会在容器中创建对象。
- 按需加载所有自动配置项
- 非常多的starter
- 引入了哪些场景这个场景的自动配置才会开启
- SpringBoot所有的自动配置功能都在 spring-boot-autoconfigure 包里面
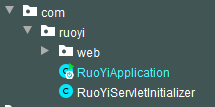
默认包结构
- 主程序所在包及其下面的所有子包里面的组件都会被默认扫描进来
- 无需以前的包扫描(xml配置)
- 想要改变扫描路径,
@SpringBootApplication(scanBasePackages="com.atguigu")或者@ComponentScan指定扫描路径
2.3 自动配置原理入门
2.3.1 @SpringBootApplication
main方法所在的类上的@SpringBootApplication注解等价于:
@SpringBootConfiguration
@EnableAutoConfiguration
@ComponentScan(excludeFilters = { @Filter(type = FilterType.CUSTOM, classes = TypeExcludeFilter.class),
		@Filter(type = FilterType.CUSTOM, classes = AutoConfigurationExcludeFilter.class) })
public @interface SpringBootApplication {}
@SpringBootConfiguration
- 该注解表明主方法所在的类是一个配置类,并且将此类注入到ioc容器。
@Configuration
public @interface SpringBootConfiguration {}
@ComponentScan
- 该注解指定扫描哪些组件,Spring注解。
public @interface ComponentScan {}
2.3.2 @EnableAutoConfiguration
- 自动装配组件和这个注解有关。
@AutoConfigurationPackage
@Import(AutoConfigurationImportSelector.class)
public @interface EnableAutoConfiguration {}
2.3.2.1 @AutoConfigurationPackage
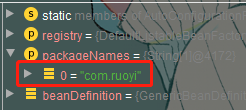
- 利用Registrar给容器中导入一系列组件
- 将指定的一个包下的所有组件导入进来。MainApplication 所在包下。
@Import(AutoConfigurationPackages.Registrar.class)
public @interface AutoConfigurationPackage {}
----------------------------------------------------
public static void register(BeanDefinitionRegistry registry, String... packageNames) {
  if (registry.containsBeanDefinition(BEAN)) {
	BeanDefinition beanDefinition = registry.getBeanDefinition(BEAN);
	ConstructorArgumentValues constructorArguments = beanDefinition.getConstructorArgumentValues();
	constructorArguments.addIndexedArgumentValue(0, addBasePackages(constructorArguments, packageNames));
  }
  else {
	GenericBeanDefinition beanDefinition = new GenericBeanDefinition();
	beanDefinition.setBeanClass(BasePackages.class);
	beanDefinition.getConstructorArgumentValues().addIndexedArgumentValue(0, packageNames);
	beanDefinition.setRole(BeanDefinition.ROLE_INFRASTRUCTURE);
	registry.registerBeanDefinition(BEAN, beanDefinition);
  }
}
2.3.2.2 @Import(AutoConfigurationImportSelector.class)
1、利用getAutoConfigurationEntry(annotationMetadata);给容器中批量导入一些组件
2、调用List
3、利用工厂加载 Map<String, List
4、从META-INF/spring.factories位置来加载一个文件。
- 默认扫描我们当前系统里面所有META-INF/spring.factories位置的文件
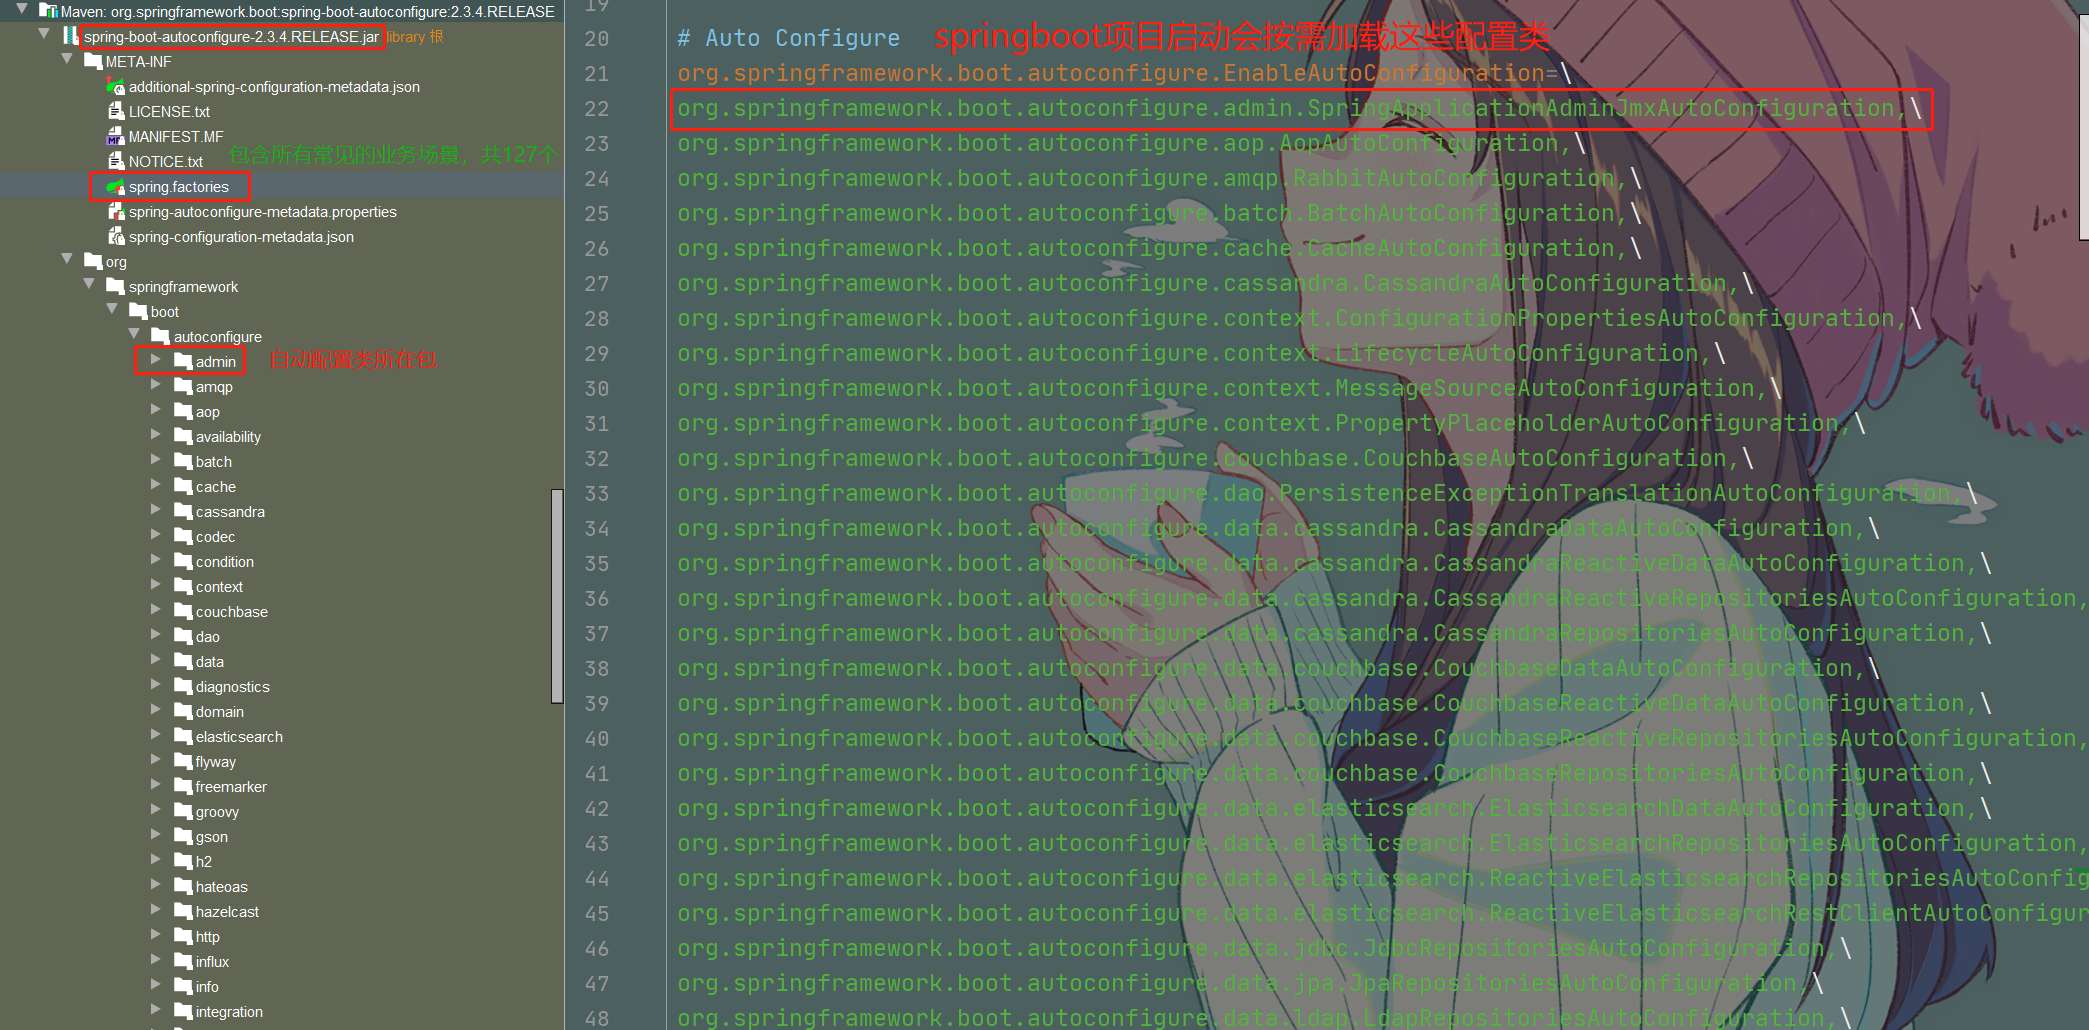
- spring-boot-autoconfigure-2.3.4.RELEASE.jar包里面也有META-INF/spring.factories

文件里面写死了spring-boot一启动就要给容器中加载的所有配置类
spring-boot-autoconfigure-2.3.4.RELEASE.jar/META-INF/spring.factories
# Auto Configure
org.springframework.boot.autoconfigure.EnableAutoConfiguration=\
org.springframework.boot.autoconfigure.admin.SpringApplicationAdminJmxAutoConfiguration,\
org.springframework.boot.autoconfigure.aop.AopAutoConfiguration,\
...
2.4 按需开启自动配置项
虽然127个场景的所有自动配置启动的时候默认全部加载。xxxxAutoConfiguration按照条件装配规则(@Conditional),最终会按需配置。
- SpringBoot默认会在底层配好所有的组件。但是如果用户自己配置了以用户的优先。
2.5 总结
- SpringBoot先加载所有的自动配置类 xxxxxAutoConfiguration
- 每个自动配置类按照条件进行生效,默认都会绑定配置文件指定的值。xxxxProperties里面拿。xxxProperties和配置文件(application.yml)进行了绑定
- 生效的配置类就会给容器中装配很多组件。
- 只要容器中有这些组件,相当于这些功能就有了。
- 定制化配置
- 用户直接自己@Bean替换底层的组件
- 用户去看这个组件是获取的配置文件什么值就去修改。
xxxxxAutoConfiguration ---> 组件 ---> xxxxProperties里面拿值 ----> application.properties
3. springboot核心功能
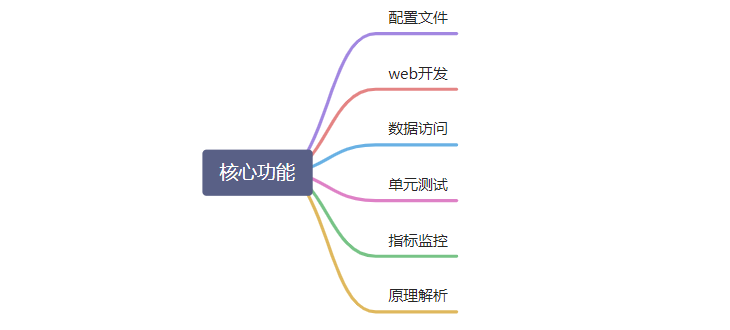
3.1 配置文件
3.1.1 properties
SpringBoot使用一个全局的配置文件,配置文件名称是固定的· application.properties
语法结构: key=value.
3.1.2 yml
- 见SpringBoot基础内容
https://www.cnblogs.com/cxnph/articles/15508633.html
3.2 Web开发
3.2.1 SpringMVC自动配置
Spring Boot provides auto-configuration for Spring MVC that works well with most applications.
- SpringBoot为MVC提供了自动配置,大多场景我们都无需自定义配置
The auto-configuration adds the following features on top of Spring’s defaults:
● Inclusion of ContentNegotiatingViewResolver and BeanNameViewResolver beans.
○ 内容协商视图解析器和BeanName视图解析器
● Support for serving static resources, including support for WebJars (covered later in this document)).
○ 静态资源(包括webjars)
● Automatic registration of Converter, GenericConverter, and Formatter beans.
○ 自动注册 Converter,GenericConverter,Formatter
● Support for HttpMessageConverters (covered later in this document).
○ 支持 HttpMessageConverters (后来我们配合内容协商理解原理)
● Automatic registration of MessageCodesResolver (covered later in this document).
○ 自动注册 MessageCodesResolver (国际化用)
● Static index.html support.
○ 静态index.html 页支持
● Custom Favicon support (covered later in this document).
○ 自定义 Favicon(小图标)
● Automatic use of a ConfigurableWebBindingInitializer bean (covered later in this document).
○ 自动使用 ConfigurableWebBindingInitializer ,(DataBinder负责将请求数据绑定到JavaBean上)
If you want to keep those Spring Boot MVC customizations and make more MVC customizations (interceptors, formatters, view controllers, and other features), you can add your own @Configuration class of type WebMvcConfigurer but without @EnableWebMvc.
- 如果你想要定制更多的MVC功能,可以不用
@EnableWebMvc注解。使用@Configuration + WebMvcConfigurer来自定义规则。
3.2.2 静态资源访问
只要静态资源放在这些路径下,都能够被访问。
"classpath:/META-INF/resources/",
"classpath:/resources/",
"classpath:/static/",
"classpath:/public/"
原理: 静态映射
- 请求进来,先去找Controller看能不能处理。不能处理的所有请求又都交给静态资源处理器。静态资源也找不到则响应404页面
改变默认的静态资源路径及前缀
//静态资源访问前缀,默认无前缀,通常不修改,会导致favion失效
spring:
  mvc:
    static-path-pattern: /haha/**
  //静态资源默认访问路径,是一个数组
  resources:
    static-locations: [classpath:/haha/]

 浙公网安备 33010602011771号