一、Spring
Spring最核心的两个概念就是IOC和AOP,可以理解为一个容器,里面装配所有用户使用到的bean,以前的一个类用到另一个类都是在本类中new一个对象,控制权在程序员手中,每当要修改该对象都需要程序员手动去修改。有了spring之后,就将控制权转交给容器,需要什么对象就去容器里拿,IOC是一种思想,DI是IOC的一种实现方式,需要什么就注入什么,对象之间的耦合性大大降低,管理起来也非常方便,依赖注入是一种设计模式,自动装配是一种实现方式。
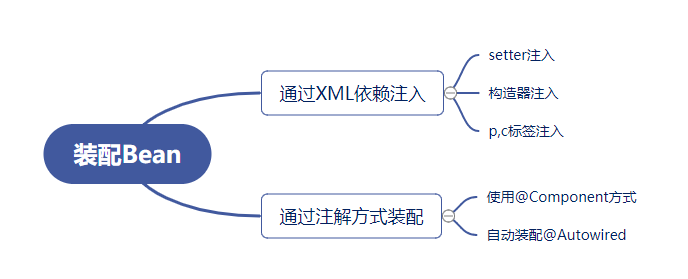
Spring使用xml方式创建bean:在xml中配置需要的bean,然后配置里面的属性,然后这个bean就可以直接使用了,使用ClassPathXmlApplicationContext就可以从配置文件中取出需要的bean对象,然后做相应的操作。使用xml依赖注入的方式有三种:构造器注入,getset注入,pc标签命名空间注入。
Spring使用注解代替xml配置:在配置类上加@Configuration相当于配置类,也可以指定@ComponentScan配置扫描的包,配合@Bean注解,然后使用AnnotationConfigApplicationContext加载配置类就可以获取bean。
Spring中B<context:annotation-config/>
spring源码配置及导入idea:https://blog.csdn.net/AARON0797/article/details/104424462
spring中文文档:https://zhuanlan.zhihu.com/p/426486874
Spring MVC是Spring Framework的一部分,核心是DispatcherServlet,是基于Java实现MVC的轻量级Web框架,DispatcherServlet的作用是将请求分发到不同的处理器。MVC是Modal、View、Controller的简写主要作用是降低了视图与业务逻辑间的双向耦合,是一种架构模式。
1、SpringMVC的执行流程(实线是SpringMVC提供的,虚线是用户自己实现的)

(1)用户发出请求,DispatcherServlet接收并拦截请求;
(2)DispatcherServlet调用处理器映射器HandlerMapping,HandlerMapping根据url找到handler,HandlerExecution是具体的handler,作用是根据url查找控制器,HandlerExecution将解析后的信息传递给DispatcherServlet;
(3)DispatcherServlet调用处理器适配器HandlerAdapter,HandlerAdapter根据对应规则找到Handler,即让对应的Controller执行,Controller将具体的执行信息返回HandlerAdapter,HandlerAdapter将视图逻辑名或模型传递给DispatcherServlet;
(4)DispatcherServlet调用视图解析器ViewResolver,ViewResolver解析HandlerAdapter传过来的逻辑视图名(给返回信息添加前缀和后缀),然后将处理后的名称传递给DispatcherServlet;
(5)DispatcherServlet根据视图解析器解析的结果,调用具体的视图,然后渲染数据展示给用户。
2、配置文件使用
web.xml:使用Servlet配置每一个Servlet都需要在web.xml中配置,有了SpringMVC只需要配置一个DispatcherServlet即可


<?xml version="1.0" encoding="UTF-8"?>
<web-app xmlns="http://xmlns.jcp.org/xml/ns/javaee"
         xmlns:xsi="http://www.w3.org/2001/XMLSchema-instance"
         xsi:schemaLocation="http://xmlns.jcp.org/xml/ns/javaee http://xmlns.jcp.org/xml/ns/javaee/web-app_4_0.xsd"
         version="4.0">

    <servlet>
        <servlet-name>springmvc</servlet-name>
        <servlet-class>org.springframework.web.servlet.DispatcherServlet</servlet-class>
        <init-param>
            <param-name>contextConfigLocation</param-name>
            <param-value>classpath:applicationContext.xml</param-value>
        </init-param>
        <load-on-startup>1</load-on-startup>
    </servlet>
    <servlet-mapping>
        <servlet-name>springmvc</servlet-name>
        <url-pattern>/</url-pattern>
    </servlet-mapping>

    <filter>
        <filter-name>encoding</filter-name>
        <filter-class>org.springframework.web.filter.CharacterEncodingFilter</filter-class>

        <init-param>
            <param-name>encoding</param-name>
            <param-value>utf-8</param-value>
        </init-param>
    </filter>
    <filter-mapping>
        <filter-name>encoding</filter-name>
        <url-pattern>/*</url-pattern>
    </filter-mapping>
</web-app>
applicationContext配置:
<?xml version="1.0" encoding="UTF-8"?>
<beans xmlns="http://www.springframework.org/schema/beans"
       xmlns:xsi="http://www.w3.org/2001/XMLSchema-instance"
       xmlns:context="http://www.springframework.org/schema/context"
       xmlns:mvc="http://www.springframework.org/schema/mvc"
       xsi:schemaLocation="http://www.springframework.org/schema/beans
        http://www.springframework.org/schema/beans/spring-beans.xsd
        http://www.springframework.org/schema/context
        http://www.springframework.org/schema/context/spring-context-4.3.xsd
        http://www.springframework.org/schema/mvc
        http://www.springframework.org/schema/mvc/spring-mvc-4.3.xsd">

    <!-- 自动扫描包,让指定包下的注解生效,由IOC容器统一管理 -->
    <context:component-scan base-package="com.kuang.controller"/>

    <!-- 让Spring MVC不处理静态资源 -->
    <mvc:default-servlet-handler />
    <!--
    支持mvc注解驱动
        在spring中一般采用@RequestMapping注解来完成映射关系
        要想使@RequestMapping注解生效
        必须向上下文中注册DefaultAnnotationHandlerMapping
        和一个AnnotationMethodHandlerAdapter实例
        这两个实例分别在类级别和方法级别处理。
        而annotation-driven配置帮助我们自动完成上述两个实例的注入。
     -->
    <mvc:annotation-driven />

    <!--json乱码-->
    <mvc:annotation-driven>
        <mvc:message-converters register-defaults="true">
            <bean class="org.springframework.http.converter.StringHttpMessageConverter">
                <constructor-arg value="UTF-8"/>
            </bean>
            <bean class="org.springframework.http.converter.json.MappingJackson2HttpMessageConverter">
                <property name="objectMapper">
                    <bean class="org.springframework.http.converter.json.Jackson2ObjectMapperFactoryBean">
                        <property name="failOnEmptyBeans" value="false"/>
                    </bean>
                </property>
            </bean>
        </mvc:message-converters>
    </mvc:annotation-driven>

    <!-- 视图解析器 -->
    <bean class="org.springframework.web.servlet.view.InternalResourceViewResolver"
          id="internalResourceViewResolver">
        <!-- 前缀 -->
        <property name="prefix" value="/WEB-INF/jsp/" />
        <!-- 后缀 -->
        <property name="suffix" value=".jsp" />
    </bean>

    <!--拦截器配置-->
    <mvc:interceptors>
        <mvc:interceptor>
            <!--包括这个请求下面的所有资源-->
            <mvc:mapping path="/**"/>
            <bean class="com.kuang.config.MyInterceptor"/>
        </mvc:interceptor>
    </mvc:interceptors>

    <!--文件上传配置-->
    <bean id="multipartResolver"  class="org.springframework.web.multipart.commons.CommonsMultipartResolver">
        <!-- 请求的编码格式,必须和jSP的pageEncoding属性一致,以便正确读取表单的内容,默认为ISO-8859-1 -->
        <property name="defaultEncoding" value="utf-8"/>
        <!-- 上传文件大小上限,单位为字节(10485760=10M) -->
        <property name="maxUploadSize" value="10485760"/>
        <property name="maxInMemorySize" value="40960"/>
    </bean>

</beans>
三、Mybatis
Mybatis是一款优秀的持久层框架,本是apache的一个开源项目ibatis,2010年这个项目由apache 迁移到了google code,并且改名为MyBatis,它是一个半自动化的ORM框架,避免了几乎所有的JDBC代码和手动设置参数以及获取结果集的过程。
1、使用Mybatis的步骤:
(1)编写配置文件mybatis-config.xml
<?xml version="1.0" encoding="UTF-8" ?>
<!DOCTYPE configuration PUBLIC "-//mybatis.org//DTD Config 3.0//EN" "http://mybatis.org/dtd/mybatis-3-config.dtd">

<configuration>

<!--引入外部配置文件-->
<properties resource="db.properties"/>

<settings>
    <setting name="mapUnderscoreToCamelCase" value="true"/>
    <setting name="cacheEnabled" value="true"/>
    <setting name="logImpl" value="STDOUT_LOGGING"/>
</settings>

<typeAliases>
    <typeAlias type="com.hou.pojo.User" alias="User"></typeAlias>
</typeAliases>

<environments default="development">
    <environment id="development">
        <transactionManager type="JDBC"/>
        <dataSource type="POOLED">
            <property name="driver" value="${driver}"/>
            <property name="url" value="${url}"/>
            <property name="username" value="${username}"/>
            <property name="password" value="${password}"/>
        </dataSource>
    </environment>
</environments>

<!--绑定接口-->
<mappers>
    <!--<mapper resource="com/hou/dao/UserMapper.xml"/>-->
    <!--<mapper class="com.hou.dao.UserMapper" />-->
    <package name="com.hou.dao" />
</mappers>
</configuration>
外部文件db.properties
driver=com.mysql.jdbc.Driver
url=jdbc:mysql://127.0.0.1:3306/mybatis?useSSL=true&useUnicode=true&characterEncoding=UTF-8
username=root
password=123
说明:使用class引入mapper文件,使用映射器接口实现类的完全限定类名需要配置文件名称和接口名称一致,并且位于同一目录下;使用包扫描的方式引入mapper文件,将包内的映射器接口实现全部注册为映射器但是需要配置文件名称和接口名称一致,并且位于同一目录下;使用resource方式引入没有要求,用"/"分割,其他用"."分割。
(2)编写接口:使用xml或者注解开发,注解直接在接口方法上使用对应的注解写sql,缺点是对于复杂sql不是很灵活。
(3)编写与接口对应的xxxMapper.xml
<?xml version="1.0" encoding="UTF-8" ?>
<!DOCTYPE mapper PUBLIC "-//mybatis.org//DTD Config 3.0//EN" "http://mybatis.org/dtd/mybatis-3-mapper.dtd">

<mapper namespace="com.hou.mapper.BlogMapper">
    <!--动态SQL-->
    <insert id="addBlog" parameterType="Blog">
        insert into mybatis.blog (id, title, author, create_time, views) values
        (#{id}, #{title}, #{author}, #{create_time}, #{views});
    </insert>

    <select id="queryBlogIF" parameterType="map" resultType="Blog">
        select * from mybatis.blog
        <where>
            <include refid="if-title-author"></include>
        </where>
    </select>

    <select id="queryBlogchoose" parameterType="map" resultType="Blog">
        select * from mybatis.blog
        <where>
            <choose>
                <when test="title != null">
                    title = #{title}
                </when>
                <when test="author != null">
                    and author = #{author}
                </when>
                <otherwise>
                    and views = #{views}
                </otherwise>
            </choose>
        </where>
    </select>

    <update id="updateBlog" parameterType="map">
        update mybatis.blog
        <set>
            <if test="title != null">
                title = #{title},
            </if>
            <if test="author != null">
                author = #{author}
            </if>
        </set>
        where id = #{id}
    </update>

    <sql id="if-title-author">
        <if test="title != null">
            title = #{title}
        </if>
        <if test="author != null">
            and author = #{author}
        </if>
    </sql>

    <!--ids是传的,#{id}是遍历的-->
    <select id="queryBlogForeach" parameterType="map" resultType="Blog">
        select * from mybatis.blog
        <where>
            <foreach collection="ids" item="id" open="and ("close=")" separator="or">
                id=#{id}
            </foreach>
        </where>
    </select>

    <!--多个学生对应一个老师的情况使用 association(对象)-->
    <!--第一种:查询老师和学生然后进行关联-->
    <select id="getStudent" resultMap="StudentTeacher">
        select * from student;
    </select>

    <resultMap id="StudentTeacher" type="com.hou.pojo.Student">
        <result property="id" column="id"></result>
        <result property="name" column="name"></result>
        <association property="teacher" column="tid" javaType="com.hou.pojo.Teacher" select="getTeacher">
        </association>
    </resultMap>

    <select id="getTeacher" resultType="com.hou.pojo.Teacher">
        select * from teacher where id = #{id};
    </select>

    <!--第二种:按结果关联查询-->
    <select id="getStudent2" resultMap="StudentTeacher2">
        select s.id sid,s.name sname,t.name tname
        from student s,teacher t where s.tid=t.id;
    </select>

    <resultMap id="StudentTeacher2" type="com.hou.pojo.Student">
        <result property="id" column="sid"></result>
        <result property="name" column="sname"></result>
        <association property="teacher" javaType="com.hou.pojo.Teacher">
            <result property="name" column="tname"></result>
        </association>
    </resultMap>

    <!--一个老师对应多个学生,使用collection(集合)-->
    <!--第一种:按结果-->
    <select id="getTeacher" resultMap="TeacherStudent">
        select s.id sid, s.name sname, t.name tname, t.id tid from student s, teacher t where s.tid = t.id and t.id = #{id};
    </select>

    <resultMap id="TeacherStudent" type="com.hou.pojo.Teacher">
        <result property="id" column="tid"></result>
        <result property="name" column="tname"></result>
        <!--集合中的泛型信息,我们用oftype获取-->
        <collection property="studentList" ofType="com.hou.pojo.Student">
            <result property="id" column="sid"></result>
            <result property="name" column="sname"></result>
        </collection>
    </resultMap>

    <!--第二种:查询老师和学生,进行关联-->
    <select id="getTeacher2" resultMap="TeacherStudent2">
        select * from mybatis.teacher where id = #{id}
    </select>

    <resultMap id="TeacherStudent2" type="com.hou.pojo.Teacher">
        <collection property="studentList" column="id" javaType="ArrayList" ofType="com.hou.pojo.Student" select="getStudentByTeacherId">
        </collection>
    </resultMap>

    <select id="getStudentByTeacherId" resultType="com.hou.pojo.Student">
        select * from mybatis.student where tid = #{id}
    </select>
</mapper>
数据库字段和实体类字段不对应时,可以使用resultMap对应
<resultMap id="UserMap" type="User">
  <!-- id为主键 -->
  <id column="id" property="id"/>
  <!-- column是数据库表的列名 , property是对应实体类的属性名 -->
  <result column="name" property="name"/>
  <result column="pwd" property="password"/>
</resultMap>
<select id="selectUserById" resultMap="UserMap">
 select id , name , pwd from user where id = #{id}
</select>
(4)进行测试
@Test
    public void testDemo(){
        SqlSessionFactory sqlSessionFactory = null;
        SqlSession sqlSession = null;
        try {
            //使用mybatis第一步:获取sqlSessionFactory对象
            String resource = "mybatis-config.xml";
            InputStream inputStream = Resources.getResourceAsStream(resource);
            sqlSessionFactory = new SqlSessionFactoryBuilder().build(inputStream);
            sqlSessionFactory.openSession();
            //第一种:获取Mapper
            UserMapper userDao = sqlSession.getMapper(UserMapper.class);
            List<User> userList = userDao.getUserList();
            //第二种:写全方法及包名
            List<User> userList2 = sqlSession.selectList("com.hou.dao.UserDao.getUserList");
            for(User user: userList){
                System.out.println(user);
            }
        } catch (IOException e) {
            e.printStackTrace();
        } finally {
            //关闭
            sqlSession.close();
        }
    }
2、使用xml编写sql需要对静态资源进行过滤,在pom文件中配置,否则会找不到文件
<resources>
  <resource>
    <directory>src/main/java</directory>
    <includes>
      <include>**/*.properties</include>
      <include>**/*.xml</include>
    </includes>
    <filtering>false</filtering>
  </resource>
  <resource>
    <directory>src/main/resources</directory>
    <includes>
      <include>**/*.properties</include>
      <include>**/*.xml</include>
    </includes>
    <filtering>false</filtering>
  </resource>
</resources>
3、缓存
Mybatis系统中缓存是存在内存中的临时数据,默认定义了两级缓存:一级缓存和二级缓存,默认开启一级缓存(sqlSession级别的缓存,也称本地缓存),二级缓存需要手动开启和配置,是基于namespace级别的缓存,查询顺序:二级缓存--->一级缓存--->数据库。
一级缓存失效的几种情况:增删改都会使缓存失效;sqlSession关闭之后缓存也会失效;两次查询的数据不一样,一级缓存中没有也会导致再次查询数据库。
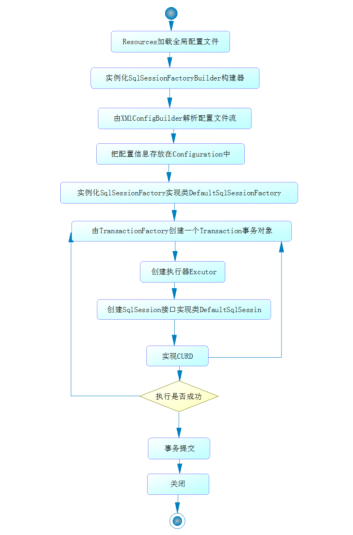
4、Mybatis详细执行流程
SqlSessionFactoryBuilder 的作用在于创建 SqlSessionFactory,创建成功后,SqlSessionFactoryBuilder 就失去了作用;SqlSessionFactory 的生命周期存在于整个MyBatis 的应用之中。
四、SpringBoot
SpringBoot整合了各种框架,核心就是自动装配,SpringBoot启动时会加载大量的自动装配类,如果需要的组件在自动配置类中,就不需要手动配置,只需要再配置文件中指定属性的值即可,另外自动配置类必须在一定的条件下才能生效,@Conditional指定的条件成立,才给容器中添加组件,配置里面的所有内容才生效;如果是自己写的属性值,那么需要在类上加@ConfigurationProperties,作用是将配置文件中配置的每一个属性的值映射到这个组件中,将类中所有属性和配置文件中相关的配置进行绑定,参数prefix="Xxxx",将配置文件中的Xxxx下面的所有属性一一对应。
xxxxAutoConfigurartion:自动配置类;给容器中添加组件
xxxxProperties:封装配置文件中相关属性;
五、微服务
Martin Fowler微服务论文:https://martinfowler.com/articles/microservices.html
翻译:https://www.cnblogs.com/liuning8023/p/4493156.html
===================================================================================================
世界上第一个程序员:
http://mp.weixin.qq.com/s?__biz=Mzg4NjAwMTQzNA==&mid=2247487320&idx=1&sn=e0455a0e3c04710ab3e163ee1dde89fe&chksm=cfa1152df8d69c3b4f2696af67312ac5a7bd262938bb0bca4b7e36da8bb53f300e2be491216e&mpshare=1&scene=23&srcid=0308fVhGJv2p1HYjlvZfPp88&sharer_sharetime=1615194517428&sharer_shareid=0235418a1d00106d58babd03c3be12d9#rd


 浙公网安备 33010602011771号