Nginx的反向代理和负载均衡
nginx实现反向代理
yy 复制,8yy:表示从当前光标所在的行开始复制8行
p 粘贴
dd 剪切,8dd:表示从当前光标所在的行开始剪切8行
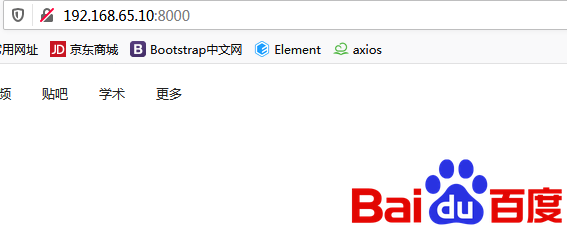
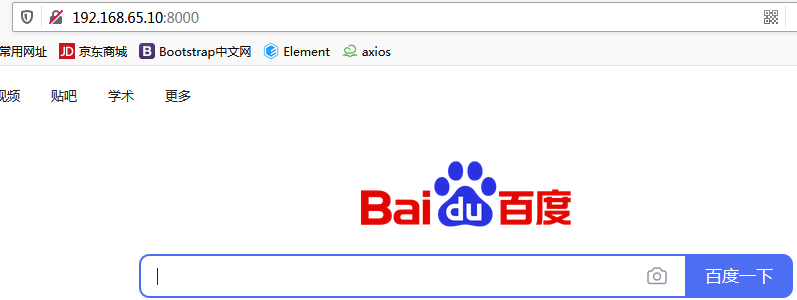
     14 http {
     15     include       /etc/nginx/mime.types;
     16     default_type  application/octet-stream;
     17
     18     log_format  main  '$remote_addr - $remote_user [$time_local] "$request" '
     19                       '$status $body_bytes_sent "$http_referer" '
     20                       '"$http_user_agent" "$http_x_forwarded_for"';
     21
     22     access_log  /var/log/nginx/access.log  main;
     23
     24     sendfile        on;
     25     #tcp_nopush     on;
     26
     27     keepalive_timeout  65;
     28
     29     #gzip  on;
     30      server {
     31         listen 80;
     32         server_name 192.168.65.10;
     33         location / {
     34         root /home/web/html;
     35         index choose.html;
     36 }
     37             }
     38      server {
     39         listen 8000;
     40         server_name 192.168.65.10;
     41         location / {
     42         proxy_pass https://www.baidu.com;
     43 }
     44             }
     45     include /etc/nginx/conf.d/*.conf;
     46 }
但在实际开发中,会使用nginx的分类配置,实现多个配置文件同时生效,这样就不用多个配置文件驳杂在一起
如:
进入配置目录
[root@localhost ~]# cd /etc/nginx/conf.d/
[root@localhost conf.d]# ls
default.conf
创建百度配置文件baidu.conf
[root@localhost conf.d]# vi baidu.conf
      1 server {
      2         listen 8000;
      3         server_name 192.168.65.10;
      4         location / {
      5                 proxy_pass https://www.baidu.com;
      6         }
      7 }
然后优雅的重启 nginx -s reload ,效果和上面一样,但配置可不一样
nginx实现负载均衡
打包二个jar项目,里面分别有二个页面(一个端口为8000 , 另一个为8001),放在一个目录里面

     22     access_log  /var/log/nginx/access.log  main;
     23
     24     sendfile        on;
     25     #tcp_nopush     on;
     26
     27     keepalive_timeout  65;
     28
     29     #gzip  on;
     30
     31     #负载均衡组
     32      upstream myServer{
     33       server 192.168.65.10:8000;
     34       server 192.168.65.10:8001;
     35      }
     36      server {
     37         listen 80;
     38         server_name 192.168.65.10;
     39         location / {
     40         proxy_pass http://myServer;
     41 }
     42             }
     43     include /etc/nginx/conf.d/*.conf;
然后启动jar包(前置条件需要先安装好jdk)
[root@localhost app]# nohup java -jar nginx8001.jar &    //不停止的开启这个jar包,且在后台运行
[1] 1311
[root@localhost app]# nohup: ignoring input and appending output to ‘nohup.out’

[1]+  Exit 1                  nohup java -jar nginx8001.jar
[root@localhost app]# nohup java -jar nginx_test8000.jar &
[1] 1321
[root@localhost app]# nohup: ignoring input and appending output to ‘nohup.out’

[1]+  Exit 1                  nohup java -jar nginx_test8000.jar
然后重启nginx就可以了,如果重启失败使用以下命令:
nginx -c /etc/nginx/nginx.conf
再次重启就可以了

 浙公网安备 33010602011771号