vue-slot与slot-scope详解
一,思考,element-UI <el-table>中如何获取当前行数据?
<el-table-column prop label="操作">
                <template slot-scope="scope">
                  <span class="edit"></span>
                  <span class="delete" @click.prevent="deleteRow(scope.row.alarmModelId,0)"></span>
                </template>
 </el-table-column>
用到的就是插槽
二,什么是插槽?
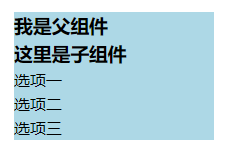
插槽就是子组件中的提供给父组件使用的一个占位符,用<slot></slot> 表示,父组件可以在这个占位符中填充任何模板代码,如 HTML、组件等,填充的内容会替换子组件的<slot></slot>标签。
三,单个插槽(匿名插槽)
单个插槽可以放置在组件的任意位置,但是就像它的名字一样,一个组件中只能有一个该类插槽。
1) 匿名的方式,就是指把在引用组件的时候,里面传的内容,全部一起传送到组件页面中 <slot></slot> 所在的位置。
2) 只要组件中有 <slot></slot> ,并且不管有多少个,都会全部渲染为传过来的内容。
3) <slot></slot>里面也可以设置内容,这个内容是保证引入组件的时候,有个默认值。当然,<slot></slot>里面不设置内容也可以,这样只是没有默认值,是不会报错的。
4) 传递的内容,也可以是动态的,如同上面一样。但是要注意的是,这个内容不能是 引用组件的时候组件上的内容,要注意作用域。可以查看官网 插槽编译作用域。
5) 如果传递的内容,没有slot 来接收,那么,传递的内容就会被抛弃掉,不会起作用。
例子:
父组件:
<template>
  <div class="parent">
   <h3>我是父组件</h3>
    <child>  <!--子组件 -->
       <ul>  <!--因为在child子组件中定义了一个<slot></slot> ul中的内容就会显示到插槽中 -->
        <li>选项一</li>
        <li>选项二</li>
        <li>选项三</li>
        </ul>
    </child>
  </div>
</template>

<script>
import child from './child.vue'
export default {
  name: 'parent',
  data() {
    return {

    }
  },
  components:{
      child
  }
 }
</script>
<style scoped>
.parent{
    margin-left: 100px;
    width: 200px;
    background: lightblue;
    margin-top: 20px;
}
</style>
子组件:
<template>
  <div class="child">
    <h3>这里是子组件</h3>
    <slot></slot>  <!--插槽-->
  </div>
</template>

<script>
export default {
  name: 'child',
  data() {
    return {

    }
  }
 }
</script>

<style scoped>

</style>
渲染结果:

四,具名插槽
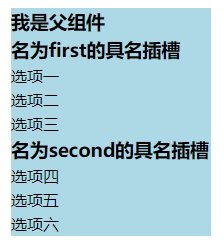
就是带有名字的插槽,有一个name属性,具名的插槽可以在组件中出现多次,而之前的匿名插槽只能出现一次,毕竟存在多个插槽,页面也不知道自己的正确显示位置应该在哪里。
1) 引入组件的页面,如果是多个内容,需要用template 包裹起来,并且添加 slot 属性和 自定义值 。
2) slot 的值 需要和 组件中 <slot name='xxx'></slot> name的值相对应。
3) 如果剩下的内容没有包裹起来并制定值的话,那么这些内容会被渲染到 组件中 所有的 <slot></slot> 所在的位置。
4) 如果 slot 设置为default 和 name 设置为default,那就和没设置slot与name是一样的。
例子:
父组件:
<template>
  <div class="parent">
   <h3>我是父组件</h3>
    <child>  <!--子组件 -->
       <ul slot="first">  <!--名为first的插槽 -->
        <li>选项一</li>
        <li>选项二</li>
        <li>选项三</li>
        </ul>
         <ul slot="second">  <!--名为second的插槽-->
        <li>选项四</li>
        <li>选项五</li>
        <li>选项六</li>
        </ul>
    </child>
  </div>
</template>

<script>
import child from './child.vue'
export default {
  name: 'parent',
  data() {
    return {

    }
  },
  components:{
      child
  }
 }
</script>
<style scoped>
.parent{
    margin-left: 100px;
    width: 200px;
    background: lightblue;
    margin-top: 20px;
}
</style>
子组件:
<template>
  <div class="child">
    <h3>名为first的具名插槽</h3>
    <slot name="first"></slot>  <!--名为first的具名插槽-->
    <h3>名为second的具名插槽</h3>
    <slot name="second"></slot>  <!--名为second的具名插槽-->
  </div>
</template>

<script>
export default {
  name: 'child',
  data() {
    return {

    }
  }
 }
</script>

<style scoped>

</style>
渲染结果:

五,作用域插槽
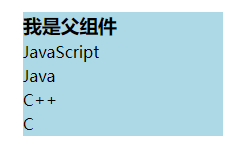
1) 作用域插槽主要是 使用子组件的任何数据 来达到自定义显示内容的目的
2) 作用域插槽最最最最最重要的一步,即是在<slot></slot> 上绑定数据 ,如果没有绑定数据,则父组件收到的,只是一个空对象{ }。
3) 作用域插槽中 <slot></slot> 上绑定数据,可以是写死的,也可以是动态绑定的。如果是动态绑定的,则也需要 v-bind:xxx
4) 作用域插槽中 <slot></slot> 上绑定的数据 也可以传一个定义好的有返回值的 mthods 方法。比如我定义了 <slot what='say()'></slot> ,然后say方法为: say:function(){ return '我说了' } 。最后得到的结果就是 “我说了”,当然,动态绑定一定要加 v-bind:xxx。
5) 当 绑定上数据之后,引用组件的地方 中 发送的内容就能通过 slot-scope 来获取。获取到的内容,就是一个对象,比如 <slot name='sayWhat' said='message'></slot> 我这里绑定 said='message' 之后, 那边接收到的就是 { said:"xxxx"} 一个对象。
6) slot-scope 可以接收任何有效的可以出现在函数定义的参数位置上的 JavaScript 表达式
例子:
父组件:
<template>
  <div class="parent">
   <h3>我是父组件</h3>
    <child>  <!--子组件 -->
      <!-- 2.5以下必须使用template -->
      <template slot-scope="scoped">
        <ul>
            <li v-for="(item, index) in scoped.data" :key="index">{{item}}</li>
        </ul>
      </template>
    </child>
  </div>
</template>

<script>
import child from './child.vue'
export default {
  name: 'parent',
  data() {
    return {

    }
  },
  components:{
      child
  }
 }
</script>
<style scoped>
.parent{
    margin-left: 100px;
    width: 200px;
    background: lightblue;
    margin-top: 20px;
}
</style>
子组件:
<template>
  <div class="child">
   <slot :data="pLanguage">
   </slot>
  </div>
</template>

<script>
export default {
  name: 'child',
  data() {
    return {
      pLanguage:['JavaScript','Java','C++','C']
    }
  }
 }
</script>

<style scoped>

</style>
渲染结果:

六,2.6版本之后新用法
vue 在 2.6.0 中,具名插槽和作用域插槽引入了一个新的统一的语法 (即 v-slot 指令)。它取代了 slot 和 slot-scope 这两个目前已被废弃但未被移除且仍有用的特性。但是将会在vue 3 中,被废弃的这两个,不会被支持即无效。
1,具名插槽的变化
<testSlot>
    <!--2.6.0以前的写法-->
    <template  slot='header'>
        <p>------------header----------------</p>
        <h3>这是header1的内容</h3>
        <p>这是header2的内容</p>
    </template>


    <!--2.6.0之后的写法-->
    <template v-slot:header>
        <p>------------header----------------</p>
        <h3>这是header1的内容</h3>
        <p>这是header2的内容</p>
    </template>
</testSlot>
1) slot=' xxx ' 改成了 v-slot : xxx 并且冒号后面这个名称不能打引号
2) 组件页面中slot的内容没有变化
3) 2.6.0 之后 具名插槽 v-slot:header 可以缩写为 #header
2,作用域插槽的变化
<slotScope :message='msg'>
    <!--2.6.0之前的写法-->
    <div slot='sayWhat' slot-scope='thing'>说了:{{thing.said}}</div>

    <template slot='listbox' slot-scope='value'>
        <p>{{value.send.text}}</p>
    </template>

    <!--2.6.0之后的写法,不能单独用在html标签上-->
    <template v-slot:sayWhat='thing'>
      <div>说了:{{thing.said}}</div>
    </template>
    <template v-slot:listbox='value'>
        <p>{{value.send.text}}</p>
    </template>
</slotScope>
1) 两个属性合并成了一个 v-slot : 插槽名称 = ' 传过来的值 ' 。
2) 组件页面中slot的内容没有变化 。
3) v-slot 不能用在 html 标签上 。
4) 如果是默认插槽 可以写成 v-slot='xxx'。
5) 还增加了 可以解构插槽props 和 设置默认值的内容,具体的可以查看官网 解构插槽

