springboot学习入门之四---开发Web应用之Thymeleaf篇
http://tengj.top/2017/03/13/springboot4/
1项目结构
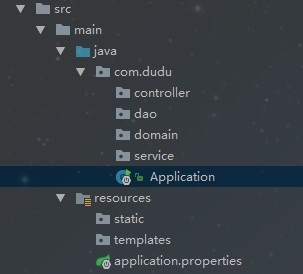
说明:
- root package结构:
com.dudu - 应用启动类
Application.java置于root package下,这样使用@ComponentScan注解的时候默认就扫描当前所在类的package - 实体(Entity)置于
com.dudu.domain包下 - 逻辑层(Service)置于
com.dudu.service包下 - controller层(web)置于
com.dudu.controller层包下 - static可以用来存放静态资源
- templates用来存放默认的模板配置路径
2Spring Web MVC框架
2.1springmvc框架简介
Spring MVC允许你创建特定的@Controller或@RestController beans来处理传入的HTTP请求。
示例:
@RestController
@RequestMapping(value="/users")
public class MyRestController {
    @RequestMapping(value="/{user}", method=RequestMethod.GET)
    public User getUser(@PathVariable Long user) {
        // ...
    }
    @RequestMapping(value="/{user}/customers", method=RequestMethod.GET)
    List<Customer> getUserCustomers(@PathVariable Long user) {
        // ...
    }
    @RequestMapping(value="/{user}", method=RequestMethod.DELETE)
    public User deleteUser(@PathVariable Long user) {
        // ...
    }
}
2.2Spring MVC自动配置
Spring Boot为Spring MVC提供适用于多数应用的自动配置功能。在Spring默认基础上,自动配置添加了以下特性:
- 引入ContentNegotiatingViewResolver和BeanNameViewResolver beans。
- 对静态资源的支持,包括对WebJars的支持。
- 自动注册Converter,GenericConverter,Formatter beans。
- 对HttpMessageConverters的支持。
- 自动注册MessageCodeResolver。
- 对静态index.html的支持。
- 对自定义Favicon的支持。
1)如果想全面控制Spring MVC,你可以添加自己的@Configuration,并使用@EnableWebMvc对其注解。
2)如果想保留Spring Boot MVC的特性,并只是添加其他的MVC配置(拦截器,formatters,视图控制器等),你可以添加自己的WebMvcConfigurerAdapter类型的@Bean(不使用@EnableWebMvc注解)
3静态文件
默认情况下,Spring Boot从classpath下一个叫/static(/public,/resources或/META-INF/resources)的文件夹或从ServletContext根目录提供静态内容。这使用了Spring MVC的ResourceHttpRequestHandler,所以你可以通过添加自己的WebMvcConfigurerAdapter并覆写addResourceHandlers方法来改变这个行为(加载静态文件)
4模板引擎
Spring Boot支持多种模版引擎包括:
- FreeMarker
- Groovy
- Thymeleaf(官方推荐)
- Mustache
JSP技术Spring Boot官方是不推荐的,原因有三:
- tomcat只支持war的打包方式,不支持可执行的jar。
- Jetty 嵌套的容器不支持jsp
- Undertow
- 创建自定义error.jsp页面不会覆盖错误处理的默认视图,而应该使用自定义错误页面
当你使用上述模板引擎中的任何一个,它们默认的模板配置路径为:src/main/resources/templates。当然也可以修改这个路径,具体如何修改,可在后续各模板引擎的配置属性中查询并修改。
4.1Thymeleaf模板引擎
Thymeleaf是一款用于渲染XML/XHTML/HTML5内容的模板引擎。类似JSP,Velocity,FreeMaker等,它也可以轻易的与Spring MVC等Web框架进行集成作为Web应用的模板引擎。
与其它模板引擎相比,Thymeleaf最大的特点是能够直接在浏览器中打开并正确显示模板页面,而不需要启动整个Web应用。它的功能特性如下:
- Spring MVC中@Controller中的方法可以直接返回模板名称,接下来Thymeleaf模板引擎会自动进行渲染(如ModelAndView)
- 模板中的表达式支持Spring表达式语言(Spring EL)
- 表单支持,并兼容Spring MVC的数据绑定与验证机制
- 国际化支持
Spring官方也推荐使用Thymeleaf
4.1.1使用
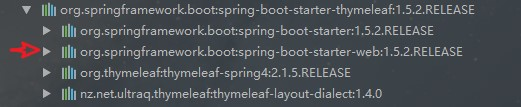
1)引入依赖:
<dependency>
    <groupId>org.springframework.boot</groupId>
    <artifactId>spring-boot-starter-thymeleaf</artifactId>
</dependency>
如图所示,spring-boot-starter-thymeleaf会自动包含spring-boot-starter-web,所以我们就不需要单独引入web依赖了。
2)编写controller
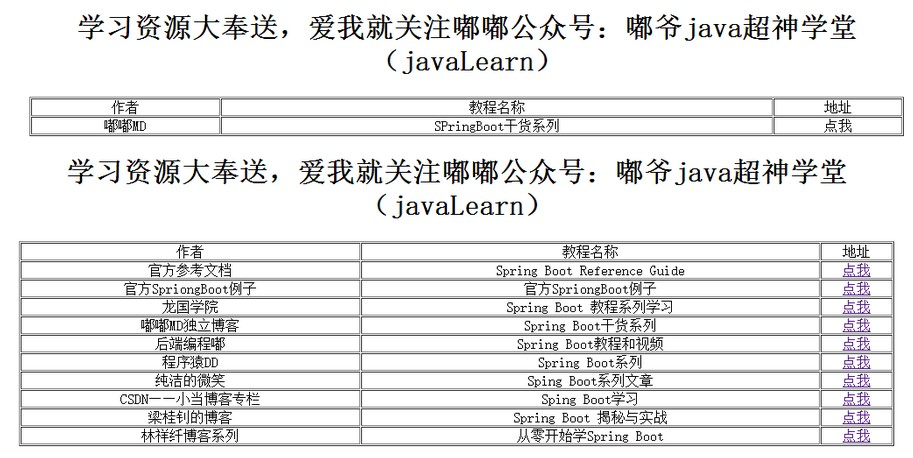
@Controller
@RequestMapping("/learn")
public class LearnResourceController {
    @RequestMapping("/")
    public ModelAndView index(){
        List<LearnResouce> learnList =new ArrayList<LearnResouce>();
        LearnResouce bean =new LearnResouce("官方参考文档","Spring Boot Reference Guide","http://docs.spring.io/spring-boot/docs/1.5.1.RELEASE/reference/htmlsingle/#getting-started-first-application");
        learnList.add(bean);
        bean =new LearnResouce("官方SpriongBoot例子","官方SpriongBoot例子","https://github.com/spring-projects/spring-boot/tree/master/spring-boot-samples");
        learnList.add(bean);
        bean =new LearnResouce("龙国学院","Spring Boot 教程系列学习","http://www.roncoo.com/article/detail/125488");
        learnList.add(bean);
        bean =new LearnResouce("嘟嘟MD独立博客","Spring Boot干货系列 ","http://tengj.top/");
        learnList.add(bean);
        bean =new LearnResouce("后端编程嘟","Spring Boot教程和视频 ","http://www.toutiao.com/m1559096720023553/");
        learnList.add(bean);
        bean =new LearnResouce("程序猿DD","Spring Boot系列","http://www.roncoo.com/article/detail/125488");
        learnList.add(bean);
        bean =new LearnResouce("纯洁的微笑","Sping Boot系列文章","http://www.ityouknow.com/spring-boot");
        learnList.add(bean);
        bean =new LearnResouce("CSDN——小当博客专栏","Sping Boot学习","http://blog.csdn.net/column/details/spring-boot.html");
        learnList.add(bean);
        bean =new LearnResouce("梁桂钊的博客","Spring Boot 揭秘与实战","http://blog.csdn.net/column/details/spring-boot.html");
        learnList.add(bean);
        bean =new LearnResouce("林祥纤博客系列","从零开始学Spring Boot ","http://412887952-qq-com.iteye.com/category/356333");
        learnList.add(bean);
        ModelAndView modelAndView = new ModelAndView("/index");
        modelAndView.addObject("learnList", learnList);
        return modelAndView;
    }
}
3)编写HTML
引入依赖后就在默认的模板路径src/main/resources/templates下编写模板文件即可完成。这里我们新建一个index.html:
<!DOCTYPE html>
<html xmlns:th="http://www.thymeleaf.org">
<head>
    <title>learn Resources</title>
    <meta http-equiv="Content-Type" content="text/html; charset=UTF-8" />
</head>
<body>

<div style="text-align: center;margin:0 auto;width: 1000px; ">
<h1>学习资源大奉送,爱我就关注嘟嘟公众号:嘟爷java超神学堂(javaLearn)</h1>
<table width="100%" border="1" cellspacing="1" cellpadding="0">
    <tr>
        <td>作者</td>
        <td>教程名称</td>
        <td>地址</td>
    </tr>
    <!--/*@thymesVar id="learnList" type=""*/-->
    <tr th:each="learn : ${learnList}">
        <td th:text="${learn.author}">嘟嘟MD</td>
        <td th:text="${learn.title}">SPringBoot干货系列</td>
        <td><a th:href="${learn.url}" target="_blank">点我</a></td>
    </tr>
</table>
</div>
</body>
</html>
注:通过xmlns:th=”http://www.thymeleaf.org“ 命令空间,将静态页面转换为动态的视图,需要进行动态处理的元素将使用“th:”前缀。
4)结果展示
对比下直接打开index.html和启动工程后访问http://localhost:8080/learn 看到的效果,Thymeleaf做到了不破坏HTML自身内容的数据逻辑分离。
5)Thymeleaf的默认参数配置
在application.properties中可以配置thymeleaf模板解析器属性
下一篇准备介绍下如何整合jsp,毕竟现在绝大多数的企业还是用jsp来作为模板引擎的。


 浙公网安备 33010602011771号