搭建 P4 编程环境
- 0. 引言
- 1. Ubuntu操作系统准备
- 2. P4环境的代码框架
- 3. 创建P4目录,加入环境变量,并安装依赖项
- 4. 设置环境变量和软件版本
- 5. 安装ProtoBuf
- 6. 安装gRPC
- 7. 安装BMv2依赖,下面PI编译时会用到
- 8. 安装PI数据平面接口
- 9. 安装BMv2软件交换机
- 10. 安装P4C编译器
- 11. 安装mininet网络仿真器
- 12. 安装p4-util项目
- 13. 安装ipsumdump
- 14. 下载P4语言的官方tutorials
- 15. ETH Zurich大学的P4-learning项目
- 16. Princeton大学的开源P4编程实验
- 【可选】在Ubuntu 16.04上和自带的Python 3.5并列安装Python 3.8以及图神经网络分析工具 Pytorch Geometric
- 附录:文献引用
- 后话
0. 引言
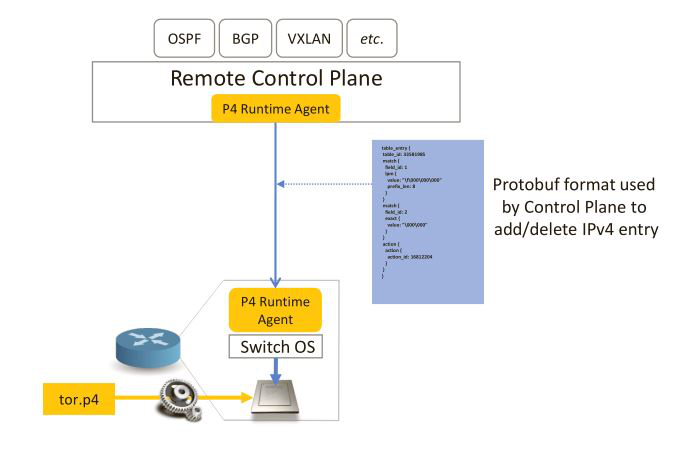
互联网一直以强调智能终端和哑网络的架构而自豪。不过,随着时间的推移,随着应用程序需求的不断发展,网络变得更加智能,网络交换机实现了访问控制、隧道、覆盖格式、安全监测等功能。P4,这种交换机控制平面的标准化公共接口,可以帮助实现网络智能化。它允许操作员使用标准接口编写自己的控制应用程序,忽略底层交换机的具体实现。这就是软件定义的网络(SDN)的思想。在整个开源网络设备技术架构中,P4 runtime接口是控制器面向网络设备的数据平台的标准访问接口;P4语言为不同的数据平面的实现架构,规定统一的高层编程语言。
P4试图以两种方式实现可移植性。首先,P4程序应该是目标独立target independent,允许程序员在不同的实现平台上统一地指定包处理:基于CPU的软件交换机、基于FPGA的硬件交换机、基于NPU的硬件交换机、和基于ASIC的可重构硬件交换机。第二,P4语言本身是独立于协议的protocol independent,因为它没有对任何特定的协议进行本机建模。相反,它提供了抽象,允许程序员用一种通用语法表达现有和未来的协议格式。
从软件定义网络的发展历史来说,Nick McKeown是软件定义网络和开放网络研究的领导人物,可以参考网络开放创新:Nick McKeown的技术人生路 和专访Nick McKeown:网络领域的游戏颠覆者。普林斯顿大学的Jennifer Rexford和斯坦福大学的Nick McKeown两位教授主导并创立的可编程语言P4。2013年Nick成立了Barefoot Networks公司,致力于开发基于P4的网络芯片Tofino和软件开发套件Capilano,并帮助P4社区发展壮大。2019年4月,开放网络基金会(ONF)宣布已完成与P4.org的合并,并将主持所有P4活动和工作组。P4已经成为了描述交换机、路由器和NIC如何处理数据包的行业标准。ONF是一个由运营商牵头的联盟,负责推动颠覆性的网络转型,成员包括AT&T、中国电信、中国联通、康卡斯特、德国电信、谷歌、NTT和土耳其电信。
关于软件定义网络,具体参考权威中文书籍:国之重器出版工程,软件定义网络核心原理与应用实践(第三版),作者: 黄韬 / 刘江 / 魏亮 / 张娇 / 杨帆 / 刘韵洁,2018年,人民邮电出版社。
随着2017年25Gbps高速网络开始迅速被采用,基于CPU和纯软件开发的DPDK框架逐渐暴露出了一些不足:
- 基于DPDK的应用可以达到较高的10Gbps包转发速率的软件交换机。但是云计算业务的猛增给基础设施带来了压力,随着网络带宽从10G向25G、100G的演进,通用服务器上的DPDK需要通过更强力的CPU才能达到线速,随之带来的是高昂的投入成本。特别是单Core的主频越高,价格越贵,且主频增加之间和价格增加是非线性关系。网络IO计算与存储软件本身的计算对CPU构成了争抢。SDN硬件卸载方案呼之欲出。而P4可以显著降低硬件编程的难度和门槛。
- 基于DPDK可以做10Gbps的软件负载均衡器,但这是通过多服务器、多核负载均衡实现的。更高线速下的负载均衡算法还是要由硬件交换机或者网卡实现的,并不能被软件定义。如果网络中出现单个大象流,无法被硬件交换机或者网卡的负载均衡算法很好的分发,就会造成单根网线或者单个CPU Core出现拥塞,对业务造成巨大影响。利用P4语言可以实现这些硬件交换机和智能网卡的可编程,实现超高线速下的在线流量测量和大象流的负载均衡调度。
P4语言的开发环境可以粗略分为三种:
- 第一种是商用开发环境,诸如Barefoot出品的Capilano,专门为其自家设计的芯片Tofino而推出的一款IDE。
- 第二种是面向FPGA等硬件运行条件的开发环境,比如NetFPGA Sume智能网卡。这种情况下P4程序大致需要先使用前端编译器来编译生成一种中间表示文件,然后再使用后端编译器根据中间表示文件生成目标运行文件。中间表示文件即IR文件,类似介于C语言和汇编之间的链接文件。目标运行文件类似windows平台的exe文件,linux平台的可执行二进制文件,以及能直接加载/烧写入FPGA运行的文件。
- 第三种是面向软件交换机的开发环境,这种环境对于接触过 OpenFlow 开发和Open vSwitch(OVS)的朋友应该很熟悉。这种情况下P4程序只需要经过一次编译过程,生成数据平面的 JSON 格式描述文件,最后在启动软件交换机时将 JSON 描述文件导入即可。
1. Ubuntu操作系统准备
除了在物理真实机器上安装P4,另一个选择是在虚拟机中安装P4环境。系统是Ubuntu 16.04或者18.04。准备虚拟机的时候,可以参考这个链接。
- 2GB RAM:运行内存可适当分配,我这里分配了2GB。
- 2 processors
- At least 120GB disk space:注意虚拟机需要分配最好大约200GB左右的磁盘空间。Select the default VDI for disk type; dynamically allocated 动态可拓展分配空间。
- Two network interfaces, Adapter 1 attached to NAT, and Adapter 2 attached to host-only Adapter set to vboxnet0. Configure both to use DHCP.
下载链接
2. P4环境的代码框架
整个P4环境的代码框架如下所示:
P4
├── protobuf          ## Google Protocol Buffer作为依赖
├── grpc              ## 作为BMv2的依赖
├── PI                ## PI P4 runtime库
├── behavioral-model  ## BMv2 软件交换机
├── p4c               ## p4c 编译器
├── mininet           ## mininet 网络仿真
├── tutorials         ## 教程目录,以及以后主要的学习,实验
|── p4-learning       ## ETH zurich大学的p4高级网络课程的教程和代码
└── p4-utils          ## p4-utils是Mininet的扩展,以支持P4设备,可以实现控制面与数据面的交互
其中protobuf、grpc、PI、behavioral-model、p4c、mininet、tutorials属于P4环境的内容:
- ProtoBuf:Google 公司内部的混合语言数据标准
- grpc: 是一个通用、高性能的开源 RPC 框架,可以高效地连接单个或多个数据中心的服务
- PI:是P4 runtime的实现,用于控制平面对数据平面的控制。网络设备面向中央控制器的南向接口,最著名的是OpenFlow,还有最新的P4 runtime。
- BMv2:是一款支持P4编程的软件交换机
- p4c:是一款P4的编译器
- mininet:是一个虚拟的网络拓扑搭建软件
- p4 tutorials :提供了用于学习的示例代码。例如负载均衡,简单的隧道机制以及源路由等。
- trex:Cisco的TRex报文发生器
- p4-learning: ETH zurich大学的p4高级网络课程的教程和代码
- p4-utils: Mininet的扩展,以支持P4设备,可以实现控制面与数据面的交互
现在还没有特殊的社区版IDE或者IDE插件用于支持P4开发,因此自行选用习惯的文本编辑器编写程序,比较推荐Sublime。
3. 创建P4目录,加入环境变量,并安装依赖项
更换国内的pip源
需要创建或修改配置文件(linux 的文件在~/.pip/pip.conf ,windows 在%HOMEPATH%\pip\pip.ini)
终端:cd ~/
查看是否有 .pip 文件夹:ls -a
没有就新建一个文件夹:mkdir .pip
然后在.pip 文件夹内新建一个文件 touch pip.conf.
编辑pip.conf文件,加入国内源。比如,可以使用豆瓣的镜像:
[global]
index-url = http://pypi.douban.com/simple
[install]
trusted-host=pypi.douban.com
或者可以用清华源。参考清华大学开源软件镜像站:https://mirrors.tuna.tsinghua.edu.cn/
[global]
index-url = https://pypi.tuna.tsinghua.edu.cn/simple
[install]
trusted-host=pypi.tuna.tsinghua.edu.cn
或者编辑 pip.conf 文件,写入阿里云的镜像:
[global]
index-url = http://mirrors.aliyun.com/pypi/simple/
[install]
trusted-host=mirrors.aliyun.com
安装依赖项
依赖项的安装很重要,不然等会会出各种问题。
sudo apt-get update

sudo apt-get upgrade

sudo apt-get install -y cmake gcc g++ git automake llvm llvm-dev llvm-runtime libtool bison flex build-essential vim

# Install pkg-config here, as it is required for p4lang/PI
# installation to succeed.
sudo apt-get install -y pkg-config

sudo apt-get install -y wget curl zip unzip rar unrar unar

sudo apt-get install -y libgc-dev libfl-dev libgmp-dev libevent-dev libssl-dev libjudy-dev libpcap-dev tcpdump

sudo apt-get install -y libboost-dev libboost-iostreams-dev libboost-graph-dev libboost-test-dev libboost-program-options-dev libboost-system-dev libboost-filesystem-dev libboost-thread-dev

sudo apt-get install -y libreadline6 libreadline6-dev
# 这里如果提示废弃就执行下面的安装
sudo apt-get install -y libreadline-dev

# Deps needed to build PI:
sudo apt-get install -y libjudy-dev libreadline-dev valgrind libtool-bin libboost-dev libboost-system-dev libboost-thread-dev

# Things needed for `cd tutorials/exercises/basic ; make run` to work:
sudo apt-get install -y libgflags-dev net-tools

sudo apt-get install -y doxygen graphviz texlive-full

sudo apt-get install -y bridge-utils tcpreplay
sudo apt-get install -y zlib1g-dev pciutils kmod strace  ## needed by cisco trex
尤其注意:用sudo apt-get upgrade更新数据包后,一定要用openssl version -v命令确定目前ubuntu系统缺省的openssl的版本号,必须是OpenSSL 1.0.2g 1 Mar 2016。否则,1.1版本的openssl不兼容后面v1.3.2版本的grpc。这个openssl的兼容性问题在grpc的github网页上有详细讨论。
下面安装需要的python相关依赖。根据python的官方网页,pip的安装最好用python-pip包来导引sudo python2 -m pip install --upgrade 命令,来安装最新版本pip。另外,在pip安装的时候,最好加上sudo,这样把pip的包安装到系统全局目录/usr/local/lib/python2.7/dist-packages/pip,而不是特定用户的~/.local/目录下面。后面google protobuf等工具安装python bindings,都是默认安装到系统的/usr/local/lib/pythonxxx目录下面。
Debian and most other distributions include a python-pip package, if you want to use the Linux distribution-provided versions of pip see Installing pip/setuptools/wheel with Linux Package Managers.
You can also install pip yourself to ensure you have the latest version. It’s recommended to use the system pip to bootstrap a user installation of pip:
安装Python和Pip环境以及依赖的Python包
Python2和pip2环境安装
sudo python2 -m pip uninstall -y pip  ## 卸载旧的pip
sudo apt-get remove -y python-pip python-setuptools ## 卸载旧的pip

sudo apt-get install -y python python-dev python-pip python-numpy python-setuptools python-wheel python-networkx

#sudo python2 -m pip install --upgrade pip   ## don't uprade pip
# python2 -m pip install --user virtualenv

sudo pip2 install six ply scapy ipaddr psutil crcmod xxhash
注意:一定要避免升级upgrade pip。参考You should not upgrade to pip 10 on Ubuntu, because the system version installed through apt is modified in a way not compatible to pip 10. See github.com/pypa/pip/issues/5221 。安装过程中遇到这样的warnings,请一律忽略。
You are using pip version 8.1.1, however version 20.1.1 is available.
You should consider upgrading via the 'pip install --upgrade pip' command.
升级pip会导致各种问题在这个网页里有详细讨论。升级后pip的安装目录会非常杂乱。
- Ubuntu自带的python-pip安装包的缺省目录是/usr/lib/pythonxxx。
- 用sudo python2 -m pip install --upgrade pip命令升级过以后,pip目录变成/usr/local/lib/pythonxxx。
- 用sudo python2 -m pip install --user --upgrade pip命令升级以后,pip目录变成~/.local/lib/pythonxxx。
下面是Python3和pip3环境的安装。这里一样要避免升级pip3。
sudo python3 -m pip uninstall -y pip  ## 卸载旧的pip3
sudo apt-get remove -y python-pip3 ## 卸载旧的pip3

sudo apt-get install -y python3 python3-dev python3-pip python3-numpy

#sudo python3 -m pip install --upgrade pip  ## don't uprade pip3
# python3 -m pip install --user virtualenv

sudo pip3 install six setuptools ply scapy ipaddr netaddr psutil crcmod xxhash murmurhash3
sudo pip3 install networkx==2.4
I found networkx 2.5 is not compatible with the p4-utils package used by our basic_p4_measurement project. So here I force python3 to use network 2.4.
确认pip、pip2、pip3的版本。下面的命令显示pip2命令是python2.7目录下的,而pip3命令是在python3.5目录下。
$ pip -V
pip 8.1.1 from /usr/lib/python2.7/dist-packages (python 2.7)
$ pip2 -V
pip 8.1.1 from /usr/lib/python2.7/dist-packages (python 2.7)
$ pip3 -V
pip 8.1.1 from /usr/lib/python3/dist-packages (python 3.5)

$ which pip
/usr/bin/pip
$ which pip2
/usr/bin/pip2
$ which pip3
/usr/bin/pip3
确认一下python的版本。
$ python -V
Python 2.7.12
$ python3 -V
Python 3.5.2
自由切换Python2和Python3语言版本
Ubuntu16.04下如何在Python版本2.7和3.5之间完美切换: Firstly, use the command update-alternatives --list python to list the supported python version in your system. If you see the response update-alternatives: error: no alternatives for python, use the following commands to enlist the python libraries already in the /usr/bin directory.
$ which python2.7
/usr/bin/python2.7
$ which python3.5
/usr/bin/python3.5

$ sudo update-alternatives --install /usr/bin/python python /usr/bin/python2.7 2
$ sudo update-alternatives --install /usr/bin/python python /usr/bin/python3.5 1
Finally, use the command 来确保python的版本是2.7。
sudo update-alternatives --config python
to configure the appropriate version of python, and use python --version to verify the configuration.
如果提前查看tutorials/utils/run_exercise.py文件,可以发现P4 tutorials用的还是Python2.7版本,更危险的是BMv2交换机还是基于Python2开发的,升级到Python3,会导致BMv2 behavior model安装失败。所以,一定要用sudo update-alternatives --config python命令强制Ubuntu系统的python和pip命令都缺省使用Python2.7。
准备P4语言的编辑器
Sublime是一款很推荐的适用P4语言文件的编辑器。之前准备Ubuntu环境的时候已经安装过了。下面给Sublime安装P4语言的语法亮显。在Sublime窗口的Preference/Package Control菜单中选择Install Package选项,然后在弹出窗口中选择安装p4 syntax highlighter语法亮显插件。之后,在Sublime窗口的View/Syntax里就有p4语言选项了。点击激活该语言选项,就可以对p4数据面编程代码做语法亮显。
Pycharm里面有专门针对P4语言的语法亮显Plugin。在MacOS下插件安装的菜单路径是Pycharm | Preferences | Plugins。在Marketplace里搜索 P4插件。
4. 设置环境变量和软件版本
在搭建之前为了不破坏原环境的整洁性,可以在home目录下创建一个P4的工作目录,并且加入环境变量:
# 创建一个P4的文件夹目录
mkdir ~/P4
# 进入目录
cd ~/P4
P4的官网github的安装流程给的Bmv2,PI,P4C,PROTOBUF,GRPC版本如下。参考官方p4lang的tutorials里面的自动安装脚本里的版本,把该环境变量配置加到~/.bashrc文件末尾,然后执行source ~/.bashrc。
# 设置相关路径和版本变量
P4_HOME=$HOME/P4
PROTOBUF_COMMIT="v3.2.0"
GRPC_COMMIT="v1.3.2"
THRIFT_VERSION="0.10.0"
#获得cpu核数,与某些软件的编译选项相关
#NUM_CORES=`grep -c ^processor /proc/cpuinfo`
NUM_CORES=2
# checkout version under test
BMV2_COMMIT="b447ac4c0cfd83e5e72a3cc6120251c1e91128ab"  # August 10, 2019
PI_COMMIT="41358da0ff32c94fa13179b9cee0ab597c9ccbcc"    # August 10, 2019
P4C_COMMIT="69e132d0d663e3408d740aaf8ed534ecefc88810"   # August 10, 2019
# 设置相关路径和版本变量
P4_HOME=$HOME/P4
PROTOBUF_COMMIT="v3.6.1"
GRPC_COMMIT="v1.17.2"
#GRPCIO_VERSION="1.17.1"
THRIFT_VERSION="0.12.0"
#获得cpu核数,与某些软件的编译选项相关
#NUM_CORES=`grep -c ^processor /proc/cpuinfo`
NUM_CORES=2
# checkout version under test
BMV2_COMMIT="b447ac4c0cfd83e5e72a3cc6120251c1e91128ab"  # August 10, 2019
PI_COMMIT="41358da0ff32c94fa13179b9cee0ab597c9ccbcc"    # August 10, 2019
P4C_COMMIT="69e132d0d663e3408d740aaf8ed534ecefc88810"   # August 10, 2019
安装的时候一定要时刻关注版本的变化,要按照官网 github 给的版本安装才尽量不会出现问题。多参考官方p4lang的tutorials里面的自动安装脚本里的版本。
尤其注意:一定要用openssl version -v命令确定目前ubuntu系统缺省的openssl的版本号,必须是OpenSSL 1.0.2g。否则,1.1版本的openssl不兼容后面v1.3.2版本的grpc。这个openssl的兼容性问题在grpc的github网页上有详细讨论。
编译make的时候,如果跑满电脑的所有核,系统会崩溃。所以下面的命令,缺省给2个核做并行编译,可根据自己电脑的硬件情况调整。
#NUM_CORES=`grep -c ^processor /proc/cpuinfo`
NUM_CORES=2
同时,也可以通过下面的配置命令控制脚本执行。
# 打印脚本命令.
set -x
# 在有错误输出时停止.
set -e
5. 安装ProtoBuf
protobuf 也叫 protocol buffer 是google 的一种数据交换的格式,它独立于语言,独立于平台。google 提供了多种语言的实现:java、c#、c++、go 和 python,每一种实现都包含了相应语言的编译器以及库文件。
由于它是一种二进制的格式,比使用 xml 、json进行数据交换快许多。可以把它用于分布式应用之间的数据通信或者异构环境下的数据交换。作为一种效率和兼容性都很优秀的二进制数据传输格式,可以用于诸如网络传输、配置文件、数据存储等诸多领域。参考:protobuf入门教程(一):简介和安装
sudo apt-get install autoconf automake libtool curl make g++ unzip
git clone https://github.com/google/protobuf.git
cd $P4_HOME/protobuf
sudo make clean
git checkout ${PROTOBUF_COMMIT}
git submodule update --init --recursive
./autogen.sh
./configure
make -j${NUM_CORES}
make check -j${NUM_CORES}
sudo make install
sudo ldconfig
# force install python module
cd $P4_HOME/protobuf/python
sudo python2 setup.py install
sudo python3 setup.py install
# sudo python3.8 setup.py install
cd ../..
验证一下,看下面的python命令能否成功。如果报错no module found,那后面的基于grpc和google protobuf的tutorials就跑不通。另外,如果pip -V告警,没有办法只能把sudo apt-get remove python-pip,然后重新安装python-pip了。
$ pip -V   ## 测试pip是否损坏
pip 8.1.1 from /usr/lib/python2.7/dist-packages (python 2.7)
$ pip2 -V
pip 8.1.1 from /usr/lib/python2.7/dist-packages (python 2.7)
$ pip3 -V
pip 8.1.1 from /usr/lib/python3/dist-packages (python 3.5)

$ python
Python 2.7.12 (default, Apr 15 2020, 17:07:12)
[GCC 5.4.0 20160609] on linux2
Type "help", "copyright", "credits" or "license" for more information.
>>> from google.protobuf.internal import enum_type_wrapper

$ python3
Python 3.5.2 (default, Apr 16 2020, 17:47:17)
[GCC 5.4.0 20160609] on linux
Type "help", "copyright", "credits" or "license" for more information.
>>> from google.protobuf.internal import enum_type_wrapper
要注意这里的git checkout ,一定要checkout,不然它会默认下载最新版的protobuf,在最后运行实例的时候会报如下的错:No module named protobuf.internal.
注:如果运行./autogen.sh时出现./autogen.sh:curl not found则需要安装curl,输入以下指令
sudo apt-get install curl
6. 安装gRPC
gRPC 是一个高性能、开源和通用的 RPC 框架,面向移动和 HTTP/2 设计。目前提供 C、Java 和 Go 语言版本,分别是:grpc, grpc-java, grpc-go. 其中 C 版本支持 C, C++, Node.js, Python, Ruby, Objective-C, PHP 和 C# 支持.
gRPC 基于 HTTP/2 标准设计,带来诸如双向流、流控、头部压缩、单 TCP 连接上的多复用请求等特。这些特性使得其在移动设备上表现更好,更省电和节省空间占用。参考gRPC 官方文档中文版。
低版本的ProtoBuf和gRPC(目前是GRPC_COMMIT="v1.3.2")安装是整个安装流程中最麻烦的。
cd $P4_HOME
git clone https://github.com/google/grpc.git
cd $P4_HOME/grpc/
git reset --hard HEAD #放弃本地修改
git checkout ${GRPC_COMMIT}
git submodule update --init --recursive
export LDFLAGS="-Wl,-s"
sudo make clean
make -j${NUM_CORES}
sudo make install
sudo ldconfig
unset LDFLAGS
cd ..
# Install gRPC Python Package
sudo pip2 install grpcio
sudo pip3 install grpcio
#sudo pip3.8 install grpcio
sudo pip install代表进行全局安装,安装后全局可用。pip3 install --user代表仅该用户的安装,安装后仅该用户可用。如果是信任的安装包(如grpcio、protobuf、thrift等)可用使用该命令进行安装。
如果pip3 install grpcio 将会报错,暂时略过这个命令。等后面走完了整个p4安装流程重新pip3 install grpcio,可能不会报错了。
在python和python3中import grpc组件,确认是否能成功引入。
$ python
Python 2.7.12 (default, Apr 15 2020, 17:07:12)
[GCC 5.4.0 20160609] on linux2
Type "help", "copyright", "credits" or "license" for more information.
>>> import grpc

$ python3
Python 3.5.2 (default, Apr 16 2020, 17:47:17)
[GCC 5.4.0 20160609] on linux
Type "help", "copyright", "credits" or "license" for more information.
>>> import grpc
可能遇到的问题和解法:
-
也许会遇到以下的编译问题。This is an openssl compatibility issue already discussed here. The problem is that this version of debian ships with OpenSSL 1.1 which has breaking changes in the API. See https://wiki.openssl.org/index.php/OpenSSL_1.1.0_Changes#Downloads
src/core/lib/security/credentials/jwt/jwt_verifier.c: In function ‘pkey_from_jwk’: src/core/lib/security/credentials/jwt/jwt_verifier.c:498:10: error: dereferencing pointer to incomplete type ‘RSA {aka struct rsa_st}’ rsa->n = ^~ Makefile:2470: recipe for target '/home/chang/P4/grpc/objs/opt/src/core/lib/security/credentials/jwt/jwt_verifier.o' failed make: *** [/home/chang/P4/grpc/objs/opt/src/core/lib/security/credentials/jwt/jwt_verifier.o] Error 1讨论页给的解法:I settled with the standard Makefile procedure, installing openssl-1.0 package, and exporting PKG_CONFIG_PATH to point to OpenSSL 1.0。可惜这个方法我之前试过,不好用。在Ubuntu 16.04,要确保用
openssl version -v命令确定目前ubuntu系统缺省的openssl的版本号,必须是OpenSSL 1.0.2g 1 Mar 2016。然后,如果遇到以上问题,执行以下命令。sudo apt-get install -y --allow-downgrades openssl1.0 echo "export OPENSSL_DIR=/usr/lib/ssl1.0/" >> ~/.bashrc source ~/.bashrc # (Used to check the version of the Current OpenSSL binaries) openssl version -v PKG_CONFIG_PATH=/usr/lib/ssl1.0/pkgconfig make -j${NUM_CORES} CFLAGS='-Wno-implicit-fallthrough' CFLAGS="-Wno-error"可以再make就可以了
7. 安装BMv2依赖,下面PI编译时会用到
这一步没有完全安装bmv2,一切都是按照github上的指示来操作的,先安装BMv2的依赖,下面PI编译时会用到。behavioral-model又叫bmv2交换机模块。
首先,下载BMv2源代码。
cd $P4_HOME
git clone https://github.com/p4lang/behavioral-model.git
cd $P4_HOME/behavioral-model
git checkout ${BMV2_COMMIT}
然后,修改BMv2源文件中的install-thrift.sh安装文件。
cd $P4_HOME/behavioral-model/travis
gedit install-thrift.sh
-
修改thrift版本号到0.10.0。这个版本的thrift能兼容python2和python3。
#!/bin/sh

THIS_DIR=$( cd "$( dirname "${BASH_SOURCE[0]}" )" && pwd )
source $THIS_DIR/common.sh

check_lib libthrift libthrift-0.9.2

set -e
# Make it possible to get thrift in China
# wget http://archive.apache.org/dist/thrift/0.9.2/thrift-0.9.2.tar.gz
# tar -xzvf thrift-0.9.2.tar.gz
git clone -b 0.9.2 https://github.com/apache/thrift.git thrift-0.9.2
cd thrift-0.9.2
./bootstrap.sh
./configure --with-cpp=yes --with-c_glib=no --with-java=no --with-ruby=no --with-erlang=no --with-go=no --with-nodejs=no
make -j2 && sudo make install
cd lib/py
sudo python setup.py install
cd ../../..
修改成
#!/bin/sh THIS_DIR=$( cd "$( dirname "${BASH_SOURCE[0]}" )" && pwd ) source $THIS_DIR/common.sh check_lib libthrift libthrift-0.10.0 set -e # Make it possible to get thrift in China # wget http://archive.apache.org/dist/thrift/0.9.2/thrift-0.9.2.tar.gz # tar -xzvf thrift-0.9.2.tar.gz git clone -b 0.10.0 https://github.com/apache/thrift.git thrift-0.10.0 cd thrift-0.10.0 ./bootstrap.sh ./configure --with-cpp=yes --with-c_glib=no --with-java=no --with-ruby=no --with-erlang=no --with-go=no --with-nodejs=no make -j2 && sudo make install cd lib/py sudo python2 setup.py install sudo python3 setup.py install # sudo python3.8 setup.py install cd ../../.. -
这里既有
sudo python2 setup.py install也有sudo python3 setup.py install。让这个脚本同时为python2和Python3安装thrift访问的接口。 -
特别注意,如果是旧的P4环境想升级thrift版本,一定要首先完整卸载PI、BMv2、p4c组件,因为它们都依赖这个thrift通信模块。卸载方法是先分别进入
$P4_HOME/PI、$P4_HOME/behavior_model、$P4_HOME/p4c/build目录去执行sudo make clean; sudo make uninstall; sudo ldconfig的清理和卸载命令。然后采用上面的办法再完美卸载thrift-0.9.2。切记要卸载干净了,再重新走下面的BMv2软件交换机的依赖安装流程。 -
如果错误安装了旧版的thrift-0.9.2。按照下面步骤可以完美删除旧版thrift。下面的thrift-0.9.2源代码文件夹,可以在这个链接下载一份。
cd thrift-0.9.2-source-directory
sudo ./bootstrap.sh
sudo ./configure --with-cpp=yes --with-c_glib=no --with-java=no --with-ruby=no --with-erlang=no --with-go=no --with-nodejs=no
sudo make uninstall
cd lib/py
sudo python setup.py install --record files.txt
sudo cat files.txt | xargs rm -rf
sudo python3 setup.py install --record files.txt
sudo cat files.txt | xargs rm -rf
sudo ldconfig
这里用
python setup.py install --record files.txt来列举所有用python setup.py install命令安装的thrift的python bindings的文件列表。然后,执行sudo cat files.txt | xargs rm -rf删除这些安装文件。注意该删除命令会提示一些无权限删除的文件,自己用sudo rm -rf命令逐一删掉。千万记着删除完以后,要用sudo ldconfig的动态链接库管理命令,去除刚才删掉的动态链接库。最后,用
ldconfig -p | grep thrift命令,确认不再有thrift的动态链接库组件在系统中了。- 如果发现还有thrift 0.9.2的动态链接库,就全部手动用
sudo rm -f命令删掉,然后执行sudo ldconfig。 - 如果遇到情况
libthriftc.so.0 (libc6,x86-64) => /usr/local/lib/libthriftc.so.0和libthriftc.so (libc6,x86-64) => /usr/local/lib/libthriftc.so这两个没有0.9.2版本号的thrift动态链接库还存在,可以忽略掉它们。后面安装thrift 0.10.0版本库的时候,会把它们自动覆盖掉。
注:ldconfig是一个动态链接库管理命令,其目的为了让动态链接库为系统所共享。ldconfig的主要用途:
默认搜寻/lilb和/usr/lib,以及配置文件/etc/ld.so.conf内所列的目录下的库文件。搜索出可共享的动态链接库,库文件的格式为:lib*.so.,进而创建出动态装入程序(ld.so)所需的连接和缓存文件。
缓存文件默认为/etc/ld.so.cache,该文件保存已排好序的动态链接库名字列表。ldconfig通常在系统启动时运行,而当用户安装了一个新的或者删除旧的动态链接库时,就需要手工运行这个命令。
- 如果发现还有thrift 0.9.2的动态链接库,就全部手动用
-
最后,执行如下依赖安装命令:
cd $P4_HOME/behavioral-model
# From bmv2's install_deps.sh, we can skip apt-get install.
# Nanomsg is required by p4runtime, p4runtime is needed by BMv2...
tmpdir=`mktemp -d -p .`
cd ${tmpdir}
sudo bash ../travis/install-thrift.sh
sudo bash ../travis/install-nanomsg.sh
sudo ldconfig
sudo bash ../travis/install-nnpy.sh
sudo ldconfig
cd ..
sudo rm -rf $tmpdir
cd ..
一定要确保thrift编译器和thrift动态链接库版本一致。否则后面编译过不了。${THRIFT_VERSION}之前配置的是0.10.0。所以下面显示旧版的打印输出。
$ thrift -version
Thrift version 0.10.0
$ ldconfig -p | grep thrift
	libthriftz-0.10.0.so (libc6,x86-64) => /usr/local/lib/libthriftz-0.10.0.so
	libthriftnb-0.10.0.so (libc6,x86-64) => /usr/local/lib/libthriftnb-0.10.0.so
  	libthriftc.so.0 (libc6,x86-64) => /usr/local/lib/libthriftc.so.0
  	libthriftc.so (libc6,x86-64) => /usr/local/lib/libthriftc.so
  	libthrift-0.10.0.so (libc6,x86-64) => /usr/local/lib/libthrift-0.10.0.so
$ python2
>>> import thrift
$ python3
>>> import thrift
-
在执行install-nnpy.sh的时候,可能会遇到以下cffi版本不一致的报错。
Processing /home/chang/P4/behavioral-model/tmp.9P8Ae2jPZo/nnpy
    Complete output from command python setup.py egg_info:
    Traceback (most recent call last):
      File "<string>", line 1, in <module>
      File "/tmp/pip-7lmchybl-build/setup.py", line 4, in <module>
        generate.run()
      File "/tmp/pip-7lmchybl-build/generate.py", line 60, in run
        f.write(symbols(headers))
      File "/tmp/pip-7lmchybl-build/generate.py", line 37, in symbols
        ffi = FFI()
      File "/usr/local/lib/python3.5/dist-packages/cffi/api.py", line 56, in __init__
        backend.__version__, backend.__file__))
    Exception: Version mismatch: this is the 'cffi' package version 1.14.0, located in '/usr/local/lib/python3.5/dist-packages/cffi/api.py'.  When we import the top-level '_cffi_backend' extension module, we get version 1.5.2, located in '/usr/lib/python3/dist-packages/_cffi_backend.cpython-35m-x86_64-linux-gnu.so'.  The two versions should be equal; check your installation.
如果遇到以上问题,可以用以下的命令,强制python-cffi的版本是上面期望的1.5.2,即可。
sudo apt-get remove python-cffi python3-cffi
pip uninstall cffi
pip install cffi==1.5.2
8. 安装PI数据平面接口
PI是P4 runtime的实现,用于Control Plane对数据平面的控制。其核心理念是以IT的方式来管理整个CT系统,包括网络设备和云主机。整个设计最顶层是远端的控制器,接口端主要分成三类,一个是P4runtime,然后就是gOMI和gNOI。g代表gRPC,而不是传统网络设备所使用的NETCONF,这可以使得策略的下发效率提升很多。
cd $P4_HOME
git clone https://github.com/p4lang/PI.git
cd $P4_HOME/PI
sudo make clean
git checkout ${PI_COMMIT}
git submodule update --init --recursive
./autogen.sh
./configure --with-proto --with-thrift --with-pi
sudo make -j${NUM_CORES}
sudo make check -j${NUM_CORES}
sudo make install
sudo ldconfig
cd .. #回退到P4目录
9. 安装BMv2软件交换机
P4 BMv2是一种支持P4可编程和V1 Model报文处理框架的软件交换机。其他软件交换机包括Open vSwitch、Pantou、Indigo等。它们对P4可编程性的支持还在发展过程中。比如,在这个ppt报告,业界领先的Open vSwitch也明确表示未来将支持P4可编程,以及支持DPDK的用户态报文处理。
Note: bmv2 is not meant to be a production-grade software switch. It is meant to be used as a tool for developing, testing and debugging P4 data planes and control plane software written for them. As such, the performance of bmv2 - in terms of throughput and latency - is significantly less than that of a production-grade software switch like Open vSwitch. For more information about the performance of bmv2, refer to this document.
无论是Open vSwitch还是BMv2,软件交换机的主要问题还是难于应对云环境下的单口25Gbps甚至100Gbps以上的高速报文处理。主要是利用软件交换机和Mininet虚拟网络拓扑,来做分布式的多点报文流测量和采集的实验。也可以利用NetFPGA的硬件交换机,实现单点高线速的报文流测量框架。
关于软件定义的软件交换机和硬件交换机,可以查看软件定义网络核心原理与应用实践(第三版),作者: 黄韬 / 刘江 / 魏亮 / 张娇 / 杨帆 / 刘韵洁,2018年,人民邮电出版社。
之前只是安装了BMv2的依赖,现在开始才是正式安装。首先要确保有5GB的空闲硬盘空间,BMv2的编译和测试会产生大量的目标文件和临时文件。用df -h命令可以查看磁盘空间空间,用baobab命令可以查看指定路径上的磁盘空间占用情况,方便磁盘清理。
修改BMv2交换机源码,让hash_ex哈希函数调用xxHash32哈希算法实现
注意:xxHash是一个性能非常优秀的适合CPU架构的开源哈希函数实现,优于murmurhash、lookup、cityhash等。其Github主页显示:The benchmark uses SMHasher speed test, compiled with Visual 2010 on a Windows Seven 32-bit box. The reference system uses a Core 2 Duo @3GHz.
Name Speed Quality Author xxHash 5.4 GB/s 10 Y.C. MurmurHash 3a 2.7 GB/s 10 Austin Appleby SBox 1.4 GB/s 9 Bret Mulvey Lookup3 1.2 GB/s 9 Bob Jenkins CityHash64 1.05 GB/s 10 Pike & Alakuijala FNV 0.55 GB/s 5 Fowler, Noll, Vo CRC32 0.43 GB/s † 9 MD5-32 0.33 GB/s 10 Ronald L.Rivest SHA1-32 0.28 GB/s 10 Note: SMHasher's CRC32 implementation is known to be slow. Faster implementations exist.
后面的操作步骤,目的都是把hash_ex函数映射到32位xxHash。
首先,打开文件$P4_HOME/behavioral-model/targets/simple_switch/simple_switch.cpp。里面实现了两个扩展Hash函数hash_ex和bmv2_hash。
gedit $P4_HOME/behavioral-model/targets/simple_switch/simple_switch.cpp
其中bmv2_hash是基于xxHash64实现的。把hash_ex代码片段修改成对bm::hash::xxh32哈希函数的调用。
namespace {

struct hash_ex {
/*  uint32_t operator()(const char *buf, size_t s) const {
    const uint32_t p = 16777619;
    uint32_t hash = 2166136261;

    for (size_t i = 0; i < s; i++)
      hash = (hash ^ buf[i]) * p;

    hash += hash << 13;
    hash ^= hash >> 7;
    hash += hash << 3;
    hash ^= hash >> 17;
    hash += hash << 5;
    return static_cast<uint32_t>(hash);
  }
*/
  uint32_t operator()(const char *buf, size_t s) const {
    return bm::hash::xxh32(buf, s);
  }
};

struct bmv2_hash {
  uint64_t operator()(const char *buf, size_t s) const {
    return bm::hash::xxh64(buf, s);
  }
};
xxHash哈希函数在$P4_HOME/behavioral-model/src/bm_sim/xxhash.c中实现。然后在$P4_HOME/behavioral-model/src/bm_sim/calculations.cpp中申明函数调用。打开这个calculations.cpp文件.
gedit $P4_HOME/behavioral-model/src/bm_sim/calculations.cpp
找到下面的代码片段,加上xxh32的哈希函数定义。
namespace hash {

uint64_t xxh64(const char *buffer, size_t s) {
  return XXH64(buffer, s, 0);
}

uint32_t xxh32(const char *buffer, size_t s) {
  return XXH32(buffer, s, 0);
}

}  // namespace hash

...

struct xxh64 {
  uint64_t operator()(const char *buf, size_t len) const {
    return XXH64(buf, len, 0);
  }
};

struct xxh32 {
  uint32_t operator()(const char *buf, size_t len) const {
    return XXH32(buf, len, 0);
  }
};

...

REGISTER_HASH(xxh64);
REGISTER_HASH(xxh32);
找到$P4_HOME/behavioral-model/include/bm/bm_sim/calculations.h.
gedit $P4_HOME/behavioral-model/include/bm/bm_sim/calculations.h
找到下面的xxh64函数申明,在旁边加上xxh32函数申明。
namespace hash {

uint64_t xxh64(const char *buffer, size_t s);

uint32_t xxh32(const char *buffer, size_t s);

}  // namespace hash
正式编译和安装BMv2交换机
执行下面的编译和安装命令。根据[Performance of bmv2网页说明](https://github.com/p4lang/behavioral-model/blob/master/docs/performance.md:To get the best performance (highest throughput and lowest latency), do a fresh clone of bmv2 and run ./configure with the following flags: ./configure 'CXXFLAGS=-g -O3' 'CFLAGS=-g -O3' --disable-logging-macros --disable-elogger。
cd $P4_HOME/behavioral-model
sudo make clean
sudo ./install_deps.sh # 安装依赖文件
./autogen.sh
./configure 'CXXFLAGS=-g -O3' 'CFLAGS=-g -O3' --disable-logging-macros --disable-elogger --with-proto --with-thrift --with-pi
make -j${NUM_CORES}
make check -j${NUM_CORES} #运行unit test,保证所有项都是pass,再继续往下安装
sudo make install
sudo ldconfig
然后修正一个BMv2交换机和Python3控制器不兼容的Bug。
cd $P4_HOME/behavioral-model/tools/bm_runtime/standard
sudo chmod 666 ttypes.py
gedit ttypes.py
找到BmMatchParam类,加上一个自定义的哈希函数。避免Python3运行控制器脚本时的TypeError: unhashable type: 'BmMatchParam'的错误。
class BmMatchParam(object):
    def __hash__(self):
        return hash(str(self.exact)+str(self.lpm)+str(self.ternary))
    ......
可能遇到的问题和解法:
-
在执行
sudo ./install_deps.sh的时候,可能会遇到以下cffi版本不一致的报错。Processing /home/chang/P4/behavioral-model/tmp.9P8Ae2jPZo/nnpy Complete output from command python setup.py egg_info: Traceback (most recent call last): File "<string>", line 1, in <module> File "/tmp/pip-7lmchybl-build/setup.py", line 4, in <module> generate.run() File "/tmp/pip-7lmchybl-build/generate.py", line 60, in run f.write(symbols(headers)) File "/tmp/pip-7lmchybl-build/generate.py", line 37, in symbols ffi = FFI() File "/usr/local/lib/python3.5/dist-packages/cffi/api.py", line 56, in __init__ backend.__version__, backend.__file__)) Exception: Version mismatch: this is the 'cffi' package version 1.14.0, located in '/usr/local/lib/python3.5/dist-packages/cffi/api.py'. When we import the top-level '_cffi_backend' extension module, we get version 1.5.2, located in '/usr/lib/python3/dist-packages/_cffi_backend.cpython-35m-x86_64-linux-gnu.so'. The two versions should be equal; check your installation.如果遇到以上问题,可以用以下的命令,强制python-cffi的版本是上面期望的1.5.2,即可。
sudo apt-get remove python-cffi python3-cffi
pip uninstall cffi
pip install cffi==1.5.2
安装Simple_switch_grpc
这里多了个Simple_switch_grpc的安装,它是支持P4 Runtime的SimpleSwitch版本,这个东西的安装很关键,否则最后的示例也是无法运行的。不过只要你前面安装的都没有问题,这里也不会有啥问题,如果除了问题,推荐github上的Simple_switch_grpc来看是否依赖项出了问题。
# Simple_switch_grpc target
cd $P4_HOME/behavioral-model/targets/simple_switch_grpc
sudo make clean
./autogen.sh
./configure 'CXXFLAGS=-g -O3' 'CFLAGS=-g -O3' --disable-logging-macros --disable-elogger --with-proto --with-thrift --with-pi
make -j${NUM_CORES}
make check
sudo make install
sudo ldconfig
cd ../../..
如果make check这一步没有报错。恭喜了,至此,你已经无限接近最后的成功了,就差最后一个组件了!
再测试一下BMv2软件交换机的吞吐率。Make sure that Mininet, iperf and ethtool are installed on your machine. Then run the following commands:
cd $P4_HOME/behavioral-model/mininet
sudo python stress_test_ipv4.py
The Python script creates a Mininet topology with 2 hosts connected by one instance of simple_switch. simple_switch is running the simple_router.p4 P4 program. It is a P4_14 program which has been pre-compiled for you using the legacy p4c-bm compiler. After creating the topology, the necessary table entries are installed to ensure L3 connectivity between the 2 hosts. An iperf server is then created on one host, while the other runs an iperf client. Once the test completes, you should see some logs similar to these ones:
...
Ready !
*** Ping: testing ping reachability
h1 -> h2
h2 -> h1
*** Results: 0% dropped (2/2 received)
Running iperf measurement 1 of 5
1416 Mbps
Running iperf measurement 2 of 5
1431 Mbps
Running iperf measurement 3 of 5
1455 Mbps
Running iperf measurement 4 of 5
1415 Mbps
Running iperf measurement 5 of 5
1445 Mbps
Median throughput is 1431 Mbps
10. 安装P4C编译器
这个组件非常关键,它是p4语言的编译器,而且对于它一定要注意版本的问题。目前p4c官方支持两个编译targets。
- p4c-bm2-ss: can be used to target the P4
simple_switchwritten using the BMv2 behavioral model https://github.com/p4lang/behavioral-model - p4c-ebpf: can be used to generate C code which can be compiled to EBPF https://en.wikipedia.org/wiki/Berkeley_Packet_Filter and then loaded in the Linux kernel for packet filtering
在2019年12月有学者宣称构建了P4c-uBPF编译器,能支持Open vSwitch软件交换机的编译目标:Extending OVS packet processing pipeline at runtime using P4。这个是未来软件交换机的发展趋势,性能远远高于P4 BMv2软件交换机。但目前在Open vSwitch上的P4语言工具链还不成熟,而且提高报文处理性能,真正要靠硬件卸载hardware offloadings。
修改p4c源代码,增加p4 v1model对hash_ex哈希函数的支持
首先,下载p4c的源代码。
cd $P4_HOME
git clone --recursive https://github.com/p4lang/p4c.git
cd $P4_HOME/p4c #切换到p4c目录下
sudo apt-get install -y cmake g++ git automake libtool libgc-dev bison flex libfl-dev libgmp-dev libboost-dev libboost-iostreams-dev libboost-graph-dev llvm pkg-config python python-scapy python-ipaddr python-ply tcpdump doxygen graphviz #安装依赖
git checkout ${P4C_COMMIT}
git submodule update --init --recursive
然后,修改p4c的v1model模型,让它能支持更多的哈希函数。找到并打开$P4_HOME/p4c/p4include/v1model.p4文件。
gedit $P4_HOME/p4c/p4include/v1model.p4
定位到下面HashAlgorithm的枚举类型定义。如何扩展p4 v1model的哈希函数,在github上 issue 884和 issue 570,都有详细讨论。在它的末尾加上新的哈希函数类型hash_ex。该哈希函数由$P4_HOME/behavioral-model/targets/simple_switch/simple_switch.cpp实现。
enum HashAlgorithm {
    crc32,
    crc32_custom,
    crc16,
    crc16_custom,
    random,
    identity,
    csum16,
    xor16,
    hash_ex
}
另外,打开文件$P4_HOME/p4c/backends/bmv2/simple_switch/simpleSwitch.cpp.
gedit $P4_HOME/p4c/backends/bmv2/simple_switch/simpleSwitch.cpp
找到supportedHashAlgorithms的列表定义,在末尾加上v1model.algorithm.hash_ex.name。
    static std::set<cstring> supportedHashAlgorithms = {
        v1model.algorithm.crc32.name, v1model.algorithm.crc32_custom.name,
        v1model.algorithm.crc16.name, v1model.algorithm.crc16_custom.name,
        v1model.algorithm.random.name, v1model.algorithm.identity.name,
        v1model.algorithm.csum16.name, v1model.algorithm.xor16.name,
        v1model.algorithm.hash_ex.name
    };
另外,查看$P4_HOME/p4c/backends/bmv2/simple_switch/simpleSwitch.cpp头部include的v1mode.h头文件在哪里,比如说,我这边的版本包含头文件是$P4_HOME/p4c/frontends/p4/fromv1.0/v1model.h。打开这个v1mode.h头文件,找到下面的Algorithm_Model定义。
gedit $P4_HOME/p4c/frontends/p4/fromv1.0/v1model.h
按照下面代码片段,加上hash_ex的枚举变量申明。
struct Algorithm_Model : public ::Model::Enum_Model {
    Algorithm_Model() : ::Model::Enum_Model("HashAlgorithm"),
                        crc32("crc32"), crc32_custom("crc32_custom"),
                        crc16("crc16"), crc16_custom("crc16_custom"),
                        random("random"), identity("identity"), csum16("csum16"), xor16("xor16"), hash_ex("hash_ex") {}
    ::Model::Elem crc32;
    ::Model::Elem crc32_custom;
    ::Model::Elem crc16;
    ::Model::Elem crc16_custom;
    ::Model::Elem random;
    ::Model::Elem identity;
    ::Model::Elem csum16;
    ::Model::Elem xor16;
    ::Model::Elem hash_ex;
};
正式编译和安装p4c编译器
最后,执行以下命令编译p4语言编译器p4c。
cd $P4_HOME/p4c #切换到p4c目录下
rm -r build
mkdir build
cd build
cmake ..
make -j${NUM_CORES} #会有警告
make check #和eBPF相关的测试会失败,这是正常的,因为没装eBPF内核报文处理的组件
sudo make install
sudo ldconfig
cd ../.. #回退到P4目录
构建P4编译器的过程将花费大约1小时的时间。注意这里的make check不能加参数-j${NUM_CORES},否则会有很多并行执行导致的错误。
可能遇到的问题和解法:
-
在make -j\({NUM_CORES}步骤中,发现以下报错问题: tools/ir-generator/CMakeFiles/irgenerator.dir/build.make:120: *** 目标模式不含有“%”。 停止。build.make第120行的内容是tools/ir-generator/\)<$BOOL:1:/home/lkk/p4c/build/tools/ir-generator>/irgenerator: tools/ir-generator/CMakeFiles/irgenerator.dir/unified_irgenerator_srcs_1.cpp.o . The problem is caused by the incorrect version of cmake. The default cmake is not from the /user/bin/cmake, but instead the Xilinx SDK folder.
$ whereis cmake
cmake: /usr/bin/cmake /opt/Xilinx/SDK/2018.2/tps/lnx64/cmake-3.3.2/bin/cmake /usr/share/man/man1/cmake.1.gz
So I fixed the problem by adding a /usr/bin path to the beginning of the $PATH environmental variable. I add the follow command to ~/.bashrc
export PATH=/usr/bin:$PATH -
在make -j${NUM_CORES}步骤中,发现以下报错问题。
CMake Error at /usr/share/llvm-3.8/cmake/LLVMConfig.cmake:178 (include): include could not find load file: /usr/share/llvm/cmake/LLVMExports.cmake Call Stack (most recent call first): backends/ebpf/CMakeLists.txt:111 (find_package) CMake Error at /usr/share/llvm-3.8/cmake/LLVMConfig.cmake:181 (include): include could not find load file: /usr/share/llvm/cmake/LLVM-Config.cmake Call Stack (most recent call first): backends/ebpf/CMakeLists.txt:111 (find_package)这是一个已知的错误:a bug of llvm-3.8 on Ubuntu 16.04。可以按照 这个 csdn 网页的方法来解决问题。
sudo apt-get install -y llvm-3.8-dev libclang-3.8-dev sudo ln -s /usr/share/llvm-3.8 /usr/share/llvm sudo mkdir -p /usr/lib/llvm-3.8/share/llvm sudo ln -s /usr/share/llvm-3.8/cmake /usr/lib/llvm-3.8/share/llvm/cmake sudo sed -i -e '/get_filename_component(LLVM_INSTALL_PREFIX/ {s|^|#|}' -e '/^# Compute the installation prefix/i set(LLVM_INSTALL_PREFIX "/usr/lib/llvm-3.8")' /usr/lib/llvm-3.8/share/llvm/cmake/LLVMConfig.cmake sudo sed -i '/_IMPORT_CHECK_TARGETS Polly/ {s|^|#|}' /usr/lib/llvm-3.8/share/llvm/cmake/LLVMExports-relwithdebinfo.cmake sudo sed -i '/_IMPORT_CHECK_TARGETS sancov/ {s|^|#|}' /usr/lib/llvm-3.8/share/llvm/cmake/LLVMExports-relwithdebinfo.cmake sudo ln -s /usr/lib/x86_64-linux-gnu/libLLVM-3.8.so.1 /usr/lib/llvm-3.8/lib/ -
在make -j${NUM_CORES}步骤中,同样会出现一些警告,例如:
/home/ubuntu/p4c/ir/type.def: In member function ‘virtual bool IR::Type_InfInt::equiv(const IR::Node&) const’:
/home/ubuntu/p4c/ir/type.def:175:15: warning: unused variable ‘a’ [-Wunused-variable]
以及
make check多个测试用例失败:99% tests passed, 15 tests failed out of 1391 The following tests FAILED: 399 - ebpf-kernel/testdata/p4_16_samples/issue870_ebpf.p4 (Failed) 400 - ebpf-kernel/testdata/p4_16_samples/valid_ebpf.p4 (Failed) 401 - ebpf-kernel/testdata/p4_16_samples/hit_ebpf.p4 (Failed) 402 - ebpf-kernel/testdata/p4_16_samples/action_call_table_ebpf.p4 (Failed) 403 - ebpf-kernel/testdata/p4_16_samples/bool_ebpf.p4 (Failed) 404 - ebpf-kernel/testdata/p4_16_samples/key-issue-1020_ebpf.p4 (Failed) 405 - ebpf-kernel/testdata/p4_16_samples/stack_ebpf.p4 (Failed) 406 - ebpf-kernel/testdata/p4_16_samples/key_ebpf.p4 (Failed) 407 - ebpf-kernel/testdata/p4_16_samples/action_call_ebpf.p4 (Failed) 408 - ebpf-kernel/testdata/p4_16_samples/test_ebpf.p4 (Failed) 409 - ebpf-kernel/testdata/p4_16_samples/lpm_ebpf.p4 (Failed) 410 - ebpf-kernel/testdata/p4_16_samples/count_ebpf.p4 (Failed) 411 - ebpf-kernel/testdata/p4_16_samples/init_ebpf.p4 (Failed) 412 - ebpf-kernel/testdata/p4_16_samples/switch_ebpf.p4 (Failed) 413 - ebpf-kernel/testdata/p4_16_samples/two_ebpf.p4 (Failed) Errors while running CTest CMakeFiles/check-all.dir/build.make:57: recipe for target 'CMakeFiles/check-all' failed make[3]: *** [CMakeFiles/check-all] Error 8 CMakeFiles/Makefile2:483: recipe for target 'CMakeFiles/check-all.dir/all' failed make[2]: *** [CMakeFiles/check-all.dir/all] Error 2 CMakeFiles/Makefile2:623: recipe for target 'CMakeFiles/check.dir/rule' failed make[1]: *** [CMakeFiles/check.dir/rule] Error 2 Makefile:394: recipe for target 'check' failed make: *** [check] Error 2测试失败都与eBPF有关,而不会使用它。
11. 安装mininet网络仿真器
为了测试软件定义网络的想法,需要一个强大的网络仿真工具。传统的网络模拟器(NS2、OPNET)属于网络模拟器network simulator,仅仅能模拟网络中的离散事件。这些平台开发的代码不能直接部署到真实网络中。斯坦福大学Nick McKeown研究小组基于Linux Container架构,开发了Mininet这一轻量级的进程虚拟化网络仿真工具,并于2010年发布。Mininet最重要的特点是,他所有代码几乎可以无缝迁移到真实的硬件环境,方便为网络添加新的功能并进行相关测试。而且,Linux上运行的程序基本都可以在Mininet上运行,比如报文捕捉工具tcpdump、报文分析工具wireshark。
mininet是一个可以在有限资源的普通电脑上快速建立大规模SDN网络原型系统的网络仿真工具。该系统有虚拟的终端节点(End hosts)、软件交换机、控制器组成。这使它可以模拟真实网络,可以对各种想法或网络协议等进行开发验证。
由于Mininet是基于LInux Container这一内核虚拟化技术开发出的进程虚拟化平台,因此其实现进程虚拟化主要是用到了Linux 内核的namespace机制,可以实现进程级的虚拟化。网络中每个节点的模拟进程利用Linux的unshare系统调用,可以创建自己的独立namespace。在用户态,控制器有自己的controller namespace,每个交换机有自己的switch namespace,每个主机有自己的host namespace。通过namespace虚拟化三种系统资源。
- 网络协议栈:每个创建出的namespace独立拥有至少一块虚拟网卡,而root namespace看到的是物理网卡。不同namespace看到的网卡是不一样的。
- 进程表:每个namespace的第一个进程看到自己的PID是1(即init进程的第一个子进程),以为自己是系统中的第一个进程。同时不同namespace之间的进程等不可见。
- 文件挂载表:不同namespace中看到的文件系统挂载情况不一样。
中央控制器是一个用户进程,他在loopback地址上预留的6633端口监听来自所有交换机的安全信道链接。
cd $P4_HOME
git clone https://github.com/mininet/mininet
cd $P4_HOME/mininet
sudo ./util/install.sh -nwv
cd ../ #回退到P4目录
安装完成后,使用sudo mn --test pingall进行测试,若出错可以尝试使用以下步骤:
sudo apt-get update
sudo apt install net-tools bridge-utils
关于mininet安装也可以参考源码安装mininet。
关于mininet命令的使用手册,参考官方网站mininet.org/walkthrough。
12. 安装p4-util项目
P4-utils is an extension to Mininet that makes P4 networks easier to build, run and debug: https://github.com/nsg-ethz/p4-utils。安装步骤如下。
First clone this repository:
cd $P4_HOME
git clone https://github.com/nsg-ethz/p4-utils
Run the installation script:
cd $P4_HOME/p4-utils
sudo ./install.sh
13. 安装ipsumdump
ipsumdump reads IP packets from the network (using libpcap, or packet sockets on Linux), or from a tcpdump(1) save file, and writes an ASCII summary of the packet data to the standard output.
cd $P4_HOME
git clone https://github.com/kohler/ipsumdump
cd $P4_HOME/ipsumdump
./bootstrap.sh
rm -r build
mkdir build
cd build
../configure
cd libclick-2.1
make
cd ..
make
sudo make install
14. 下载P4语言的官方tutorials
 cd $P4_HOME
 git clone https://github.com/p4lang/tutorials
主要的工作目录时tutorials,其余的都是被使用的工具组件:
tutorials/
├── exercises   # 存放各种练习
├── utils       # 工具脚本目录
└── vm          # 用于vagrant构建虚拟机的目录,可以无视
其中utils里面存放了一些用于调用各个组件(mininet, bmv2, PI, p4c)的脚本,有了这些脚本,可以专注于p4代码的开发,控制面的编写,以及拓扑的构建,而不需要费神去了解bmv2的启动命令,p4c的调用选项等等。具体如何使用,也是非常的简单,进入一个具体的例子查看:
# 切换进入 exercises/basic 这个例子
basic
├── basic.p4   # 要编写的p4代码
├── build      # 生成文件的目录
├── logs       # 日志文件, 在调试的时候真的非常重要!
├── Makefile   ### 通过Makefile 来调用utils下的脚本!
├── pcaps      # 生成的pcap包,可以使用wireshark等工具来分析
├── README.md  # 详细的指导
├── receive.py ## 利用scapy写的抓取和分析数据包的工具
├── s1-runtime.json  #
├── s2-runtime.json  # 在运行同时加载入交换机的控制面代码,这里有争议,稍后再谈
├── s3-runtime.json  #
├── send.py    ## 利用scapy写的构建和发送数据包的工具
├── solution   # 这里有这个例子的示例代码(答案)
└── topology.json  # 描述拓扑的json文件
可以看到,通过Makefile,可以调用utils下的脚本,让p4代码跑起来。具体的操作步骤参看github网址的Basic Forwarding。
进入目录$P4_HOME/tutorials/exercises/basic,把solution/basic.p4文件拷贝出来,覆盖掉basic.p4。
cd $P4_HOME/tutorials/exercises/basic
cp solution/basic.p4 .
然后,执行以下操作即可。
#
# This will:
# compile basic.p4, and
# start a Mininet instance with three switches (s1, s2, s3) configured in a triangle, each connected to one host (h1, h2, h3 and h4).
make run
# The hosts are assigned IPs of 10.0.1.1, 10.0.2.2, 10.0.3.3, and 10.0.4.4.
# You should now see a Mininet command prompt. Try to ping between hosts in the topology:
mininet> h1 ping h2
mininet> pingall
# you should now see a Mininet command prompt. Open two terminals for h1 and h2, respectively:
mininet> xterm h1 h2
# Each host includes a small Python-based messaging client and server. In h2's xterm, start the server:
./receive.py
# In h1's xterm, send a message to h2:
./send.py 10.0.2.2 "P4 is cool"
# Type exit to leave each xterm and the Mininet command line. Then, to stop mininet:
make stop
# And to delete all pcaps, build files, and logs:
make clean
如果上面代码运行成功,那么恭喜你成功安装了P4环境!!
15. ETH Zurich大学的P4-learning项目
cd $P4_HOME
git clone https://github.com/nsg-ethz/p4-learning
Try to run a simple demo program
cd $P4_HOME/p4-learning/demos/ip_forwarding/one_table
sudo p4run
The program will create the following topology, and try to ping from host1 to host2.
                   +--+
            +------+s2+------+
            |      +--+      |
+--+      +-++              ++-+       +--+--+
|h1+------+s1|              |s4+-------+h2/h3|
+--+      +-++              ++-+       +--+--+
            |                |
            |      +--+      |
            +------+s3+------+
                   +--+
In another shell window,
cd $P4_HOME/p4-learning/demos/ip_forwarding/one_table
sudo python controller.py populate 50000
Then, in the p4run window, run the command.
mininet> h1 ping h2

PING 10.0.2.2 (10.0.2.2) 56(84) bytes of data.
64 bytes from 10.0.2.2: icmp_seq=1 ttl=61 time=0.875 ms
64 bytes from 10.0.2.2: icmp_seq=2 ttl=61 time=0.675 ms
64 bytes from 10.0.2.2: icmp_seq=3 ttl=61 time=0.894 ms
这个项目包含内容. You can read them carefully in the coming few weeks.
- Slides: deck of slides that go from the story of SDN and introduction to data plane programming to advanced (research level) applications.
- Documentation: list of links and documents with very useful information for P4 development.
- Examples: a collection of examples showing how to use almost all the simple switch features.
- Demos: a collection of demos with running examples.
- Exercises:A set of P4 exercises with a long description and solutions.
- Environment Installation: a guide and scripts to install the required software to start developing P4 applications in your own machine
16. Princeton大学的开源P4编程实验
基于P4编程语言,可以对硬件加速的数据面编程,处理报文流、或者报文负载里的event stream,加速stream processing。关于P4编程,Princeton大学提供了开源实验P4 Campus: P4 Applications For Campus Networks。
- The P4 Campus initiative supports developing production-level P4 programs that can run in real campus networks. https://p4campus.cs.princeton.edu/
这个项目目前有四个实验。
- Measure microbursts: Catch the microburst culprits in the network.
- Find heavy hitters: Find heavy hitters in the network.
- Anonymize live traffic: Anonymize live network traffic in line-rate.
- Fingerprint OS: Identify hosts' operating systems in real time.
- Measure Flow RTT: Measure round-trip-time latency of flows.
- PINOT: Programmable In-Network Obfuscation of Traffic
后面四个实验有BMv2虚拟交换机上的源代码。
【可选】在Ubuntu 16.04上和自带的Python 3.5并列安装Python 3.8以及图神经网络分析工具 Pytorch Geometric
Ubuntu 16.04系统上默认的Python3的版本是3.5.2。但是控制面分析程序需要至少Python 3.8环境。因此,遵照文档《在Ubuntu_16.04 系统上编译安装Python_3.8》,把默认的python3和pip3都升级成3.8。
然后,为Python 3.8安装P4环境的第三方包,安装在/usr/local/lib/python3.8/site-packages目录下,供任何用户使用:
sudo pip3.8 install six setuptools ply scapy ipaddr netaddr psutil crcmod networkx numpy xxhash murmurhash3
这里加上了sudo,不加就报权限错误。加了sudo以后,这些第三方包都安装在了/usr/local/lib/python3.8目录下面。
最后,确认一下python和pip的版本。
$ pip -V
pip 8.1.1 from /usr/lib/python2.7/dist-packages (python 2.7)
$ pip2 -V
pip 8.1.1 from /usr/lib/python2.7/dist-packages (python 2.7)
$ pip3 -V
pip 8.1.1 from /usr/lib/python3/dist-packages (python 3.5)
$ pip3.8 -V
pip 9.0.1 from /usr/local/lib/python3.8/site-packages (python 3.8)

$ which pip
/usr/bin/pip
$ which pip2
/usr/bin/pip2
$ which pip3
/usr/local/bin/pip3
$ which pip3.8
/usr/local/bin/pip3.8

$ python -V
Python 2.7.12
$ python3 -V
Python 3.5.2
$ python3.8 -V
Python 3.8.3
然后,为python3.8和pip3.8补上P4环境依赖的安装,包括protobuf、grpcio、thrift等python bindings包。
cd $P4_HOME/protobuf/python
sudo python3.8 setup.py install

sudo pip3.8 install grpcio
sudo pip3.8 install xxhash murmurhash
sudo pip3.8 install networkx
修改BMv2源文件中的install-thrift.sh安装文件。
cd $P4_HOME/behavioral-model/travis
gedit install-thrift.sh
-
修改thrift版本号到0.10.0。这个版本的thrift能兼容python2和python3。修改成
#!/bin/sh THIS_DIR=$( cd "$( dirname "${BASH_SOURCE[0]}" )" && pwd ) source $THIS_DIR/common.sh check_lib libthrift libthrift-0.10.0 set -e # Make it possible to get thrift in China # wget http://archive.apache.org/dist/thrift/0.9.2/thrift-0.9.2.tar.gz # tar -xzvf thrift-0.9.2.tar.gz git clone -b 0.10.0 https://github.com/apache/thrift.git thrift-0.10.0 cd thrift-0.10.0 ./bootstrap.sh ./configure --with-cpp=yes --with-c_glib=no --with-java=no --with-ruby=no --with-erlang=no --with-go=no --with-nodejs=no make -j2 && sudo make install cd lib/py sudo python2 setup.py install sudo python3 setup.py install sudo python3.8 setup.py install cd ../../.. -
执行如下依赖安装命令:
cd $P4_HOME/behavioral-model
# From bmv2's install_deps.sh, we can skip apt-get install.
# Nanomsg is required by p4runtime, p4runtime is needed by BMv2...
tmpdir=`mktemp -d -p .`
cd ${tmpdir}
sudo bash ../travis/install-thrift.sh
sudo ldconfig
cd ..
sudo rm -rf $tmpdir
另外,也可以进一步为python3.8环境补上对PostgreSQL数据库的python接口psycopg2的安装,以及补上datasketches-cpp项目的Python Wrapper for Datasketches的安装。
最后,按照文档《PyTorch-Geometric安装指南》,安装PyG图神经网络分析工具。注意PyG的安装非常缓慢,而且依赖pip。当pip环境损坏的时候,常常要重新装pip。所以建议在安装完P4环境以后安装PyG。
用pip3.8 list命令,可以验证一下这些包都安装了。
$ pip3.8 list
...
grpcio (1.29.0)
...
murmurhash3 (2.3.5)
...
pip (9.0.1)
...
protobuf (3.2.0)
psycopg2 (2.8.6.dev0)
...
thrift (0.10.0)
torch (1.5.0+cpu)
torch-cluster (1.5.4)
torch-geometric (1.5.0)
torch-scatter (2.0.4)
torch-sparse (0.6.4)
torch-spline-conv (1.2.0)
torchvision (0.6.0+cpu)
tox (3.15.2)
...
xxhash (1.4.3)
附录:文献引用
- Github库Bmv2 https://github.com/p4lang/behavioral-model
- Github库p4c https://github.com/p4lang/p4c
- P4官网 http://p4.org/
- P4语言规范 https://p4lang.github.io/p4-spec/
- P4邮件列表 http://lists.p4.org/mailman/listinfo/
- Barefoot官网 https://www.barefootnetworks.com/technology/
- Github库ProtoBuf https://github.com/google/protobuf/blob/master/src/README.md
- p4lang user-bootstrap P4环境安装脚本
- 郑浩@sdnlab: P4编程理论与实践(1)—快速上手
- 郑浩@sdnlab: P4编程理论与实践(2)—快速上手
- P4编程环境搭建+实现tutorials中basic的案例
- P4编程环境搭建
- ubuntu18.04配置P4环境
- Getting Started with P4 and Ubuntu 18.04 LTS
后话
官网 github 中各自的组件安装的 issue 里面有很多问题的解决问题的方法

 浙公网安备 33010602011771号