Flask上下文管理源码分析 ——(3)
引出的问题
Flask如何使用上下文临时把某些对象变为全局可访问
首先我们做如下的几种情况的假设
情况一:单进程单线程
这种情况可以基于全局变量存储临时的对象
情况二:单进程多线程
这种情况会出现多个线程共享全局的变量,为了每个线程中的数据不被其他线程修改,可以借助hreading.local对象,为每个线程做唯一的表示用来做键,请求的对象作为值来实现
多线程共享数据的问题
import threading
class Foo(object):
    def __init__(self):
        self.name = 0

local_values = Foo()

def func(num):
    local_values.name = num
    import time
    time.sleep(1)
    print(local_values.name, threading.current_thread().name)


for i in range(20):
    th = threading.Thread(target=func, args=(i,), name='线程%s' % i)
    th.start()
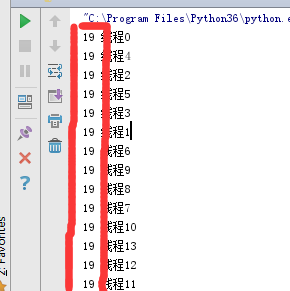
我们可以看到最后把每个线程中对象中name值都变为了19,不能保证每个线程中对象中的值唯一

使用hreading.local对象可以对每个线程做唯一的表示可以解决上述的问题
import threading

local_values = threading.local()

def func(num):
    local_values.name = num
    import time
    time.sleep(1)
    print(local_values.name, threading.current_thread().name)


for i in range(20):
    th = threading.Thread(target=func, args=(i,), name='线程%s' % i)
    th.start()
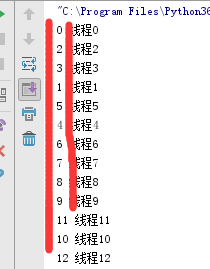
可以看到每个线程中的值唯一

- 情况三:单进程单线程(多个协程)Flask 的上下文管理就是基于这种情况做的
在这种情况下使用上面的方法可以保证线程中的数据唯一,但是使用其内部创建多个协程后,hreading.local只能对线程作唯一的标示,协程是在单线程下切换的,所以多个协程还会出现共享数据的问题
解决的思路:为每个程做唯一的标示,我们可以通过python自带的greenlet模块中的getcurrent来实现
只需对上面的代码做简单的修改即可
import threading
try:
    from greenlet import getcurrent as get_ident # 协程
except ImportError:
    try:
        from thread import get_ident
    except ImportError:
        from _thread import get_ident # 线程


class Local(object):
    def __init__(self):
        self.storage = {}
        self.get_ident = get_ident

    def set(self,k,v):
        ident = self.get_ident()
        origin = self.storage.get(ident)
        if not origin:
            origin = {k:v}
        else:
            origin[k] = v
        self.storage[ident] = origin

    def get(self,k):
        ident = self.get_ident()
        origin = self.storage.get(ident)
        if not origin:
            return None
        return origin.get(k,None)

local_values = Local()


def task(num):
    local_values.set('name',num)
    import time
    time.sleep(1)
    print(local_values.get('name'), threading.current_thread().name)


for i in range(20):
    th = threading.Thread(target=task, args=(i,),name='线程%s' % i)
    th.start()
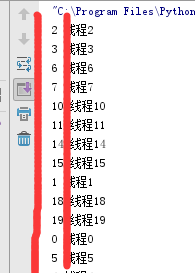
测试的结果如下

使用面向对象中方法对其进行简单的优化
在初始化的时候设置属性的时候,为了避免循环引用,我们可以这样做 object.__setattr__(self, 'storage', {})
class Foo(object):

    def __init__(self):
        object.__setattr__(self, 'storage', {})
        # self.storage = {}

    def __setattr__(self, key, value):
        self.storage = {'k1':'v1'}
        print(key,value)

    def __getattr__(self, item):
        print(item)
        return 'df'


obj = Foo()

# obj.x = 123
# 对象.xx
修改后的代码如下所示
import threading
try:
    from greenlet import getcurrent as get_ident # 协程
except ImportError:
    try:
        from thread import get_ident
    except ImportError:
        from _thread import get_ident # 线程


class Local(object):

    def __init__(self):
        object.__setattr__(self, '__storage__', {})
        object.__setattr__(self, '__ident_func__', get_ident)


    def __getattr__(self, name):
        try:
            return self.__storage__[self.__ident_func__()][name]
        except KeyError:
            raise AttributeError(name)

    def __setattr__(self, name, value):
        ident = self.__ident_func__()
        storage = self.__storage__
        try:
            storage[ident][name] = value
        except KeyError:
            storage[ident] = {name: value}

    def __delattr__(self, name):
        try:
            del self.__storage__[self.__ident_func__()][name]
        except KeyError:
            raise AttributeError(name)


local_values = Local()


def task(num):
    local_values.name = num
    import time
    time.sleep(1)
    print(local_values.name, threading.current_thread().name)


for i in range(20):
    th = threading.Thread(target=task, args=(i,),name='线程%s' % i)
    th.start()
偏函数 (帮助我们传递参数)
import functools

def func(a1):
    print(a1)


new_func = functools.partial(func,666)

new_func()
运行结果如下

面向对象中的魔法方法的简单使用
import flask.globals
class Foo(object):

    def __init__(self,num):
        self.num = num

    def __add__(self, other):
        data = self.num + other.num
        return Foo(data)

obj1 = Foo(11)
obj2 = Foo(22)

v = obj1 + obj2
print(v.num)
运行结果如下

chain 帮助我们拼接列表中的值
from itertools import chain

# def f1(x):
#     return x + 1
#
# func1_list = [f1,lambda x:x-1]
#
# def f2(x):
#     return x + 10
#
#
# new_fun_list = chain([f2],func1_list)
# for func in new_fun_list:
#     print(func)


v1 = [11,22,33]
v2 = [44,55,66]

new = chain(v1,v2)
for item in new:
    print(item)
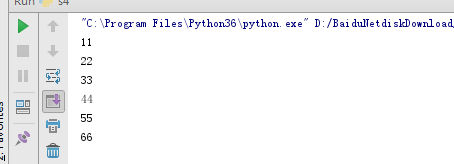
测试结果如下

Flask上下文源码分析
Flask中有两种上下文,请求上下文和应用上下文。
Flask上下文大致可以分为3个步奏
1 请求到来的时候(为每个线程/协程开辟独立的空间,存入statck中)
- ctx = 封装RequestContext(request,session)
- ctx放到Local中
2 执行视图函数的时候(调用每个线程自己的数据)
- 导入request
- 调用 _lookup_req_object函数:去local中将requestContext想获取到,再去requestContext中获取request或session
3- 请求结束(把数据从stack中删除)
- ctx.auto_pop()
- ctx从local中移除。
当程序启动时执行run方法中的 run_simple方法
请求上下文 (request,session)
封装请求相关的数据
    def run(self, host=None, port=None, debug=None,
            load_dotenv=True, **options):

        _host = '127.0.0.1'
        _port = 5000
        server_name = self.config.get('SERVER_NAME')
        sn_host, sn_port = None, None

        if server_name:
            sn_host, _, sn_port = server_name.partition(':')

        host = host or sn_host or _host
        port = int(port or sn_port or _port)

        options.setdefault('use_reloader', self.debug)
        options.setdefault('use_debugger', self.debug)
        options.setdefault('threaded', True)

        cli.show_server_banner(self.env, self.debug, self.name, False)

        from werkzeug.serving import run_simple

        try:
            run_simple(host, port, self, **options)
        finally:
            # reset the first request information if the development server
            # reset normally.  This makes it possible to restart the server
            # without reloader and that stuff from an interactive shell.
            self._got_first_request = False
当请求来的时候会执行 run_simple中的self对象,也就是app.__call__方法,代码如下
    def __call__(self, environ, start_response):
        return self.wsgi_app(environ, start_response)
查看源码中的wsgi_app方法,参数environ表示所有请求的数据,start_response表示响应
    def wsgi_app(self, environ, start_response):
        # 将请求相关的数据environ 封装到request_context 对象中
        ctx = self.request_context(environ) # 生成一个类
        error = None
        try:
            try:
                # 把请求的对象封装到local中,每个线程 / 协程都是独立的空间存储
                ctx.push()
                response = self.full_dispatch_request()
            except Exception as e:
                error = e
                response = self.handle_exception(e)
            except:
                error = sys.exc_info()[1]
                raise
            return response(environ, start_response)
        finally:
            if self.should_ignore_error(error):
                error = None
            # 最后把请求在local中的数据删掉
            ctx.auto_pop(error)
在上面的源码中我们可以看到把所有请求相关的数据封装到了,self.request_context(environ)中,其返回一个RequestContext赋值给ctx我们继续追踪其内部的代码如下所示
    def request_context(self, environ):
     # self指的是app对象
        return RequestContext(self, environ)
我们可以看到RequestContext类对environ进行了封装,在这里我们可以看到session的数据为None其初始化的方法如下:
class RequestContext(object):
    def __init__(self, app, environ, request=None):
        self.app = app
        if request is None:
            request = app.request_class(environ)
        self.request = request
        self.url_adapter = app.create_url_adapter(self.request)
        self.flashes = None
        self.session = None
        self._after_request_functions = []
        self.match_request()
把请求相关的数据添加到Local对象的storage中
我们继续追踪wsgi_app中的ctx.push的代码如下
    def push(self):
        top = _request_ctx_stack.top
        if top is not None and top.preserved:
            top.pop(top._preserved_exc)

        app_ctx = _app_ctx_stack.top
        if app_ctx is None or app_ctx.app != self.app:
            app_ctx = self.app.app_context()
            app_ctx.push()
            self._implicit_app_ctx_stack.append(app_ctx)
        else:
            self._implicit_app_ctx_stack.append(None)

        if hasattr(sys, 'exc_clear'):
            sys.exc_clear()
        # self 是request_contenx的对象,其中包含了请求相关的所有数据
        #  _request_ctx_stack==>LocalStack
        _request_ctx_stack.push(self)

        if self.session is None:
            session_interface = self.app.session_interface
            self.session = session_interface.open_session(
                self.app, self.request
            )

            if self.session is None:
                self.session = session_interface.make_null_session(self.app)
在最下面我们看到了给session中的数据重新赋了值
我们查看_request_ctx_stack类和其内部的push方法,把请求封装后的数据_request_ctx当做参数传递进去
_request_ctx_stack = LocalStack()
继续追踪LocalStack类中的push方法代码如下
    def push(self, obj):
        """Pushes a new item to the stack"""
        rv = getattr(self._local, 'stack', None)
        if rv is None:
            # 执行local 对象的__setatr__方法
            self._local.stack = rv = []
        # 把requestContext 对象添加到列表中 self._local.stack = rv = [把requestContext]
        rv.append(obj)
        return rv
在上面的源码中有一个赋值的操作self._local.stack=rv=[],self.local=local()会触发local()对象中的__setatr__方法参数key=stack,value=[],其__setatr__方法代码如下所示
    def __setattr__(self, name, value):
        # name = stack value = []
        # {"唯一的表示":
        # {stack:[requestContext(ctx)]}
        ident = self.__ident_func__()
        storage = self.__storage__
        try:
            storage[ident][name] = value
        except KeyError:
            storage[ident] = {name: value}
ident = self.__ident_func__() 表示的是为线程/协程做唯一的标示,也就以为者当前的请求的上下文添加到了这样的一个字典中
继续追踪LocalStack类中的push方法中的下rv.append(obj),把当前请求相关的数据添加到stoage中,obj是请求相关的数据RequestCotent,
{
    "线程/协助的唯一表示" : {"stack":["当前请求相关的数据"]}

}
当请求结束的时候删除storage中的,当前请求的数据
我们回去继续追踪wsgi_app中 ctx.auto_pop(error)方法删除请求结束后的数据
request和session使用内部调用源码分析
from flask import Flask,request
其代码如下
from functools import partial
from werkzeug.local import LocalStack, LocalProxy

def _lookup_req_object(name):
    top = _request_ctx_stack.top
    if top is None:
        raise RuntimeError(_request_ctx_err_msg)
    # 去requestContext中获取request的值
    return getattr(top, name)


def _lookup_app_object(name):
    top = _app_ctx_stack.top
    if top is None:
        raise RuntimeError(_app_ctx_err_msg)
    return getattr(top, name)


def _find_app():
    top = _app_ctx_stack.top
    if top is None:
        raise RuntimeError(_app_ctx_err_msg)
    return top.app


# context locals
_request_ctx_stack = LocalStack()
_app_ctx_stack = LocalStack()
current_app = LocalProxy(_find_app)
# partial 偏函数
request = LocalProxy(partial(_lookup_req_object, 'request'))
session = LocalProxy(partial(_lookup_req_object, 'session'))
g = LocalProxy(partial(_lookup_app_object, 'g'))
在上面的源码中,我们可以看到request是一个LocalProxy对象,其内部的参数通过偏函数partial调用_lookup_req_object函数传的参数默认为'request",_lookup_req_object代码如下
def _lookup_req_object(name):
    top = _request_ctx_stack.top
    if top is None:
        raise RuntimeError(_request_ctx_err_msg)
    # 去requestContext中获取request的值
    return getattr(top, name)
top调用的是_app_ctx_stack= LocalStack()类中的top方法,代码如下
    def top(self):
        """The topmost item on the stack.  If the stack is empty,
        `None` is returned.
        """
        try:
            return self._local.stack[-1]
        except (AttributeError, IndexError):
            return None
其返回的是存储在storage{"stack":{"当前请求":[RequestContent(当前请求的数据)]}},中当前请求的数据,也就是RequestContent对象,所以上面的_llokup_req_object.函数返回的是RequestContent中的g
class RequestContext(object):

    def __init__(self, app, environ, request=None):
        self.app = app
        if request is None:
            request = app.request_class(environ)
        self.request = request
        self.url_adapter = app.create_url_adapter(self.request)
        self.flashes = None
        self.session = None
所以request = LocalProxy(RequestContent.request)和session= LocalProxy(RequestContent.session)创建一个类,其初始化的方法如下
class LocalProxy(object):

    __slots__ = ('__local', '__dict__', '__name__', '__wrapped__')

    def __init__(self, local, name=None):
        # self.__loacl = local  local 指的是request
        object.__setattr__(self, '_LocalProxy__local', local)
        object.__setattr__(self, '__name__', name)
        if callable(local) and not hasattr(local, '__release_local__'):
            # "local" is a callable that is not an instance of Local or
            # LocalManager: mark it as a wrapped function.
            object.__setattr__(self, '__wrapped__', local)
通过上面的赋值我们可以知道,最终把RequestContent.reques赋值给self.local = RequestContent.reques
补充知识:面向对象的通过通过私有字段的取值
class Foo(object):

    def __init__(self):
        self.name = 'alex'
        self.__age = 18

    def get_age(self):
        return self.__age

obj = Foo()
# 强制获取私有字段
print(obj._Foo__age)
当我们使用request中的方法的时候,会执行其内部的魔法方法如:
- print(request)   -->  LocalProxy对象的__str__
- request.method   -->  LocalProxy对象的__getattr__
- request + 1      -->  LocalProxy对象的__add__
通过以上Flask源码的解读,我们可以试着传递一些值做一些简单的修改
from flask.globals import _request_ctx_stack
from functools import partial

def _lookup_req_object(name):
    # name = request
    # top= ctx
    top = _request_ctx_stack.top
    if top is None:
        raise RuntimeError('不存在')
    # return ctx.request
    return getattr(top, name)

class Foo(object):
    def __init__(self):
        self.xxx = 123
        self.ooo = 888

req = partial(_lookup_req_object,'xxx')
xxx = partial(_lookup_req_object,'ooo')

# 当前求刚进来时
_request_ctx_stack.push(Foo())

# 使用
# obj = _request_ctx_stack.top
# obj.xxx
v1 = req()
print(v1)
v2 = xxx()
print(v2)

# 请求终止,将local中的值移除
_request_ctx_stack.pop()
后台打印的结果如下

应用上下文(current__app,g)
源码wsgi_app
    def wsgi_app(self, environ, start_response):
        # 将请求相关的数据environ 封装到request_context 对象中
        # ctx.app = app
        # ctx.request = app.request_class(environ)
        ctx = self.request_context(environ) # 生成一个类
        error = None
        try:
            try:
                # 把请求的对象封装到local中,每个线程 / 协程都是独立的空间存储
                ctx.push()
                response = self.full_dispatch_request()
            except Exception as e:
                error = e
                response = self.handle_exception(e)
            except:
                error = sys.exc_info()[1]
                raise
            return response(environ, start_response)
        finally:
            if self.should_ignore_error(error):
                error = None
            # 最后把请求在local中的数据删掉
            ctx.auto_pop(error)
追踪ctx.push代码如下
    def push(self):
        top = _request_ctx_stack.top
        if top is not None and top.preserved:
            top.pop(top._preserved_exc)

        app_ctx = _app_ctx_stack.top
        if app_ctx is None or app_ctx.app != self.app:
            # 应用上下文 创建一个对象  app_ctx =  AppContext(object)  app_ctx.g   app_ctx.app
            app_ctx = self.app.app_context()
            app_ctx.push()
            self._implicit_app_ctx_stack.append(app_ctx)
        else:
            self._implicit_app_ctx_stack.append(None)

        if hasattr(sys, 'exc_clear'):
            sys.exc_clear()
        # self 是request_contenx的对象,其中包含了请求相关的所有数据
        #  _request_ctx_stack==>LocalStack
        _request_ctx_stack.push(self)

        if self.session is None:

            session_interface = self.app.session_interface
            self.session = session_interface.open_session(
                self.app, self.request
            )

            if self.session is None:
                self.session = session_interface.make_null_session(self.app)
app_cxt = self.app.app_context() 的源码了解到其返回的是一个AppContext对象
    def app_context(self):
        return AppContext(self)
AppContext源码如下
class AppContext(object):
    def __init__(self, app):
        self.app = app
        self.url_adapter = app.create_url_adapter(None)
        self.g = app.app_ctx_globals_class()

        # Like request context, app contexts can be pushed multiple times
        # but there a basic "refcount" is enough to track them.
        self._refcnt = 0
我们追踪g变量的源码发现其用法类似字典
class _AppCtxGlobals(object):

    def get(self, name, default=None):

        return self.__dict__.get(name, default)

    def pop(self, name, default=_sentinel):

        if default is _sentinel:
            return self.__dict__.pop(name)
        else:
            return self.__dict__.pop(name, default)

    def setdefault(self, name, default=None):

        return self.__dict__.setdefault(name, default)
回到上面的代码 app_ctx对象,从中我们可以拿到app_ctx和app_ctx.app这就是我们要找的应用上下文了
继续追踪 app_ctx.push()源码如下
    def push(self):
        self._refcnt += 1
        if hasattr(sys, 'exc_clear'):
            sys.exc_clear()
        _app_ctx_stack.push(self)
        appcontext_pushed.send(self.app)

追踪 _app_ctx_stack = LocalStack()中的push方法
    def push(self, obj):
        """Pushes a new item to the stack"""
        rv = getattr(self._local, 'stack', None)
        if rv is None:
            # 执行local 对象的__setatr__方法
            self._local.stack = rv = []
        # 把requestContext 对象添加到列表中 self._local.stack = rv = [把requestContext]
        rv.append(obj)
        return rv
在上面的源码中有一个赋值的操作self._local.stack=rv=[],self.local=local()会触发local()对象中的__setatr__方法参数key=stack,value=[],其__setatr__方法代码如下所示
    def __setattr__(self, name, value):
        # name = stack value = []
        # {"唯一的表示":
        # {stack:[requestContext(ctx)]}
        ident = self.__ident_func__()
        storage = self.__storage__
        try:
            storage[ident][name] = value
        except KeyError:
            storage[ident] = {name: value}
继续追踪LocalStack类中的push方法中的下rv.append(obj),把当前请求相关的数据添加到stoage中,obj是请求相关的数据RequestCotent,
{
    "stack" : {"线程/协助的唯一表示":["当前请求相关的数据"]}

}
g变量和 current_app
from flask import Flask,g,current_app
其代码如下
from functools import partial
from werkzeug.local import LocalStack, LocalProxy

def _lookup_req_object(name):
    top = _request_ctx_stack.top
    if top is None:
        raise RuntimeError(_request_ctx_err_msg)
    # 去requestContext中获取request的值
    return getattr(top, name)


def _lookup_app_object(name):
    top = _app_ctx_stack.top
    if top is None:
        raise RuntimeError(_app_ctx_err_msg)
    return getattr(top, name)


def _find_app():
    top = _app_ctx_stack.top
    if top is None:
        raise RuntimeError(_app_ctx_err_msg)
    return top.app


# context locals
_request_ctx_stack = LocalStack()
_app_ctx_stack = LocalStack()
current_app = LocalProxy(_find_app)
# partial 偏函数
request = LocalProxy(partial(_lookup_req_object, 'request'))
session = LocalProxy(partial(_lookup_req_object, 'session'))
g = LocalProxy(partial(_lookup_app_object, 'g'))
在上面的源码中,我们可以看到g是一个LocalProxy对象,其内部的参数通过偏函数partial调用_lookup_app_object函数传的参数默认为'g",_lookup_app_object代码如下
def _lookup_req_object(name):
    top = _request_ctx_stack.top
    if top is None:
        raise RuntimeError(_request_ctx_err_msg)
    # 去requestContext中获取request的值
    return getattr(top, name)
top调用的是app_cxt = LocalStack() 类中的top方法,代码如下
    def top(self):
        """The topmost item on the stack.  If the stack is empty,
        `None` is returned.
        """
        try:
            return self._local.stack[-1]
        except (AttributeError, IndexError):
            return None
其返回的是存储在storage{"stack":{"当前请求":[RequestContent(当前请求的数据)]}},中当前请求的数据,也就是RequestContent对象,所以上面的_llokup_req_object.函数返回的是AppContext中的g
class AppContext(object):

    def __init__(self, app):
        self.app = app
        self.url_adapter = app.create_url_adapter(None)
        self.g = app.app_ctx_globals_class()

        # Like request context, app contexts can be pushed multiple times
        # but there a basic "refcount" is enough to track them.
        self._refcnt = 0
所以g= LocalProxy(AppContext.g) 和 current_app = LocalProxy(AppContext.app)创建一个类,其初始化的方法如下
class LocalProxy(object):

    __slots__ = ('__local', '__dict__', '__name__', '__wrapped__')

    def __init__(self, local, name=None):
        # self.__loacl = local  local 指的是request
        object.__setattr__(self, '_LocalProxy__local', local)
        object.__setattr__(self, '__name__', name)
        if callable(local) and not hasattr(local, '__release_local__'):
            # "local" is a callable that is not an instance of Local or
            # LocalManager: mark it as a wrapped function.
            object.__setattr__(self, '__wrapped__', local)
当我们使用g和current_app 中的方法的时候,会执行其内部的魔法方法如:
- print(g)   -->  LocalProxy对象的__str__
- g.get(')-->  LocalProxy对象的__getattr__
多app应用
from werkzeug.wsgi import DispatcherMiddleware
from werkzeug.serving import run_simple
from flask import Flask, current_app

app1 = Flask('app01')

app2 = Flask('app02')


@app1.route('/index')
def index():
    return "app01"


@app2.route('/index2')
def index2():
    return "app2"

# http://www.oldboyedu.com/index
# http://www.oldboyedu.com/sec/index2
dm = DispatcherMiddleware(app1, {
    '/sec': app2,
})

if __name__ == "__main__":
    app2.__call__
    run_simple('localhost', 5000, dm)
with在类中的使用
class SQLHelper(object):

    def open(self):
        pass

    def fetch(self,sql):
        pass

    def close(self):
        pass

    def __enter__(self):
        self.open()
        return self

    def __exit__(self, exc_type, exc_val, exc_tb):
        self.close()

with SQLHelper() as obj: # 自动调用类中的__enter__方法, obj就是__enter__返回值
    obj.fetch('xxxx')
    # 当执行完毕后,自动调用类 __exit__ 方法
flask的local中保存数据时,使用列表创建出来的栈。为什么用栈?
在写脚本的时候一个线程中执行多个app他们的关系还是嵌套的
- 如果写web程序,web运行环境;栈中永远保存1条数据(可以不用栈)。
- 写脚本获取app信息时,可能存在app上下文嵌套关系。
from flask import Flask,current_app,globals,_app_ctx_stack

app1 = Flask('app01')
app1.debug = False # 用户/密码/邮箱
# app_ctx = AppContext(self):
# app_ctx.app
# app_ctx.g

app2 = Flask('app02')
app2.debug = True # 用户/密码/邮箱
# app_ctx = AppContext(self):
# app_ctx.app
# app_ctx.g


with app1.app_context():# __enter__方法 -> push -> app_ctx添加到_app_ctx_stack.local
    # {<greenlet.greenlet object at 0x00000000036E2340>: {'stack': [<flask.ctx.AppContext object at 0x00000000037CA438>]}}
    print(_app_ctx_stack._local.__storage__)
    print(current_app.config['DEBUG'])

    with app2.app_context():
        # {<greenlet.greenlet object at 0x00000000036E2340>: {'stack': [<flask.ctx.AppContext object at 0x00000000037CA438> ]}}
        print(_app_ctx_stack._local.__storage__)
        print(current_app.config['DEBUG'])

    print(current_app.config['DEBUG'])
打印的数据如下

关于g变量简单的使用
我们可以在请求到来的时候,给用户赋予一些权限,在视图函数中使用
from flask import Flask,request,g

app = Flask(__name__)

@app.before_request
def before():
    g.permission_code_list = ['list','add']


@app.route('/',methods=['GET',"POST"])
def index():
    print(g.permission_code_list)
    return "index"


if __name__ == '__main__':
    app.run()

