机器学习 Tensorflow 基础
简单使用
import tensorflow as tf

a = tf.constant(10)
b = tf.constant(20)
# 定义了一种操作 op
c = tf.add(a, b)
print(c)


with tf.Session() as sess:
    ret = sess.run(c)
    print(ret)

可以看到出现了很多的警告信息,这是因为 tensorflow 使用的是 pip 安装的,给出的建议是使用源码安装,这样可以提高 cpu 的使用效率,当然也可以设置日志等级来屏蔽警告信息
import os
os.environ['TF_CPP_MIN_LOG_LEVEL'] = '2'
完整代码如下
import tensorflow as tf
# 关闭警告
import os
os.environ['TF_CPP_MIN_LOG_LEVEL'] = '2'

a = tf.constant(10)
b = tf.constant(20)
# 定义了一种操作 op
c = tf.add(a, b)
print(c)

with tf.Session() as sess:
    ret = sess.run(c)
    print(ret)

深度学习介绍
深度学习,如深度神经网络、卷积神经网络和递归神经网络已被应用计算机视觉、语音识别、自然语言处理、音频识别与生物信息学等领域并获取了极好的效果。

深度学习框架
认识 TensorFlow
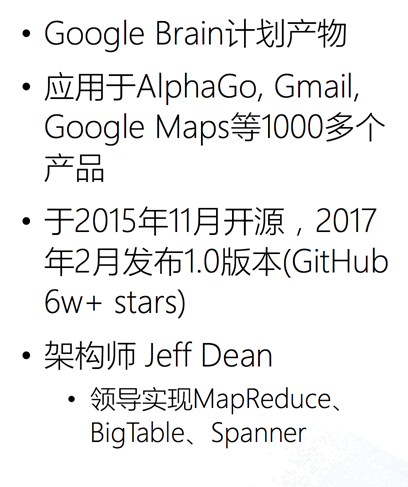

Tensorflow特点
1、真正的可移植性
- 引入各种计算设备的支持包括CPU/GPU/TPU,以及能够很好地运行在移动端,如安卓设备、ios、树莓派等等
2、多语言支持
- Tensorflow 有一个合理的c++使用界面,也有一个易用的python使用界面来构建和执行你的graphs,你可以直接写python/c++程序
3、高度的灵活性与效率
- TensorFlow是一个采用数据流图(data flow graphs),用于数值计算的开源软件库能够灵活进行组装图,执行图。随着开发的进展,Tensorflow的效率不段在提高
4、支持
- TensorFlow 由谷歌提供支持,谷歌投入了大量精力开发 TensorFlow,它希望TensorFlow 成为机器学习研究人员和开发人员的通用语言

Tensorflow的安装(开启gpu支持)
如果您的系统没有 NVIDIA®GPU,请构建并安装CPU版本
Ubuntu:
- 安装CUDA和cuDNN
Mac:
- 安装CUDA和cuDNN
Tensorflow基础
tf 加法运算
import tensorflow as tf
import os
os.environ['TF_CPP_MIN_LOG_LEVEL'] = '2'


def tf_add():
    # 一个常量
    a = tf.constant(10)
    b = tf.constant(20)
    # 定义了一种操作 op
    c = tf.add(a, b)
    with tf.Session() as sess:
        add_result = sess.run(c)
        print(add_result)
数据流图
tensorflow 是计算密集型,django 等框架是 IO 密集型
Tensorflow进阶之图
图默认已经注册,一组表示 tf.Operation计算单位的对象和tf.Tensor表示操作之间流动的数据单元的对象
获取调用:
-
tf.get_default_graph()
-
op、sess或者tensor 的graph属性
哪些是 op
图的创建
tf.Graph()
使用新创建的图
g = tf.Graph()
with g.as_default():
    a = tf.constant(1.0)
    assert c.graph is g
图的简单使用
import tensorflow as tf
import os
os.environ['TF_CPP_MIN_LOG_LEVEL'] = '2'

def tf_graf():
    a = tf.constant(10)
    b = tf.constant(20)
    g = tf.get_default_graph()
    print('默认的图', g)
    print('操作对象的图')
    print(a.graph)
    print(b.graph)
    new_g = tf.Graph()
    print("手动创建的图: ", new_g)
    with new_g.as_default():
        # 在这个作用域中, 定义tensor类型的对象的图就是new_g
        d = tf.constant(20)
        print("=====", d.graph)

if __name__ == '__main__':
    tf_graf()

Tensorflow进阶之会话
tf.Session()
- 运行TensorFlow操作图的类,使用默认注册的图(可以指定运行图)
import tensorflow as tf
import os
os.environ['TF_CPP_MIN_LOG_LEVEL'] = '2'

def tf_graf():
    a = tf.constant(10)
    b = tf.constant(20)
    c = tf.add(a, b)
    g = tf.get_default_graph()
    print('默认的图', g)
    new_g = tf.Graph()

    # 创建Session如果不指定图,则默认创建的图对象,也可以指定图对象
    with tf.Session(graph=new_g) as sess:
        # sess的graph是默认的图对象
        print(sess.graph)
        # 在这里不能运行 sess.run(c),因为 c op 是属于默认的图

if __name__ == '__main__':
    tf_graf()

会话资源
- 会话可能拥有很多资源,如 tf.Variable,tf.QueueBase和tf.ReaderBase,会话结束后需要进行资源释放
- 通用的使用上下文管理器
sess = tf.Session() sess.run(...) sess.close()

使用上下文管理器
with tf.Session() as sess:
  sess.run(...)
config=tf.ConfigProto(log_device_placement=True)
交互式:tf.InteractiveSession()
会话的run()方法,运行ops和计算tensor
run(fetches, feed_dict=None,graph=None)
fetches
- 嵌套列表,元组namedtuple,dict或OrderedDict(重载的运算符也能运行)
feed_dict
- 允许调用者覆盖图中指定张量的值,提供给
placeholder使用
返回值异常
RuntimeError:如果它Session处于无效状态(例如已关闭)
TypeError:如果fetches或feed_dict键是不合适的类型
ValueError:如果fetches或feed_dict键无效或引用 Tensor不存在
Tensorflow Feed操作
意义:在程序执行的时候,不确定输入的是什么,提前“占个坑”
语法:placeholder提供占位符,run时候通过feed_dict指定参数
import tensorflow as tf
import os
os.environ['TF_CPP_MIN_LOG_LEVEL'] = '2'
def sess_run():
"""
会话对象和它的run方法
:return: None
"""
a = tf.constant(10)
b = tf.constant(20, name='bname')
f = tf.constant(30)
# 定义了一种操作 op
c = tf.add(a, b)
# 定义一个占位符对象
plt = tf.placeholder(tf.float32, shape=(2, 2))
print("=======", plt)
print('++++++++++')
print(a.graph)
print('a_op', a.op)
print('b_name', b.name)
print(plt.shape)
print(plt.get_shape)
print('++++++++++')
with tf.Session(config=tf.ConfigProto(log_device_placement=True)) as sess:
ret = sess.run([a, b])
# config=tf.ConfigProto(log_device_placement=True), 输出在那个硬件上运行的任务
print(a.eval())# 输出a的值
"""
Device mapping: no known devices.
Add: (Add): /job:localhost/replica:0/task:0/cpu:0
Const_1: (Const): /job:localhost/replica:0/task:0/cpu:0
Const: (Const): /job:localhost/replica:0/task:0/cpu:0
"""
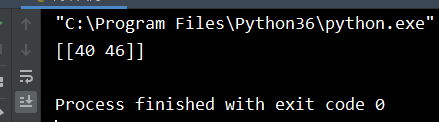
ret = sess.run(plt, feed_dict={plt: [[11.0, 22.0], [33.0, 44.0]]})
print(ret)
return None
if __name__ == '__main__':
sess_run()


"C:\Program Files\Python36\python.exe" D:/数据分析/机器学习/day4/3-代码/test.py
======= Tensor("Placeholder:0", shape=(2, 2), dtype=float32)
++++++++++
<tensorflow.python.framework.ops.Graph object at 0x000000000255FEB8>
a_op name: "Const"
op: "Const"
attr {
  key: "dtype"
  value {
    type: DT_INT32
  }
}
attr {
  key: "value"
  value {
    tensor {
      dtype: DT_INT32
      tensor_shape {
      }
      int_val: 10
    }
  }
}

b_name bname:0
(2, 2)
<bound method Tensor.get_shape of <tf.Tensor 'Placeholder:0' shape=(2, 2) dtype=float32>>
++++++++++
Device mapping: no known devices.
Add: (Add): /job:localhost/replica:0/task:0/cpu:0
Placeholder: (Placeholder): /job:localhost/replica:0/task:0/cpu:0
Const_1: (Const): /job:localhost/replica:0/task:0/cpu:0
bname: (Const): /job:localhost/replica:0/task:0/cpu:0
Const: (Const): /job:localhost/replica:0/task:0/cpu:0
10
[[11. 22.]
 [33. 44.]]

Process finished with exit code 0
Tensorflow进阶之张量
tf.concat 有tf创建的类型都是张量(一般是多维数组)
张量的阶和数据类型
-
Tensorflow基本的数据格式
-
一个类型化的N维度数组(tf.Tensor)
-
三部分,名字,形状,数据类型
张量的阶

张量的数据类型

张量属性
-
graph 张量所属的默认图
-
op 张量的操作名
-
name 张量的字符串描述
-
shape 张量形状
简单使用
import tensorflow as tf
import os
os.environ['TF_CPP_MIN_LOG_LEVEL'] = '2'


def tf_session():
    # 一个常量
    a = tf.constant(10)
    b = tf.constant(20)
    # 定义了一种操作 op
    sum = tf.add(a, b)
    with tf.Session() as sess:
        print(sum.eval())
        print(sum.graph)
        print(sum.name)
        print(sum.op)
        print(sess.run((sum)))


if __name__ == '__main__':
    tf_session()
"C:\Program Files\Python36\python.exe" D:/数据分析/机器学习/day4/3-代码/test.py
30
<tensorflow.python.framework.ops.Graph object at 0x00000000025CF9E8>
Add:0
name: "Add"
op: "Add"
input: "Const"
input: "Const_1"
attr {
  key: "T"
  value {
    type: DT_INT32
  }
}

30

Process finished with exit code 0
张量修改


TensorFlow中,张量具有静态形状和动态形
状静态形状:创建一个张量,初始状态的形状
-
tf.Tensor.get_shape:获取静态形状
-
tf.Tensor.set_shape():更新Tensor对象的静态形状,通常用于在不能直接推断的情况下
动态形状:一种描述原始张量在执行过程中的一种形状(动态变化)
- tf.reshape:创建一个具有不同动态形状的新张量
要点
-
1、转换静态形状的时候,1-D到1-D,2-D到2-D,不能跨阶数改变形状
-
2、 对于已经固定或者设置静态形状的张量/变量,不能再次设置静态形状
-
3、tf.reshape()动态创建新张量时,元素个数不能不匹配
import tensorflow as tf
import os
os.environ['TF_CPP_MIN_LOG_LEVEL'] = '2'

def tf_shape():
    """
    张量  Tensor 多维的数组
    张量包含的属性: 图, op, 名字, 形状
    # 表示形状的时候 如果有None 形状待定, 最后在run的时候 指定数据就能够确定张量的形状
    # 在形状没有确定之前可以通过set_shape来指定形状
    # 在张量的形状已经确定的情况下不能够通过set_shape修改
    # 张量的静态形状已经固定 就不能够再被修改, 如果没有固定可以通过set_shape修改形状,但是需要和已知的行或者列对应\
    # reshape: 1. 会生成新的对象  2. 动态创建新张量时,元素个数必须得匹配元素的个数  2行3列的数组在修改形状的时候 必须修改为3行两列

    :return:
    """
    a = tf.constant(10)
    print(a.graph)
    print(a.op)
    print(a.name)
    print(a.shape)
    b = tf.constant(20, name='bname')
    f = tf.constant(30)
    # 定义了一种操作 op
    c = tf.add(a, b)
    # 定义一个占位符对象

    plt = tf.placeholder(tf.float32, shape=(2, 3))
    # plt = tf.placeholder(tf.float32, shape=(None, 3))
    # plt.set_shape([3, 3])
    print('++++++++++')
    print(plt.get_shape)
    print('++++++++++')

    # reshape 重新修改形状
    # reshape 修改形状的时候会生成新的对象
    print(plt.get_shape)
    re_plt = tf.reshape(plt, shape=[3, 2])
    print(re_plt.get_shape)

    with tf.Session(config=tf.ConfigProto(log_device_placement=True)) as sess:
        ret = sess.run(plt, feed_dict={plt: [[11.0, 22.0, 33.0], [33.0, 44.0,55.0]]})
        ret1 = sess.run(re_plt, feed_dict = {re_plt : [[11.0, 22.0], [33.0, 44.0], [66.0,88.0]]})
        print(ret)
        print(ret1)

if __name__ == '__main__':
    tf_shape()
输出结果如下
"C:\Program Files\Python36\python.exe" D:/数据分析/机器学习/day4/3-代码/test.py
<tensorflow.python.framework.ops.Graph object at 0x000000000258FEF0>
name: "Const"
op: "Const"
attr {
  key: "dtype"
  value {
    type: DT_INT32
  }
}
attr {
  key: "value"
  value {
    tensor {
      dtype: DT_INT32
      tensor_shape {
      }
      int_val: 10
    }
  }
}

Const:0
()
++++++++++
<bound method Tensor.get_shape of <tf.Tensor 'Placeholder:0' shape=(2, 3) dtype=float32>>
++++++++++
<bound method Tensor.get_shape of <tf.Tensor 'Placeholder:0' shape=(2, 3) dtype=float32>>
<bound method Tensor.get_shape of <tf.Tensor 'Reshape:0' shape=(3, 2) dtype=float32>>
Device mapping: no known devices.
[[11. 22. 33.]
 [33. 44. 55.]]
[[11. 22.]
 [33. 44.]
 [66. 88.]]

Process finished with exit code 0
张量操作-生成张量
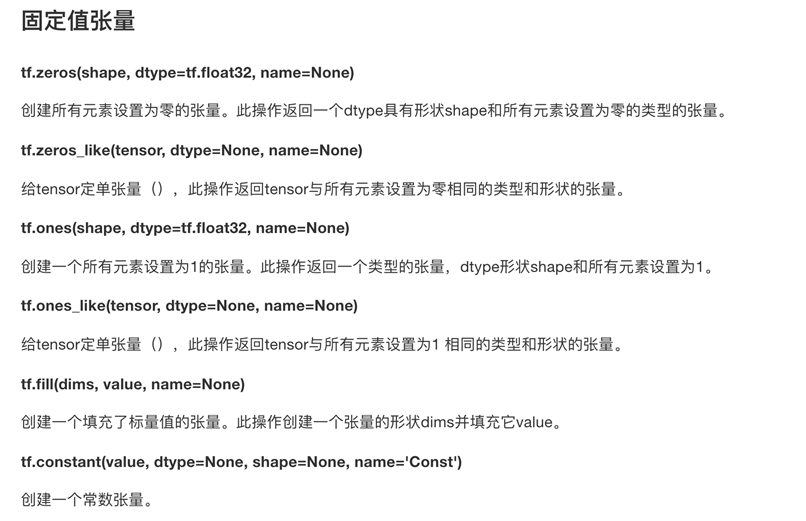
创建一个所有元素为0的张量
import tensorflow as tf
a = tf.zeros(shape=(2,3), dtype=tf.float16, name='a')
# 在交互模式下开启回话
tf.InteractiveSession()
a.eval()
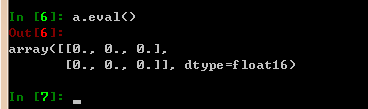
b = tf.zeros_like(a)
b.eval()

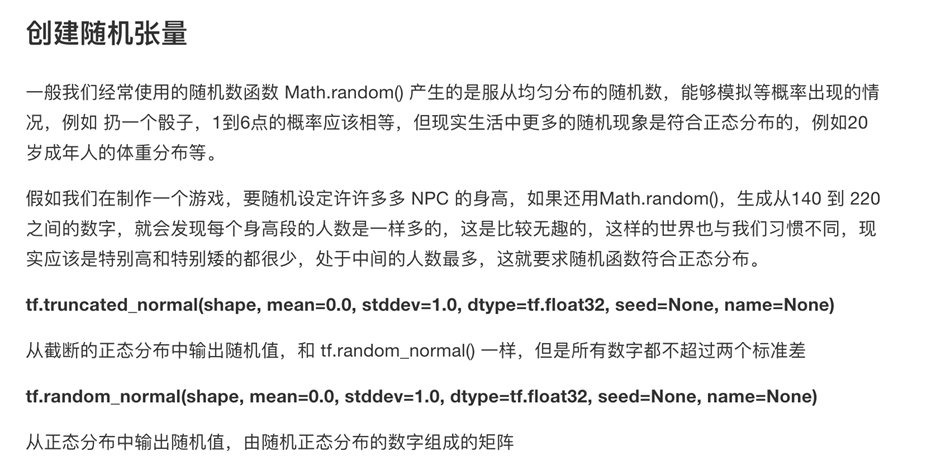
正态分布
张量操作-张量变换


提供给Tensor运算的数学函数网址
-
算术运算符
-
基本数学函数
-
矩阵运算
-
减少维度的运算(求均值)
-
序列运算
- https://www.tensorflow.org/versions/r1.0/api_guides/python/math_ops
Tensorflow进阶之变量
变量也是一种OP,是一种特殊的张量,能够进行存储持久化,它的值就是张量,默认被训练
变量的创建
tf.Variable(initial_value=None,name=None, trainable=True)
- 创建一个带值initial_value的新变量
assign(value)
- 为变量分配一个新值返回新值
eval(session=None)
- 计算并返回此变量的值
name属性表示变量名字
变量的初始化
tf.global_variables_initializer()
- 添加一个初始化所有变量的op在会话中开启
import tensorflow as tf
import os
os.environ['TF_CPP_MIN_LOG_LEVEL'] = '2'

def var_demo():
    """
    演示变量的基本使用:
    定义  tf.Variable() 仅仅完成了变量的定义
    初始化 必须将当前图中定义变量 通过global_variables_initializer 收集所有需要初始化的变量 得到一个op对象
    初始化: 必须在 会话对象中 运行 初始化的op对象才能够创建变量
    作用域
    :return: None
    """
    # 不能够写成创建或者初始化 而是设置一个变量
    # 变量也是张量
    a = tf.Variable(initial_value=1.0, name='axxx')
    b = tf.Variable(initial_value=1.0, name='bxxx')
    # print(a)
    # 会返回一个op操作, 该操作会获取到当前图中所有需要被创建的变量
    init_op = tf.global_variables_initializer()
    print("=====")
    print(init_op)
    print("=====")
    with tf.Session() as sess:
        # 在访问a之前 进行初始化的操作, 运行init_op 就可以了
        sess.run(init_op)
        print(a.eval())

    return None


if __name__ == '__main__':
    var_demo()

小案例:矩阵相乘演示变量变化的过程
矩阵相乘一个矩阵的行必须等于另外一个列
import tensorflow as tf
import os
os.environ['TF_CPP_MIN_LOG_LEVEL'] = '2'


def mat():
    """
    矩阵相乘
    :return: None
    """
    # 1行 3列的张量
    var1 = tf.Variable(initial_value=[[1, 2, 3]], name="var1")
    # 3行 2列 张量
    var2 = tf.Variable(initial_value=[[4, 5], [6, 7], [8, 9]], name='var2')
    # 定义一个矩阵相乘的操作
    mat_op = tf.matmul(var1, var2)
    # Attempting to use uninitialized value Variable
    # 变量需要被初始化
    init_op = tf.global_variables_initializer()

    with tf.Session() as sess:

        # 运行初始化的op对象
        sess.run(init_op)
        # 变量初始化之后 可以将变量的变化写入到一个events文件中
        tf.summary.FileWriter(logdir='/tmp/log/', graph=sess.graph)
        ret = sess.run(mat_op)
        print(ret)

    return None


if __name__ == '__main__':
    mat()
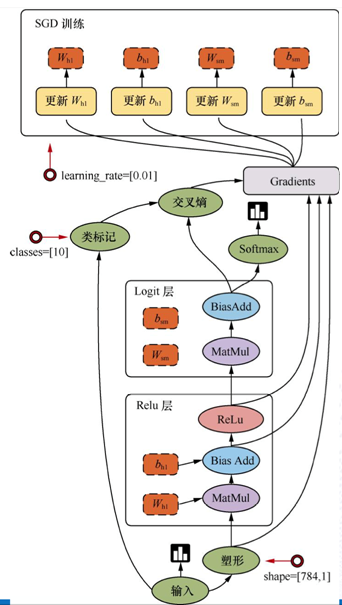
可视化学习Tensorboard
数据序列化-events文件
TensorBoard 通过读取 TensorFlow 的事件文件来运行
- tf.summary.FileWriter('/tmp/tensorflow/summary/test/', graph=)
- 返回filewriter,写入事件文件到指定目录(最好用绝对路径),以提供给tensorboard使用
开启
tensorboard --logdir=“/tmp/log/”
一般浏览器打开为127.0.0.1:6006
注:修改程序后,再保存一遍会有新的事件文件,打开默认为最新
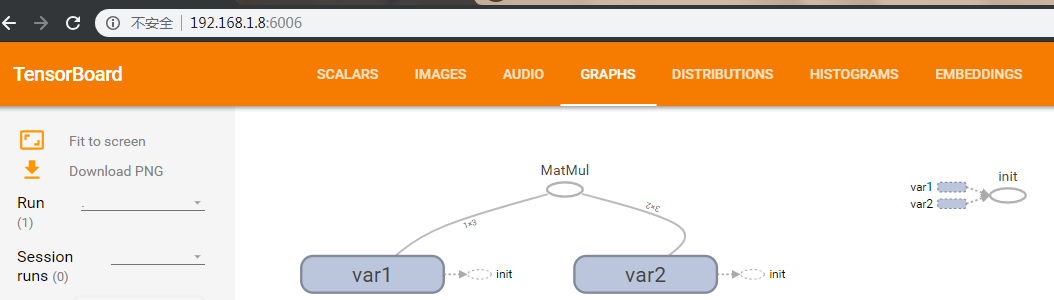
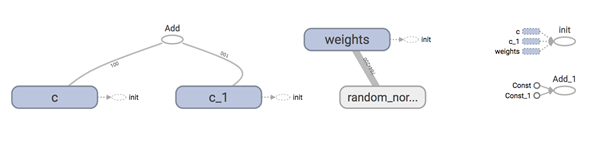
图中的符号意义

增加变量显示
目的:观察模型的参数、损失值等变量值的变化
1、收集变量
-
tf.summary.scalar(name=’’,tensor) 收集对于损失函数和准确率等单值变量,name为变量的名字,tensor为值
-
tf.summary.histogram(name=‘’,tensor) 收集高维度的变量参数
-
tf.summary.image(name=‘’,tensor) 收集输入的图片张量能显示图片
2、合并变量写入事件文件
-
merged = tf.summary.merge_all()
-
运行合并:summary = sess.run(merged),每次迭代都需运行
-
添加:FileWriter.add_summary(summary,i),i表示第几次的值
tensorflow变量作用域
tf.variable_scope(<scope_name>)创建指定名字的变量作用域
-
观察变量的name改变
-
嵌套使用变量作用域
-
观察变量的name改变
如果在之前,给变量取相同的name会出现什么样的情况
tensorflow变量作用域的作用
- 让模型代码更加清晰,作用分明
模型保存和加载
-
tf.train.Saver(var_list=None,max_to_keep=5)
-
var_list:指定将要保存和还原的变量。它可以作为一个dict或一个列表传递.
-
max_to_keep:指示要保留的最近检查点文件的最大数量。创建新文件时,会删除较旧的文件。如果无或0,则保留所有检查点文件。默认为5(即保留最新的5个检查点文件。)
例如:saver.save(sess, '/tmp/ckpt/test/model')
saver.restore(sess, '/tmp/ckpt/test/model')
保存文件格式:checkpoint文件
tensorflow实现一个简单的线性回归案例
Tensorflow运算API
矩阵运算
- tf.matmul(x, w)
平方
- tf.square(error)
均值
- tf.reduce_mean(error)
梯度下降API
tf.train.GradientDescentOptimizer(learning_rate)梯度下降优化
-
learning_rate:学习率,一般为 0.01
-
method:
-
return:梯度下降op
案例演示
import tensorflow as tf
import os
os.environ['TF_CPP_MIN_LOG_LEVEL'] = '2'


def linear():
    """
    通过tensorflow来手动实现线性回归
    相关的函数: matmul, square, reduce_mean, tf.train.GradientDescentOptimizer(learning_rate)
    y = 0.7 * x1 + 0.8
    :return: None
    """
    # 准备数据 这个自变量的值服从标准的正态分布
    # 指定作用域的命名空间
    with tf.variable_scope('data'):
        x = tf.random_normal(shape=[100, 1], mean=0, stddev=1.0)
        # 目标值 权重的矩阵 乘以特征值的矩阵
        y = tf.matmul(x, [[0.7]]) + 0.8

    with tf.variable_scope('model'):
        # 随机的指定权重值weight 和 偏置值 bias, 最终在训练的过程中让随机指定weight 和bias 向 0.7 和 0.8靠近
        # weight就应该是一个变量, 变量才能够被训练
        weight = tf.Variable(
            initial_value=tf.random_normal(shape=[1, 1], mean=0, stddev=1.0), name='weight'
        )
        bias = tf.Variable(initial_value=0.0, name='bias')

        # 获取预测值
        y_predict = tf.matmul(x, weight) + bias

    with tf.variable_scope("op"):
        # 获取均方误差
        loss = tf.reduce_mean(tf.square(y - y_predict))
        # 定义优化损失的op
        # 通过梯度下降优化误差 最小化误差
        # learning_rate 学习的速率
        train_op = tf.train.GradientDescentOptimizer(learning_rate=0.01).minimize(loss)
        # 需要初始化变量
        init_op = tf.global_variables_initializer()

    # 收集变量的变化
    tf.summary.scalar('loss', loss)
    tf.summary.scalar('bias', bias)
    tf.summary.histogram('weight', weight)
    # 合成一个操作对象
    merge_op = tf.summary.merge_all()

    # 定义模型的保存操作
    saver_op = tf.train.Saver()
    # 在会话中运行op 优化损失
    with tf.Session() as sess:
        # 初始化变量
        sess.run(init_op)
        # 将变量的变化写入到events文件中
        file_writer = tf.summary.FileWriter(logdir='./tmp/summary/linear/', graph=sess.graph)
        # 执行梯度下降优化损失的操作
        # 从之前保存的路径来进行恢复操作
        if os.listdir('./tmp/summary/linear/li/'):
            print("===================")
            saver_op.restore(sess=sess, save_path='./tmp/summary/linear/li/')
        for i in range(150):
            # 每次迭代都需要运行 需要在循环中执行
            summary = sess.run(merge_op)
            print("随机得到的权重值为%f, 偏置值为%f" % (weight.eval(), bias.eval()))
            sess.run(train_op)
            print("随机得到的权重值为%f, 偏置值为%f" % (weight.eval(), bias.eval()))
            # 每一次循环都需要记录变化\
            # 将合成的变化写入到events文件中
            file_writer.add_summary(summary, i)
            if i % 10 == 0:
                # 每次迭代都需要完成保存的操作
                pass
        # 迭代结束之后就开始保存变量
        saver_op.save(sess=sess, save_path='./tmp/summary/linear/li/')
    return None


if __name__ == '__main__':
    linear()
tensorboard 查看可视化模型
tensorboard --logdir='/home/python/Desktop/biao/tesorflow_tes/tmp/summary' --host='192.168.1.8'

自定义命令行参数
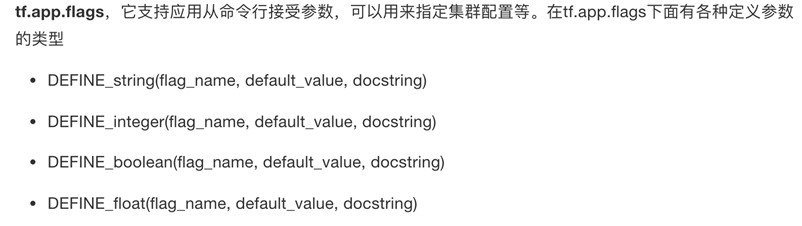
2、 tf.app.flags.,在flags有一个FLAGS标志,它在程序中可以调用到我们前面具体定义的flag_name
3、通过tf.app.run()启动main(argv)函数
案例演示
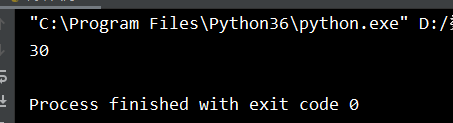
import tensorflow as tf
import os
os.environ['TF_CPP_MIN_LOG_LEVEL']='2'


# 自定义命令行参数
tf.app.flags.DEFINE_string(flag_name='home_path', default_value='./tmp', docstring="默认的路径信息")
tf.app.flags.DEFINE_integer(flag_name='max_step', default_value=30, docstring="最大迭代的次数")
FLAGS = tf.app.flags.FLAGS


def main(argv):
    print(argv)
    print(FLAGS.home_path)
    print(FLAGS.max_step)


if __name__ == '__main__':
    tf.app.run()


 浙公网安备 33010602011771号