linux 综合架构网站服务
HTTP协议请求和响应过程
curl -v www.baidu.com
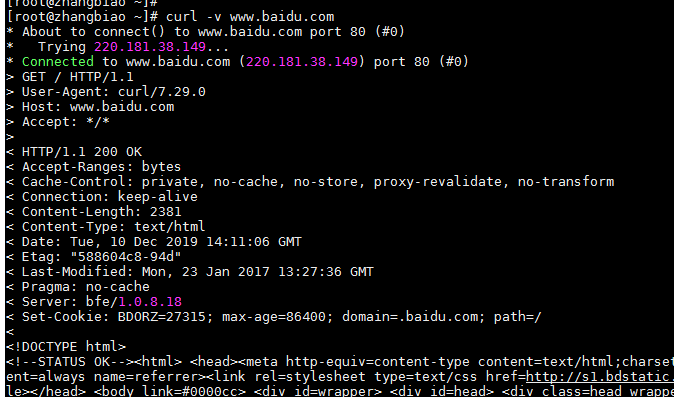
HTTP请求报文
1) 请求行
-
请求方法: Get --读/看 ---获取/拿过来
-
post --写/提交
-
请求信息: index.html(首页文件) oldboy.jpg
-
请求协议: http 1.1
-
HTTP: 1.0 TCP短连接
-
HTTP: 1.1 TCP长连接
-
HTTP: 2.0 TCP长连接优化 提高用户并发(同时)访问的效率
2) 请求头
- 请求主机信息
3) 空行
4) 请求主体
-
使用get方法时, 没有请求主体信息
-
使用post方法时,具有请求主体内容
HTTP响应报文
1) 起始行
- 状态码信息 访问请求是成功响应/失败响应
2) 响应头部
3) 空行
4) 响应主体
HTTP协议资源信息
-
URL: 全称为Uniform Resource Location,中文翻译为统一资源定位符,docs.ansible.com
-
URI: 全称为Uniform Resource Identifier,中文翻译为统一资源标识符,ansible/latest/user_guide/playbooks_reuse_roles.html
评测网站好坏的指标
PV: 页面访问量(用户浏览一次页面记录一次)
UV: 记录独立访客数量(记录用户数量)
-
cookie: 标识用户身份信息, 会保存在用户客户端本地
-
session: 记录用户的一些会话操作, eg: 记录用户登录信息 记录在服务端
网站的并发
-
A种理解:网站服务器每秒能够接收的最大用户请求数
-
B种理解:网站服务器每秒能够响应的最大用户请求数
-
C种理解:网站服务器在单位时间内能够处理的最大连接数
nginx介绍
常用的网站服务软件
-
apache软件: http://apache.org/
-
nginx软件: http://nginx.org
官方文档
http://nginx.org/en/docs/
nginx服务的软件特点
1) 支持高并发,消耗内存资源少
2) 具有多种功能
-
网站web服务功能 --- apache
-
网站负载均衡功能 --- LVS
-
网站缓存服务 --- Squid
3) 在多种系统平台都可以进行部署
4) nginx实现网络通讯时使用的时异步网络IO模型: epoll模型(apache -- select模型)
yum官方源安装方法:
第一个历程: 更新nginx官方yum源
/etc/yum.repos.d/nginx.repo
[nginx-stable]
name=nginx stable repo
baseurl=http://nginx.org/packages/centos/$releasever/$basearch/
gpgcheck=1
enabled=1
gpgkey=https://nginx.org/keys/nginx_signing.key
第二个历程: yum安装nginx软件
yum install -y nginx
第三个历程: 启动nginx服务,检查服务是否安装正确
systemctl start nginx
systemctl enable nginx
nginx 日志切割
/etc/logrotate.conf
# rotate log files weekly
weekly                     --- 定义默认日志切割的周期

# keep 4 weeks worth of backlogs
rotate 4                   --- 定义只保留几个切割后的文件

# create new (empty) log files after rotating old ones
create                     --- 创建出一个相同的源文件

# use date as a suffix of the rotated file
dateext                    --- 定义角标(扩展名称信息)

# uncomment this if you want your log files compressed
#compress                  --- 是否对切割后的文件进行压缩处理

# RPM packages drop log rotation information into this directory
include /etc/logrotate.d   --- 加载包含/etc/logrotate.d/目录中文件配置

# no packages own wtmp and btmp -- we'll rotate them here
/var/log/wtmp {            --- 单独对某个文件进行切割配置
   monthly
   create 0664 root utmp
   minsize 1M             --- 最小大小为1M,小于1M不进行切割
   rotate 1
}

/var/log/btmp {
   missingok
   monthly
   create 0600 root utmp
   rotate 1
}
nginx服务配置文件
主配置文件 /etc/nginx/nginx.conf
第一个部分: 配置文件主区域配置
user  www;               	 --- 定义worker进程管理的用户
补充: nginx的进程 ps -ef | grep nginx
master process:  主进程		---管理服务是否能够正常运行   boss
worker process:  工作进程	---处理用户的访问请求         员工
worker_processes  2;        ---定义有几个worker进程  == CPU核数 / 核数的2倍
error_log  /var/log/nginx/error.log warn;   --- 定义错误日志路径信息
pid        /var/run/nginx.pid;              --- 定义pid文件路径信息
第二个部分: 配置文件事件区域
events {
    worker_connections  1024;   --- 一个worker进程可以同时接收1024访问请求
}
第三个部分: 配置http区域
http {
    include       /etc/nginx/mime.types;      --- 加载一个配置文件
    default_type  application/octet-stream;   --- 指定默认识别文件类型
    log_format  oldboy  '$remote_addr - $remote_user [$time_local] "$request" '
                        '$status $body_bytes_sent "$http_referer" '
                        '"$http_user_agent" "$http_x_forwarded_for"';
                      --- 定义日志的格式
    access_log  /var/log/nginx/access.log  oldboy;
                      --- 指定日志路径
    sendfile        on;   ???
    #tcp_nopush     on;   ???
    keepalive_timeout  65;   --- 超时时间
    #gzip  on;
    include /etc/nginx/conf.d/*.conf;        --- 加载一个配置文件
}
/etc/nginx/nginx.d/default --- 扩展配置
server {
    listen       8080;                --- 指定监听的端口
    server_name  www.oldboy.com;      --- 指定网站域名
    root   /usr/share/nginx/html;     --- 定义站点目录的位置
    index  index.html index.htm;      --- 定义首页文件
    error_page   500 502 503 504  /50x.html;   --- 优雅显示页面信息
    location = /50x.html {
        root   /usr/share/nginx/html;
    }
}
nginx服务的企业应用
利用nginx服务搭建一个网站(www)
第一个历程: 编写虚拟主机配置文件
cd /etc/nginx/conf.d/
vim www.conf
server {
   listen        80;
   server_name   www.oldboy.com;
   location  /oldboy {
     root  /usr/share/nginx/html;
     index oldboy.html;
   }
}
第二个历程: 需要获取开发人员编写的网站代码
<html>
  <meta charset="utf-8">
  <head>
    <title>老男孩深圳01最牛x</title>
  </head>
  <body>
    老男孩教育深圳01-脱产班
    <table border=1>
      <tr> <td>01</td> <td>oldboy</td> </tr>
      <tr> <td>02</td> <td>oldgirl</td> </tr>
      <tr> <td>03</td> <td>olddog</td> </tr>
    </table>
    <a href="http://blog.oldboyedu.com">
      <img src="oldboy.jpg" />
    </a>
   </body>
</html>
第三个历程: 重启nginx服务(平滑重启)
nginx命令参数
-
-t : 检查测试配置文件语法
-
-s : 控制服务停止或者重新启动
两种方法:
-
systemctl reload nginx
-
nginx -s reload
第四个历程: 编写DNS配置信息
- C:\Windows\System32\drivers\etc\hosts
第五个历程: 进行测试访问
http://www.oldboy.com
利用nginx服务搭建一个多网站(www bbs blog)
第一个历程: 创建多个虚拟主机配置文件
bbs.conf
server {
   listen        80;
   server_name   bbs.oldboy.com;
   location  / {
     root  /html/bbs;
     index index.html;
   }
}
blog.conf
server {
   listen        80;
   server_name   blog.oldboy.com;
   location  / {
     root  /html/blog;
     index index.html;
   }
}
www.conf
server {
   listen        80;
   server_name   www.oldboy.com;
   location  / {
     root  /html/www;
     index index.html;
   }
}
第二个历程: 创建站点目录和目录中首页文件
[root@web01 conf.d]# mkdir /html/{www,bbs,blog} -p
[root@web01 conf.d]# for name in {www,bbs,blog};do echo "10.0.0.7 $name.oldboy.com" >/html/$name/index.html  ;done
[root@web01 conf.d]# for name in {www,bbs,blog};do cat /html/$name/index.html  ;done
10.0.0.7 www.oldboy.com
10.0.0.7 bbs.oldboy.com
10.0.0.7 blog.oldboy.com
第三个历程: 编写hosts解析文件
10.0.0.7 www.oldboy.com bbs.oldboy.com blog.oldboy.com
第四个历程: 进行访问测试
[root@web01 conf.d]# curl www.oldboy.com
10.0.0.7 www.oldboy.com
[root@web01 conf.d]# curl bbs.oldboy.com
10.0.0.7 bbs.oldboy.com
[root@web01 conf.d]# curl blog.oldboy.com
10.0.0.7 blog.oldboy.com
基于地址的方式进行访问
用途:只能用指定地址访问--- 负载均衡+高可用服
server {
 listen        10.0.0.7:80;
 server_name   www.oldboy.com;
 location  / {
   root  /html/www;
   index index.html;
 }
}
基于端口的方式进行访问: zabbix服务(apache:80) + web服务(nginx:80) --> 主机
server {
   listen        8080;
   server_name   www.oldboy.com;
   location  / {
     root  /html/www;
     index index.html;
   }
}
企业中网站的安全访问配置
根据用户访问的地址进行控制
-
10.0.0.0/24 www.oldboy.com/AV/ 不能访问
-
172.16.1.0/24 www.oldboy.com/AV/ 可以访问
nginx访问模块: ngx_http_access_module
-
Syntax: deny address | CIDR | unix: | all;
-
Default: —
-
Context: http, server, location, limit_except
第一个历程: 编写配置文件
[root@web01 conf.d]# vim www.conf
server {
 listen        80;
 server_name   www.oldboy.com;
 location / {
   root  /html/www;
   index index.html;
 }
 location /AV {
   deny  10.0.0.0/24;
   allow 172.16.1.0/24;
   root  /html/www;
   index index.html;
 }
}
补充:
-
location外面的信息, 全局配置信息
-
location里面的信息, 局部配置信息
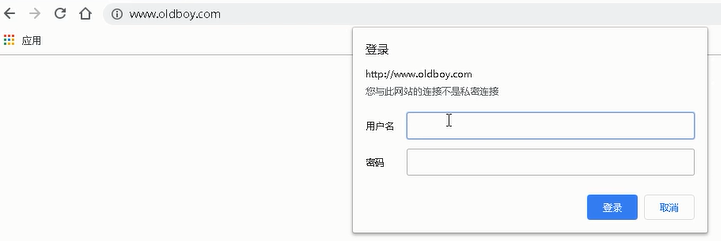
根据用户访问进行认证
nginx认证模块: ngx_http_auth_basic_module
-
auth_basic "closed site"; --- 开启认证功能 内容随便写,提示功能
-
auth_basic_user_file conf/htpasswd; --- 加载用户密码文件 相对目录
第一个历程: 编写虚拟主机配置文件
server {
 listen        80;
 server_name   www.oldboy.com;
 location / {
   root  /html/www;
   index index.html;
   auth_basic      "oldboy-sz-01";
   auth_basic_user_file password/htpasswd;
 }
第二个历程: 创建密码文件(文件中密码信息必须是密文的)
htpasswd 创建一个有密文信息的密码文件
  -c  Create a new file.  *****
      创建一个密码文件
  -n  Don't update file; display results on stdout.
      不会更新文件; 显示文件内容信息
  -b  Use the password from the command line rather than prompting for it. *****
      免交互方式输入用户密码信息
  -i  Read password from stdin without verification (for script usage).
      读取密码采用标准输入方式,并不做检查 ???
  -m  Force MD5 encryption of the password (default).
      md5的加密算法
  -B  Force bcrypt encryption of the password (very secure).
      使用bcrypt对密码进行加密
  -C  Set the computing time used for the bcrypt algorithm
      (higher is more secure but slower, default: 5, valid: 4 to 31).
      使用bcrypt algorithm对密码进行加密
  -d  Force CRYPT encryption of the password (8 chars max, insecure).
      密码加密方式
  -s  Force SHA encryption of the password (insecure).
      加密方式
  -p  Do not encrypt the password (plaintext, insecure).
      不进行加密
  -D  Delete the specified user.
      删除指定用户
  -v  Verify password for the specified user.
创建密码文件
htpasswd -bc /htpasswd oldboy 123456
curl 命令测试
[root@web01 password]# curl www.oldboy.com -u oldboy
Enter host password for user 'oldboy':
10.0.0.7 www.oldboy.com
[root@web01 password]# curl www.oldboy.com -u oldboy:123456
10.0.0.7 www.oldboy.com
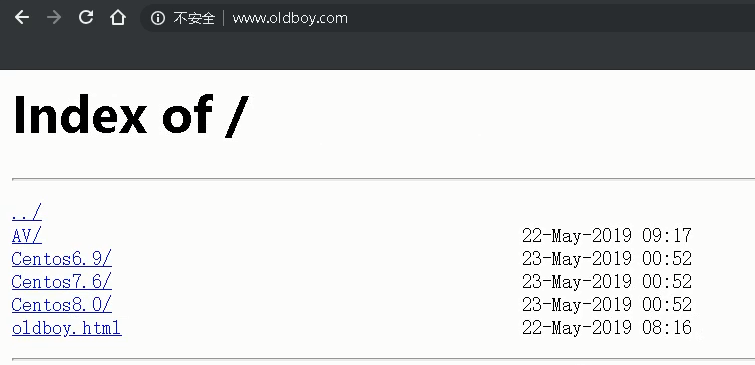
利用nginx服务搭建网站文件共享服务器
nginx模块功能: ngx_http_autoindex_module
-
Syntax: autoindex on | off;
-
Default:
-
autoindex off;
-
Context: http, server, location
第一个步骤: 编写配置文件(www.conf)
server {
   listen        80;
   server_name   www.oldboy.com;
   location / {
     root  /html/www;
     auth_basic      "oldboy-sz-01";
     auth_basic_user_file password/htpasswd;
     autoindex on;    --- 开启nginx站点目录索引功能
}
PS:
-
1. 需要将首页文件进行删除
-
2. mime.types媒体资源类型文件作用
-
文件中有的扩展名信息资源, 进行访问时会直接看到数据信息
-
文件中没有的扩展名信息资源, 进行访问时会直接下载资源
网站页面目录数据,中文出现乱码,如何解决:
location / {
   root  /html/www;
   #index index.html;
   auth_basic      "oldboy-sz-01";
   auth_basic_user_file password/htpasswd;
   autoindex on;
   charset utf-8;   --- 修改目录结构中出现的中文乱码问题
 }
利用nginx服务搭配置文件别名功能
第一个历程: 编写配置文件
server_name www.oldboy.com old.com
第二个历程: 配置好解析信息
作用:
-
01. 编写网站访问测试
-
02. 定位要访问的网站服务器
利用nginx状态模块功能对网站进行监控
状态模块: ngx_http_stub_status_module
- stub_status
第一个历程: 编写配置文件
[root@web01 conf.d]# vim state.conf
server {
   listen    80;
   server_name  state.oldboy.com
   stub_status;
}
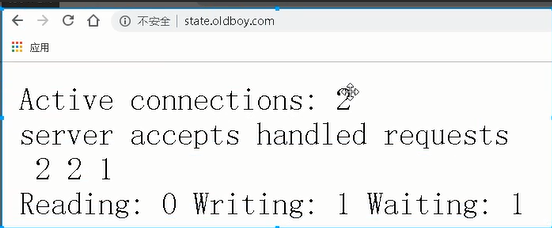
返回值说明
-
Active connections: 激活的连接数信息 4000用户 3500
-
accepts: 接收的连接数汇总(综合) TCP
-
handled: 处理的连接数汇总(综合) TCP
-
requests: 总计的请求数量 HTTP协议请求
-
Reading: nginx服务读取请求报文的数量 100人点餐
-
Writing: nginx服务响应报文信息数量 100人响应
-
Waiting: nginx队列机制,要处理(读取或者响应保存进行保存)
nginx 常用变量
-
$remote_addr 显示用户访问源IP地址信息
-
$remote_user 显示认证的用户名信息
-
[$time_local] 显示访问网站时间
-
"$request" 请求报文的请求行信息
-
$status 用户访问网站状态码信息
-
$body_bytes_sent 显示响应的数据尺寸信息
-
$http_referer 记录调用网站资源的连接地址信息(防止用户盗链)
-
老男孩nginx---access.log---莫文杰(荒原饮露---老男孩图片链接)---http_referer(链接)
-
$http_user_agent 记录用户使用什么客户端软件进行访问页面的 (谷歌 火狐 IE 安卓 iphone)
-
$http_x_forwarded_for ??? 负载均衡
nginx服务location作用说明
错误页面优雅显示
location /oldboy {
   root /html/www;
   error_page  404  /oldboy.jpg;
}
输入一个错误的 uri 返回 /oldboy.jpg
www.oldboy/oldboy/1111
location详细配置:
Syntax: location [ = | ~ | ~* | ^~ ] uri { ... }
location @name { ... }
Default: —
只是优先级不同而已
location = / {              --- 精确匹配    优先级01 最高
[ configuration A ]
}

location / {                --- 默认匹配    优先级04 最低
    [ configuration B ]
}

location /documents/ {      --- 按照目录进行匹配    优先级03
    [ configuration C ]
}

location ^~ /images/ {      --- 优先匹配/不识别uri信息中符号信息       优先级02
    [ configuration D ]
}

location ~* \.(gif|jpg|jpeg)$ {  --- 不区分大小写进行匹配  优先级03
    [ configuration E ]
}
利用nginx实现页面跳转功能
rewrite模块是跳转功能: http_rewrite_module
-
Syntax: rewrite regex replacement [flag]; rewite 匹配的正则信息 替换成什么信息
-
Default: —
-
Context: server, location, if
跳转方式:
-
永久跳转: permanent 301 会将跳转信息进项缓存
-
临时跳转: redirect 302 不会缓存跳转信息
第一种方法: 利用不同server区块配置打破循环
server {
   server_name  oldboy.com;
   rewrite ^/(.*) http://www.oldboy.com/$1 permanent;
}
第二种方法: 利用if判断实现打破循环
if ($host ~* "^oldboy.com$") {
  rewrite ^/(.*) http://www.oldboy.com/$1 permanent;
}
对接外部 rest api
server {
   listen    80;
   server_name  www.oldboy.com
   stub_status;
location ~ \.php$ {
    root /www;
    fastcgi_index index.php;          url               uri
    fastcgi_param SCRIPT_FILENAME $document_root$fastcgi_script_name;
    fastcgi_pass  127.0.0.1:9000;
    include fastcgi_params;   变量配置文件
    }
}
fastcgi_param 告诉 nginx 谁访问的,访问的是什么,在原路返回
负载均衡
location / {
   proxy_pass http://default;
   proxy_set_header Host $host;
   proxy_set_header X-Forwarded-For $remote_addr;
   proxy_next_upstream error timeout http_404 http_502 http_403;
}
proxy_next_upstream error 发生以下错误的时候(timeout http_404 http_502 http_403),传递到下一个服务器

 浙公网安备 33010602011771号